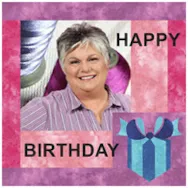
EQ8 is so versatile. Not only can you create quilts, but with the Image worktable, you can create any image you wish using the EQ tools and blocks to create a photo design. You don’t need to worry about block size or placement on the quilt layout table. Just arrange the images and blocks in the way you want your layout to look and then save the image to your computer to use for sending best wishes to people through any internet medium you choose (Facebook, Instagram, messenger, etc). Try this project and send your image in an email to that special person in your life or just post it to the internet for everyone to see. Start by opening your EQ8 program and click on the quilt worktable icon on the upper right side of the screen. Set the layout to be 1 block horizontal quilt layout with the
LESSONS WITH YVONNE–IT’S MY BIRTHDAY
Posted 11-17-2019 by Yvonne | Posted in: EQ8 EQ8 Lessons with Yvonne Favorite Posts
EQ8 Block Spotlight: Tulip Tree Leaves
Posted 11-10-2019 by Jenny | Posted in: EQ8 Block Spotlight
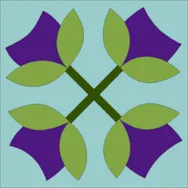
Welcome to the EQ8 Block Spotlight series! Each month we highlight a block from the EQ8 Block Library with a few design ideas. Then we want YOU to show us what you can do with the block. Let’s get creative! This month’s block: Tulip Tree Leaves Where to find it: 04 Classic Applique > Crossing Designs A few design ideas to get you started The original block is used in the corners of this first quilt. The center variation block was created by deleting one of the blossoms and then using the WreathMaker feature. Then I used the Frame Block option in Create Serendipity on the WreathMaker block. This quilt also uses a layout from the library (On-Point Medallions – 28). Lots of EQ8 goodness packed into one quilt! The second quilt alternates between a “framed” version of the block and a “tilted” version of the block (both made using
Design & Discover – Bargello Quilts
Posted 11-01-2019 by Heidi | Posted in: Design & Discover
Bargello Quilts are easy and fun to make in EQ8! Let’s get started! Click New Quilt > Vertical Strip Click the LAYOUT tab. Change the width of the first strip to 3 inches. Change the strip style to Pieced Blocks. Change the NUMBER OF BLOCKS along length to 15 Click to check the Clone the selected strip box. Click Add until you have 24 strips. The box shows how many strips you have. Experiment with different widths until you get a layout that you like. Click Add to Project Sketchbook . If you haven’t named your project yet, EQ8 will prompt you to do so. (To be saved, your item needs to be in the Sketchbook AND your project needs to be named. Here is more information.) Click the DESIGN tab > Fabric Tools > Paintbrush and start coloring your layout. You can also use different subtools of the Paintbrush
Happy Halloween!
Posted 10-31-2019 by Heidi | Posted in: Just Because More for EQers My EQ Boutique Uncategorized
Today we have 30% off all Halloween themed Boutique add-ons! Boutique products install a variety of blocks to use in your EQ software. Some products include complete quilt project files, too! Make them just like the original or, edit in EQ to make it your own! Available for Mac and Windows. (Download Only) See all sale add-ons >>> Use code: HALLOWEEN One day sale only! Ends today! 10/31/19
EQ8 Block Spotlight: Thin Leaf
Posted 10-10-2019 by Jenny | Posted in: EQ8 Block Spotlight
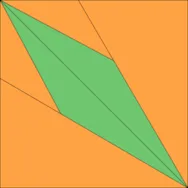
Welcome to the EQ8 Block Spotlight series! Each month we highlight a block from the EQ8 Block Library with a few design ideas. Then we want YOU to show us what you can do with the block. Let’s get creative! This month’s block: Thin Leaf Where to find it: 03 Foundation Pieced > Leaves A few design ideas to get you started This unassuming little block may look a little plain, but I think that means it has tons of potential for creativity! In my two quilts below, I think it’s difficult to pick out the individual block. But both of these designs use only the featured block! For the quilt above, I created two Shrink & Flip versions of the Thin Leaf block using Create Serendipity. These two blocks are simply alternated in a horizontal layout. I could have set the original block in the quilt layout and done
EQ Academy Recap – Fall 2019
Posted 10-01-2019 by Christine | Posted in: EQ Academy
Scroll down for photos! Would you believe we hosted 20 EQ8 classes in just 3 days?! We sure packed a lot of information into a beautiful fall weekend. A special thanks to our amazing teachers who always do such a great job! Thank you to all the students for coming! We hope to see you all back for our Spring EQ Academy starting on Thursday, April 2, 2020! Spring EQ Academy will have beginner classes as always, and intermediate topic-based classes too. We hope to open enrollment in January. Sign up for our e-mails to be notified of enrollment. Spread the word to your EQ friends!! If you’d recommend EQ Academy to other EQ8 users, please leave a review in the comments below so we can share your feedback with others. A huge thanks to the companies who sent items for the welcome bags and awesome prizes at our Social Night! The
Design & Discover – Fabrics and Photos
Posted 10-01-2019 by Heidi | Posted in: Design & Discover
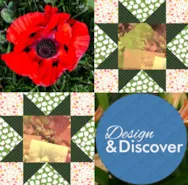
Sometimes it is hard to know if you should import your image as a photo or a fabric. The main difference between the two options is that if you import the image as a fabric, the image will tile. An image imported as a photo will not tile, it will stretch to fit the patch you place it in (on Layer 1). Here is more information. Here the first patch has an image imported as fabric, and it is tiling. The second patch shows an image imported as a photo and it is stretched. Neither image is the right size for the patch. To fix this you can either change the size of your patch (by clicking the Layout tab), resize the image to fit or crop the image to fit. Here are some more tips and information. In this case I changed the layout to fit the size of


