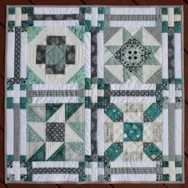
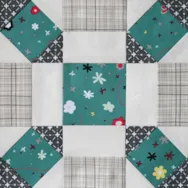
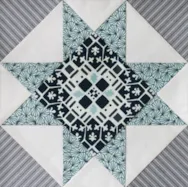
Time to share your Jump Start quilt! I can’t wait to see how everyone decided to use their beautiful blocks! Here’s my quilt: I decided to stick with a basic horizontal setting, but jazzed it up with pieced sashing and cornerstones. I quilted each block separately, with its own motif; here are a couple close-ups: To Link Up Your Photo Scroll down to the comment form at the end of this post. Fill in your info and make sure you select an image for your comment (this will be the photo of your quilt). If you have a blog, make sure to add your site too. If you wrote a post for this quilt, please link directly to that post. Let’s visit each others’ blogs and all get to know each other! GIVEAWAY! You can link up your quilt photo at any time. But for those who link up by
EQ7 Jump Start
EQ7 Jump Start: Quilt Link Up!
Posted 08-01-2014 by Jenny | Posted in: EQ7 Jump Start Favorite Posts Finished Quilts Sew Alongs
EQ7 Jump Start: Block 4 Link Up!
Posted 06-27-2014 by Jenny | Posted in: Block 4 EQ7 Jump Start Favorite Posts Sew Alongs
We’ve made it to the last block of the sew along and learned so many useful EQ7 skills along the way. I hope you’ll continue to work with the software and learn even more. EQ7 has so much to offer, we’ve only scratched the surface in this sew along! Here’s my Block 4: Don’t forget that you can always find the sew along posts here on the blog if you’d ever like to go back and revisit one of the lessons. On the main menu bar (under Behind the Mouse), hover your mouse over Sew Alongs and then choose EQ7 Jump Start from the drop-down menu. You can find other past sew alongs there too. If you’re interested in learning more about drawing your own blocks you should check out the EQ7 Summer Drawing Series from last year! To Link Up Your Photo Scroll down to the comment form at
EQ7 Jump Start: Block 4
Posted 06-16-2014 by Jenny | Posted in: Block 4 EQ7 Jump Start Favorite Posts Sew Alongs
Welcome to Block 4 of our Jump Start Sew Along. This is the final lesson in the series and this time we’re going to explore some different quilt layouts for the four blocks. Let’s get started! (Want an easy-to-print version of this lesson? Click here to download the Block 4 Lesson PDF file.) Open EQ7. Click the Open an existing project tab in the Project Helper window and open your sew along project file, which we named Jump Start Sew Along in the first lesson. Click on the project file name to select it, then click OK. The Sketchbook will appear. Click the Quilts section on the left. Notice that it says “Quilt 1 of 3 quilts” under the quilt. That’s because we’ve saved three versions of the Jump Start quilt so far- one for each of the three lessons we’ve completed. Use the scrollbar to move to the last
EQ7 Jump Start: Block 3 Link Up!
Posted 06-13-2014 by Jenny | Posted in: Block 3 EQ7 Jump Start Sew Alongs
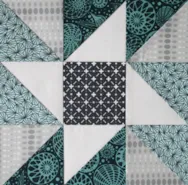
Block 3 was a bit more challenging since we ventured over to the Block Worktable. How did everyone do? Here’s my block: I love a good star block! I like this one even better on-point: To Link Up Your Photo Scroll down to the comment form at the end of this post. Fill in your info and make sure you select an image for your comment (this will be the photo of your block). If you have a blog, make sure to add your site too. If you wrote a post for this block, please link directly to that post. Let’s visit each others’ blogs and all get to know each other! GIVEAWAY! You can link up your Block 3 photo at any time. But for those who link up by Monday, June 16, 2014, 9 am EST, you’ll be entered in a giveaway. One lucky winner will receive an
EQ7 Jump Start: Block 3
Posted 06-02-2014 by Jenny | Posted in: Block 3 EQ7 Jump Start Sew Alongs
Welcome to Block 3 of our Jump Start Sew Along. In this lesson we’re going to take a look at the Block Worktable and save a new variation of a block. Let’s get started! (Want an easy-to-print version of this lesson? Click here to download the Block 3 Lesson PDF file.) Open EQ7. Click the Open an existing project tab in the Project Helper window and open your sew along project file, which we named “Jump Start Sew Along” in the first lesson. Click on the project file name to select it, then click OK. The Sketchbook will appear. Click the Quilts section on the left. Notice that it says “Quilt 1 of 2 quilts” under the quilt. That’s because we’ve saved two versions of the Jump Start quilt so far- one for each of the two lessons we’ve completed. Use the scrollbar to move to the second quilt (the
EQ7 Jump Start: Block 2 Link Up!
Posted 05-30-2014 by Jenny | Posted in: Block 2 EQ7 Jump Start Sew Alongs
Ready to share your second sew along block? Here’s my block: Did you try out adding more fabrics to EQ7? Did you color your virtual quilt block with the fabrics that you actually sewed with? Give us some details about your fabric choices in the comments! To Link Up Your Photo Scroll down to the comment form at the end of this post. Fill in your info and make sure you select an image for your comment (this will be the photo of your block). If you have a blog, make sure to add your site too. If you wrote a post for this block, please link directly to that post. Let’s visit each others’ blogs and all get to know each other! GIVEAWAY! You can link up your Block 2 photo at any time. But for those who link up by Monday, June 2, 2014, 9 am EST, you’ll
EQ7 Jump Start: Block 2
Posted 05-19-2014 by Jenny | Posted in: Block 2 EQ7 Jump Start Sew Alongs
Welcome to Block 2 of our Jump Start Sew Along. In this lesson we’re going to concentrate on fabric—how to use the fabrics built into the Fabric Library and how to add new fabrics. Let’s get started! (Want an easy-to-print version of this lesson? Click here to download the Block 2 Lesson PDF file.) Open EQ7. Click the Open an existing project tab in the Project Helper window and open your sew along project file, which we named “Jump Start Sew Along” in the first lesson. Most likely, your project will be listed under Most recently used projects (unless you’ve designed lots of projects since our last lesson!). Click on the project file name to select it, then click OK. The Sketchbook will appear. Remember that the Sketchbook holds all the “ingredients” for our quilt designs. Click the Blocks section on the left. You’ll see the four blocks that we


