EQ8 is so versatile. Not only can you create quilts, but with the Image worktable, you can create any image you wish using the EQ tools and blocks to create a photo design. You don’t need to worry about block size or placement on the quilt layout table. Just arrange the images and blocks in the way you want your layout to look and then save the image to your computer to use for sending best wishes to people through any internet medium you choose (Facebook, Instagram, messenger, etc). Try this project and send your image in an email to that special person in your life or just post it to the internet for everyone to see.
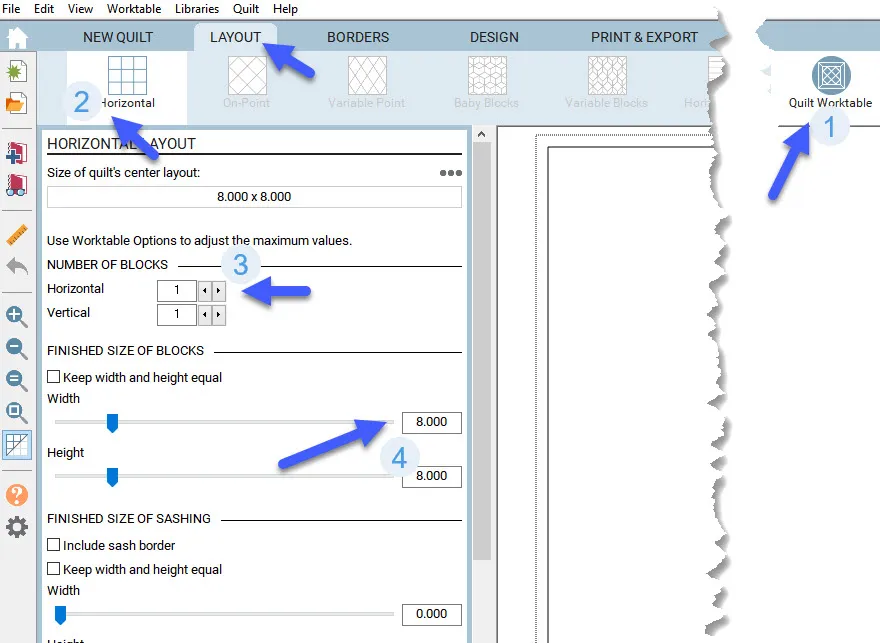
Start by opening your EQ8 program and click on the quilt worktable icon  on the upper right side of the screen.
Set the layout to be 1 block horizontal quilt layout with the size of the block to be 8 inches with a border around the edge. (You may choose to have a different size or border if you wish.)
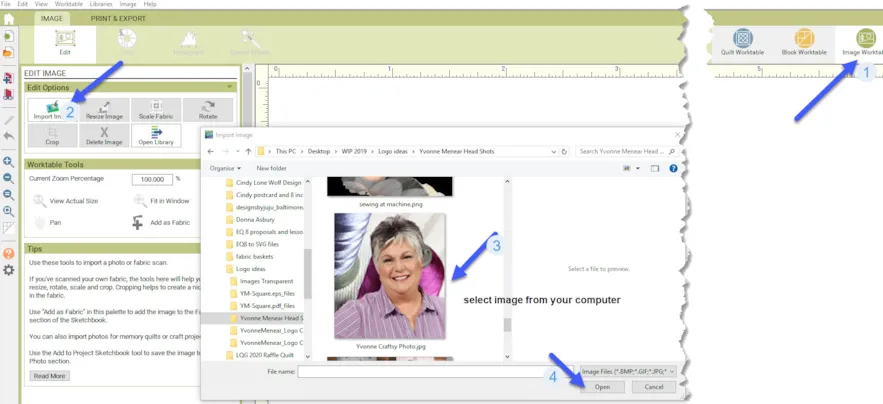
Click on the Image Worktable icon at the upper right side of the screen, Click on Import Image and navigate to the image you wish to use in your design. Click on the image to select it and then click on the ‘open’ at the bottom of the box. This will place the image on the worktable.
Depending on the image composition, you may want to use the image edit tools to get the best clarity of the picture. Once you edit the image, add it to the sketchbook.![]()
I know I want to add items around the image on my birthday greetings so I can browse the library to see what I may want to use.
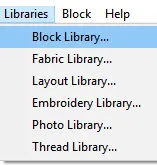
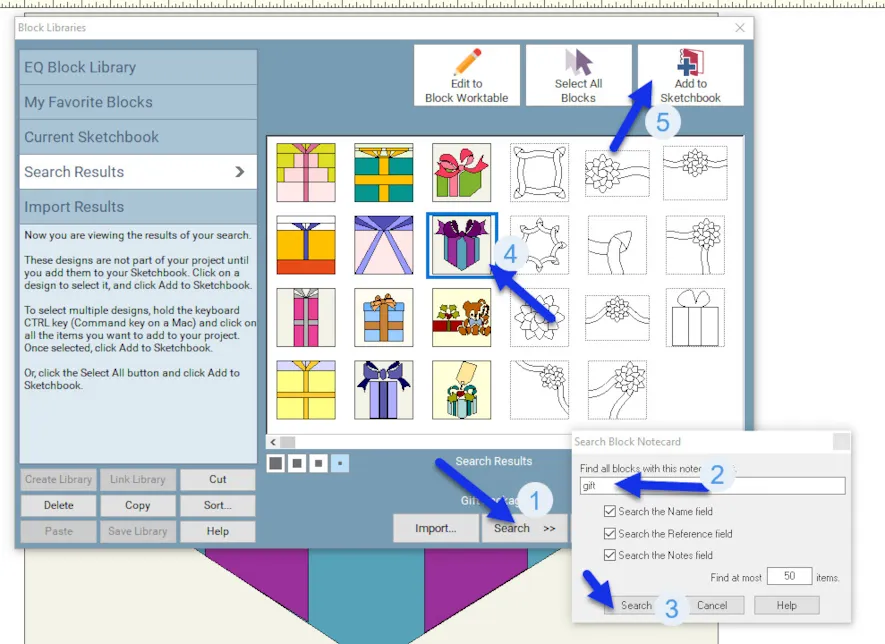
Click on the block worktable icon.  Once you are on the block worktable, click on LIBRARY>Block Library to open the box with all the built in designs that are in EQ8.
I chose to do a search for a ‘gift’ to see what was available. Once I located a gift image I added it to my sketchbook.
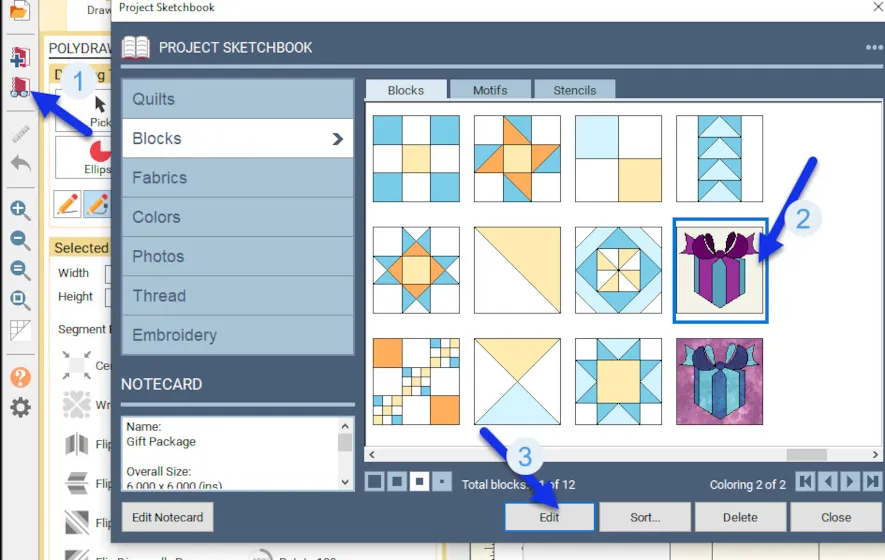
Click on the view sketchbook icon. ![]() Click on the block of the gift to select it then click on the word ‘edit’ at the bottom of the box to place it on the worktable. Color the design the way you want and add it to the sketchbook when done.
Click on the block of the gift to select it then click on the word ‘edit’ at the bottom of the box to place it on the worktable. Color the design the way you want and add it to the sketchbook when done.
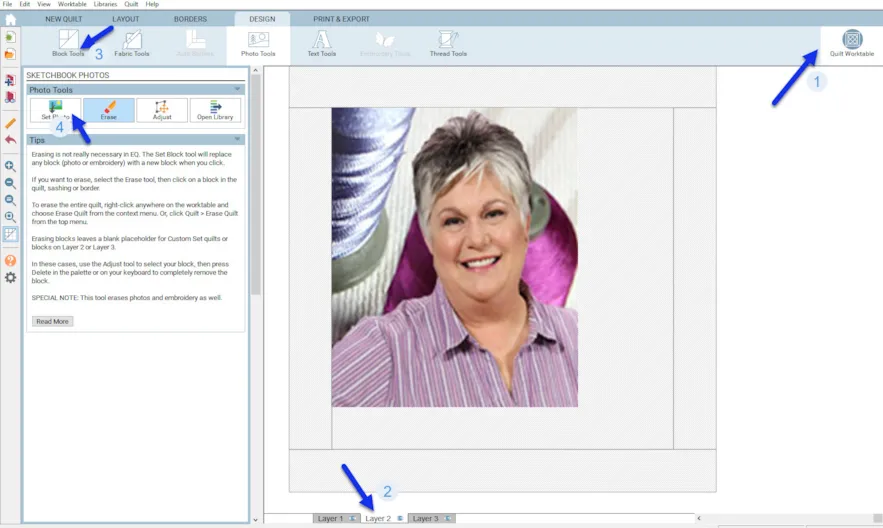
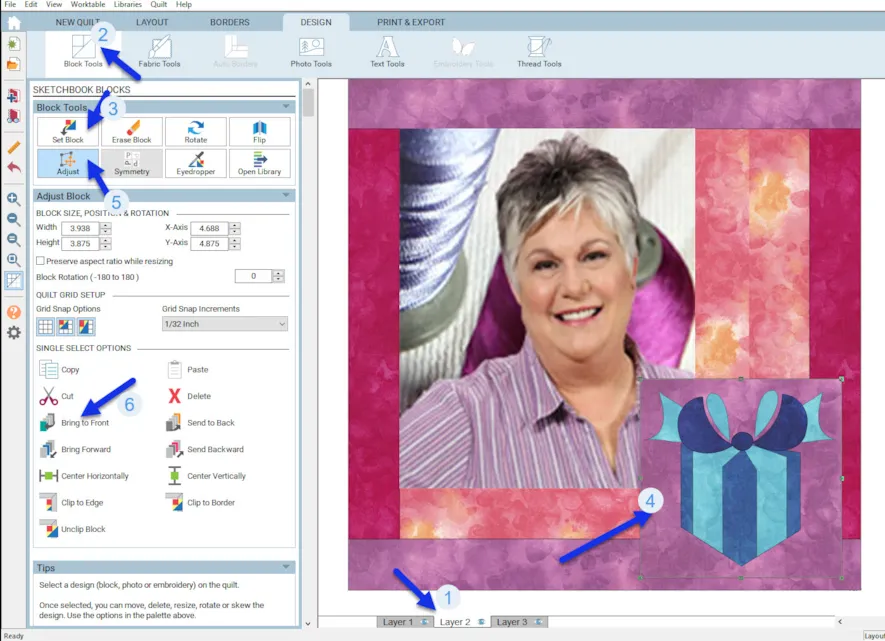
Click on the quilt worktable icon.  Click on the design tab/photo tools at the top of the screen and then select layer two of the quilt at the bottom of the screen. Set the photo on your worktable and size/position it using the adjust tool
![]() to where you want to have it on the project. Add to sketchbook.
to where you want to have it on the project. Add to sketchbook.![]()
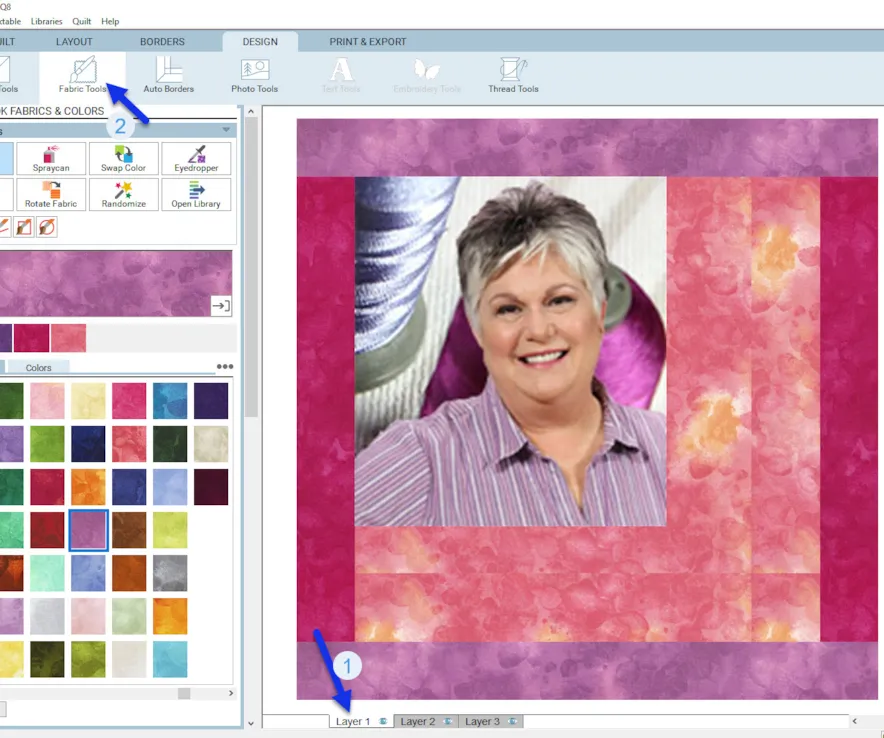
Click on layer one at the bottom of the screen and using the fabric tools color the elements of the layout. Add to sketchbook![]()
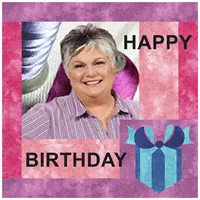
Click on layer two of the quilt layout, set the block of the gift you colored onto the layout. Resize and position it to one corner of the layout. It will be behind the photo image that was laid first. Click on the adjust tool and select the gift block and then click on ‘bring to front’ on the tools box at the left side of the screen.
Add a text message to your layout while still on layer two.
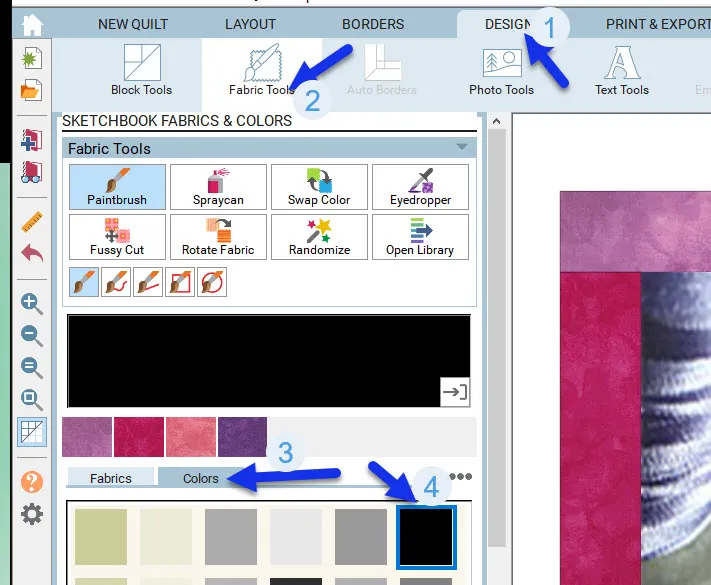
On the design tab, click on the fabric tools icon. Choose a solid black as your color choice. This will help to contrast your text words so they stand out from the background.
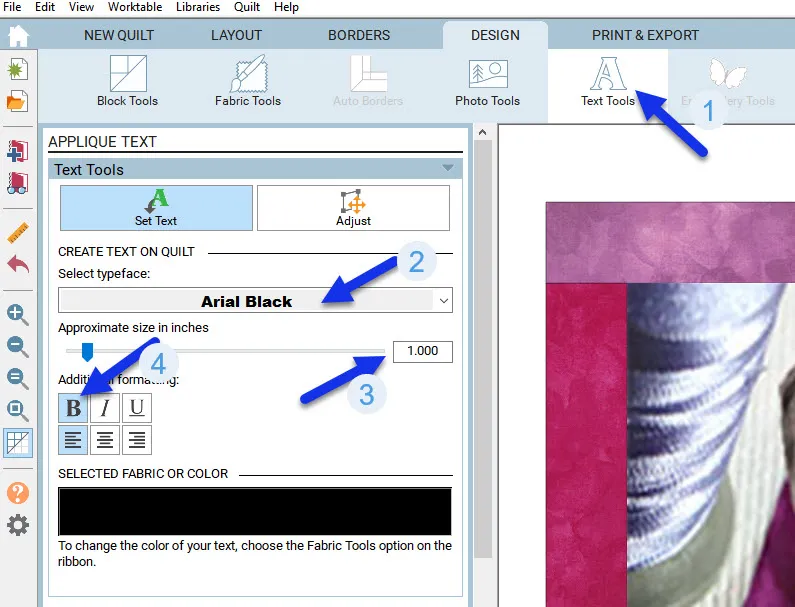
Click on the text tools icon at the top of the page. Set the properties inside the tools box. In the drop down menu, select a bold style of text and set the size to 1 inch with the bold option clicked on.
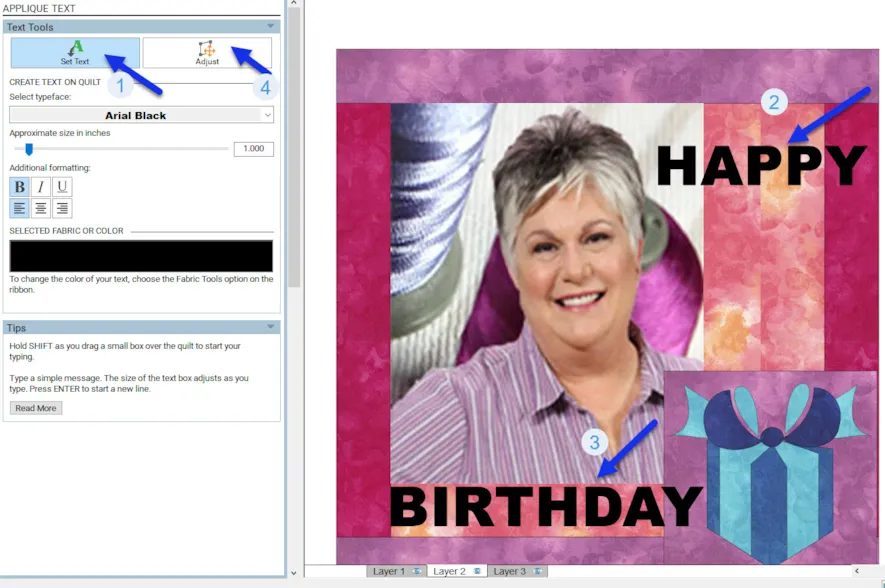
With the set text tool selected, move the cursor to the layout area and while holding down the shift key on the keyboard, click/hold/drag/ release a selection box on the layout. You will see a flashing cursor. Type in your message. You may need to do this a couple times depending on how many words and lines of text you wish to have.
Once the text is on the layout, use the adjust tool to select the text and move it to the proper position on the layout area.
This may look a little odd, but don’t forget we are making an image and not an actual quilt. Click on the hide/show outlines tool ![]() at the far left of the screen to turn off the outlines of the elements. This will make the image look more like a photo rather than block elements. Add this to the sketchbook.
at the far left of the screen to turn off the outlines of the elements. This will make the image look more like a photo rather than block elements. Add this to the sketchbook.![]()
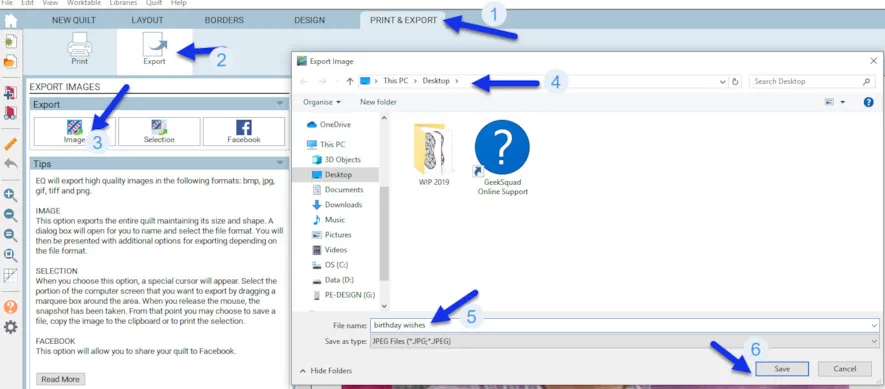
Click on the print & export tab at the top of the screen. Select the export and image selection. In the pop up box, name your image and determine where the image will be saved on the computer. Note this is now saving as a .jpg image. Click on save at the bottom of the box.
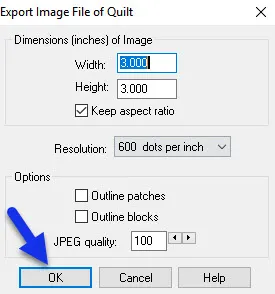
In the pop up export images properties box, just click on the OK at the bottom of the box. This is good enough as it is for sending an email or internet posting for a birthday wish.
Remember to toggle the block outlines tool back on so you will be able to see your next project properly.![]()
By adding the design to the sketchbook as you go along, you can easily go back and edit a design without having to start all over. Just go back to where you went off track and continue designing from that point on. If you only save once at the end of designing you won’t have all the steps in the sketchbook to work out if they need editing.
Your image is now ready to be sent. Enjoy playing with this option in EQ8. Remember, you don’t always have to make a quilt or block in order to use the powerful tools of the EQ8 program. Get creative with your designs and enjoy the process while making unique special greetings.





11-17-2019
11:21 am
I use this process to make gift tags.
11-17-2019
12:01 pm
Thank you so much for the great lesson. I have just started using EQ8 and it is driving me crazy, but your blog really helped me. Thanks again
11-17-2019
12:03 pm
I WANT THANKYOU FOR ALL THE INFOMATION. I REALLY LIKE WHAT YOU ARE DOING .IN FACT THESE MYFRIST TIME , PS HAPPY BIRTHDAY . MY BIRTHDAY WAS ON 11/11
11-17-2019
12:06 pm
Happy Birthday Yvonne,
your lessons are so helpful and great.
thank you,
Iris
11-17-2019
1:07 pm
Happy Birthday Yvonne!!
This article is amazing. I am so impressed at the things that are possible through EQ8.
Thank you for sharing and I hope you have an amazing day!
11-17-2019
4:40 pm
I had a similar project in mind but didn’t know where to start. Thank you for the excellent tutorial.
11-17-2019
4:44 pm
Thanks to everyone for your kind words. I am glad you like the blog. I love being able to do so many different things with EQ8 that is not just quilting related. What a wonderful program we have!!!
11-17-2019
5:17 pm
I am so confused, I am having hard time following the instructions. It’s there and then the block picture doesn’t show up…….oy ve! I’ve had the software for 2years and am still getting stuck, very frustrating to me.
11-17-2019
9:31 pm
Mary Ellen–The way I designed this lesson is to set the photo onto a quilt layout and not as a block. If you have followed what I did, then you would find your design under the quilt tab on the sketchbook and not on the block tab.
11-18-2019
12:58 pm
My image ended up in the fabric tab. i used the paint brush to place it in the 8×8 quilt block. Then I discovered I could use the image in the mitered border I’d placed around my image and it was pretty cool. Then I placed another mitered border to frame the image.
11-17-2019
5:33 pm
Happy birthday. I enjoy any teaching you so kindly provide.
11-17-2019
9:16 pm
Thank you so much for this lesson. I want to make a quilt with several photos surrounded by blocks. Would I use this method?
11-17-2019
9:30 pm
Irene–if you want to add text or an applique image to the photo, then I would use this way. Text can only be added on layer 2 of the quilt layout. If you just want to print photos onto printer fabric, then you can design it on the image worktable and print the image and add your blocks around it later. There are so many ways to use the image worktable.
11-18-2019
1:00 pm
Happy birthday and thank you for all the awesome lessons and tips. Since many of my quilts end up with scalloped edges I would like to know if it’s possible to place a scalloped border on my designs.
11-18-2019
1:11 pm
Borders can be added on the quilt layout worktable under the borders tab. There are many scalloped borders built into the program to choose from. You can also use the design tab on the quilt layout worktable and add borders there also.
11-20-2019
7:05 am
I had the same problem as MaryEllen. Not sure if it is a MAC vs. PC issue, but when I opted to send the block back, then both layers were visible. When I tried to send the block forward, I only saw the block without the image. Yes, I was on the Quilt Worktable.
11-22-2019
3:49 pm
Thank you for the lesson and your time. I will definitely try it later today. Regards Strella
11-25-2019
1:04 pm
I would like to see what the fabric requirements printout looks like for one of the EQ8 designs, so I know how it compares to the EQ Mini’s list.
Thanks,
Candice
11-25-2019
3:35 pm
Candice–When your quilt is created on the quilt worktable, click on the print and export tab at the top of the screen. On the tool box at the left, click on the yardage icon. Tell the program what type of fabric width you have or if you are using fat quarters. The program will generate a list of the fabrics in the quilt and the amount of yardage you require for each fabric.
12-10-2019
7:20 am
Easy enough to follow along and grasp the concept,thank you.