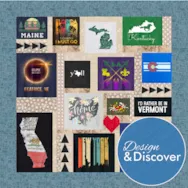
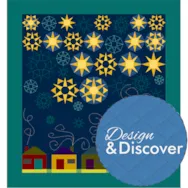
To make your t-shirt quilt, start with a Custom Set quilt. Click Design a quilt from scratch Click Custom Set. You may have to click the double arrows to see the option for Custom Set. Click the LAYOUT tab. Change the Width and Height. In this example I am using 30 x 30. You can always change your size later if you want. However, if you change the size after placing blocks or photos make sure to check Maintain the existing block sizes when resizing the layout. Click Add to Project Sketchbook . If you haven’t named your project yet, EQ8 will prompt you to do so. (To be saved, your item needs to be in the Sketchbook AND your project needs to be named. Here is more information.) Click the DESIGN tab Click Photo Tools Click Open Library Click Import > from Image files Or, if you don’t have images available to
Favorite Posts
Design & Discover: T-shirt Quilts!
Posted 12-01-2020 by Heidi | Posted in: Design & Discover
Lessons with Yvonne – Use Your Birthstone Color to Create a Quilt
Posted 11-15-2020 by Yvonne | Posted in: EQ8 EQ8 Lessons with Yvonne Favorite Posts
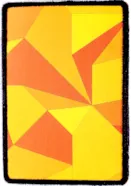
My birthday is in November. The birthstone for that month is Topaz. This is a yellow/orange color. I don’t like that color at all. But, as a challenge to myself, I will make a monochromatic block using that color. I find it is good to challenge myself in all kinds of ways as this is when I grow the most and learn all kinds of discoveries. I once made a quilt in browns and oranges that I don’t care for either, but it is now one of my favorite quilts. Surprise! Open your EQ8 and name your project ‘birthstone designs’. Click on the block worktable icon on the upper right side of the screen. Click on NEW BLOCK>Pieced>Easy Draw. Set the block size to be an 8 x 8-inch block with 24 snaps horizontal and vertical. I don’t care for the colors I am using so I will create areas
Design & Discover – Foundation Piecing from a Photo + Applique Pieces!
Posted 11-01-2020 by Heidi | Posted in: Design & Discover
This month we’ll be learning how to draw a foundation pieced block from a photo…with the option of also adding applique pieces. We get a lot of requests for lessons about how to trace pictures of people (or animals) and we want to show how to analyze the photos and break down the process. If you are interested in foundation piecing we do have another Design & Discover lesson about foundation piecing using an image of an acorn for the example to check out, too. We will be using the EasyDraw tab. Here is a great video about the rules of EasyDraw, it’s very helpful! Click Block Worktable Click NEW BLOCK Click Pieced & Applique Click Easy + Applique Click Tracing Image Click Import Image Navigate to your file. Click Open Crop your image if you would like. Click Drawing Tools Check your Snap Settings. Turn everything off except Snap to
Design and Sew Along 3 – Lesson Six
Posted 10-11-2020 by Yvonne | Posted in: Design and Sew Along EQ8 Lessons with Yvonne Favorite Posts Lesson 6
Welcome to DESIGN AND SEW ALONG 3- LESSON SIX Lessons with Yvonne. I hope you have enjoyed the first five lessons of this series. In this final lesson, we will work with the quilt layout worktable to bring our lesson block designs together to create quilt design options. The name of this class is DESIGN AND SEW ALONG. I do hope you are stitching some of the designs we have created in our EQ8 program. I would love to see some of the designs that are sewn. Remember to watch the video at the end of the blog to start with to familiarize yourself with the steps we will be taking during these class written lessons. A picture is worth a thousand words and visual learning is helpful for any of the classes. Remember to save an image of your favorite quilt from this class to post to the EQ blog page in the comment
Design and Sew Along 3 – Lesson Five
Posted 10-04-2020 by Yvonne | Posted in: Design and Sew Along EQ8 Lessons with Yvonne Favorite Posts Lesson 5
Welcome to DESIGN AND SEW ALONG 3- LESSON Five Lessons with Yvonne. I hope you have enjoyed the first four lessons of this series. In this lesson, we will explore the Summer months and the holidays of July 4 (USA) July 1 (Canada). Each set of lessons explores some different tools to use to create the 16-inch blocks we determined to be the size of all the blocks in our continuing lessons. The name of this class is DESIGN AND SEW ALONG. I do hope you are sewing some of the designs we have created in our EQ8 program. I would love to see some of the designs that are sewn. Remember to watch the video at the end of the blog to start with to familiarize yourself with the steps we will be taking during these class written lessons. A picture is worth a thousand words and visual learning is helpful for
Design & Discover – Drawing Specific Stencils
Posted 10-01-2020 by Heidi | Posted in: Design & Discover
Have you ever wanted to draw a stencil for a specific spot on your quilt? Here is a way to do that! Open a previous designed quilt or design one now. Click on the PRINT & EXPORT tab > Export > Image Save as a JPG. After you name the image and click Save, in the JPG options box, let EQ decide the size. IMPORTANT! Write down the size that EQ is saving your image as. You’ll want to make your block size the same size. Click Block Worktable. Click NEW BLOCK > Applique > Motif. In the Precision Bar, change the Block Width and Block Height to the same size your image was (in step 3). Click Tracing Image > Import Image. Select your image. In the Crop box, click OK. Click Drawing Tools. You should now see your quilt in the background of the block. (If not, click the Hide/show image for tracing button on
Design and Sew Along 3 – Lesson Four
Posted 09-27-2020 by Yvonne | Posted in: Design and Sew Along EQ8 Lessons with Yvonne Favorite Posts Lesson 4
Welcome to DESIGN AND SEW ALONG 3- LESSON FOUR Lessons with Yvonne. I hope you have enjoyed the first three lessons of this series. In this lesson, we will be looking ahead to Springtime. During Spring we have the holiday of Easter. You may choose to not celebrate the holiday, celebrate as a religious holiday, or celebrate in the secular retail promotion of the holiday. The choice will be yours. Remember to watch the video at the end of the blog to start with to familiarize yourself with the steps we will be taking during these classes written lessons. A picture is worth a thousand words and visual learning is helpful for any of the classes. Remember to save an image of your favorite block from this class to post to the EQ blog page in the comment section. Please make sure your image you post is indeed from this class. If you need
