A new DESIGN AND SEW ALONG 2, will be launching soon. I hope you can join me in this next set of free lessons on the Electric Quilt website. Be sure to sign up for the newsletter and lessons notifications. You can sign up for the newsletters and the blog postings there so you won’t miss any new lessons as they are posted. If you missed the first set of DESIGN AND SEW ALONG WITH YVONNE you can still access all those lessons here. The lessons will begin on May 3 and then a new lesson will be available every two weeks following that. May 3, May 17, May 31, June 14, and June 28. The two weeks between lessons will give you time to stitch your designs if you choose to do so. This series will focus on using the built-in designs and EQ tools to create your blocks and quilts.
Design and Sew Along 2 – Introduction to New Series
Posted 04-15-2020 by Yvonne | Posted in: Design and Sew Along EQ8 Lessons with Yvonne Favorite Posts
EQ8 Block Spotlight: Dogtooth Violet
Posted 04-10-2020 by Jenny | Posted in: EQ8 Block Spotlight
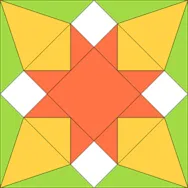
Welcome to the EQ8 Block Spotlight series! Each month we highlight a block from the EQ8 Block Library with a few design ideas. Then we want YOU to show us what you can do with the block. Whether you’re a brand new EQ8 user or a seasoned pro, come join in the fun! This month’s block: Dogtooth Violet Where to find it: 01 Classic Pieced > Four Patch A couple design ideas to get you started My first quilt uses a 4 x 4 horizontal layout. The first border is a Big & Little Points Out style. Every once in a while, it’s fun to play with a fancy border! I used color to subtly highlight four circles in the center of the quilt. And now here’s something totally different! For my second quilt, I used a layout from the library (Hexagonal – 12) and went with a darker,
NEW! Dear Jane Add-on for EQ8!
Posted 04-03-2020 by Sara | Posted in: New Products New to EQ
Get it now at the special introductory price! We have re-released Brenda Papadakis’ Dear Jane software as a download specifically for EQ8! For the entire month of April, the Dear Jane Add-on for EQ is 35% off the retail price of $49.95. This brings your price to $32.47! No code necessary, just get it before May 1st! Don’t miss out on this special offer! What’s Included? Click the video above to see the inside scoop of what’s included! Requires EQ8 software. Works with EQ8 for Windows or Mac. Quick download from your EQ Account. Installs 5 EQ project files, 5 block libraries, and several PDF resources. Includes updated blocks (from the original version) for better foundation piecing, where applicable. Can print templates, foundation patterns, and rotary cutting charts. Includes 225 quilting designs that mimic Jane A. Stickle’s quilting on her 1863 Civil War quilt. Includes 12 sewing lessons (PDF) from
This challenge is now closed. See who won here! One of our new friends, Brett Lewis (you may know him as Natural Born Quilter!) has a super fun fabric collection with Northcott called Stag and Thistle! You can download the fabrics (and coordinating Colorworks Solids) for EQ and participate in our design challenge! One lucky person will receive a fat-quarter bundle of Stag and Thistle and coordinating Colorworks solids! EQ Design Challenge & Giveaway To Enter Design a quilt in EQ using Stag and Thistle fabrics and coordinating Colorworks Solids then submit an image of it by 11:59pm ET on April 30, 2020. (Instructions for how to submit an image are at the bottom of this post.) Download the free Stag and Thistle fabrics (and coordinating Colorworks Solids) for EQ here Rules Your EQ Quilt must only use Fabrics from Stag and Thistle and the coordinating Colorworks Solids. One entry per person. (If a second entry is
Design & Discover – Photo Patchwork Quilts
Posted 04-01-2020 by Heidi | Posted in: Design & Discover
An EQ8 feature you may not know about is Photo Patchwork quilts. The style of quilts made with this feature is sometimes called pixel quilts. There are not many steps to create a Photo Patchwork quilt in EQ8 but to get results you like you may need to do some experimenting and try out different options. The first quilt we are going to create is based on a block I drew in EQ8. You can use any image you would like. Here are a few options.If you would like to base a pixel quilt on a block… Open the block to your Block Worktable Click the PRINT & EXPORT tab > Export > Image Name and save the file or, you can use my example… Right click on the block below Choose Save Image As… Name and save the file Click Design a Quilt from scratch Under NEW QUILT click
LESSONS WITH YVONNE–DESIGN AND SEW ALONG–LESSON 5
Posted 03-22-2020 by Yvonne | Posted in: Design and Sew Along EQ8 Lessons with Yvonne Favorite Posts Lesson 5
Welcome to the DESIGN AND SEW ALONG WITH YVONNE Lesson 5. This is the final lesson in this series. We will add a block border to our previous blocks and explore how the EQ8 program helps us to accomplish this. I often do not think of a border until the center of my quilt is constructed. This way I can try out different border options to see what will work best with the center blocks I have designed. Instead of posting our blocks to the blog page at the end of this lesson, I am asking that you post the image of your completed quilt layout for others to see. Launch your EQ8 program from your desktop. On the opening page, click on ‘open an existing project’ and navigate to your DESIGN AND SEW WITH YVONNE project. Confirm that you have your project open by seeing the title of the
LESSONS WITH YVONNE–Celebrate Holidays with Placemats
Posted 03-15-2020 by Yvonne | Posted in: EQ8 EQ8 Lessons with Yvonne Favorite Posts
Did you know that EQ8 has placemat options already built into the program ready for us to personalize and use for our favorite festive occasions? It makes designing and sewing these mini-projects really quick and simple. Launch your EQ8 program from the desktop. Click on the folder on the left side of the screen and name your new project ‘Holiday Placemats’. Look at the top of your screen and make sure the named project is at the top. This way, all the work you do on placemats will be in this one project folder. Click on LIBRARIES>Layout Libraries at the top of the screen. In the layout library box, on the left side of the box, navigate to EQ8 Libraries>Layouts by size>Placemats. Select the third layout in the pane by clicking on it. A blue selection box will appear around it. Add it to the sketchbook. NOTE: Most of


