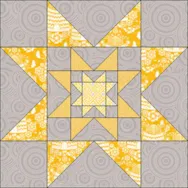
There’s a quick and easy way to create your own nested block designs in EQ7. Once you learn to create these fun designs, you won’t be able to stop! The best candidates for nested blocks are those with large plain squares in the center, like these: We’ll be using the Serendipity feature called Merge Blocks to create these designs. You must have blocks saved in your Sketchbook in order to use the Serendipity tools. Follow the steps below to create your first nested block! Open EQ7 and create a new project called Nested Blocks. Click LIBRARIES > Block Library. Scroll down and click the Variable Stars style on the left (under 01 Classic Pieced). Click on the second block to select it. Click the Add to Sketchbook button. Then click the Close button. Click the Work on Block button . Click BLOCK >Serendipity > Merge Blocks. Because the Variable Star
Creating “Nested” Blocks in EQ7
Posted 11-18-2015 by Jenny | Posted in: EQ Software Tips Favorite Posts Just Because
Tool Tip Tuesday! The Export Marquee Selection Tool
Posted 11-17-2015 by Heidi | Posted in: Quick Tip Tuesday Tool Tip Tuesday
Export Marquee Selection Use this tool to select and export all or part of the quilt, block or image currently on the worktable as a full-color image. Using the Export Marquee Selection command is possible from the Quilt worktable or the Block worktable. Click FILE > Export Marquee Selection. OR click on the Export Selection tool on the Project toolbar. If the Export Selection tool button is not visible, right-click on the toolbar and choose Add/Remove Buttons or click on the Customize Toolbar button > Add/Remove Buttons >Export Selection. The cursor will change to a small crosshair inside a magnifying glass . Select the portion of the computer screen that you want to export by dragging a marquee box around the area. When you release the mouse, the snapshot has been taken. An Export Selection dialog appears with options for saving, copying or printing the snapshot. For the Windows version: Save
EQStitch Sunday Stitch #16
Posted 11-15-2015 by Yvonne | Posted in: EQStitch Sunday Stitch
I love the ability to use the Custom Set Quilt Layout in EQ7 to help with my designing. What does that have to do with EQStitch? It works really well for me to be able to ‘see’ my quilt layout and where my machine embroidery designs would best be placed to enhance the entire quilt project. I was a quilter first and a machine embroiderer second so now almost all of my embroidery ends up in a quilt. From the quilt worktable, click on QUILT>New Quilt>Custom Set. On layer 1 of the quilt layout, click on the ‘set block’ icon on the toolbar and ‘while holding down the shift key’ on the keyboard, click/hold/drag/release the blocks you have designed for your quilt layout. Scatter the blocks around the quilt layout area giving lots of space between the blocks. (Your blocks may be pieced, appliqued, or an image printed on fabric.)
Tool Tip Tuesday! The Undo Tool
Posted 11-10-2015 by Heidi | Posted in: Quick Tip Tuesday Tool Tip Tuesday
The Undo Tool Use the Undo tool to reverse the last editing action. If the Undo tool button is not visible on the project toolbar, right-click on the toolbar and choose Add/Remove Buttons or click on the Customize Toolbar button > Add/Remove Buttons >Undo. This tool will reverse the last action, however, not all actions can be undone. If the button is disabled , Undo is not available. The action can only be undone on the Layer you created it. For example, you cannot undo an action that you made on Layer 2 if you are currently on Layer 1 of the Quilt worktable. Adding to Sketchbook will clear the undo list. Tip: Before using Undo, you can read a description of the action that will be undone by clicking Edit on the main menu and reading the text next to the Undo command. PC keyboard shortcut: CTRL+Z Mac
EQStitch Sunday Stitch #15
Posted 11-08-2015 by Yvonne | Posted in: EQStitch Sunday Stitch
Closed shapes in EQStitch make it easy for us to create designs quickly without having the artistic ability ourselves. Using the shape tools and editing them, cloning them, changing them from a curve to a line and back again, all make it a simple way to design. Try creating a design using one shape only. I chose to use the oval tool (heart) and simply edited that one shape to create an entire drawing. Start by opening your program and setting your drawing board options. I chose to have fill stitches with no edge stitch for my shapes. Using the shape tool, I created my tree trunk by changing one side of the heart into a line. Then I added several edit points on the remaining heart curve the dragged the points to multiple positions to make the arms of the branches and the roots of the trees. I used
Tool Tip Tuesday! The Export Metafile of Block Tool
Posted 11-03-2015 by Heidi | Posted in: Quick Tip Tuesday Tool Tip Tuesday
The Export Metafile of Block Tool What is a Metafile? This type of file displays an image using lines, arcs, rectangles, ovals, etc. Metafiles are actually a series of drawing commands, not pixel data. Metafiles are resolution independent, so they can be resized without loss of quality. In EQ7, you can export a metafile for a block, but not a quilt. The file created consists of the line drawing and solid fill color if you’ve chosen to export both line and fill. When you place the metafile in another application, you can manipulate the block by pulling it apart one patch at a time. Windows metafile format is understood effectively by many graphic, illustration and word processing programs although some applications may be happier manipulating the image as a single unit than as individual patches. Exporting a Windows metafile is possible from the Block worktable only. Click FILE > Export Metafile
EQStitch Sunday Stitch #14
Posted 11-01-2015 by Yvonne | Posted in: EQStitch Sunday Stitch
I often change my mind about what I want to digitize as I am working. The thought I start out with is usually not the design I end up with. I love having editing tools to toggle on and off to help me change my mind as I go along. Our shape tool in EQStitch gives us a properties bar with lots of editing options. Launch the EQStitch program by double clicking on the icon on the desktop. Name your project ‘Changing My Mind’. Set the properties of the program back to the defaults as you start this new project. Click on FILE>Preferences. Restore the defaults by clicking on the words ‘restore’ and then place a check mark next to ‘include original fabrics…’ and click on the ‘restore default settings’. Relaunch the program and open the project you named ‘Changing My Mind’. Close the sketchbook. Click on the stitch worktable


