When using the built in fonts on your computer in EQStitch, the program will see all fonts as patches. Using the text tool, you can select your font from the font folder and then create a patch to digitize. But, not all fonts are letters or numbers. Some fonts are actual pictures. There are several free font websites you can browse through and find just the right images to use for your designs after down loading them to your font folder on the computer. Open your EQStitch program. Click on the work on stitching worktable at the top of the screen. Click on STITCHING>New Design>Embroidery Click on the patch fill icon on the properties bar to turn off the patch feature. Click on the drawing board options box on the properties bar at the top of the screen. Click on the embroidery edge settings and set it to no edge
EQStitch Sunday Stitch #41
Posted 05-08-2016 by Yvonne | Posted in: EQStitch Favorite Posts Sunday Stitch
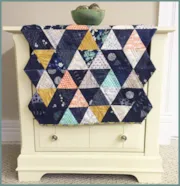
We fell in love with the new Denim prints collection by Art Gallery Fabrics so EQ Margaret designed a mini quilt with them in EQ7. Love the irregular side edges of this mini? Here’s how Margaret suggests doing it: Layer batting, backing right side up, quilt top right side down, in that order. Following the edge of the quilt top, stitch the irregular sides of the quilt through all the layers. Trim the backing and batting to match the quilt top edge. Clip backing at the inside angle. Turn right side out through the open top or bottom end. Press the edges flat. Quilt the three layers together as desired. Bind the top and bottom edges to finish. Free project: Download this project for EQ7 and have fun coloring it your own way! NOTE: This project only includes fabrics used in the quilt. To download additional fabrics from the Denims
Quick Tip Tuesday – Block Colorings
Posted 05-03-2016 by Jenny | Posted in: Quick Tip Tuesday
Each time you color a block and you click the Add to Sketchbook button, EQ7 will save a copy of that coloring to the Sketchbook. To save you from having to scroll through lots and lots of blocks in the Sketchbook, EQ7 will stack up to 10 colorings on the same block. All blocks from the Block Library come with three colorings: line drawing, grayscale, and color Select Colorings When you are working with the Set Block tool on the Quilt Worktable, you can choose which block coloring to set in the quilt two different ways: Use the display arrows at the bottom of the Blocks palette to scroll through the colorings. OR Right-click on the block in the palette and choose Select Coloring. A menu will appear with all of the block colorings. Click on the coloring you’d like to use. The coloring will then be displayed in the
EQStitch Sunday Stitch #40
Posted 05-01-2016 by Yvonne | Posted in: EQStitch Favorite Posts Sunday Stitch
By using the editing tools in the EQStitch program, you can take a basic line drawing shape and edit it to make a more unique shape and have it stitch as a continuous line. Open your EQStitch program. Once the program fully opens, click on the work on stitching worktable icon at the top of the screen. Click on STITCHING>New Design>Embroidery. Turn off the patch tool if you have it on by clicking on the patch fill icon on the properties bar at the top of the screen. You can toggle this little switch off and on as necessary. For this drawing it is best to have the patch icon turned off. Click on the drawing board options box on the properties bar and change the embroidery edge setting to be a running stitch. Click on the OK in bottom of the box to set the new line property. On
EQ Academy 2016 – Ohio
Posted 04-29-2016 by Christine | Posted in: EQ Academy
76 students… 11 employees… 4 teachers… 3 days… 1 heck of a good time! If you weren’t at this year’s EQ Academy – you should have been! What a fun 3 days! We kicked it off on Thursday morning with coffee, tea and registration at 8am. (Meeting all the students and welcoming them is my favorite part!) Classes were from 9am-4pm every day with a lunch break at noon when we all enjoyed sandwiches, salads, wraps, snacks and yummy cookies from local restaurants and caterers. Friday night each of the AWESOME teachers gave a lecture while we all snacked on Anniversary cake and took silly pictures in the photobooth. First, Yvonne Menear spoke about some of her jaw-dropping embroidered quilts (and told an incredibly funny story quoting Taylor Swift’s song, “Shake it Off” ). After that, Christa Watson displayed many of her amazing quilts and described her design process. Next,
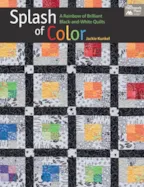
Congratulations to our winner: June! This contest has closed. Thanks for participating. Upcoming contest info here. Don’t you love great quilting books? You can’t ever have enough! And the quilts inside are always so unique and creative. Jackie Kunkel used EQ7 to create the quilts in her book, Splash of Color. Enter to win a copy at the bottom of the post! EQ: Hi Jackie! We just loved your article in the newest issue of American Patchwork & Quilting about color. Tell us a little bit about your thoughts on color and how you go about selecting a color palette. Jackie: One thing I know is that I LOVE color! The more saturated the color, the better for me! However, that is not to say that only saturated color serves a purpose for me, all color does. When I am selecting a color palette, I tend to gravitate towards the
Quick Tip Tuesday – Auto Borders: Single Block Patterns
Posted 04-26-2016 by Jenny | Posted in: Quick Tip Tuesday
If you’ve ever used the Auto Borders tool, you may have noticed two styles called Single Block Patterns 1-6 and 7-12 and wondered what those were for. Today I’ll show you one scenario when those borders will come in handy. I’ve designed this mini quilt. It’s made up of one central block and has two borders (I add a narrow border around most of my quilts to mimic the look of binding). The first border has these settings on the Borders tab: I like this design and I’m ready to make the quilt. I want to foundation piece each side of the border as one strip. But when I click on the border to select it for printing, I see that each triangle is a separate block: So when I print the pattern, each triangle is an individual block: So how do I make it print the whole side of


