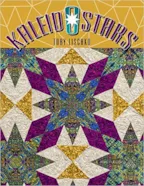
Contest is now closed. Congratulations to our winner: Mary Furber! Thanks to everyone who participated! Toby will be announcing her winner today too so check her blog! Stay tuned for our next giveaway of Riley Blake fabrics beginning Sunday, April 10th! One of our EQ Artists, Toby Lischko, has just released a new book! We just had to see some of the amazing quilts inside and pick Toby’s brain about designing them in EQ7. Read our interview below to find out about her new book, Kaleidostars! She even provided a giveaway for one lucky winner! Hi Toby! Congratulations on the release of your new book Kaleidostars! Tell us all about it! Toby: Well, I love fussy cutting fabric and I have been working with Paula Nadelstern using her new fabric collections that have a lot of symmetrical fabrics in them. My first book St. Louis Stars was about fussy cutting
Q&A and BOOK GIVEAWAY!
Posted 03-31-2016 by Christine | Posted in: Contests EQ Artists
Quick Tip Tuesday – Create Quilt from Block
Posted 03-29-2016 by Jenny | Posted in: Quick Tip Tuesday
How do I turn a block design into a quilt layout? EQ7 can turn a block into a quilt layout, but the block must have only horizontal and vertical lines. This feature comes in handy when you want to put blocks of different sizes in the same layout. You can “draw” the layout as a block, then turn the block into a real layout to fill with blocks. Start with blocks in your Sketchbook. Remember, horizontal and vertical lines only. Click QUILT > Create Quilt from Block. Click on any block that displays in the left column. Use the scrollbar to see all the blocks. These are the applicable Sketchbook blocks. Use the sliders to change the size of your quilt. Click the Add to Sketchbook button. The quilt layout will now be in the Quilts section of the Sketchbook. Click Close. To use this layout, click View Sketchbook button
EQStitch Sunday Stitch #35
Posted 03-27-2016 by Yvonne | Posted in: EQStitch Favorite Posts Sunday Stitch
Tax time. My least favorite time of year. I just want to get them done and out of the way. Doing the taxes occupies my mind for a couple weeks that seems never ending every year. No time to play with digitizing designs or sewing them at the machine. Getting creative after tax season is my reward for completing them. What keeps you from your love of sewing, designing, digitizing?
WHAT ARE THE GRAND PRIZES? There are 3 large grand prizes totaling over $3,000! Cash, a brand new laptop, TONS of fabrics, lots of thread, books, notions and so much more! HOW DO I ENTER? Submit a video here and participate in each monthly contest on our blog. WHAT ARE THE MONTHLY PRIZES? Each month we give away an EQ7 on our sponsor’s blog and the sponsor gives away a prize on our blog! Contests run from the 10th-25th (Jan-Nov). HOW DO I ENTER? Visit our blog once a month and follow the contest prompts. WHAT ARE THE SOCIAL MEDIA PRIZES? On the 1st of each month, we randomly choose a winner from Facebook, Twitter or Instagram. We contact and send them a prize bundle! HOW DO I ENTER? Include the hashtag #EQ25 in all your social media posts throughout the year!
Quick Tip Tuesday – Opening Previous Version’s Projects in EQ7
Posted 03-22-2016 by Heidi | Posted in: Quick Tip Tuesday
Did you know you can open EQ3, EQ4, EQ5 or EQ6 project in EQ7 (and EQStitch)? (EQ1 and EQ2 projects cannot be opened.) Click FILE > Open. The Project Helper will display. Click the Open an existing project tab. At the bottom-left of the box, click the folder button. In the Open box, click the Files of type drop-down menu. Choose Previous EQ versions. Navigate to the folder that holds your project. Select the file. Click Open. EQ7 will open the project, displaying the Project Sketchbook. The project will not become an EQ7 project until you resave it in the PJ7 folder. Click FILE > Save as. Click the down arrow beside the Save in: box > click My Documents > My EQ7 > PJ7. Type a name for the project in the File name: box. Click Save. Note: Here are the default locations for projects from previous versions: EQ6:
EQStitch Sunday Stitch #34
Posted 03-20-2016 by Yvonne | Posted in: EQStitch Favorite Posts Sunday Stitch
Create depth in your designs by using stitch textures, stitch angles, and stitch colors. Begin by drawing your design to create shapes that can be filled with stitches (closed shapes). Click on the set fill stitch icon on the toolbar on the stitch tab. Select a stitch pattern that has a linear repeat texture. Click on each of the closed shapes to fill the area with the stitches. Edit the stitch direction on the fill stitch properties bar to help increase the visual effect of depth into the shapes. Color the shapes with the set thread tool to add even more depth to the design. NOTE: It is difficult to see the stitch pattern and stitch direction when using very dark colors. Lighter thread colors show the design elements more easily.
Quick Tip Tuesday – Making a Quilt Label
Posted 03-15-2016 by Heidi | Posted in: Quick Tip Tuesday
You can use EQ7 to design a quilt label and then print it out directly onto EQ Printable Fabric Sheets! Here is a great video that helps explain how to do it!Or, we also have the written out steps… Setting up the label Click WORKTABLE > Quilt worktable. Click QUILT > New Quilt > Horizontal. Click the Layout tab at the bottom of the worktable. Change the number of blocks to 1 for Horizontal and Vertical. Change the size to 5” for Width and Height (or choose the size you want for your label). Click the Borders tab. Choose the style you want for the edge (border) around your border. Click Layer 1. The center of your label can stay plain, but add color if you’d like. Click the Paintbrush tool. Select a fabric or color in the palette. Click on the center of the label. Choose other colors


