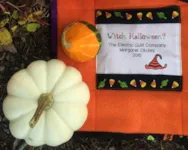
If you’re still not in the mood for Halloween, this quilt is sure to get you there EQ Margaret decided to make up a Halloween quilt and it was too cute not to share with you all… All of her fabrics are from Andover’s Halloween collections; especially “Be Witched.” She even added a cute label: You may not recognize it, but Margaret got her inspiration from the “Romantic Rosy” quilt in Kaffe Fassett’s Quilt Road book. Hope you’re having fun preparing for the holiday! Happy Halloween from EQ!
Witch Halloween?
Posted 10-29-2015 by Christine | Posted in: Favorite Posts
Tool Tip Tuesday! The Compress File Size Tool
Posted 10-27-2015 by Heidi | Posted in: Quick Tip Tuesday Tool Tip Tuesday
Compress Project File Size Project files that include unused blocks, fabrics, pictures, embellishments, and thread tend to become large, it’s a good idea to condense project files before sending them by e-mail. EQ will look at the quilts in your project file and remove designs not used in the quilts. It is strongly suggested that you use Create Copy Project to make a copy (or backup) of your project before using this command. Compress Project File Size button is not visible by default. To add it to your toolbar list, right-click on the toolbar and choose Add/Remove Buttons or click on the Customize Toolbar button. Or, click FILE from the main menu, then choose Compress Project File Size. The Compress Project File Size dialog box will display. You can choose to delete unused blocks, fabrics, embellishments, pictures and thread or just delete unused fabrics. Make your selection, then click OK.
EQStitch Sunday Stitch #13
Posted 10-25-2015 by Yvonne | Posted in: EQStitch Sunday Stitch
Seeing Turkeys everywhere reminds me of when the kids were in pre-school and they traced the shape of their hand and colored it in to be their own Thanksgiving Turkey artwork. Very simplistic, yet so effective. A basic hand shape was all they needed in their creative process. We have shape tools built into our EQStitch program. You don’t have to use any drawing tools to create an embroidery design. Just use the shape tools and create your design beginning with the background elements and moving forward to the foreground elements. Open your EQStitch program and restore the defaults to the program through the FILE>Preferences menu. Click on the stitch worktable icon and open a new drawing board by clicking on STITCHING>NewDesign>Embroidery. Click/hold the black arrow at the bottom of the toolbar and add all the tools to the toolbar. Use only the shape tools to click/hold/drag/release the shapes you
Tool Tip Tuesday! The Twist Tool
Posted 10-20-2015 by Heidi | Posted in: Quick Tip Tuesday Tool Tip Tuesday
The Twist Tool The Twist Tool is only available on the Image Worktable. You also must have an image imported for it to be available. The Twist tool loads the Precision Bar with buttons for flipping, rotating and shearing. Be sure your Precision Bar is turned on (VIEW > Precision Bar). Note: Whenever you use one of the tools on this Precision Bar, the image is required to display 1-to-1. This means that your image may become larger than the screen. You’ll need to use the Zoom tool to adjust the display so it fits the screen. Rotate 90 degrees clockwise: Rotate the image right with each click. Rotate 90 degrees counter-clockwise: Rotate the image left with each click. Flip left and right: Click to mirror the image horizontally. Flip top and bottom: Click to mirror the image vertically. Rotate by degrees: Enter a number for degrees in the
EQStitch Sunday Stitch #12
Posted 10-18-2015 by Yvonne | Posted in: EQStitch Sunday Stitch
Sometimes all I need is a cup of coffee to refresh myself. A little quiet time and a chance to decompress goes a long way. Did you know that EQStitch has designs all ready digitized for you to use? You can use them as they are or edit them for your personal touch. Launch your EQStitch program from the desktop. Set the program back to the default settings to start the new project. Click on FILE>Preferences and restore the defaults. Find a design all ready digitized in the stitching library. Click on LIBRARIES>Stitching Library. Choose any design you want from the library. I need a cup of coffee. I want an applique design. In the library box, under the EQStitch Machine Applique heading, click on ‘home and leisure’ heading and locate the pink coffee cup. Click on the cup to select it and then click on ‘add to sketchbook’ at
Q&A with Kimmy Brunner
Posted 10-16-2015 by Christine | Posted in: Favorite Posts Q&A
Have you seen this year’s International Quilt Festival’s raffle quilt? It was designed by an EQ user, Kimmy Brunner! She told me all about it in our interview below! EQ: Congratulations on making the 2015 Raffle Quilt for the International Quilt Festival in Houston! Tell us about the process of being chosen for this and how it felt! Kimmy: I was simply thrilled. This is an honor that I *never* expected would be bestowed on me and I am grateful beyond words. The Board of the International Quilt Association (IQA) decides who will be asked and they approach the artist several years in advance. The artist has the choice of working with a partner, or making the quilt themselves. I chose to make mine a solo quilt. An original design must be submitted for approval to the Board two years before the raffle date (I simply saved my [EQ7] design
Tool Tip Tuesday! The Import Image Tool
Posted 10-13-2015 by Heidi | Posted in: Quick Tip Tuesday Tool Tip Tuesday
The Import Image Tool 1. Click the Import button on the toolbar. Or, choose BLOCK > Import Image for Tracing (or STITCHING > Import Image for Tracing if importing on the Stitching worktable) The Import Image dialog box will display. 2. Browse to find the file you wish to import. By default, the filter for Files of type is set to display all image files. If you would like to filter which file formats display (only jpegs for example), click the down arrow next to Files of type and select the file format you would like. Choose the file from the folder, then click Open. The Crop Image dialog will appear. Using the Crop Dialog This dialog lets you crop the image very precisely before placing it on the worktable. Cropping and resizing can also be done once the image is placed on the worktable. Crop using the mouse The


