It’s time for Block 5 in the BlockBase+ Sew Along! Thanks again to everyone who shared their blocks on Friday. If you haven’t added your block to the link up yet, you can do so at any time in the Block 4 Link Up post.
Don’t have the BlockBase+ software yet? It’s not too late to join in! Here on the blog, click Categories > Sew Alongs > BlockBase+ Sew Along 2021 to find all the posts and catch up. Find the BlockBase+ software here >
In this post, we’re going to explore the Export options available in BlockBase+. Let’s get started!
- Double-click the BlockBase+ icon to open the software (close the Getting Started window, if you still see it when you open BB+).

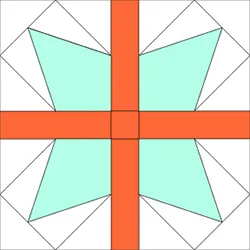
- By now, I hope you’re all pretty comfortable navigating around the software and finding your blocks. For this lesson, we’ll be working with block 1915b from the 10 Unequal 9 Patch Small Center > 04 Blocks with Unpieced Bars section. I’ll leave it up to you locate the block however you’d like!
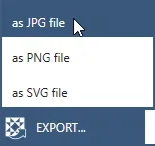
There are three export options available. JPG and PNG are both common file types that work well for creating images for websites or for printing. We’ll start with these image exports.
- With block 1915b selected, in the Block Toolbar, click Export > as JPG file.
- In the Export window, you’ll see the default size for this block is 9”. Select Custom block size and change the size to 3.000. When we’re creating an image for a website or to send in an email, we don’t need it to be the actual size of the block.
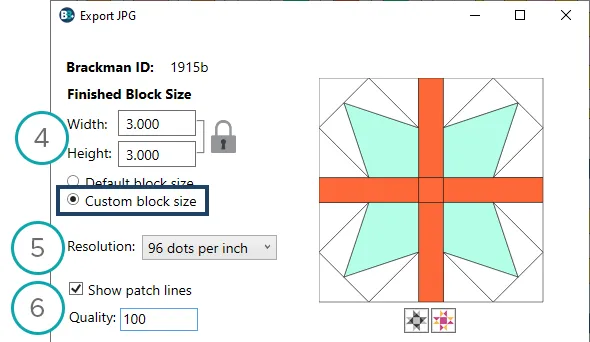
- Resolution is the next option. For this lesson, we’ll leave the resolution set to the default setting of 96 dots per inch (dpi).
- We’ll leave the box for Show patch lines checked and the Quality set to the default setting of 100.
About Resolution
The resolution you choose affects the quality of the image, and the size of the file that gets created. Generally speaking, choose a low resolution (72 dpi) if saving an image to email, or use on the web. Choose a high resolution (300 dpi) if saving an image to be published in a book or magazine.
About JPG Quality
This setting affects the size of file that gets created. It’s a trade-off between a compressed file size and the quality of the saved image: the higher the quality setting, the larger the JPEG file. Low values will produce fuzzy images. High values will produce sharp images.
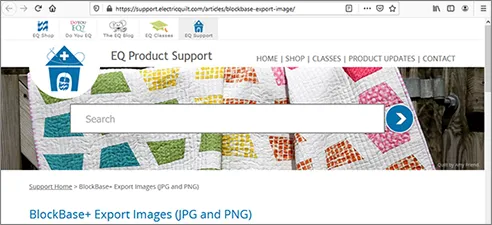
- Click the Help button. This will open your internet browser and take you directly to the EQ Support site page for the feature you’re using. In the future, if you want to export an image and can’t remember what these settings mean, use the Help button to quickly access more information.

- Close the window for the Support site.
- Back in the BB+ window, click the Export button.

- A Save window will appear. By default, the file will be named the Brackman ID. If you’d like to change it, you can type a new name.
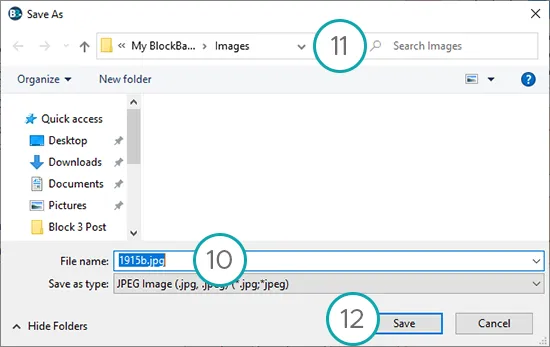
- Images exported from BB+ are saved in this directory on your computer: Documents > My BlockBase Plus > Images. You can change the save location, if you’d like. (I’m using a Windows computer for these illustrations. If you’re using a Mac, your Save window will look a little different, but the default save location will be the same as Windows.)
- Click the Save button. A JPG file will be created of this block image.
- The process is very similar for exporting PNG files. With the 1915b block still selected, click Export > as PNG file.
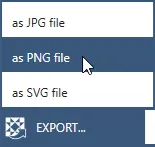
- Select Custom block size and change the size to 3.000.
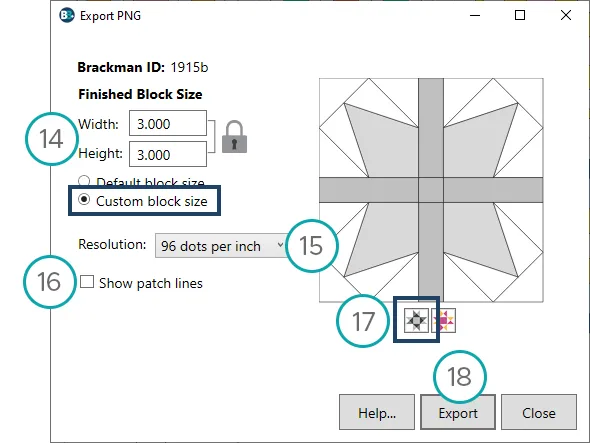
- Leave the Resolution set to 96 dots per inch (dpi).
- Uncheck the box for Show patch lines.
- Click the Colorway button to display the block in grayscale.
- Click the Export button.
- A Save window will appear. By default, the file will be named the Brackman ID. If you’d like to change it, you can type a new name.
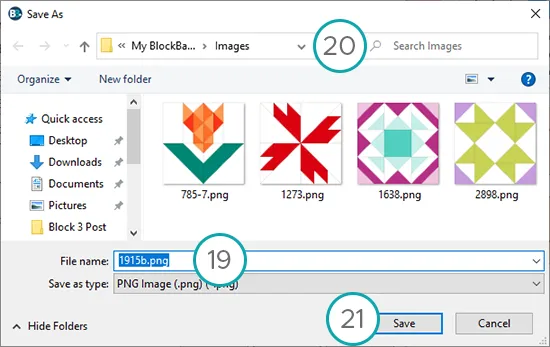
- Images exported from BB+ are saved in this directory on your computer: Documents > My BlockBase Plus > Images. You can change the save location, if you’d like. Note: I’ve exported PNG files for the other sew along blocks (I use them in these lessons). You won’t see images for these other blocks in your Save window.
- Click the Save button. A PNG file will be created of this block image.
- Now, let’s take a look at where those files were saved. On your computer (outside of the BlockBase+ software), navigate to your Documents folder.
- In your Documents folder, open the folder called My BlockBase Plus, then open the folder called Images.
- In the Images folder, you should see the two files we exported (along with any other images you’ve exported from BB+). If you have a thumbnail view selected for the folder, you should be able to see that one image is in color (the JPG file), and the other image is in grayscale (the PNG).
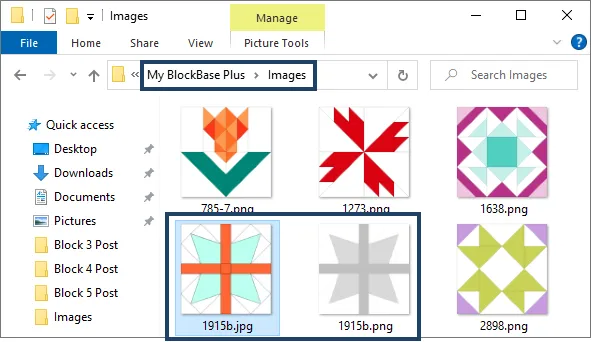
- Close the file explorer window and go back to the BB+.
Now we can try the exciting new addition to BlockBase+… SVG export! SVG (scalable vector graphic) files are a unique type of image format. These vector files can be imported into many different software applications on the market including digital cutting machines, embroidery machines, longarm software, and more.
SVG files exported from BlockBase+ can be either an image of the selected block or the templates for the selected block. The options that will work best for you will depend on how you want to use the SVG. The steps we’ll work through in the rest of the lesson are the basics for using the SVG templates with a digital cutting machine.
- With block 1915b selected, click Export > as SVG file.
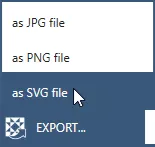
- I’m making the block at the default 9” size. If you’re making the block a different size, click Custom block size and enter your finished block size.
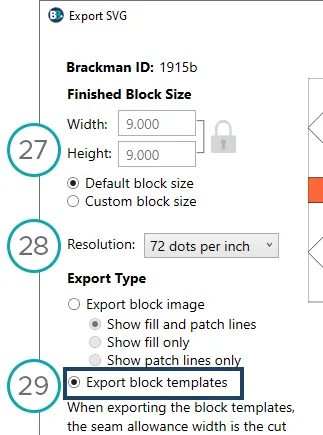
- I’m leaving the Resolution set to 72 dots per inch (dpi). On the EQ Support site, you’ll find suggested resolution settings for the common digital cutters (Cricut, Silhouette, Brother). Click the Help button in the Export SVG window to find this info.
- Under Export Type, select Export block templates. This note is in the window, but it’s important to know this information, so I’m including it here too:
When exporting the block templates, the seam allowance width is the cut line on the export. A scale indicator is added to the export to use as a guide when importing the SVG file into a third-party software. - The Seam allowance width is set to the standard quarter-inch (0.25”).
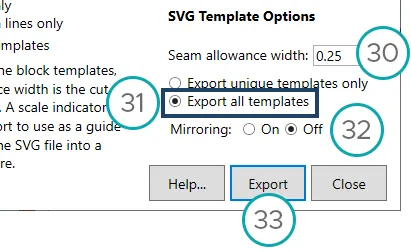
- When exporting the SVG for use with a digital cutter, make sure Export all templates is selected so that all of the patches are included in the exported file.
- By default, Mirroring is off.
- Click the Export button.
- Just like the other two export options, a Save window will appear. By default, the file will be named the Brackman ID. If you’d like to change it, you can type a new name.
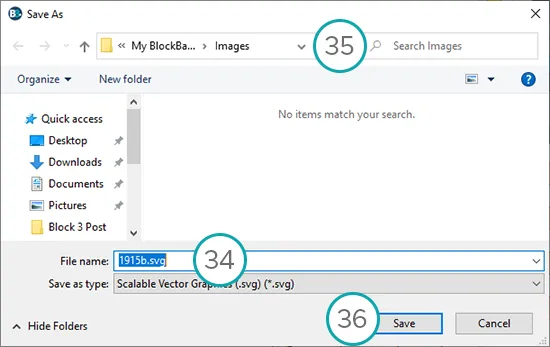
- The file will be saved to the Documents > My BlockBase Plus > Images folder on your computer. You can change the save location, if you’d like.
- Click the Save button. An SVG file will be created of this block’s templates.
- Now that the SVG file has been created, you can open the SVG in your cutter software. I won’t go into the specifics of using the different cutters in this lesson. You can find detailed instructions for the major cutters on our support site: BlockBase+ Exporting and Sharing. At the end of this lesson, there’s a quick overview of the cutting process with a Cricut Maker.
- Now that we’ve tried out all the Export options, let’s add this block to Favorites. With block 1915b still selected in the Block Viewer, click Add to Favorites in the Block Toolbar.

- At the top of the Navigation panel, click the Favorites button.

- Now you’ll see our five Sew Along blocks in the Favorites view. If you want to come back later and print a pattern for this block, you can quickly find it here in the Favorites. See my Note about Printing Block 1915b below.
- If you’re done working in BlockBase+, you can close the program by clicking the X at the top or clicking File > Quit BlockBase+.
A Quick Peek at Digital Cutters and SVG Files
If you’re not familiar with digital cutters, I’ll give you a very brief overview of the process with a Cricut Maker. As mentioned in the lesson, you can find more detailed instructions for the major cutters on the support site.
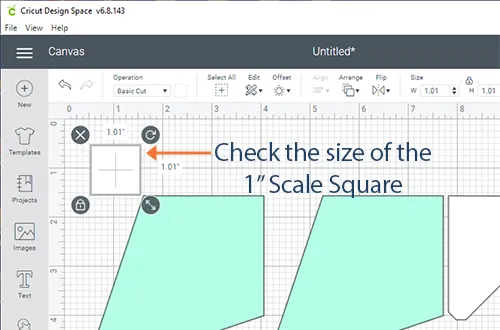
After exporting the SVG file from BB+, I can open the Cricut Design Space software and upload the SVG file. Then I can work with the templates on the Canvas screen.
Important! The first thing you should always do is check the sizing of the file by looking at the 1″ scale square that’s included in the SVG file. Every cutting software handles SVG files differently. Some cutting software changes the size of the SVG files when importing. Make sure you get to know your cutter software. The Cricut Design Space software that I’m using in these illustrations recently updated and changed the way it sizes SVG files. Be aware that updates to your cutting software can affect how your files import.
The Cricut software removes the text from the square, so I just see a white box. After I confirm that the scale square is the correct size, I can delete it because I don’t actually want to cut a 1″ square of fabric. The square shows a measurement of 1.01″ because Cricut is reading the handful of pixels that make up the outline around the square. This is the correct measurement.
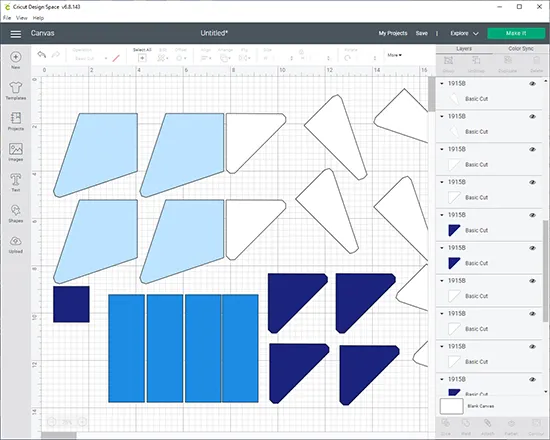
With the Cricut software, I can change the color of the patches. When I go on to the next step, the Cricut software will automatically sort the patches to different mats based on color, so changing the color here makes the next step easier.
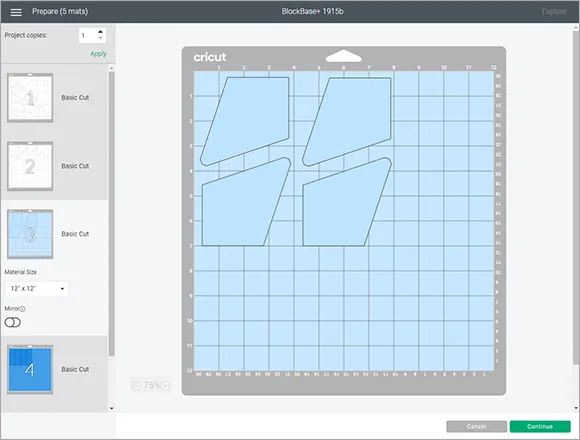
When I’m ready to cut, the Cricut software separates the patches on different mats. Patches can be moved on each mat for the best fit and use of your fabric.
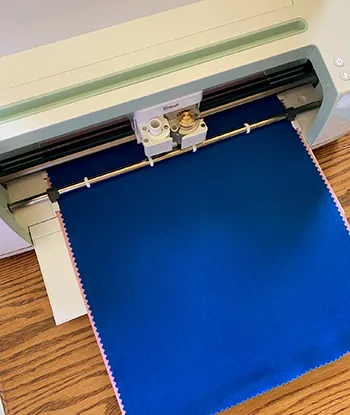
Then I can load the cutter with my fabric and start cutting.
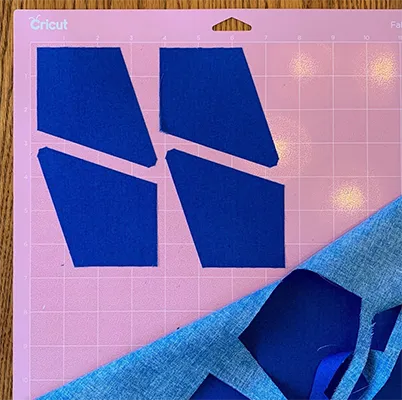
And here are the cut patches.
We focused on using SVG files with digital cutters, but SVGs have other uses too! Check out this post on using SVGs with a 3D printer and this post on using SVGs with embroidery software.
Notes Before You Start Sewing:
- You can make the block any size you like. I’m making this block at the default 9″ size.
- You can be creative in your coloring of the block. Just keep the seams/patches in the same orientation as the BB+ block.
- We covered Export options in this lesson. If you’re not using the SVG file with a digital cutter, you’ll need to choose a print option for your actual cutting/piecing of the block. See my Note about Printing Block 1915b below. For help with the printouts, visit our support site.
- There will be a new post here on the blog on Friday, June 4 where you can post a photo of your sewn block.
Note about Printing Block 1915b:
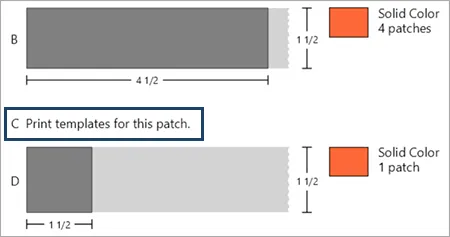
The majority of the patches in this block work well with rotary cutting (as long as you choose a size that works with the block’s grid). However, for Patch C, you’ll see that the chart tells you to print the templates. That’s because this kite-shaped piece cannot be cut simply using a ruler and rotary cutter. So you’ll need to print the template for this patch. You can find more info on rotary cuttable patches on the support site.
Comments
Let’s get to know each other in the comments! I loved reading everyone’s thoughts on binding vs. cutting on the block 4 post! I hope you all enjoy getting to know each other this way too. Here’s my question for this post–
Do you own a digital cutting machine? If so, which one and how do you like it?
Here’s my answer: I personally don’t own a cutting machine, but luckily Electric Quilt does! ![]() I have limited experience with these cutters, so I hope our sew-alongers can help each other out in the comments if there are any questions about specific cutters or how they handle SVG files.
I have limited experience with these cutters, so I hope our sew-alongers can help each other out in the comments if there are any questions about specific cutters or how they handle SVG files.
Block 5 Video
The steps in the video are the same as the steps listed above. So you can follow the written steps above, or watch the video lesson for Block 5.




05-24-2021
9:03 am
I own a GO cutter and a Big Shot, both of which I use constantly, but have avoided purchasing a Cricut because it’s another big machine to find a place for in my sewing room. However, your explanation today has me thinking about buying one. My friends have a Silhouette or a Cricut, so I think I’ll ask them for a test run before I research machine purchasing. I’m excited about the possibilities of importing files into my Bernina embroidery software!
05-24-2021
12:36 pm
I have a Cricut Maker. I held off on buying it until I started seeing people use them for applique, and I finally caved. Ironically, I’ve had lots of fun making cards with it, but have yet to cut fabric! So, I’m going to drag it out to do this block. I also have the AccuQuilt Go! system, which I love.
05-24-2021
1:16 pm
I can certainly see the benefits of a cutting machine. Familiar with them from the scrapbooking I do. For now, I’m not looking to purchase one but who knows..never say never.
05-24-2021
1:28 pm
I own a brother scan and cut. I have not gotten to exporting files because I have a more basic problem. I can cut card stock fine but have difficulty cutting material.
I have tried with and with out backing material and on stickier and less sticky mats.
It seems to get caught up. Do you have any insight into this?
05-26-2021
1:56 pm
Hi Rebecca,
I asked a colleague who has more experience with the different cutters and she suggested getting a blade that you only use for fabric and use a different blade for cardstock. It’s like fabric scissors vs. paper scissors.
She also mentioned she saw someone in a Youtube video from Brother Scan N Cut, iron their fabric between two pieces of freezer paper to stabilize it. Run the cutter and then pull the freezer paper off. Hope these suggestions help!
05-24-2021
2:07 pm
I do not have a cutting machine. I’ve checked them out and have decided that I would rather spend the money on fabric and my own cutting skills for cutting(:
05-24-2021
2:58 pm
I gave in and got a Cricut a few moths ago. It was the svg export feature that convinced me to upgrade from the original Block Base to BB+ and join this SAL. I really want it for applique and all those hard to cut shapes. So far it has worked like a charm.
05-24-2021
4:52 pm
I do not own a digital cutting machine. I do have an accuquilt cutter and I think that will have to do me.
05-24-2021
7:22 pm
I don’t own a cutting machine, but a few years back I was sorely tempted to buy a Brother ScanNCut. I wasn’t going to use it so much for sewing as for making bulletin board shapes and nametags for my public school classroom. Then I retired but saw it demoed in the vendor booth at Paducah Quilt Week. I resisted temptation again. Seems like they were much more expensive then too. And now, look what you’ve done to me — TEMPTATION again!! LOL And the Brother dealer is a quilt shop that I had planned to visit next week. . . . . (oh, y’all are so naughty)
05-24-2021
8:12 pm
Like Madeline, I have an accuquilt cutter but no digital cutting machine. My current sewing space is jammed and has overflowed into the closets of other rooms…even underbeds, etc; so best for me to keep working with what I have.
It sounds like something that could make for great fun though! I really like the idea of using the cutter for applique pieces.
05-25-2021
9:30 am
What is the model of your Cricket Cutter?
05-26-2021
2:02 pm
The Cricut machine I used is the “Cricut Maker.”
It looks like the new “Cricut Maker 3″ is coming out in June.
05-25-2021
9:34 am
Can 2 1/2” strips WOF be cut on the cricket? I am looking for an electric cutters that can do you strips WOF then sub cut into scrappy pieces. In addition to the block imports. Kind a like the Insta pot that does it all.
05-25-2021
9:50 am
An electric GO cutter can do all this for you and you can cut multiple layers of fabric at one time. However, it won’t allow you to import a block. As I understand it, the one drawback to the Cricut is you can cut only one layer at a time. BTW, a new Cricut maker model is due out in June. I’m waiting to see what promotions they run before even considering buying one.
05-26-2021
2:07 pm
If you have the large 24″ mat for the Cricut, you could set it up to cut 2.5″ x 24″ rectangles. As Joy said, you’d only be able to cut one layer at a time.
05-25-2021
10:13 am
Joy, thank you for the information. I have a manual go cutter but it takes some extra work on my part. Maybe I should consider that my daily work out for the shoulders and arms, LOL I’m doing some research online now. Looking for any feedback so I can make a wise decision.
05-25-2021
5:15 pm
I have a Cricut Explore Air, and I recently bought a fabric mat and blade. Maybe this will be the time to try it out. I had to resize the test square, as it first appeared with a size of .341 inches. So I left the patches grouped together and played with resizing the group, checking the test square’s dimensions on the side panel of the screen, until I finally got 1.01 inches.
05-26-2021
1:35 am
I don’t own a digital cutting machine. As I do a lot of fussy cutting and broderie perse work, I don’t think it would help me.
05-26-2021
3:13 pm
I do not. I haven’t looked into them recently.
The type I have seen, I was under the impression you had to buy a new die for each new shape/size. I may need to do more research :~)
05-27-2021
7:26 pm
I don’t own a cutting machine.
06-05-2021
1:17 pm
I don’t own a cutter, but keep thinking about buying one. They all seem to be made by companies not based in the UK and I’m concerned about after sales service and product support.