

It’s time for Block 3 in the BlockBase+ Sew Along! Thanks again to everyone who shared their blocks on Friday. If you haven’t added your second block to the link up yet, you can do so at any time in the Block 2 Link Up post.
Don’t have the BlockBase+ software yet? It’s not too late to join in! Here on the blog, click Categories > Sew Alongs > BlockBase+ Sew Along 2021 to find all the posts and catch up. Find the BlockBase+ software here >
![]()
In this post, we’ll take a look at the Search features available in BlockBase+. Then we’ll go through the steps of printing the Foundation Pattern. Let’s get started!
- Double-click the BlockBase+ icon to open the software.

- If you see the Getting Started window, click the Close button. (If you’d like to turn off the tour, check the box next to “Don’t show again” and then click Close.)

For the first two sew along blocks, we used the Navigation Panel to find the Category & Subcategory of the block. This time we’ll use the Search features of BB+ to find our block. There are four ways to search for blocks in BB+. Because we are searching for a specific block for this sew along (which I know the Brackman ID number for ![]() ), the quickest way to find the block is to use the Brackman ID Number search. Let’s explore the other three options first.
), the quickest way to find the block is to use the Brackman ID Number search. Let’s explore the other three options first.
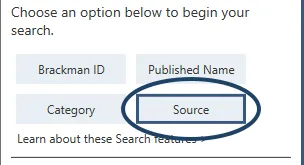
- Click the Search button at the top of the Navigation Panel.

- Click the Published Name button. You can search for a block by name or keyword using this search option.
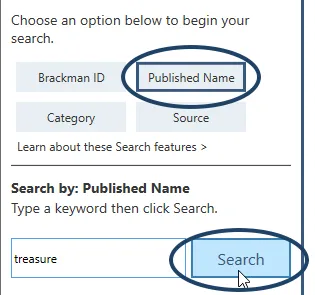
- The block we’re sewing this time has the word “treasure” in one of the published names. Type treasure in the box and click the Search button.
- In the Block Viewer, you’ll see all the blocks that include the word “treasure” in one of the Published Names. (But I’m not telling you which one we’re actually sewing yet!)

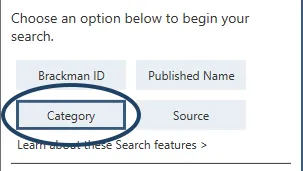
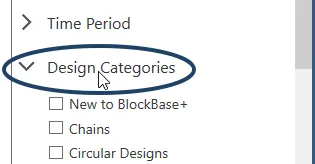
- In the Search panel on the left, click the Category button. There are many categories and subcategories to choose from here. The more categories you choose, the narrower your search results become (and the fewer blocks you’ll see).
Note: BlockBase+ will search for blocks that match ALL the categories you’ve checked. You could check the boxes for Beginner, Rotary Cutting Friendly, and Chains and find blocks that fit all of that criteria. However, if you checked Beginner and Advanced, you will receive a “No search results” message because it’s not possible for a block to be both Beginner and Advanced.
- Click Design Categories to see the list of options available.

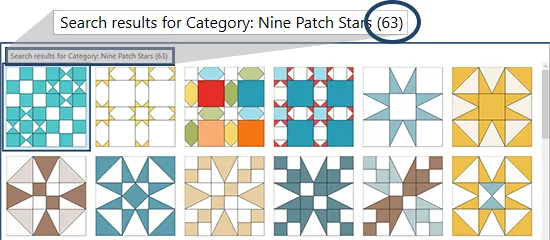
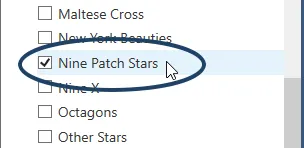
- Check the box for Nine Patch Stars. You may need to use the vertical scrollbar to the right of the list to see this option.

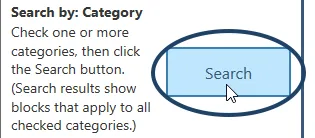
- Click the Search button.
- In the Block Viewer, you’ll see all the blocks that have been marked for the Nine Patch Stars category. At the top of the viewer, you’ll see that there are 63 blocks in this search. Remember that you can use the vertical scrollbar to the right of the viewer to see more blocks.
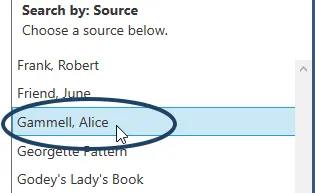
- Click the Source button. A block’s source is the earliest known source for the pattern name associated with it. All of the sources are listed in the panel.
- Scroll through the list in the panel and click on a source name to see the search results, just to see how this feature works.


Now that’ we’ve tried the other search options, let’s use the Brackman ID search to find the block we’re sewing this time. What’s a Brackman ID number? All the blocks in BlockBase+ come from Barbara Brackman’s Encyclopedia of Pieced Quilt Patterns book. As she was cataloging blocks for her book, she found that the same block can be known by many different names. Barbara choose to assign ID numbers to each block, rather simply picking one of the names a block was published under. If you have the Encyclopedia and are looking for a block that you’ve found in the book, the quickest way to find the block in BB+ is to search by the Brackman ID.
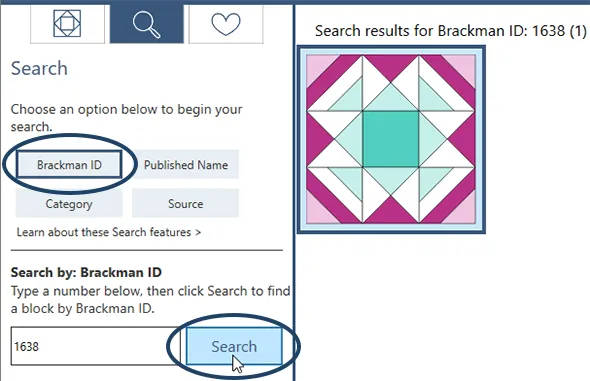
- Click the Brackman ID button.

- Type 1638 in the box and click Search.
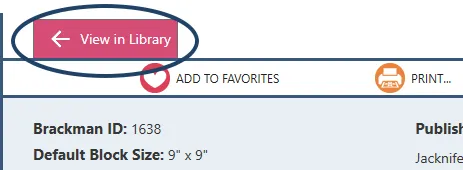
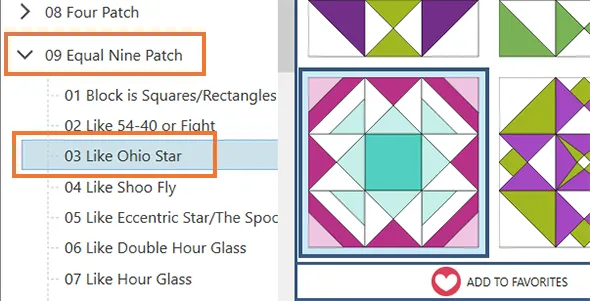
- We could go ahead and print from this search view. But let’s take a look at where this block lives in the Categories and Subcategories. Above the Block Toolbar, click the View in Library tab.
- The screen will switch to the Library view, with the 09 Equal Nine Patch > 03 Like Ohio Star category selected in the Navigation Panel. And the 1638 block is selected in the Block Viewer.

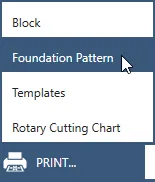
- Now we can print our pattern and get to sewing! In the Block Toolbar, click Print > Foundation Pattern.

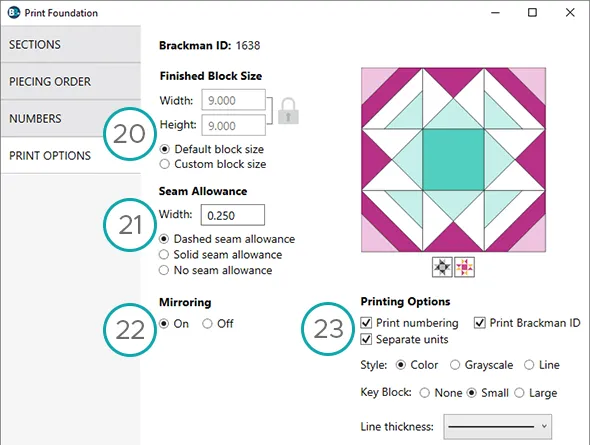
- In the Print Foundation window, you’ll see there are more options than the other two printouts we’ve used so far. There are four tabs in this window. On Windows computers (which is what I’m using for these illustrations), the tabs are on the left side of the window. On Mac computers, the tabs are along the top of the window. We’re starting on the Print Options tab.
- I’ll be using the Default block size (the default size for this blocks is 9″). If you want to change the size, click Custom block size and type a new size.

Note: The Finished Block Size is the size of the block after all the seams have been sewn (including the seams on all four sides of the block). BB+ adds the seam allowance for you in the printout. - The Seam Allowance is set to the standard quarter-inch (0.25″) that most quilters use. You can type in a new width if you’d like to change the seam allowance. You also have the option to set the seam allowance to a dashed line or a solid line. Or you can turn off the seam allowance altogether.
- Mirroring is ON by default for foundations. Because you stitch your fabric to the opposite side of the printed pattern, you’ll want mirroring on so the block is oriented correctly when finished. Not important for this symmetrical block, but good to be aware of for future blocks.
- Under Printing Options, we’ll use all the default settings.
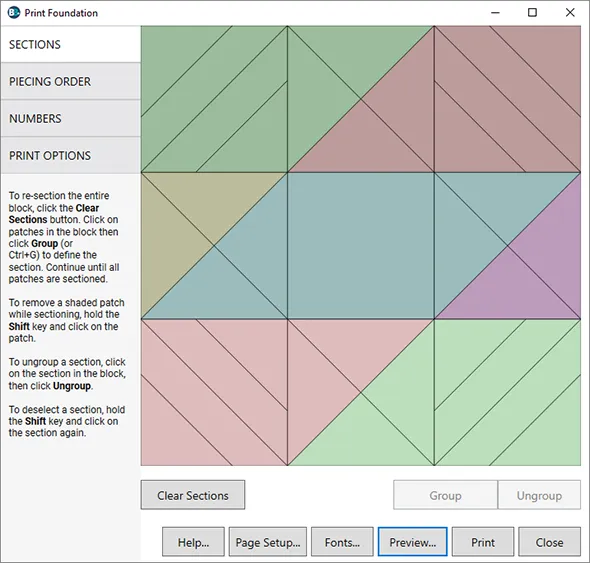
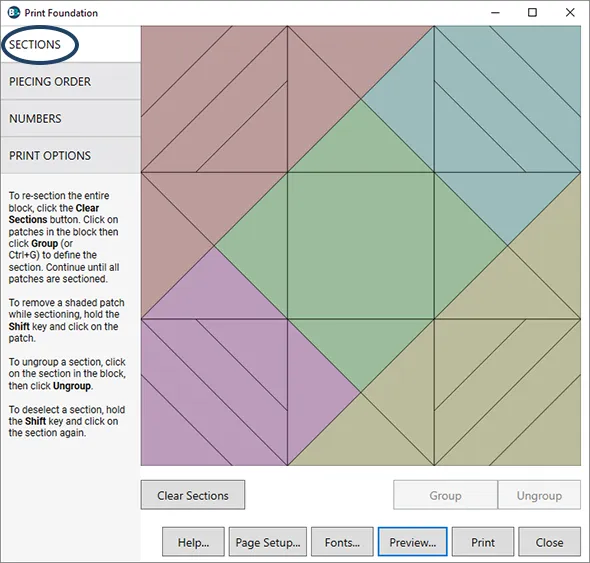
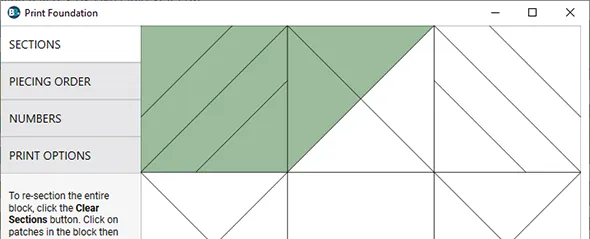
- Click the Sections tab. Each section is defined by a different color, so you can see that this block can be pieced in five sections.

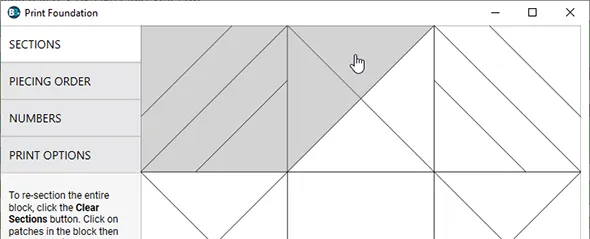
- You can change the way a block is sectioned. To clear all the sections, click the Clear Sections button. All of the patches will turn white.

- To create new sections, click on the patches you’d like in a section and they will turn gray.
- When all the patches that you’d like in a section are gray, click the Group button. Or use the keyboard shortcut Ctrl+G (Windows) or Cmd+G (Mac). The section will turn to a color.

- Continue clicking on patches and grouping them until the entire block has been sectioned. If you accidentally click the wrong patch while sectioning, hold down the Shift key on your keyboard and click on the patch to remove it from the group.
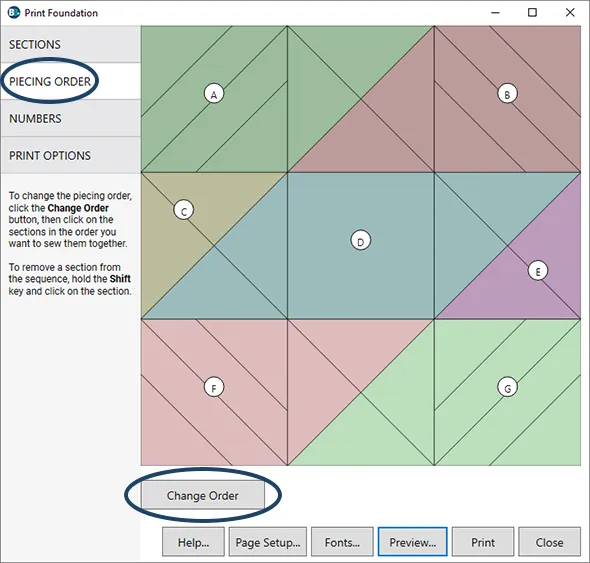
Note: The alternative way I sectioned the block above results in more sections than the original. So I wouldn’t actually want to piece the block this way, but we’re doing this for practice! - Click the Piecing Order tab. The Piecing Order refers to the letters assigned to each section. If you’d like to change the order, click the Change Order button and then click on each section in the order you’d like the letters to appear.

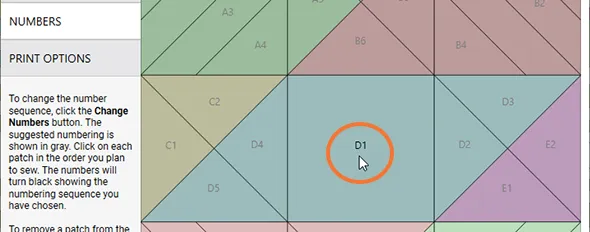
- Click the Numbers tab. The numbers on the patches indicate the sewing order for each section.
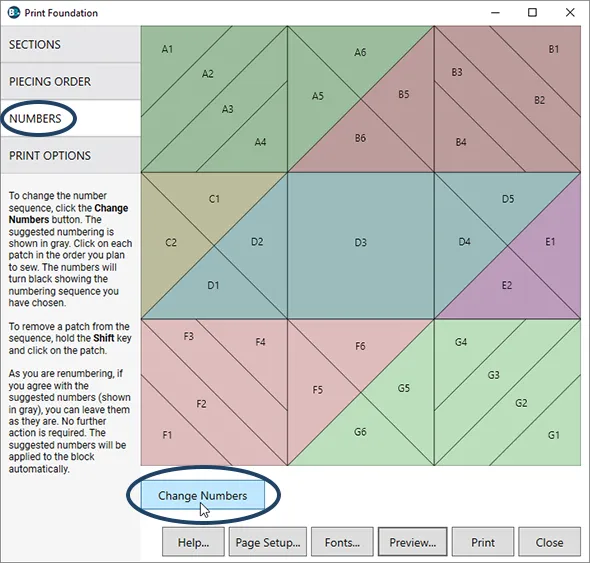
- To change numbers, click the Change Numbers button.
- All of the numbers will turn gray. Click on a patch to start the numbering sequence. The number will turn black and the rest of the patches in that section will renumber to show the suggested numbering. In the illustration below, I clicked on the square patch to start the numbering for the D section in the center, rather than on the left triangle in the section.

- If you agree with the numbers appearing in gray, no further action is needed. Or, you can continue clicking on all the patches in the order you plan to sew them until all the numbers are black. If you accidentally click the wrong patch while numbering, hold down the Shift key on your keyboard and click on the patch to remove it from the sequence.
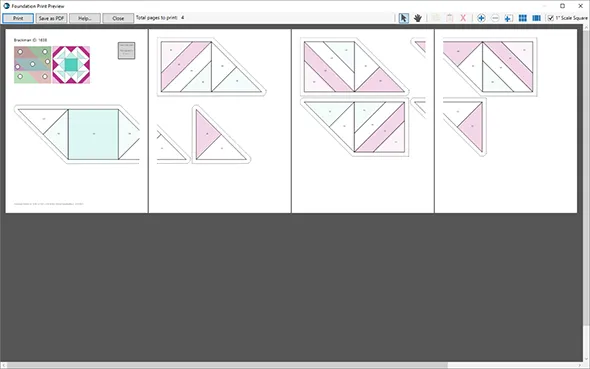
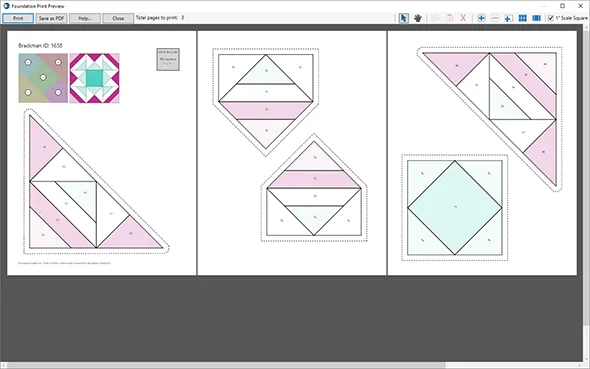
- Now that we’ve experimented with sectioning and numbering the block ourselves, let’s take a look at the printout. Click the Preview button.

- On the Print Preview screen, you can see how the changes we made on the Sections, Piecing Order, and Numbers tabs affect the foundation printout.
- If you like the way you’ve re-sectioned and re-numbered this block, you can move the sections on the pages and print. I prefer the originally sectioning for the block, so the next few steps will reset the block to the original sectioning before printing.
- Click the Close button in the Print Preview.
- Click the Close button in the Print Foundation window.
- With the 1638 block still selected in the Block Viewer, click Print > Foundation Pattern again.
- On the Print Options tab, double-check your settings. I’m making the default block size, so I can leave the settings as they are. If you’re making the block a different size, be sure to change the size again.
- Click the Preview button.
- On the Print Preview screen, you’ll see the block is back to the original five sections. Make sure there is a check in the 1″ Scale Square box.
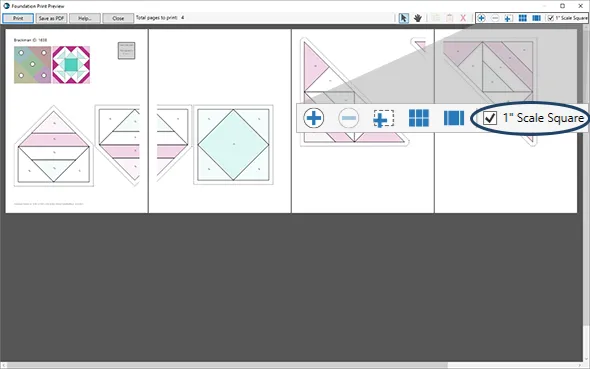
- You can move and rotate sections in the print preview, just like we did with the templates for Block 2.

- When you have the foundations arranged the way you’d like, you can click the Print button. If you don’t want to print right now, click the Close button.
- After printing or closing, click the Close button in the Print Foundation window.
- Remember that we’re adding all of our Sew Along blocks to the Favorites view. With block 1638 still selected in the block viewer, click Add to Favorites in the Block toolbar.

- At the top of the Navigation panel, click the Favorites button.
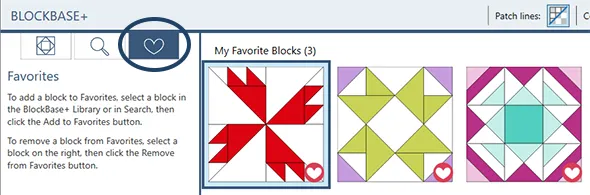
- Now you’ll see our three Sew Along blocks in the Favorites view. If you want to come back later and print a different type of printout for this block, you can quickly find it here in the Favorites.
- If you’re done working in BlockBase+, you can close the program by clicking the X at the top or clicking File > Quit BlockBase+.


Notes Before You Start Sewing:
- You can make the block any size you like.
- You can be creative in your coloring of the block. Just keep the seams/patches in the same orientation as the BB+ block.
- I showed you how to print the foundations for the block. But I realize that most quilters would prefer to use the rotary cutting chart for these easy-to-cut patches. The purpose of this lesson was to show you how to use the Foundation printout options. If you’d prefer to piece the block using a different technique (rotary cutting chart or templaetes), feel free to print those patterns instead. For help with other types of printouts, visit our support site.
- There will be a new post here on the blog on Friday, May 7 where you can post a photo of your sewn block.
Comments
Let’s get to know each other in the comments! I love reading everyone’s comments (even if I can’t respond to every comment!). I hope you all enjoy getting to know each other this way too. Here’s my question for this post–
Here at EQ, we’re making plans for our fall EQ Academy classes, which has me thinking– What’s your favorite quilting class that you’ve attended (in-person, or online)? I’ll start–
If I’m at a quilt show, I’m probably working, so I don’t have the chance to attend many in-person classes. My absolute favorite online classes were all the Craftsy free motion quilting classes taught by Christina Cameli. I love her style and find watching her free motion quilt so relaxing!
Block 3 Video
The steps in the video are the same as the steps listed above. So you can follow the written steps above, or watch the video lesson for Block 3.


04-26-2021
12:18 pm
In Covid 2020 “stay at home”, I have learned and expanded my skillset through online quilting videos–more in this last year than all of my 20+ previous years! The kindness and generosity of the world quilting community sharing their knowledge to all, well I’m grateful and indebted.
It’s hard to pick from the many, but I’d have to say that the Cindy Needham Craftsy online class and her freebies through The Quilt Show and You tube are in the top. Along with all the Karen Brown short videos on “Just Get It Done Quilts”. Also have to add all the truly informative quilting and quilt history interviews/podcasts done by individuals, museums, quilting organizations. All I can say is WOW.
04-26-2021
2:22 pm
We’ve all gotten a lot more comfortable watching classes online this past year, haven’t we? I will have to check these out
04-26-2021
2:00 pm
I love indulging in “Over the top” technique classes at quilt shows. Bethanne Nemesh’s insane binding treatments, Margaret Solomon Gunn’s intense background fillers. It’s like a runway show in Paris. Things that I may never do in real life, but picking an idea here or a portion of a technique there helps me kick my quilting and my customer quilting up another notch.
04-26-2021
2:24 pm
I love the analogy of a Paris runway show. What a great way to think of those advanced techniques!
04-26-2021
2:37 pm
This and is such a great way to learn this wonderful tool! I’m having so much fun checking out everyone’s blocks. Such diversity and amazing color combinations…certainly expanding my color awareness!
04-26-2021
3:51 pm
Hello from Vero Beach Florida! I have a BB+ question. Is there a way to add Block Details to the printed version of a Foundation pattern? I only see the details on the rotary cutting option.
To answer your query: Just before CoVid I attended AQS Quilt show in Daytona Florida. I took 2 classes with Susan Cleveland. One a workshop and one a lecture. I learned so much and proceeded to add many timesaving and ‘daily used’ quilting tools and notions to my sewing haven. Susan was an extremely fun and energetic presenter!
04-27-2021
10:27 am
The Block Details are only available on the Rotary Cutting printout. If you’d like, you could print both the foundation and the rotary cutting chart for a block.
I’m glad you enjoyed your classes with Susan!
04-26-2021
4:40 pm
I have a bit of trouble in classes so I have not taken many. But during Covid I have made it a point to learn more about EQ8. I have enjoyed doing some activities that Kari Schell has sponsored and these classes. The thing that I enjoy most is that information is given in small doses and you have time to try each thing. I have also purchased some of the books put out by EQ8 and found them to be helpful. I guess that I learn best on my own. When I have attended classes I have loved getting to know the people. I love my quilt group and each time we meet we have a brief demo. I like people but I guess I need to process on my own. TMI Becky Chapman
04-27-2021
10:31 am
I totally get that! I like to work through info at my own pace too. Everyone learns a little differently.
04-26-2021
4:48 pm
Gotta add another free online class series: 25 Days to Better Machine Quilting by Lori Kennedy. Truly, working through her series has provided me with a skill set and confidence level to free motion quilt my quilts on my domestic machine! I now have paper art tablets full of doodle quilt designs of my own & have gotten quite good at cursive quilt writing on my quilts. It’s FUN!
04-26-2021
5:31 pm
The last class I took was with Sew Steady using their rulers for free motion quilting (at the 2020 Road to CA show). It was fun but one day is not enough…
Jenny- is your final quilt layout going to use all default-sized blocks? Thanks, Susan
04-27-2021
10:35 am
Yes, my quilt will use the default sizes for all the blocks. And the sew along blocks will be a mix of different sizes. But don’t feel like you have to make the blocks the same size as me! I encourage everyone to make the blocks whatever size they like and be creative in how they use the blocks in a quilt.
I will post the piecing diagram for the quilt I make towards the end of the sew along, for anyone who would like to use it.
04-26-2021
7:26 pm
My favorite class was a year long once a month class called “Stitcher’s Garden.” We learned how to do a plethora of techniques (couching, appliqué, machine embroidery, etc.) plus how to use many of our machines’ presser feet. However, for an EQ8 class, I would love to see a paper piecing class that starts with the basics and moves at least to middle range.
04-27-2021
10:40 am
If you’re able to attend one of our EQ Academy workshops in Ohio, I teach a foundation piecing class.
Here are a couple of foundation lessons on the blog:
https://doyoueq.com/blog/2018/10/design-discover-drawing-foundation-blocks/
https://doyoueq.com/blog/2020/11/design-discover-foundation-piecing-from-a-photo-applique-pieces/
04-26-2021
9:56 pm
I have been following along and printing out blocks 1, 2 and 3, I have read them over and gone through all the steps in all 3 so far. I can’t make any of the blocks as we had a flood in our house and everything I need is currently in storage while they repair out kitchen and one of two bedrooms. Therefore I have no access to my sewing/quilting stuff nor anywhere to work on it. As soo as I can, I will be catching up and will post as I can. Thank you for your understanding.
I am thoroughly enjoying this sew-along as a great distraction to all that is going on here AND all the fun it is to learn more about BB+!
04-27-2021
10:42 am
So sorry to hear about your flood! Hopefully the repairs go quickly for you.
I look forward to seeing your blocks, whenever you have the chance to get back to your sewing machine!
04-27-2021
11:10 am
I took a Borders Class in Dickenson Texas,(Pinwheels & Posies) Taught by Winnie Flemming This class really elevated by precision and math skills. (LOL) or at least my understanding of how to get there. I still go to my math wiz husband and son when it really gets complicated.
I also took a rulers class for my longarm at Jo’s Quilting in Richmond.
04-27-2021
12:03 pm
My tip on printing the foundation pattern: for bigger size blocks, I like to use Carol Doak’s Legal-Size Foundation Paper. For this block, I could fit all the pieces plus the key block on 2 sheets of paper.
04-27-2021
12:17 pm
P.S. I forgot to mention that before looking at the preview from the Print Foundation screen, you must open Page Setup (2 buttons to the left of the Preview button) and change the paper size to Legal. Then BB+ Preview will beautifully show a Legal size view of the printable pages!
04-27-2021
5:02 pm
I attended a Quilting with rulers class with Angela Walters at my local quilt shop prior to Covid and was so inspired that I immediately went home and quilted an 83″ square quilt on my home sewing machine. It looks fabulous on my stair wall. Since then I have acquired a gently loved Handi Quilter 16 and I am now quilting every thing. I also love watching Christina Cameli on Craftsy. Jenny Doan at Missouri Star is always fun and for extra inspiration I like to sit in front of You Tube with a cup of tea and a cookie and watch Adria Good work her magic on her Longarm. AND NOW – I just learned that I will never have to tape my paper piece foundations because they printed across two pages, I can RE- ARRANGE THEM!! Thank you Jenny – you are my new favorite quilt instructor
04-28-2021
11:52 am
Ha! I’m glad you’re learning new things in the sew along!
04-29-2021
8:47 am
While working with another Blockbase block, I have discovered that I prefer the improvements that BlockBase + has made to Foundation pattern piecing printouts – better than what I could do with EQ8 on the same pattern – I was able to fit more on one page to print out.
Still trying to finish quilts and stay focussed (a problem this year) but I took a Drunkard’s path class from Papper Saxten and it was very well taught.
04-30-2021
2:46 am
I have taken a number of workshops with Katie Pasquini Masopust. She is so creative and constantly reinventing her quilting style. Now I must admit that I have never actually finished any of these workshop projects but I do think about them often and about what I aspire to be someday.
As Program Chair for my guild, this past year I have scheduled several virtual workshops via Zoom. How fun to be able to actually participate rather than just running the show.
05-01-2021
9:53 am
For the past two years I’ve been undertaking the UK City and Guilds’ certificate in patchwork and quilting. It started as a face-to-face course meeting monthly for a ‘weekend school’ but from March 2020 we became an on-line group. I’ve just completed the course and I really enjoyed it. There were two main elements, ‘design’ and ‘craft’, so I’ve leaned about colour, dyeing, pattern and composition as well as stretching my sewing skills with new techniques and having to make things outside my usual sphere. We had to make five items for assessment (as well as having a design sketchbook and samples portfolio) an item of interior design, an accessory, a wall hanging, a 3D container and “a quilt” which could be anything. It’s been good fun. I’m taking the C&G diploma now!
05-02-2021
9:33 pm
I have sewn since joining 4-H and making my first quilt at the age of 15. I would have to say my favorite sewing class would be the ones taught by my Mom and grandma. In my old years I enjoy all that craftsy offers. I have watched classes that I had no idea I would like. There just isn’t enough time in the day to get everything done.
05-23-2021
10:20 am
Just before everything shut down last March, I was able to attend a couple of in-person Helen Godden classes. She’s amazingly talented and funny, too.