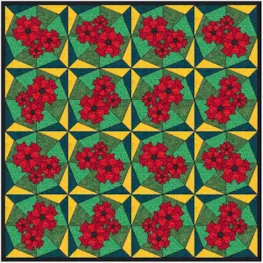
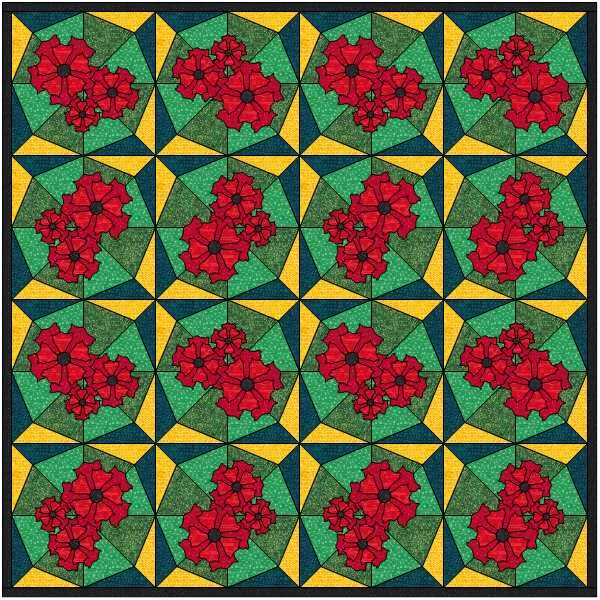
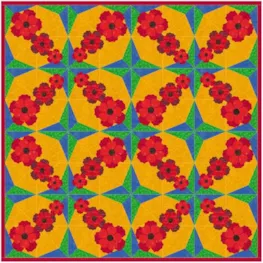
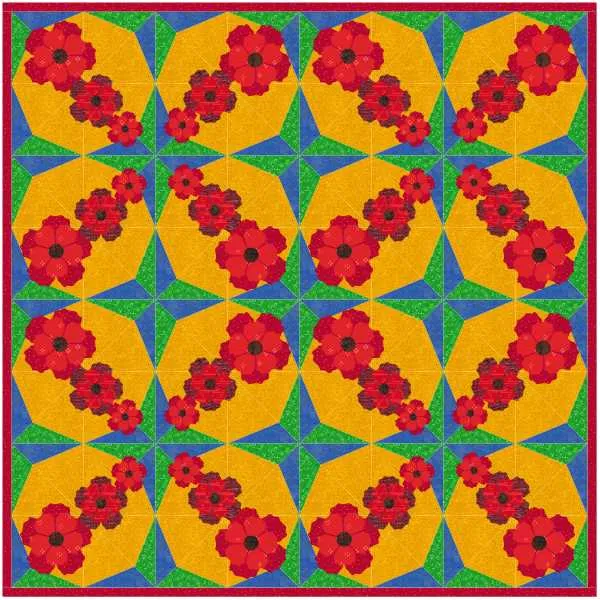
Welcome to Design and Sew Along 3–Lesson Two. I hope you liked the blocks we created in lesson one. We will continue to create more 16 inch blocks to help us celebrate the seasons and the holidays that fall into the season. We will continue with late Fall designs into the early Winter designs in lesson two. I strongly suggest you watch the video first, at the bottom of this blog page to understand what steps we will be taking to create our lesson blocks.
OPEN EXISTING PROJECT FILE AND CLEAN UP THE SKETCHBOOK
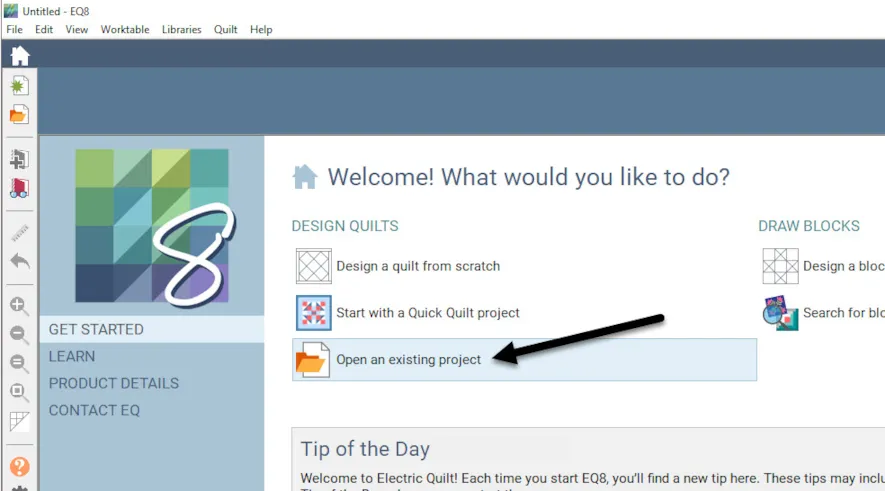
1. Click onto the EQ8 icon  on your desktop to launch the program.
2. On the opening screen, click on the ‘open an existing project’ in the center of the screen.
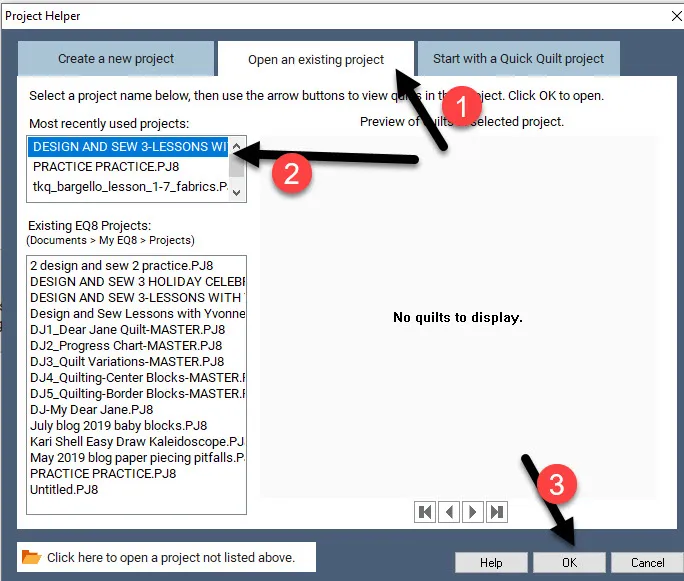
3. On the screen, click on the Design and Sew Along 3 project name to select it and then click on the OK at the bottom of the box.
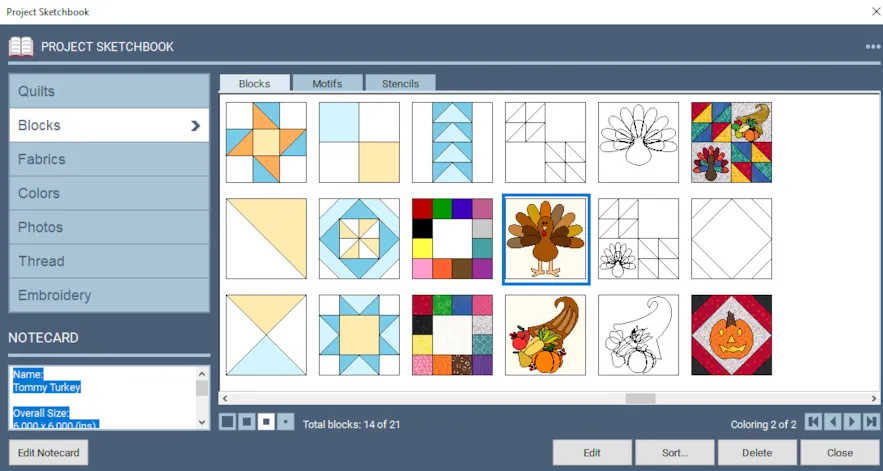
4. The project will open with the project sketchbook on the screen. The sketchbook will open to the blocks we designed in the previous lesson.
As we drew our blocks, we saved both the drawing and the final color layout of the block. It is always good to save the blocks as you draw each step. This is important because if the program closes unexpectantly for some reason, you will not have to redraw your entire block. You can simply open the program and edit the design to the worktable and continue with your drawing. Once we have completed our blocks and colored them, all the elements of the block are included in the final design.
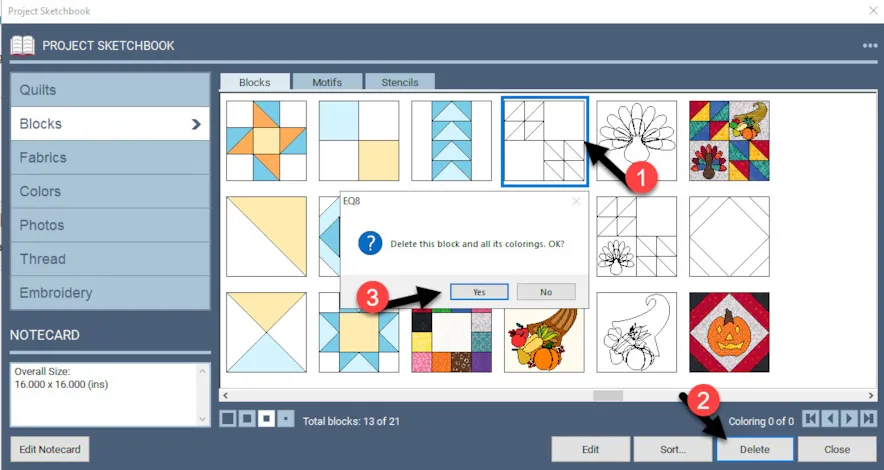
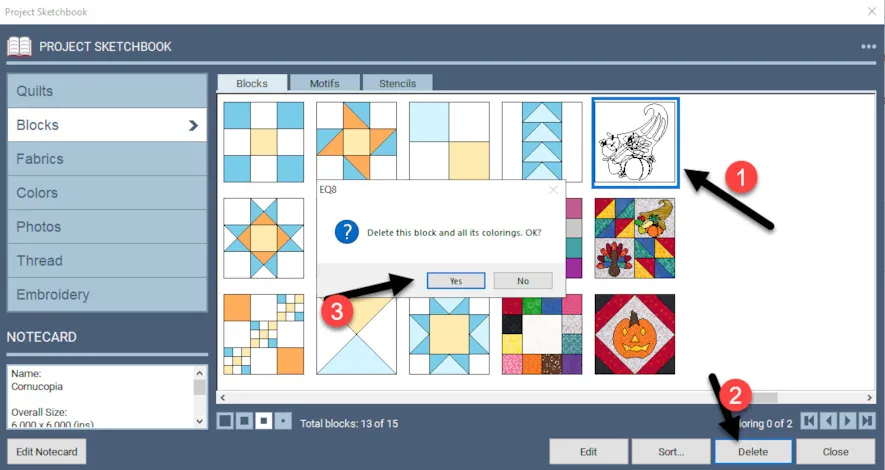
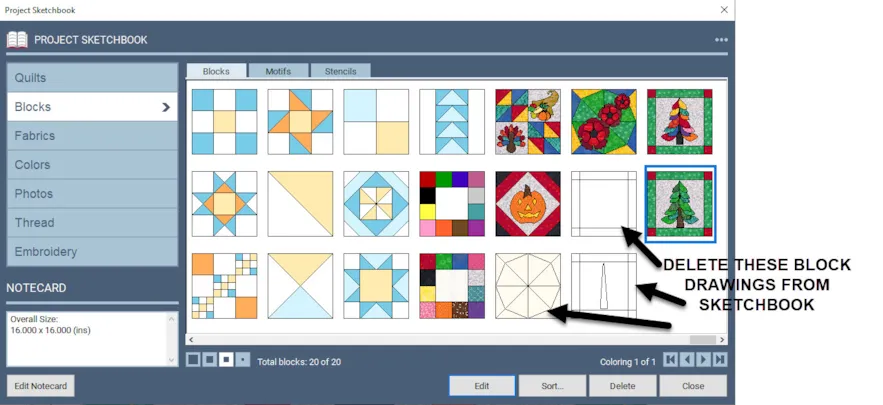
5. Click on each of the line drawings of the blocks and then click on the ‘delete’ at the bottom of the sketchbook to delete the line drawing. When you click on the ‘delete’ another box opens and asks you to confirm you want to delete this. Click on the ‘yes’ in the confirmation box.
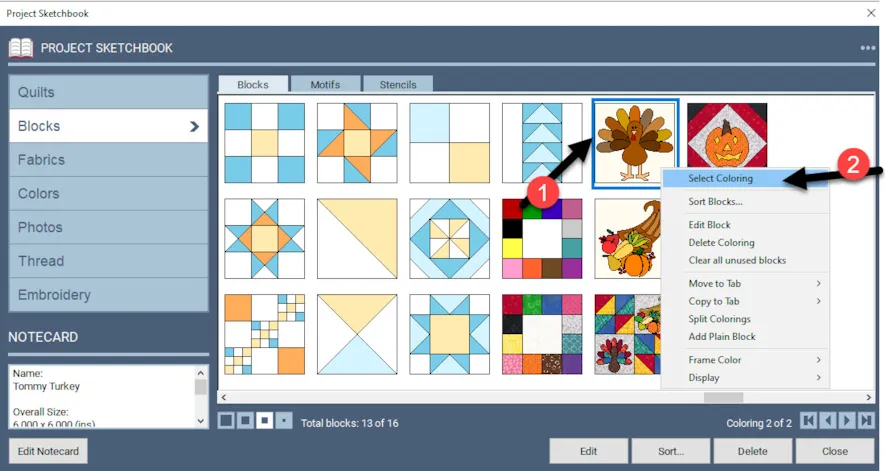
6. The turkey and the cornucopia were built in blocks in the EQ8 program. Each of those blocks has a line drawing, a grayscale coloring, and a final coloring associated with them. Click on the turkey design and then right click>select coloring.
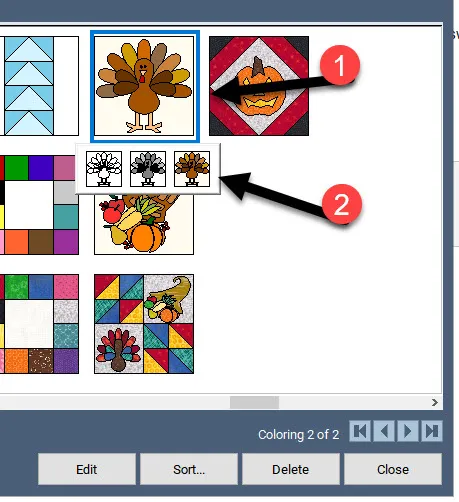
Once you have the select coloring options you will see three little boxes under the turkey design that shows the line drawing, the grayscale, and the final coloring of the block.
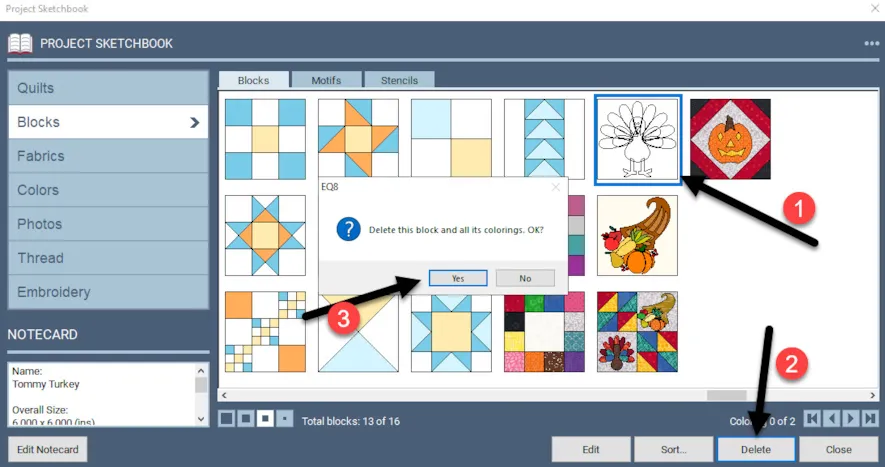
7. Click on the little line drawing option of the turkey. The image in the sketchbook now only shows the line drawing. With the line drawing selected, click on the ‘delete’ at the bottom of the sketchbook. Confirm the removal of the design by clicking on the ‘yes’ in the confirmation box.
8. Repeat this same process with the cornucopia block.
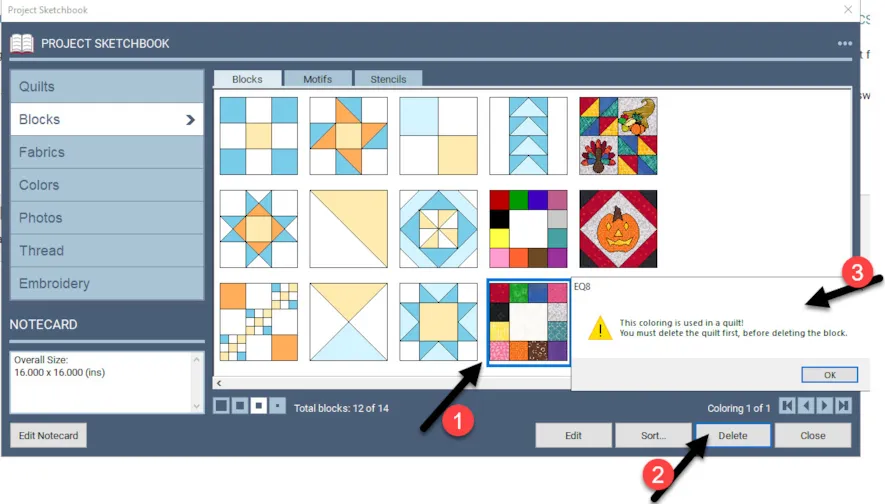
9. We used both the solid color block and the printed fabric blocks in a quilt layout to add the center stencils. We can not delete a block that is in a quilt layout. You would need to delete the quilt before you can delete the block. I want to save the quilt layout with the stencil so we will not delete these blocks from the sketchbook. Click OK to close the warning box.
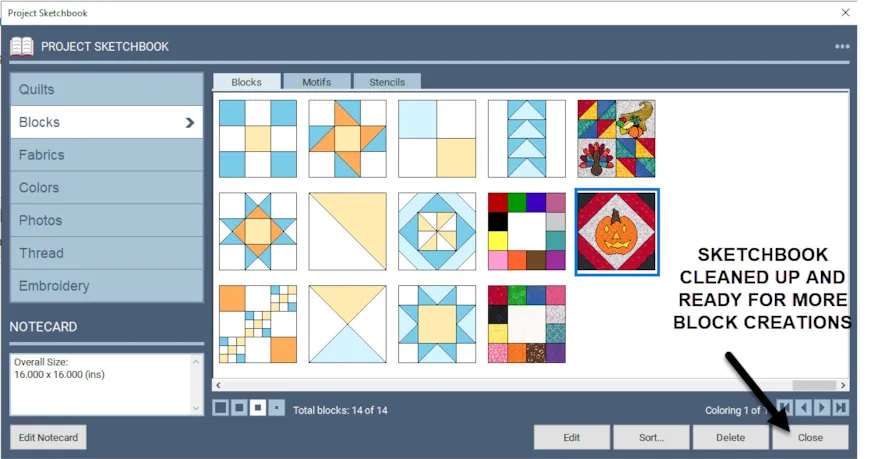
10. Now that the sketchbook is cleaned up with all the parts drawings of the blocks, we can close the sketchbook to begin our new lesson.
REMEMBERANCE DAY
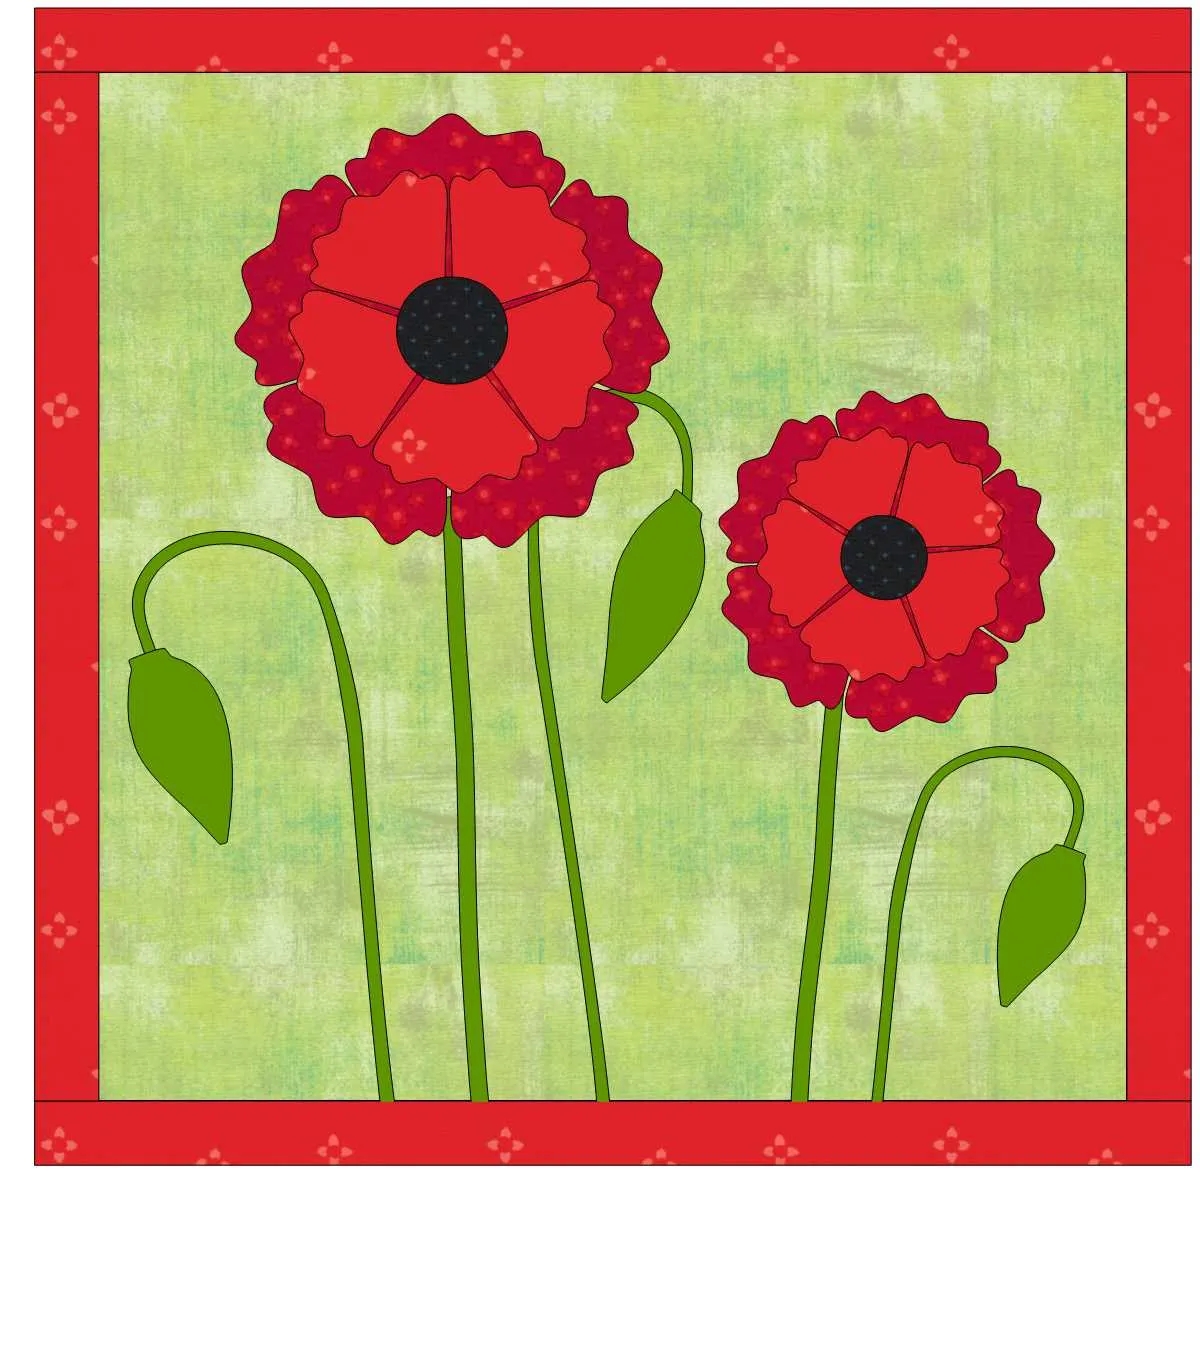
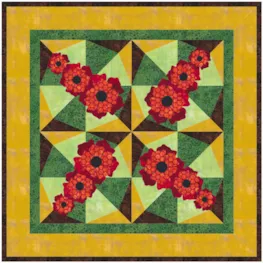
Depending on where you live, different countries may call Rememberance day by a different name. Veterans day is sometimes used to describe Remembrance day in the USA. In England, they refer to Rememberance day as Armistice Day. All of the days are celebrated on November 11 in memory of the WWI veterans who lost their lives in battle. It is celebrated internationally with the poppy flower as a symbol of that date.
1. Click on the block worktable icon on the upper right side of the screen. Click on the NEW BLOCK tab>Pieced and Applique>Poly and Applique
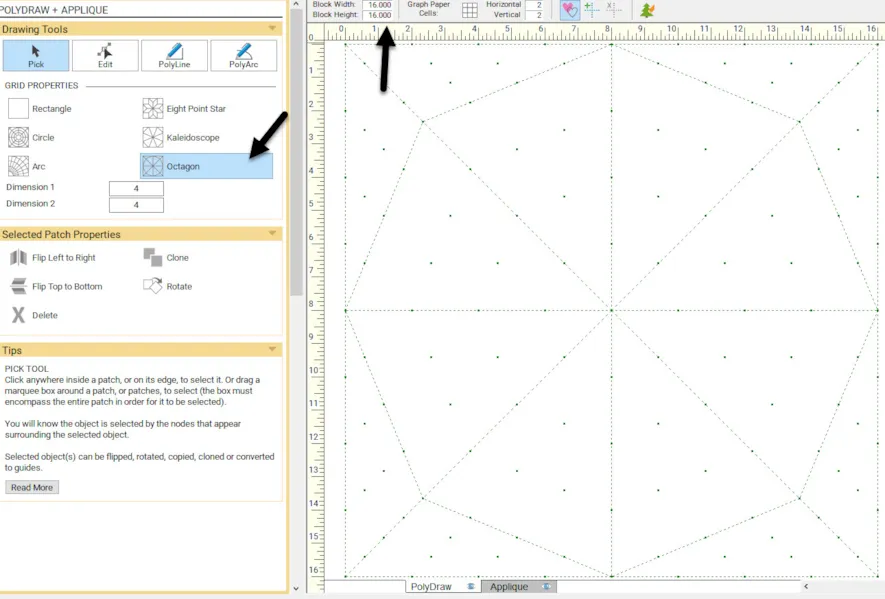
2. Click on the octagon image to select it. The block size should still be 16 inches square.
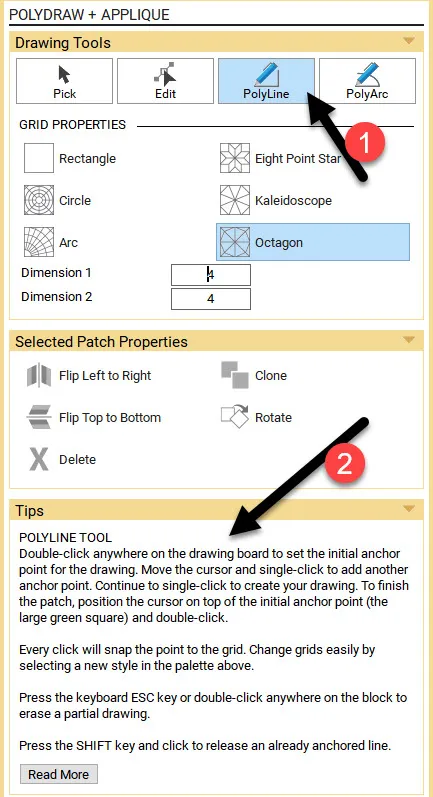
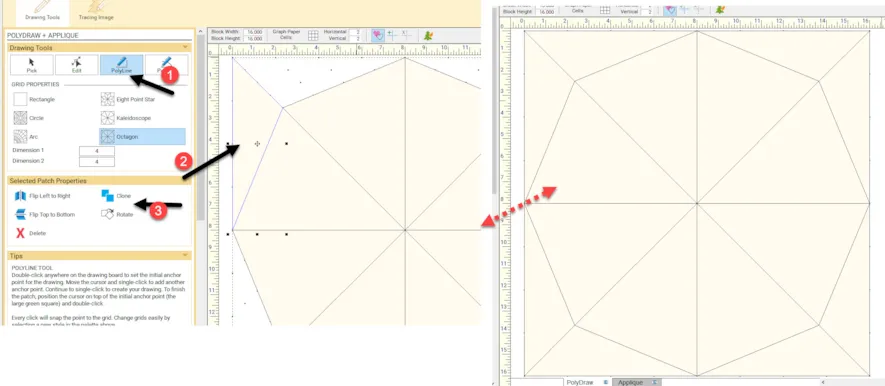
3. Click on the polyline drawing tool icon ![]() to select it.
to select it.
In the draw tools box, once you select your tool of choice there will be tips listed at the bottom of the box on how to use the tool properly.
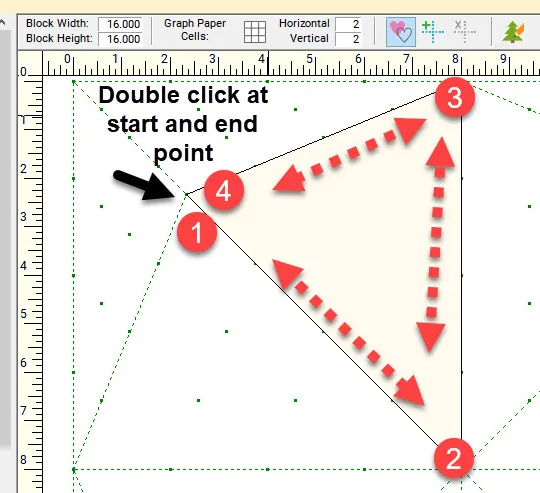
4. Move the cursor over to the drawing table and double click on one corner of a triangle to anchor the line. Move the mouse from corner point to corner point clicking once at each point. When you return to the initial point, double click the mouse again to release the drawing tool.
When drawn correctly the nodes will close the patch and it will fill with a cream color to show the patch is complete.
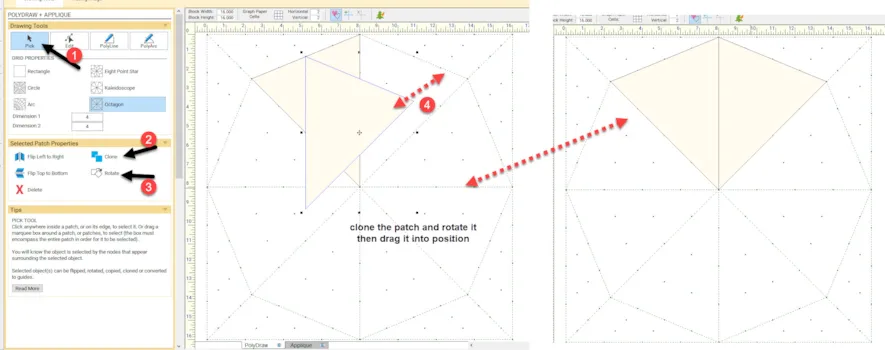
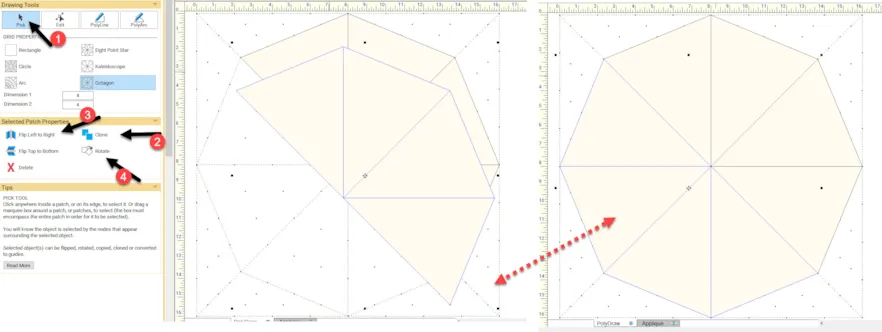
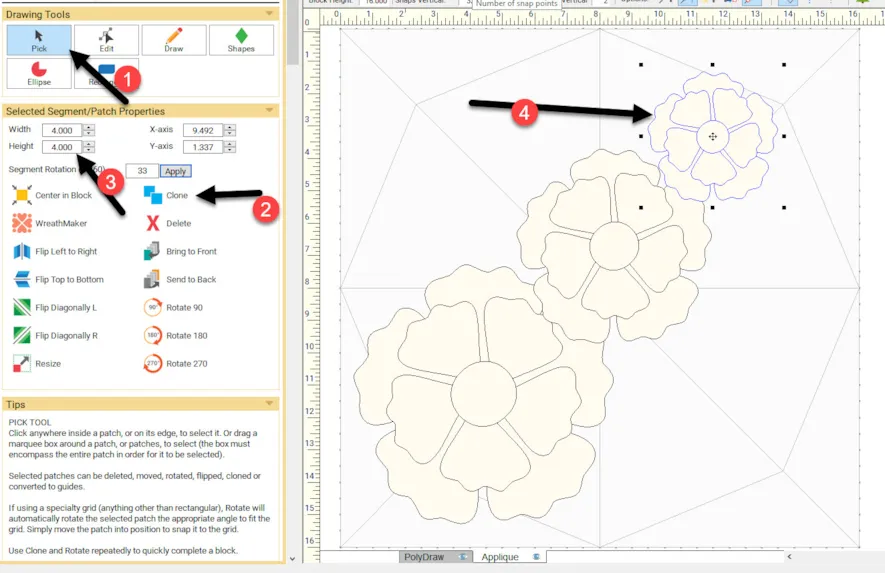
5. Click on the pick tool icon ![]() to select it. Click on the patch to select it. Once it is selected click on ‘clone’ in the toolbox at the left. Once it is cloned, click on the rotate icon in the box to rotate the new patch to the right. Click/hold/drag/release the patch into the adjacent triangle location.
to select it. Click on the patch to select it. Once it is selected click on ‘clone’ in the toolbox at the left. Once it is cloned, click on the rotate icon in the box to rotate the new patch to the right. Click/hold/drag/release the patch into the adjacent triangle location.
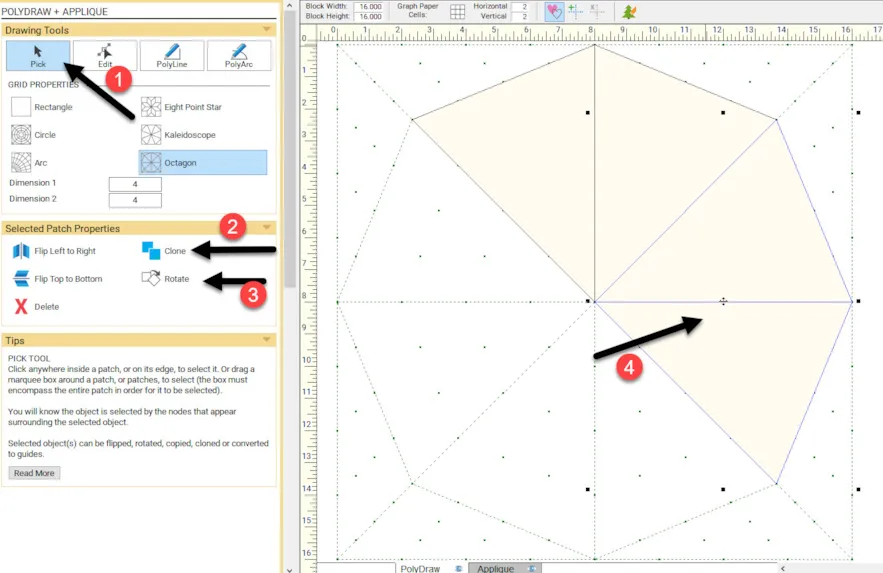
6. Click on control +A on your keyboard to select both of the triangle shapes together. Once they are both selected, click on the rotate icon two times ![]() to rotate it to the correct angle. Using the pick tool
to rotate it to the correct angle. Using the pick tool ![]() click on the center crosshairs and click/hold/drag/release the double pieces to the correct position.
click on the center crosshairs and click/hold/drag/release the double pieces to the correct position.
7. Using this same technique, hold down the shift key while you select all four segments with the pick tool.![]() Once selected clone the times and then flip left to right icon
Once selected clone the times and then flip left to right icon ![]() to have it in the correct orientation. Click on the rote icon
to have it in the correct orientation. Click on the rote icon![]() several times to get it to go in the correct direction. Click/hold/drag/release the 4 item design to the proper position to finish filling the octagon shape.
several times to get it to go in the correct direction. Click/hold/drag/release the 4 item design to the proper position to finish filling the octagon shape.
8. Repeat this same process to draw and clone/flip/rotate the corner segments to fill the entire block area. (Watch the video to refresh your memory.)
Add the design to the sketchbook![]()
9. Click on the applique tab at the bottom of the screen. We will be using the shapes tool to create a stylized Poppy flower design.
Click on the shapes icon ![]() to see all the different shapes built into the program.
to see all the different shapes built into the program.
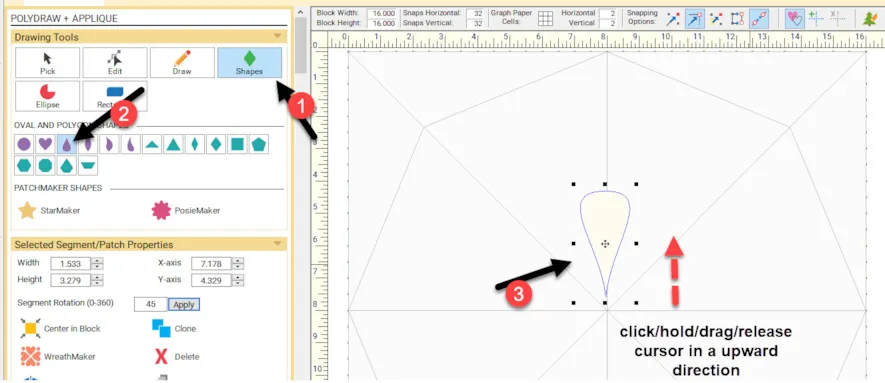
10. Click on the teardrop shape to select it. Move the cursor over to the worktable and click/hold/drag/release the cursor in an upward direction.
We are creating a stylized flower petal for the Poppy flower design so we need to edit the shape a bit.
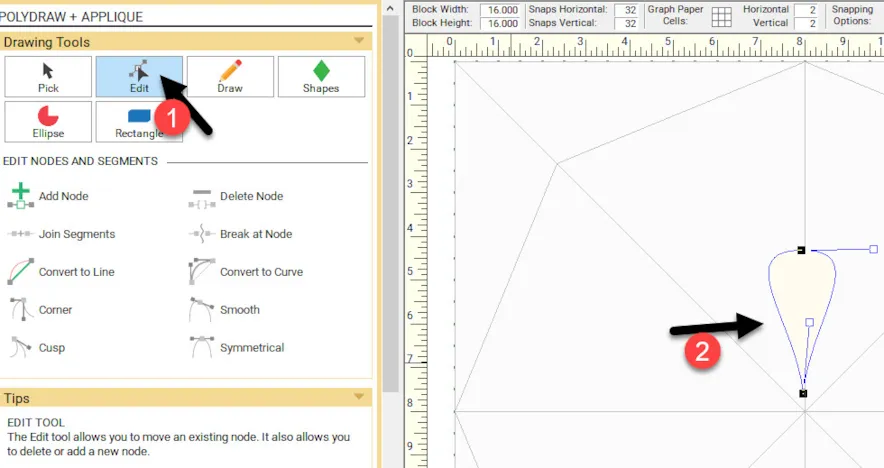
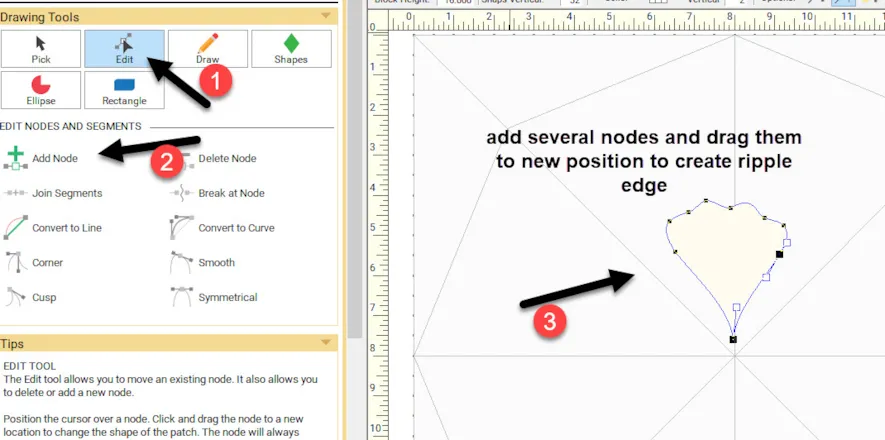
11. Click on the edit tool![]() to select it. Move the cursor over to the worktable and click directly on the edge of the shape to see the edit nodes.
to select it. Move the cursor over to the worktable and click directly on the edge of the shape to see the edit nodes.
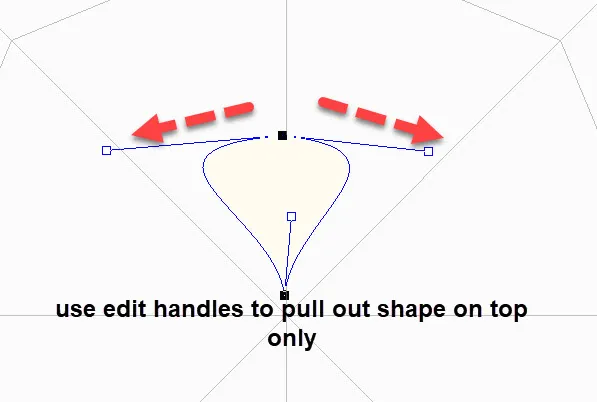
Click on the top node to see edit handles on each side of the node. Click and drag the blue box of the edit handles outwards and slightly downwards to widen the petal design.
Click on the edge of the petal and then click on ADD NODE. ![]() Add several nodes across the top of the petal on both sides of the top center node. Once there are several nodes, click/hold/drag/release each of the nodes to create a bit of a ripple effect on the top edge of the petal.
Add several nodes across the top of the petal on both sides of the top center node. Once there are several nodes, click/hold/drag/release each of the nodes to create a bit of a ripple effect on the top edge of the petal.
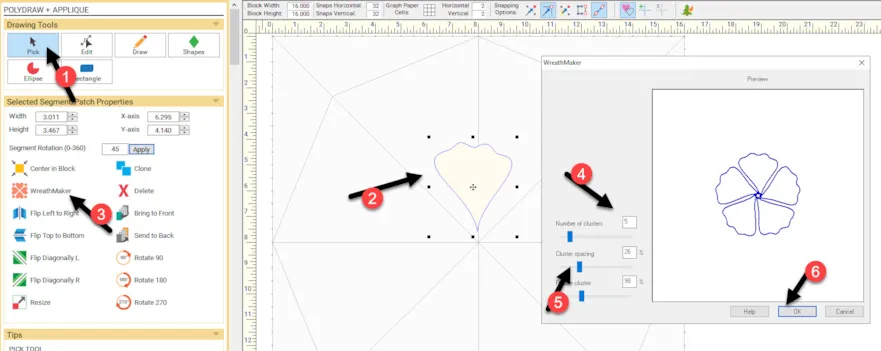
12. Click on the pick tool to select it. Move the cursor over to the petal and click on it. Click on the WreathMaker icon in the drawing tools box on the left side. In the WreathMaker box, set the number of clusters to 5 and then click and drag the slider bar to move the elements close to each other with the center tips touching. Click OK at the bottom of the box.
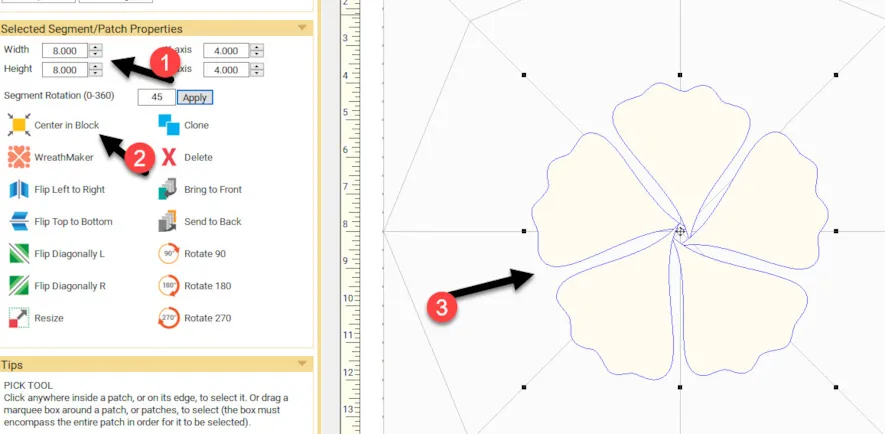
13. With the design on the worktable, set the size to be 8 x 8 inches in the properties box at the left side of the screen. Center the design on the worktable with the center icon.![]()
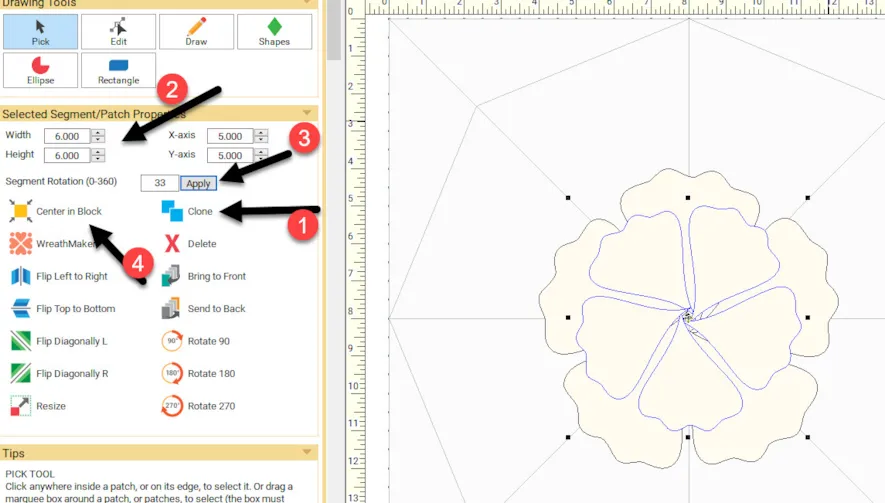
14. With the entire design still selected, click on the clone icon ![]() to make another copy and type in the size to be 6 x 6 inches. Type in the rotation to be 33 degrees and then click apply. Click on the center in the block icon.
to make another copy and type in the size to be 6 x 6 inches. Type in the rotation to be 33 degrees and then click apply. Click on the center in the block icon.![]()
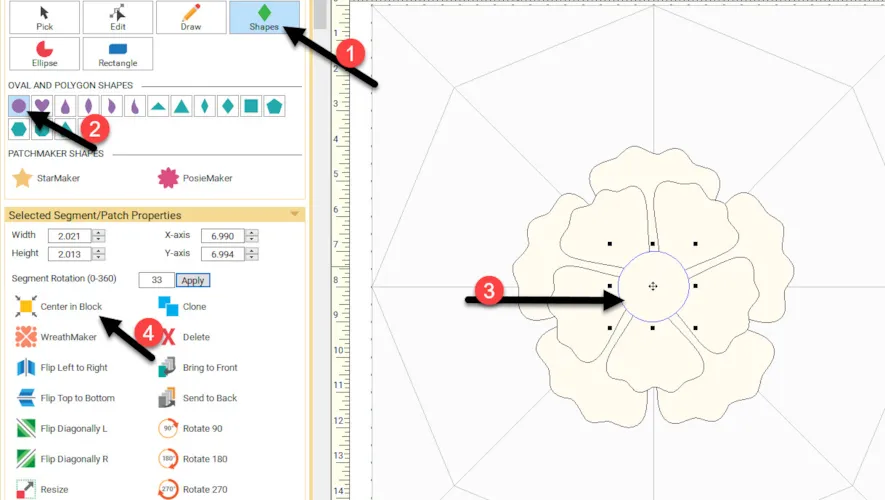
15. Click on the shapes icon![]() and then click on the circle tool to select it. Move the cursor over tot he worktable and while holding down the shift key on the keyboard, click/hold/drag/release a small circle for the center of the flower. By holding the shift key, you will get a perfect circle. Click on the center in the block icon.
and then click on the circle tool to select it. Move the cursor over tot he worktable and while holding down the shift key on the keyboard, click/hold/drag/release a small circle for the center of the flower. By holding the shift key, you will get a perfect circle. Click on the center in the block icon. ![]()
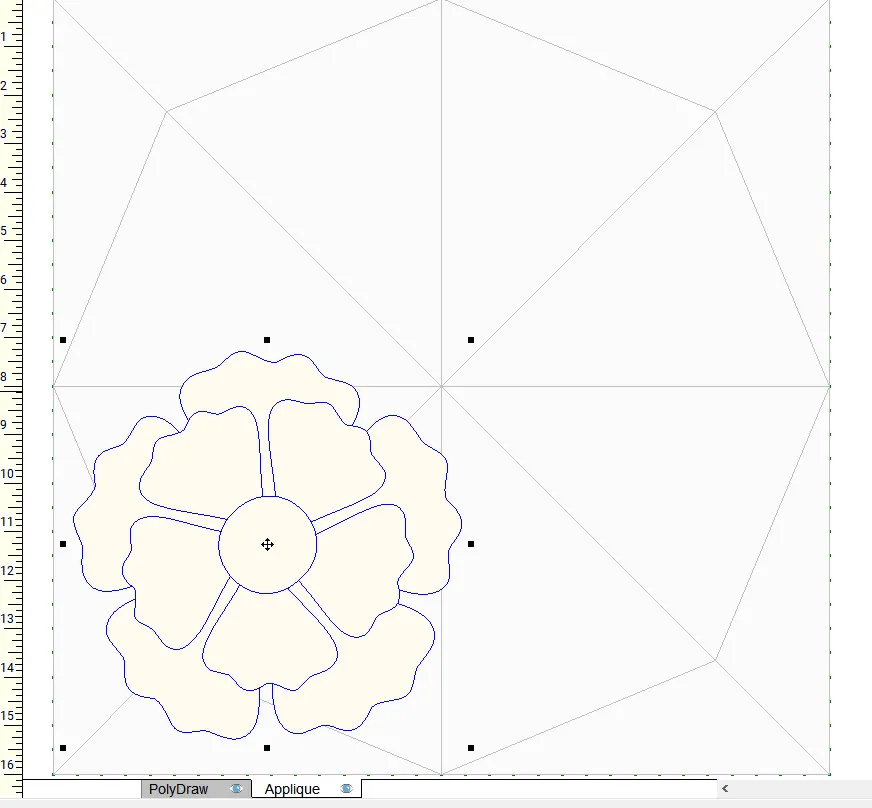
16. On the keyboard, click on the control + A key to select the entire design. Once selected, use the pick tool to click on the center crosshairs of the design and drag it to the lower-left corner of the block worktable.
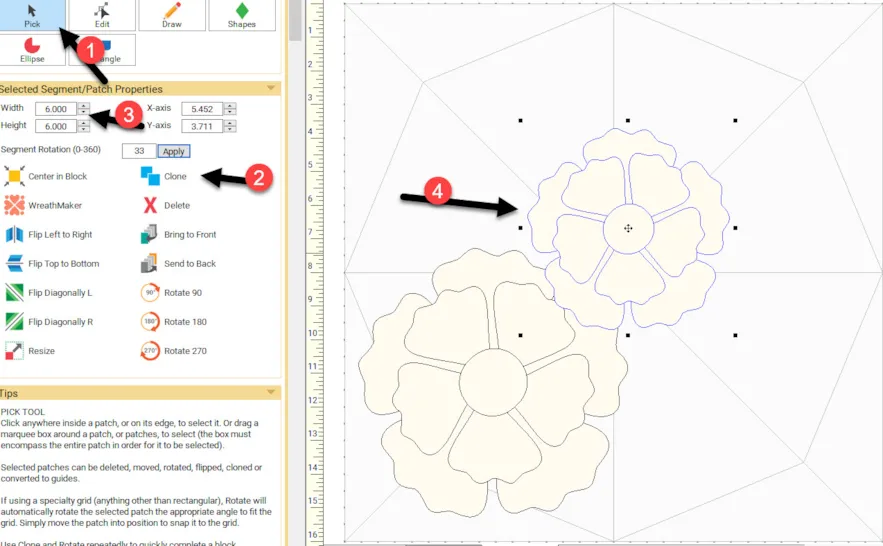
17. While the entire flower is still selected, click on the clone icon and then type in the new size of the flower to be 6 x 6 inches. Click on the center crosshairs and drag the smaller flower to the upper right side of the first flower slightly touching/overlapping the first one.
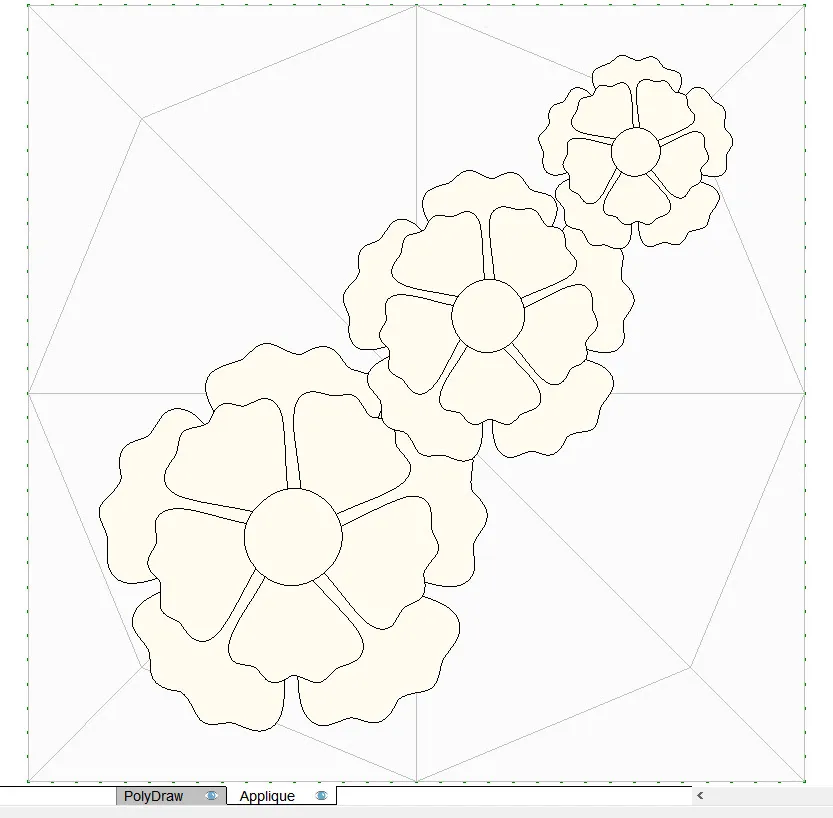
18. Repeat the same process with the smaller flower by cloning it and making it 4 x 4 inches. Move it to the upper right corner of the block.
19. The three flowers may not be exactly centered in the block. Click on control +A on your keyboard to select all three flowers and then click on the center in the block icon ![]() to center the entire design layout.
to center the entire design layout.
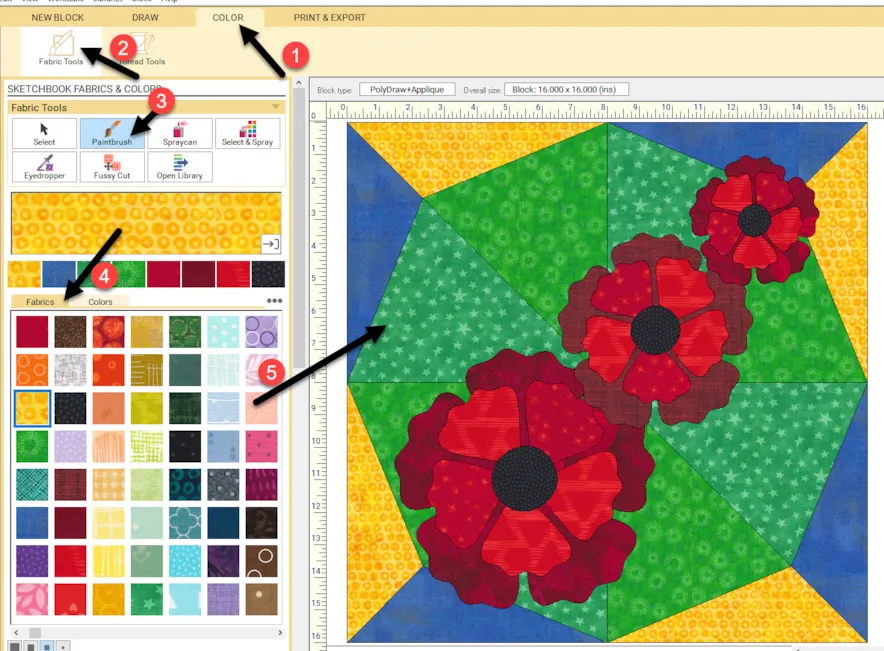
20. Click on the color tab at the top of the screen. Using the fabric tools ![]() and the paintbrush,
and the paintbrush, click on a fabric color and then click on the worktable to color the block with fabric colors we set at the beginning of the fabric palette to match the fabrics of the blocks from lesson one.
CHRISTMAS
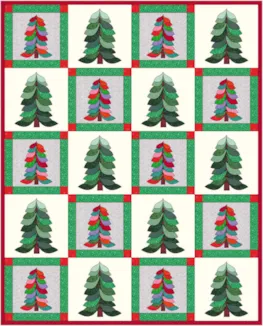
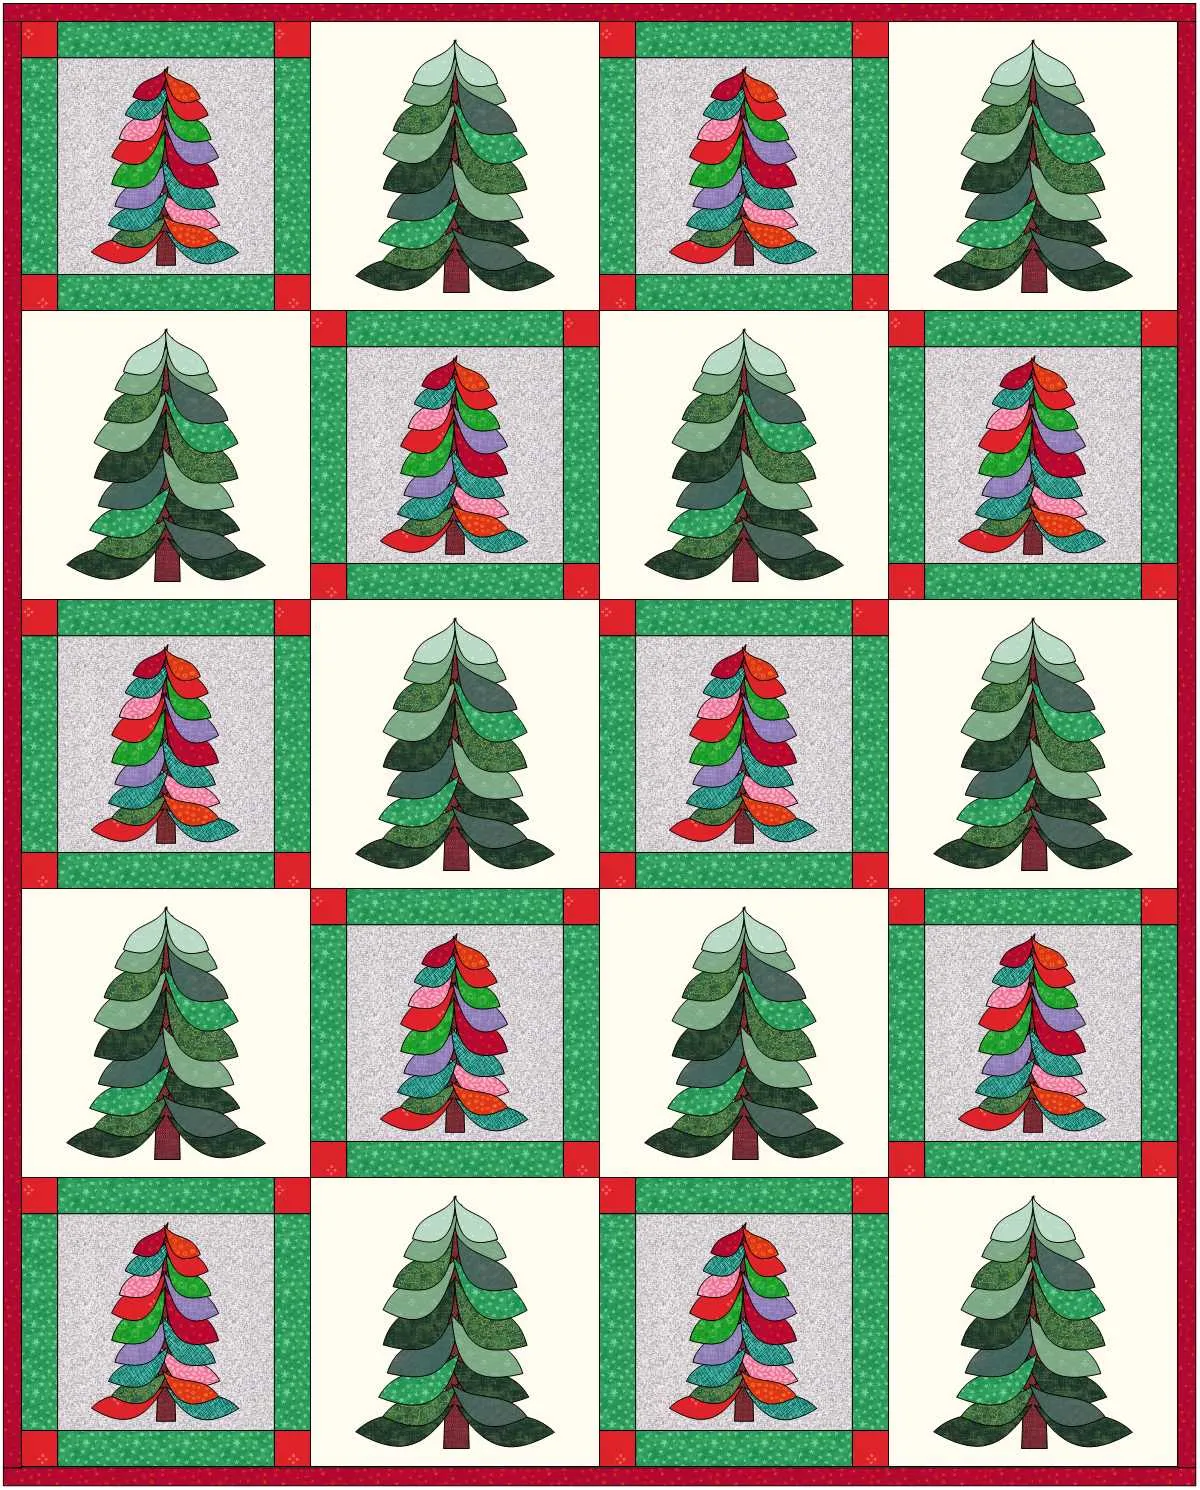
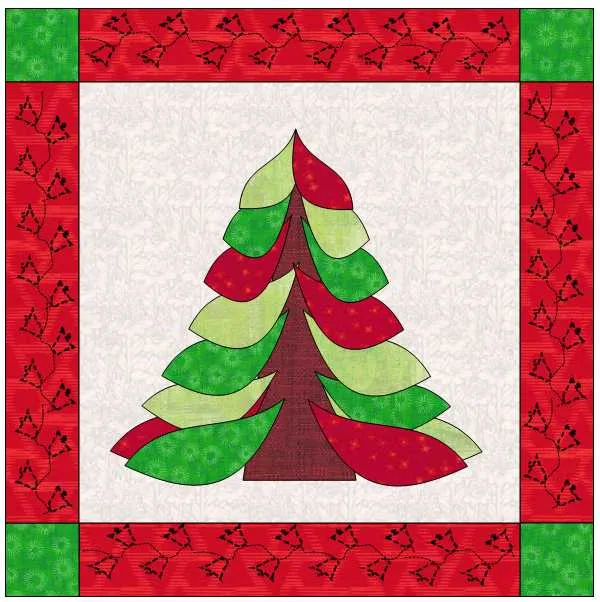
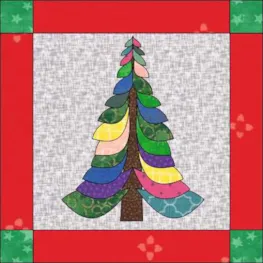
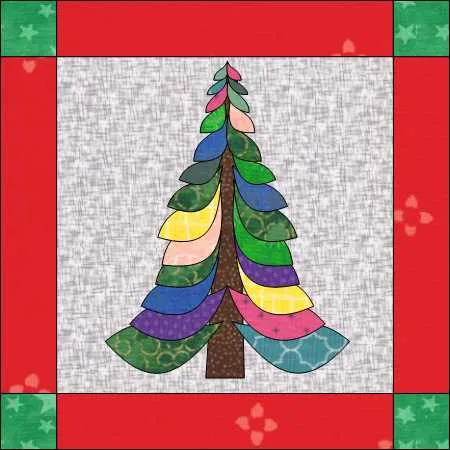
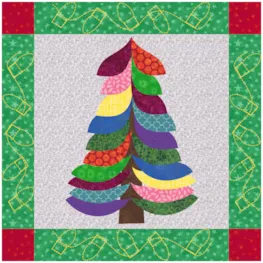
As soon as back to school starts, Halloween candies are already in the stores. In my local stores, the Christmas decorations are already making an appearance next to the Halloween candies and it is only the second week of September!! Retail pushes the seasons on us earlier and earlier. Whether you celebrate Christmas at all, or as a religious holiday, or as a secular holiday, this time of year seems to bring out the Christmas decorations. Keeping this in mind, we will create a block that has a stylized ‘Christmas’ tree. If you create it all in greens like an evergreen tree, it is just simply a tree. You will choose how or if you want to make it look like a ‘Christmas’ tree.
1. Click on the block worktable icon![]() on the upper right side of the screen. At the top of the screen click on NEW BLOCK>Pieced and Applique>Easy and Applique.
on the upper right side of the screen. At the top of the screen click on NEW BLOCK>Pieced and Applique>Easy and Applique.
2. The block worktable should still have the 16 x 16-inch block size setting with the 32 x 32 snaps option.
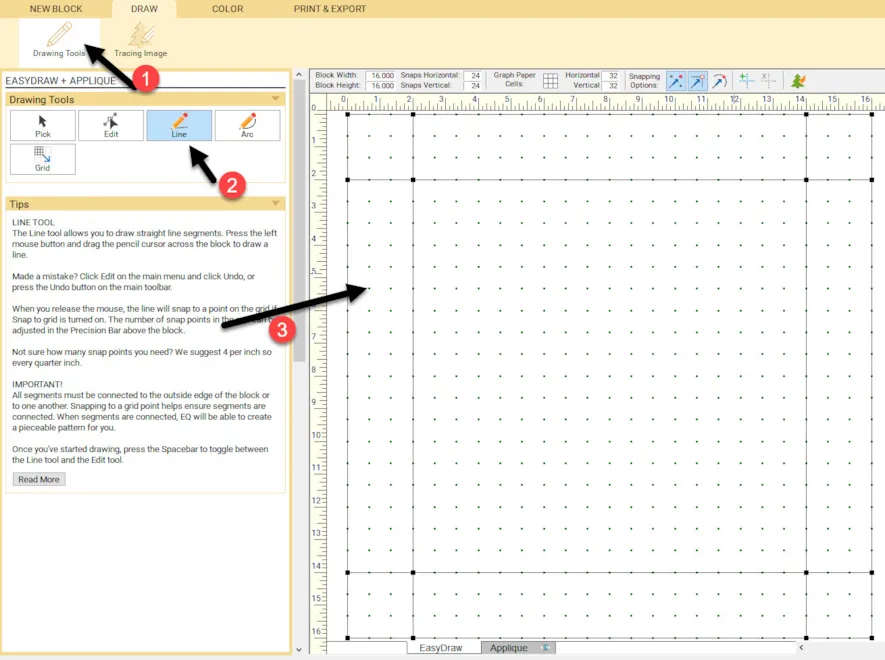
Click on the line drawing tool ![]() to select it. Move the cursor over to the block worktable and click/hold/drag/release a line on each side of the block two inches in from each side.
to select it. Move the cursor over to the block worktable and click/hold/drag/release a line on each side of the block two inches in from each side.
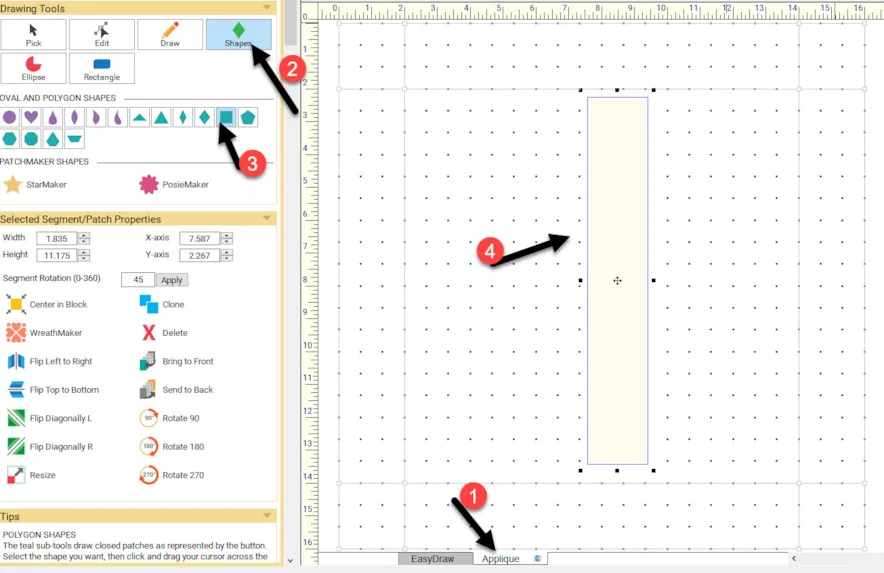
3. Click on the applique tab at the bottom of the screen.
Click on the shapes icon ![]() at the left and then click on the square shape tool to select it. Move the cursor over to the drawing area and click/hold/drag/release down and to the right to create a tall rectangle shape.
at the left and then click on the square shape tool to select it. Move the cursor over to the drawing area and click/hold/drag/release down and to the right to create a tall rectangle shape.
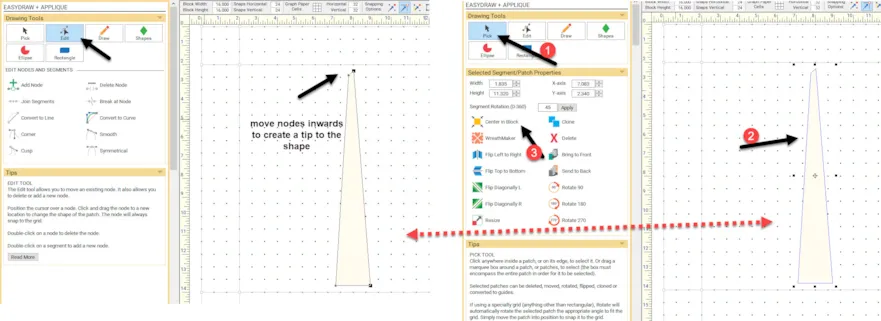
4. Click on the edit tool![]() to select it and then click on the outer edge line of the rectangle to see the edit nodes. Click on the top nodes and drag them inward to create more of a pointed tip. This will be our Christmas tree trunk shape. Once the shape is edited, click on the pick tool
to select it and then click on the outer edge line of the rectangle to see the edit nodes. Click on the top nodes and drag them inward to create more of a pointed tip. This will be our Christmas tree trunk shape. Once the shape is edited, click on the pick tool ![]() to select it and click on the shape and then click on the ‘center in block’ icon.
to select it and click on the shape and then click on the ‘center in block’ icon. ![]()
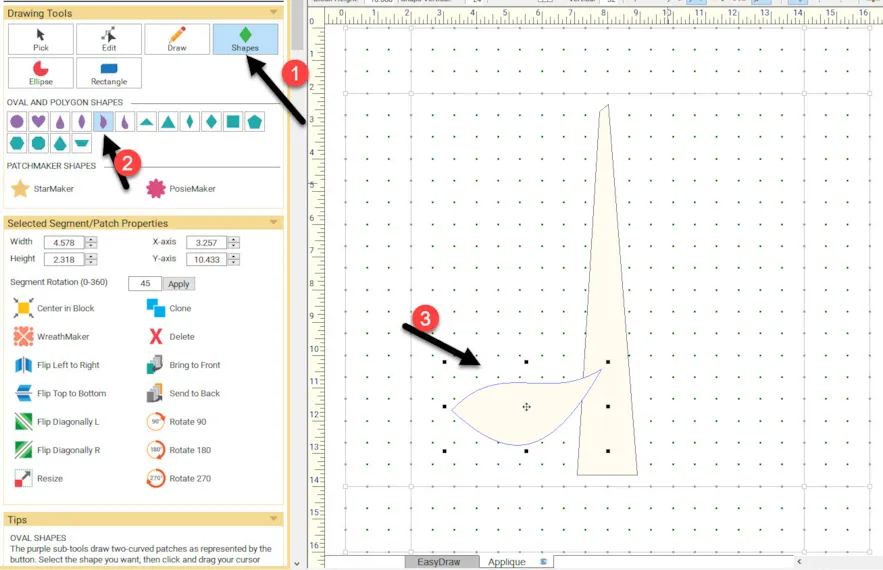
5. Click on the shapes icon![]() and then select the purple curvy leaf. Move the cursor over to the worktable and click/hold/drag/release the shape from the center of the tree trunk outwards at the bottom of the tree. The further you drag it outwards the larger the shape.
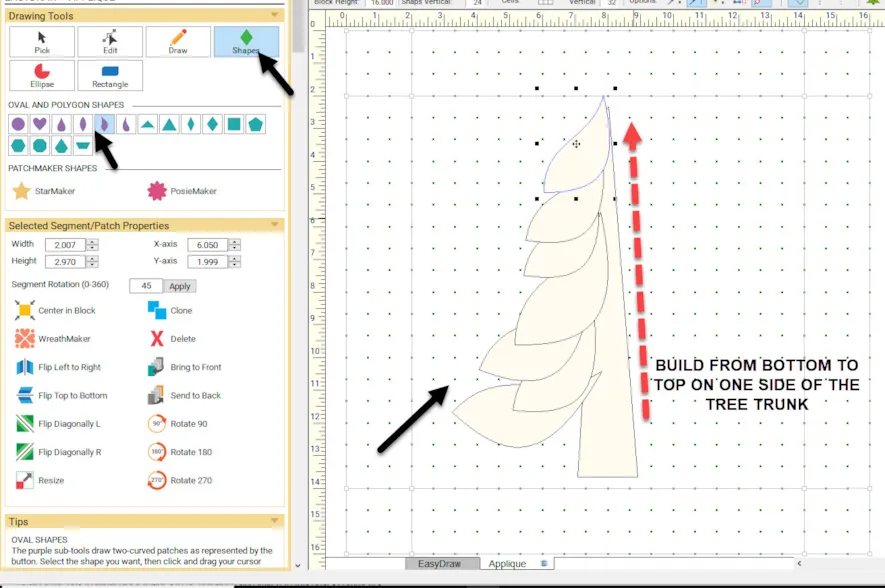
and then select the purple curvy leaf. Move the cursor over to the worktable and click/hold/drag/release the shape from the center of the tree trunk outwards at the bottom of the tree. The further you drag it outwards the larger the shape.
Continue using the leaf shape and build your design from bottom to top on one side only varying the size of the leaf as you go.
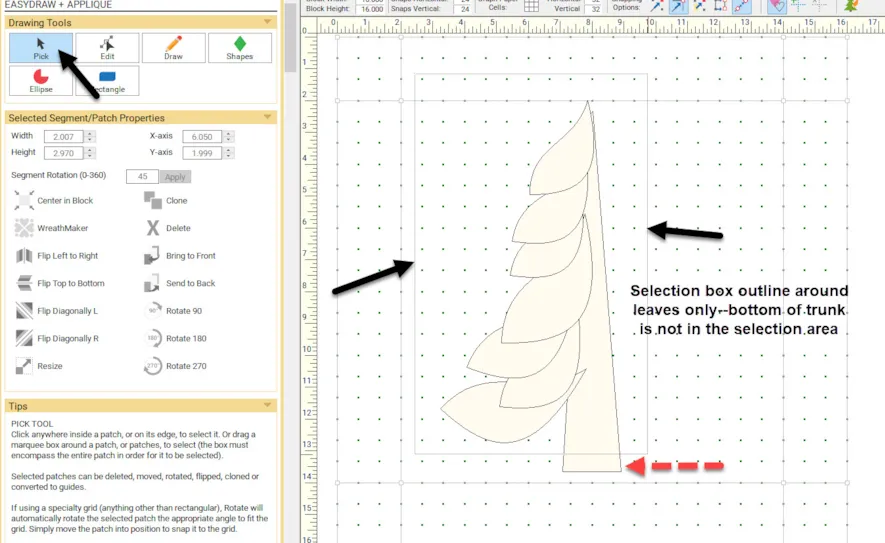
6. Click on the pick tool ![]() to select it. Move the cursor over to the drawing area and click/hold/drag/release a box moving downward and to the right to capture all the leaves but do not include the entire trunk. You want to select all the leaves only. (Watch the video for clarification on how to select leaves.)
to select it. Move the cursor over to the drawing area and click/hold/drag/release a box moving downward and to the right to capture all the leaves but do not include the entire trunk. You want to select all the leaves only. (Watch the video for clarification on how to select leaves.)
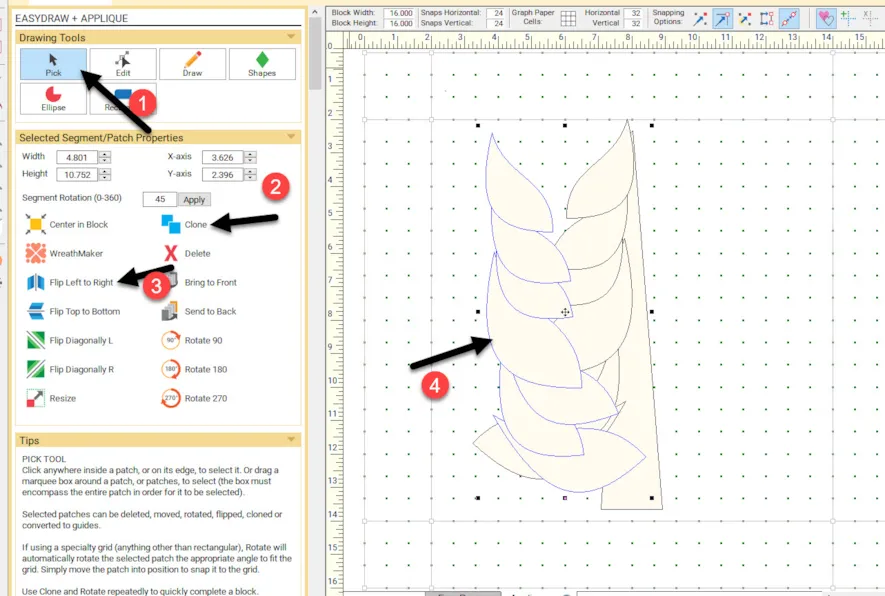
7. Once the leaves are selected, click on the word ‘clone’ ![]() and then click on ‘flip left to right’
and then click on ‘flip left to right’ ![]() to place a copy of the leaves turned into the correct position for the opposite side.
to place a copy of the leaves turned into the correct position for the opposite side.
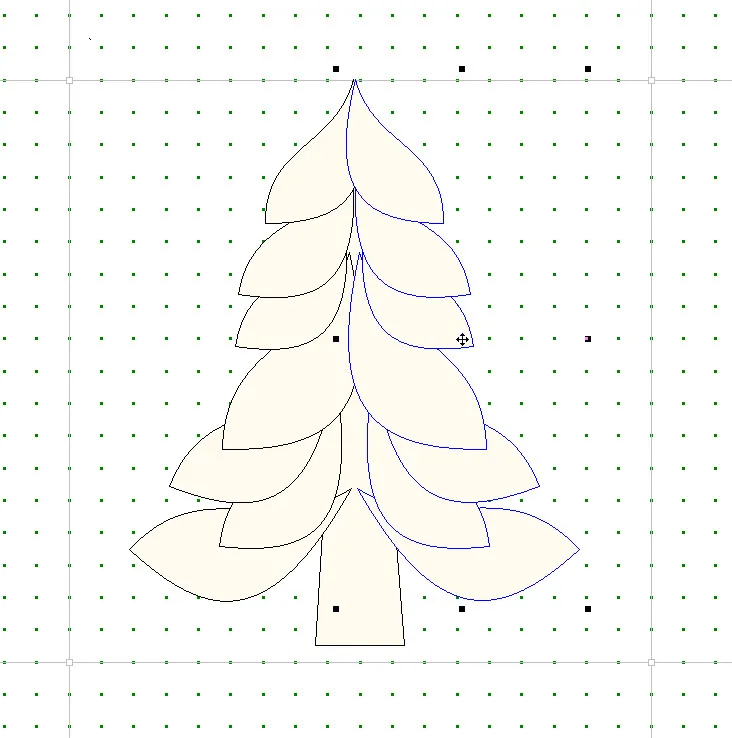
8. While the leaves are still selected, move the cursor over the center crosshairs and click/hold/drag/release the leaves to the opposite side of the tree trunk.
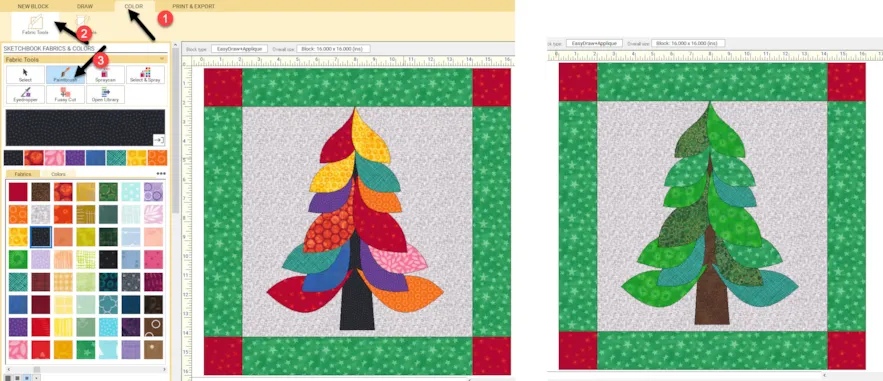
9. Click on the color tab at the top of the screen. Using the fabric tools ![]() and the paintbrush,
and the paintbrush,  click on the fabric of your choice from the fabrics loaded at the beginning of the palette and click on the trunk and leaves to color the design. Color the background and outer borders also. You can choose if you want a funky multicolored tree or a traditional evergreen tree.
10. Even if you choose not to celebrate the Christmas holiday, most storefronts and a large number of homes will be decorated for viewing with trees and lights. We will add some lights surrounding our block to help it look more festive.
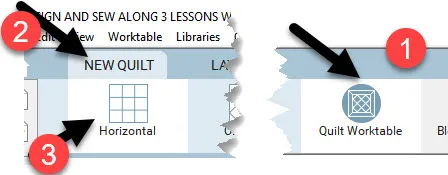
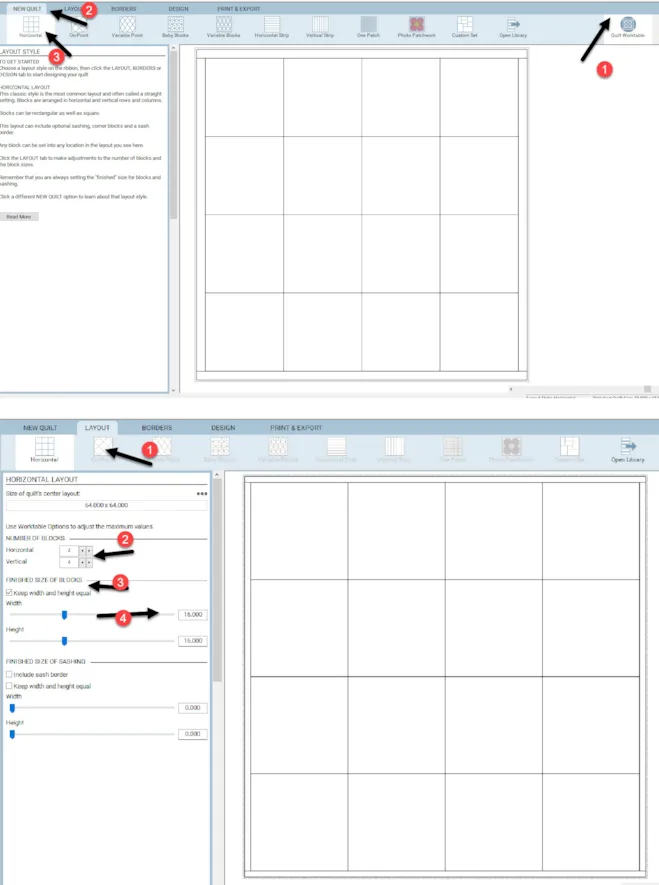
Click on the quilt worktable icon on the upper right side of the screen and select the horizontal quilt layout.
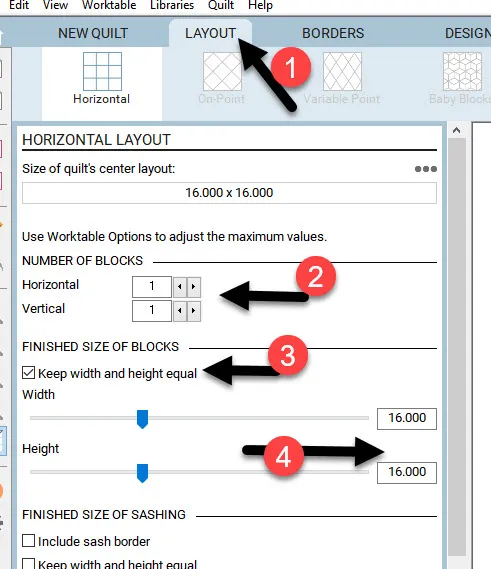
11. Click on the layout tab and set the layout to 1 x 1 block with the block size 16 x 16 inches.
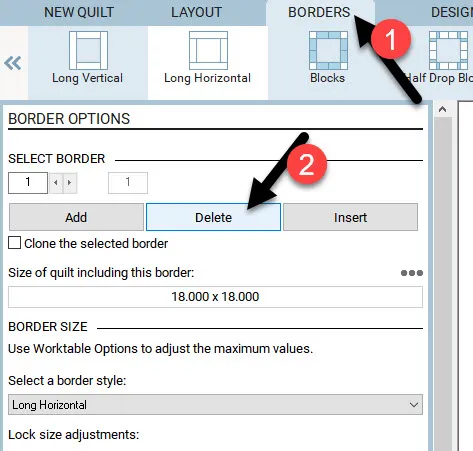
12. Click on the borders tab and click on the word ‘delete’ to remove the border from the worktable.
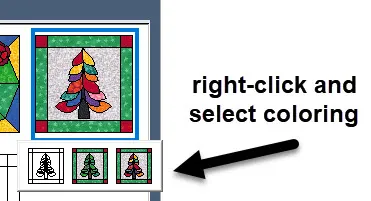
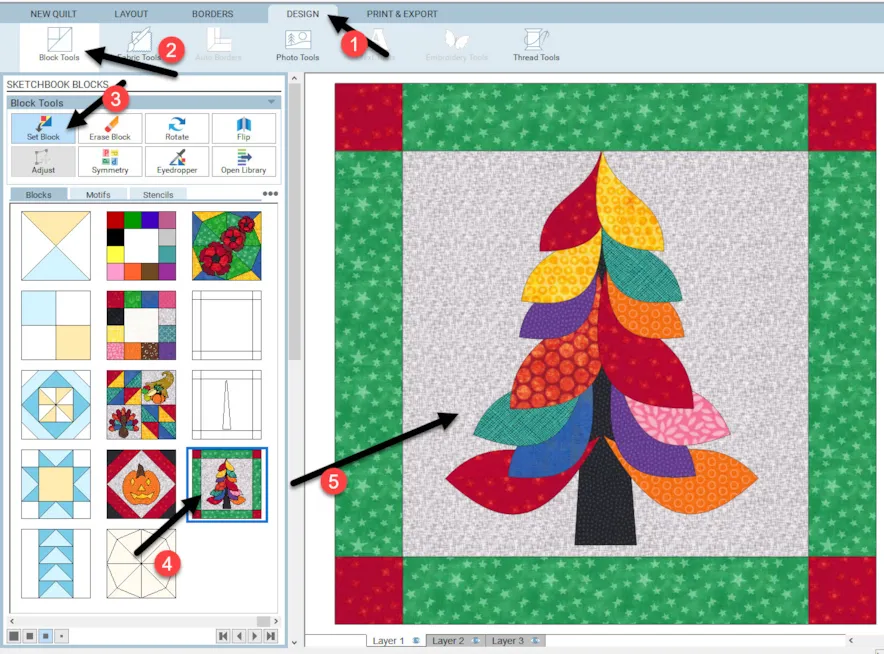
13. Click on the Design tab and locate the block under the blocks tab and click/hold/drag/release the block to the worktable. It will automatically snap into position. If you placed more than one coloring of the block in the sketchbook, you will find it by right-clicking on the block, select coloring, and you will see the little icons listed below the block with all your different colorings for that same block.
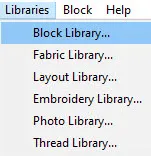
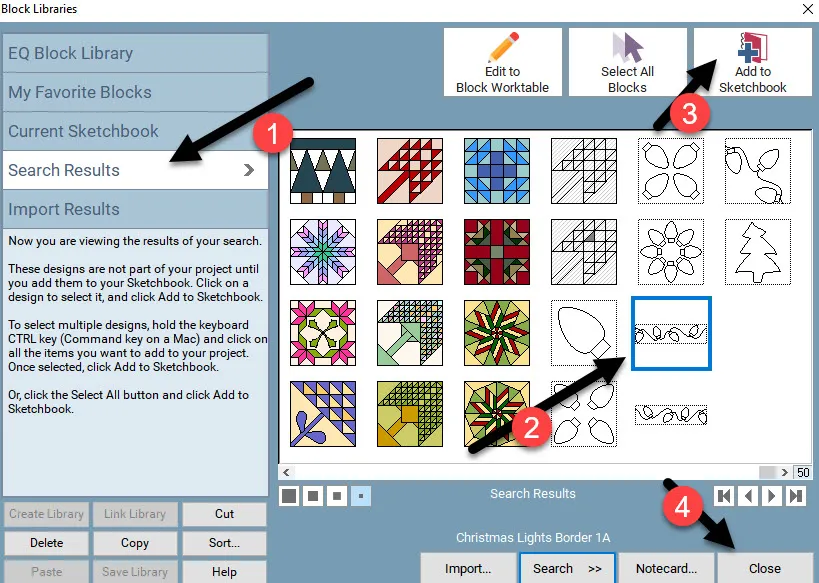
14. At the top of the screen click on LIBRARIES>Block Library
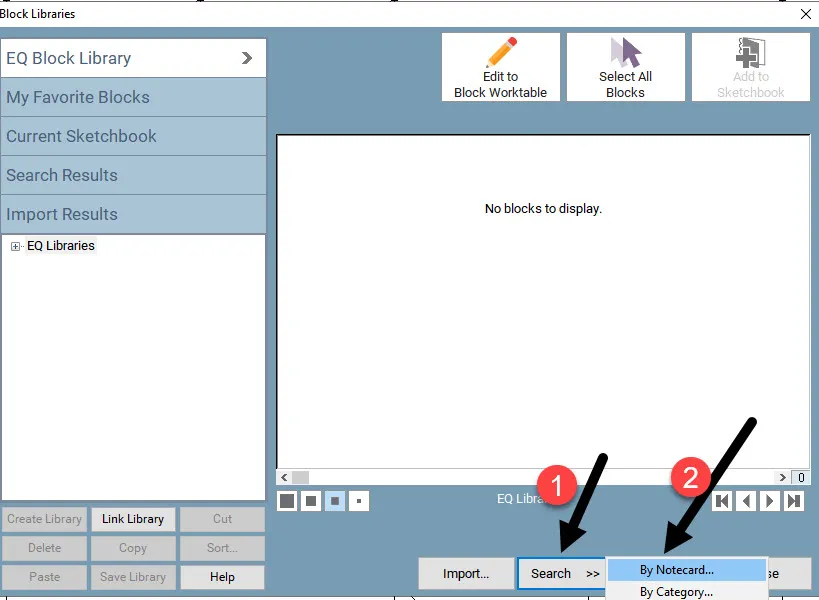
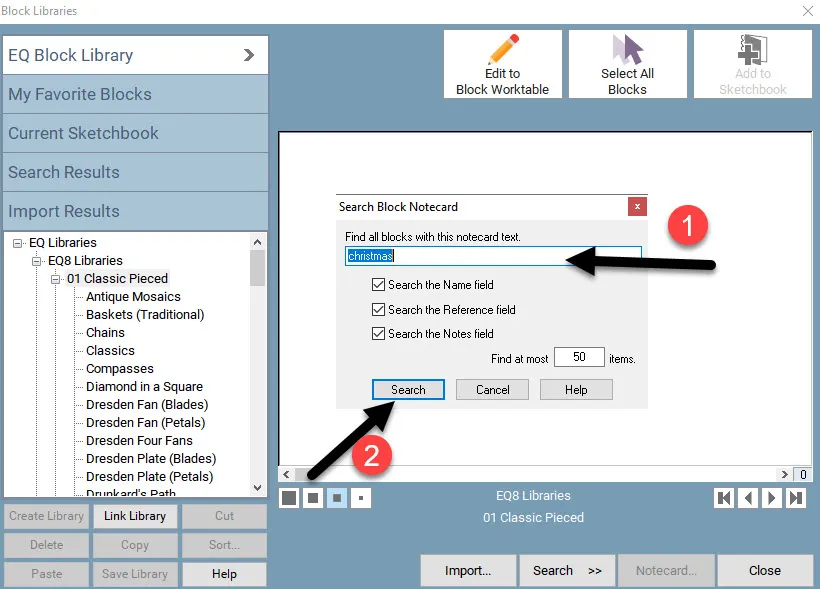
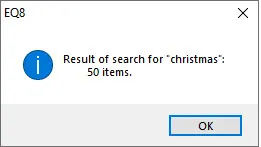
In the library box, click on search>by notecard. Type in the search name ‘Christmas’ and click ‘search’ at the bottom of the box.
In the results box, click the OK at the bottom of the box.
15. In the library box, scroll through the designs until you see the Christmas lights 1A at the end and then add it to the sketchbook. Click on ‘close’ at the bottom of the box.
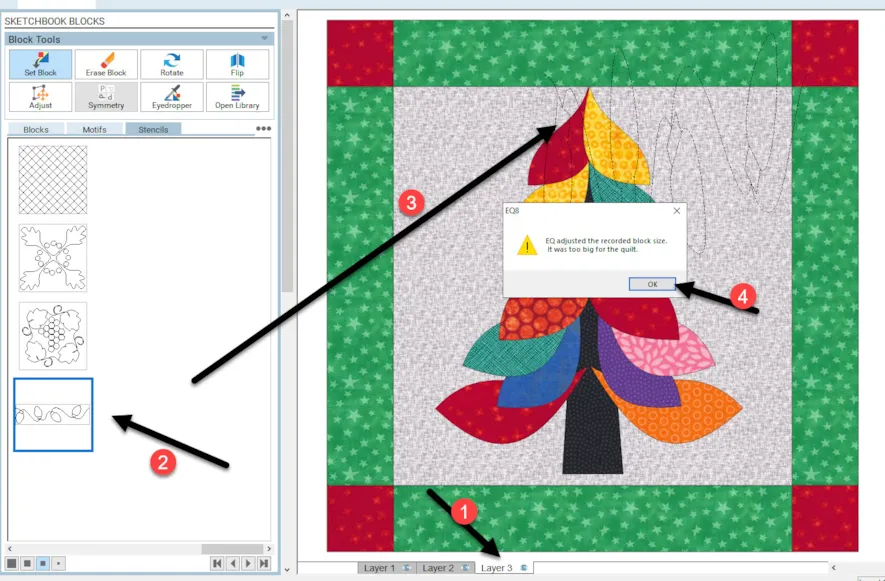
16. Click on layer 3 at the bottom of the block worktable. All stencils need to go onto layer 3 of the quilt worktable. Click on the stencils tab in the block tools box at the left to see the stencil you downloaded from the library. Click/hold/drag/release the stencil onto the worktable. It is the wrong size and EQ8 will give you an error message. Click on the OK at the bottom of the box.
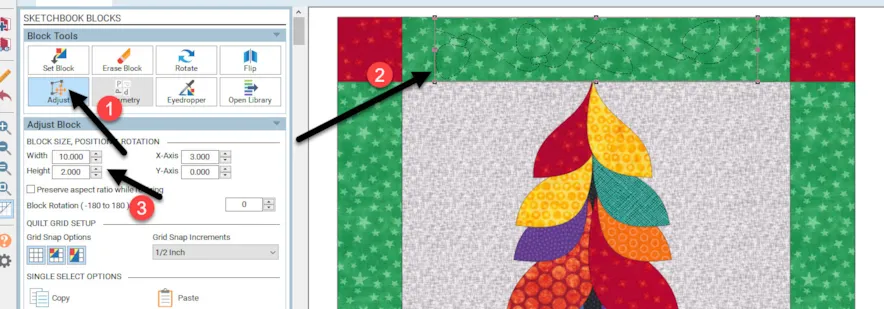
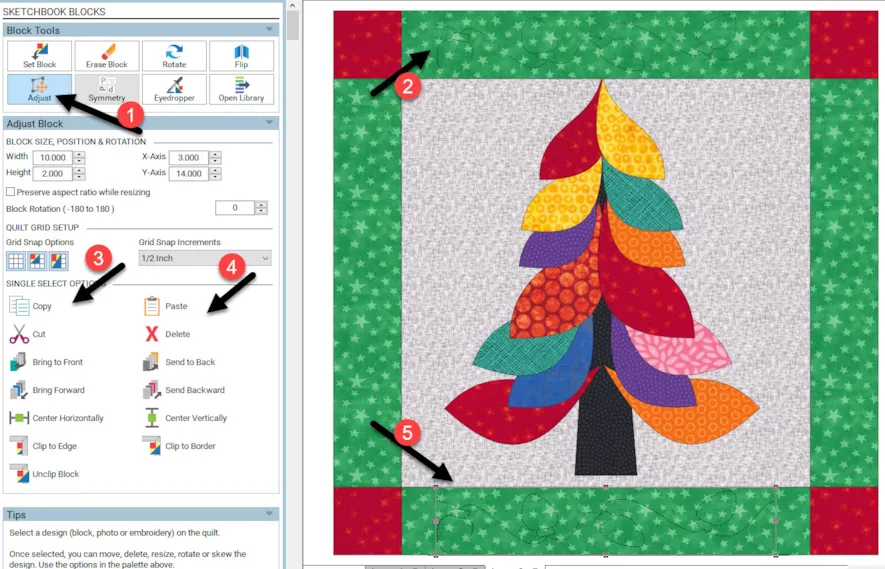
17. Click on the adjust tool icon![]() to select it. Move the cursor over to the stencil on the block worktable and click on it to select it. Type in the new size to be 10 inches wide and 2 inches high. Click/hold/drag/release the adjusted size lights to the top of the block area.
to select it. Move the cursor over to the stencil on the block worktable and click on it to select it. Type in the new size to be 10 inches wide and 2 inches high. Click/hold/drag/release the adjusted size lights to the top of the block area.
18. With the design still selected with the adjust tool, click on the copy/paste in the adjust block properties at the left to make a second copy. Click/hold/drag/release the copy of the lights to the bottom of the block.
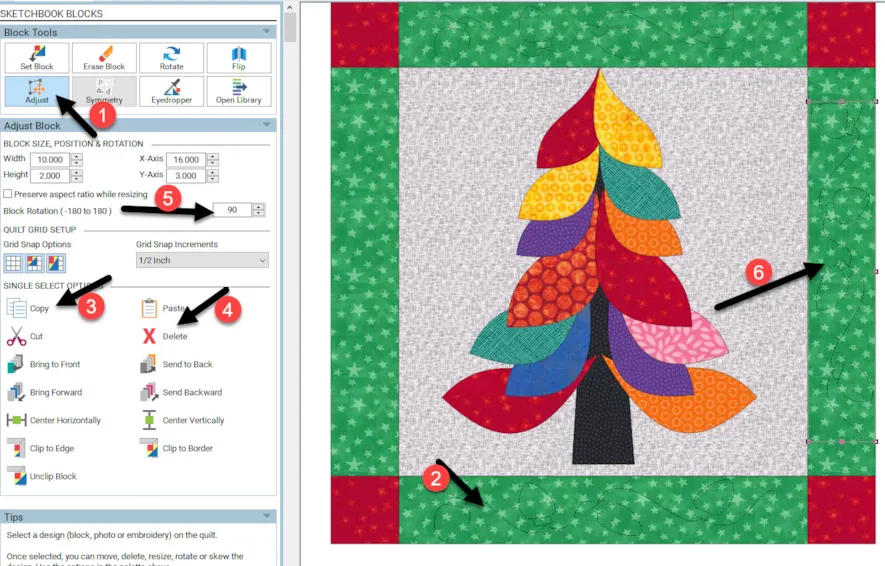
19. With the lights still selected, click on copy/paste to get another copy.
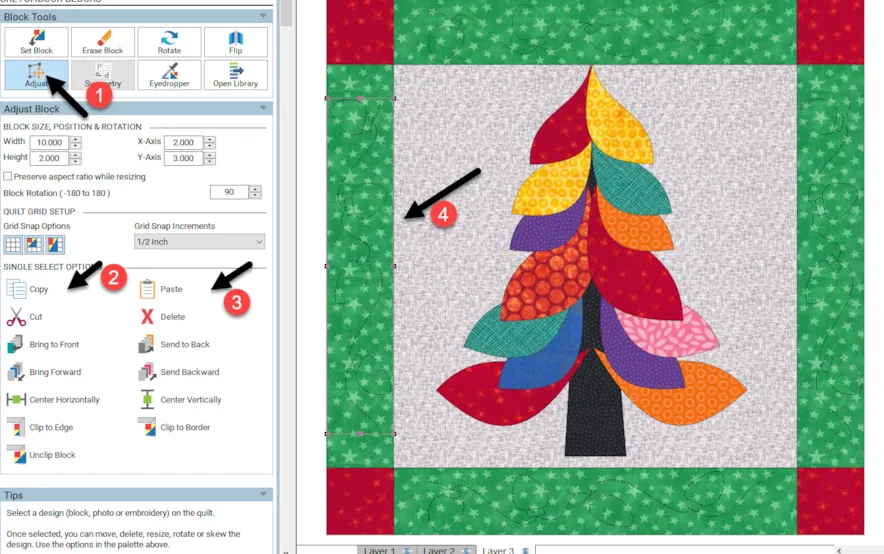
20. With the rotated copy of the lights still selected, click on copy/paste again to get another copy and click/hold/drag/release it to the opposite side of the block.
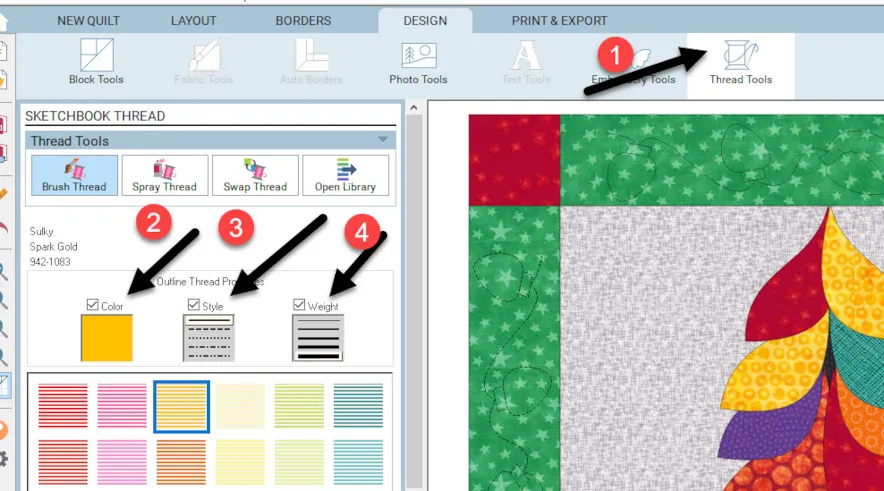
21. The stencil of the lights is hard to see against the background print fabric. Make the stencil bolder and brighter contrast in color so it stands out more.
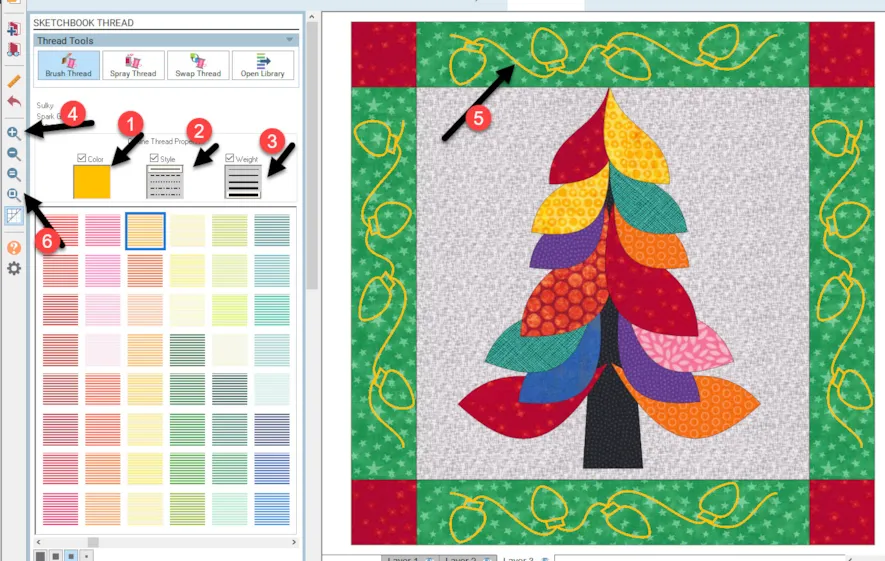
Click on the thread tools icon ![]() at the top of the screen. Select a color that is high contrast to your fabric and set the line to a solid line and the thickest weight setting for the thread.
at the top of the screen. Select a color that is high contrast to your fabric and set the line to a solid line and the thickest weight setting for the thread.
Move the cursor over to the worktable and click on each of the lines to set the thread properties. Use the zoom-in icon ![]() to click and drag a box around an area to better see the tip of the thread tool against the line of the drawing if you are having a hard time coloring the thread. When complete, click on the fit to worktable icon
to click and drag a box around an area to better see the tip of the thread tool against the line of the drawing if you are having a hard time coloring the thread. When complete, click on the fit to worktable icon![]() to return the screen to full view.
to return the screen to full view.
22. I want to print the stencil of this string of lights so I can stitch it as a decorative element onto my block.
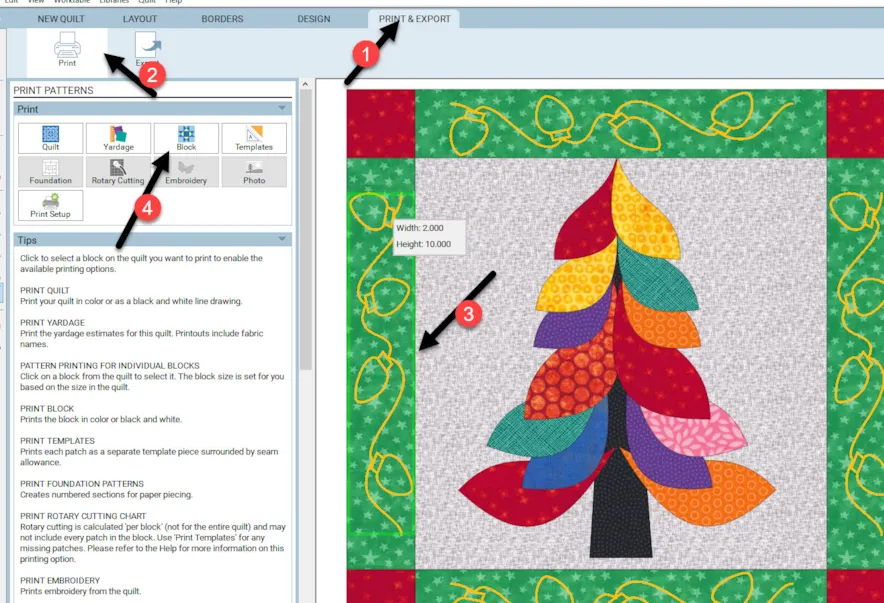
Click on the print and export tab at the top of the screen. Click on the printer icon and then click on a vertical row of the lights to select them. The vertical row will print better on the printer paper if you choose one of the vertical rows. The size of the light design will show up with a green box around the design area. Once it is selected, click on the block icon.
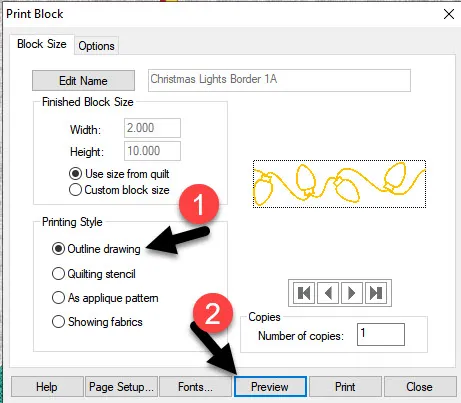
In the print dialogue box, click on the outline drawing and then click on the word preview at the bottom of the box.
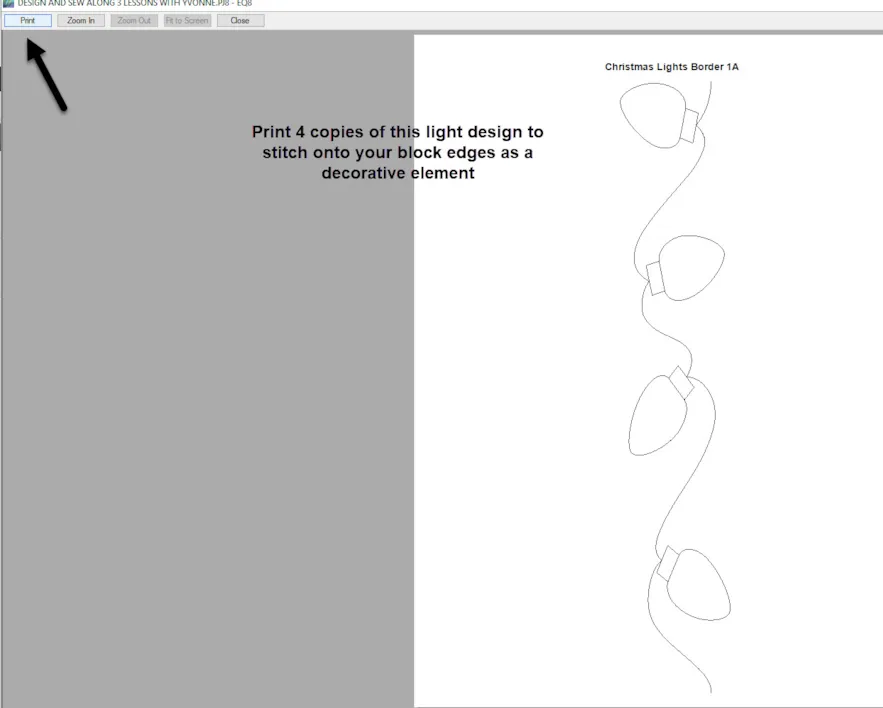
The design fits perfectly onto one page of printer paper. You would print 4 copies from this screen. Close the screen when finished printing.
NOTE: I would use this printout and lay it on my block edge and stitch right through the paper onto the block with a heavier decorative thread in my machine. A metallic thread would look good here. This is being used as a decorative element and not as a true quilt stencil.
23. Refer back to the beginning of this lesson and clean up your sketchbook. Click on the view sketchbook icon ![]() and then delete any blocks that were drawings that are no longer necessary to keep once the finished block is in the sketchbook.
and then delete any blocks that were drawings that are no longer necessary to keep once the finished block is in the sketchbook.
CREATE A QUILT LAYOUT
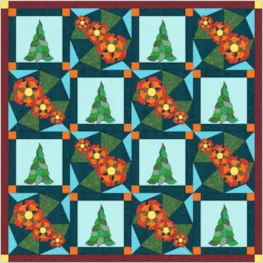
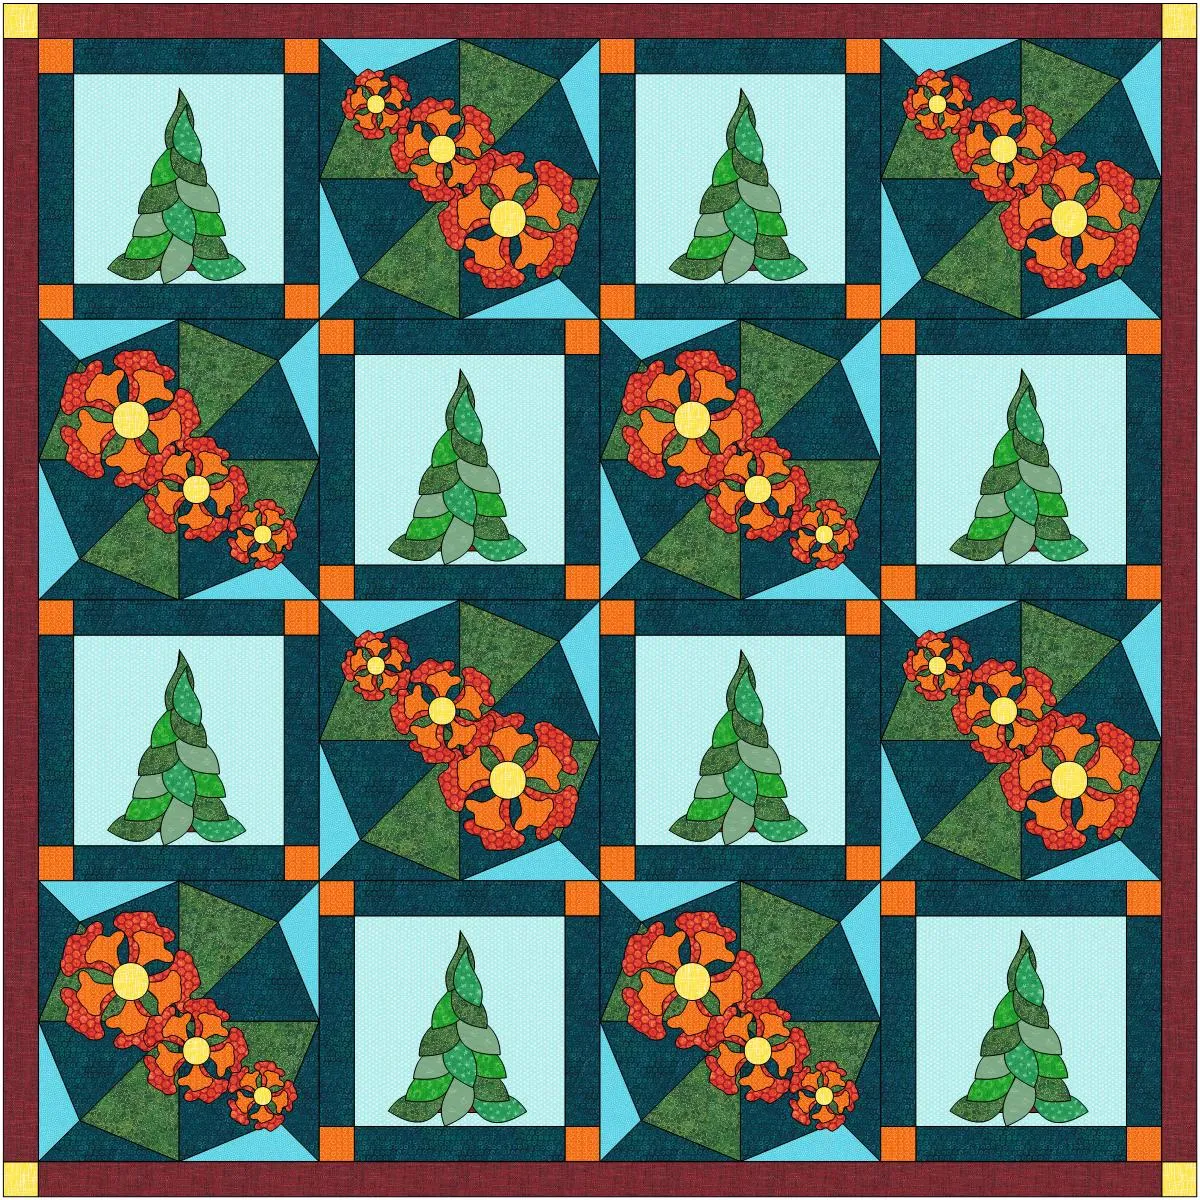
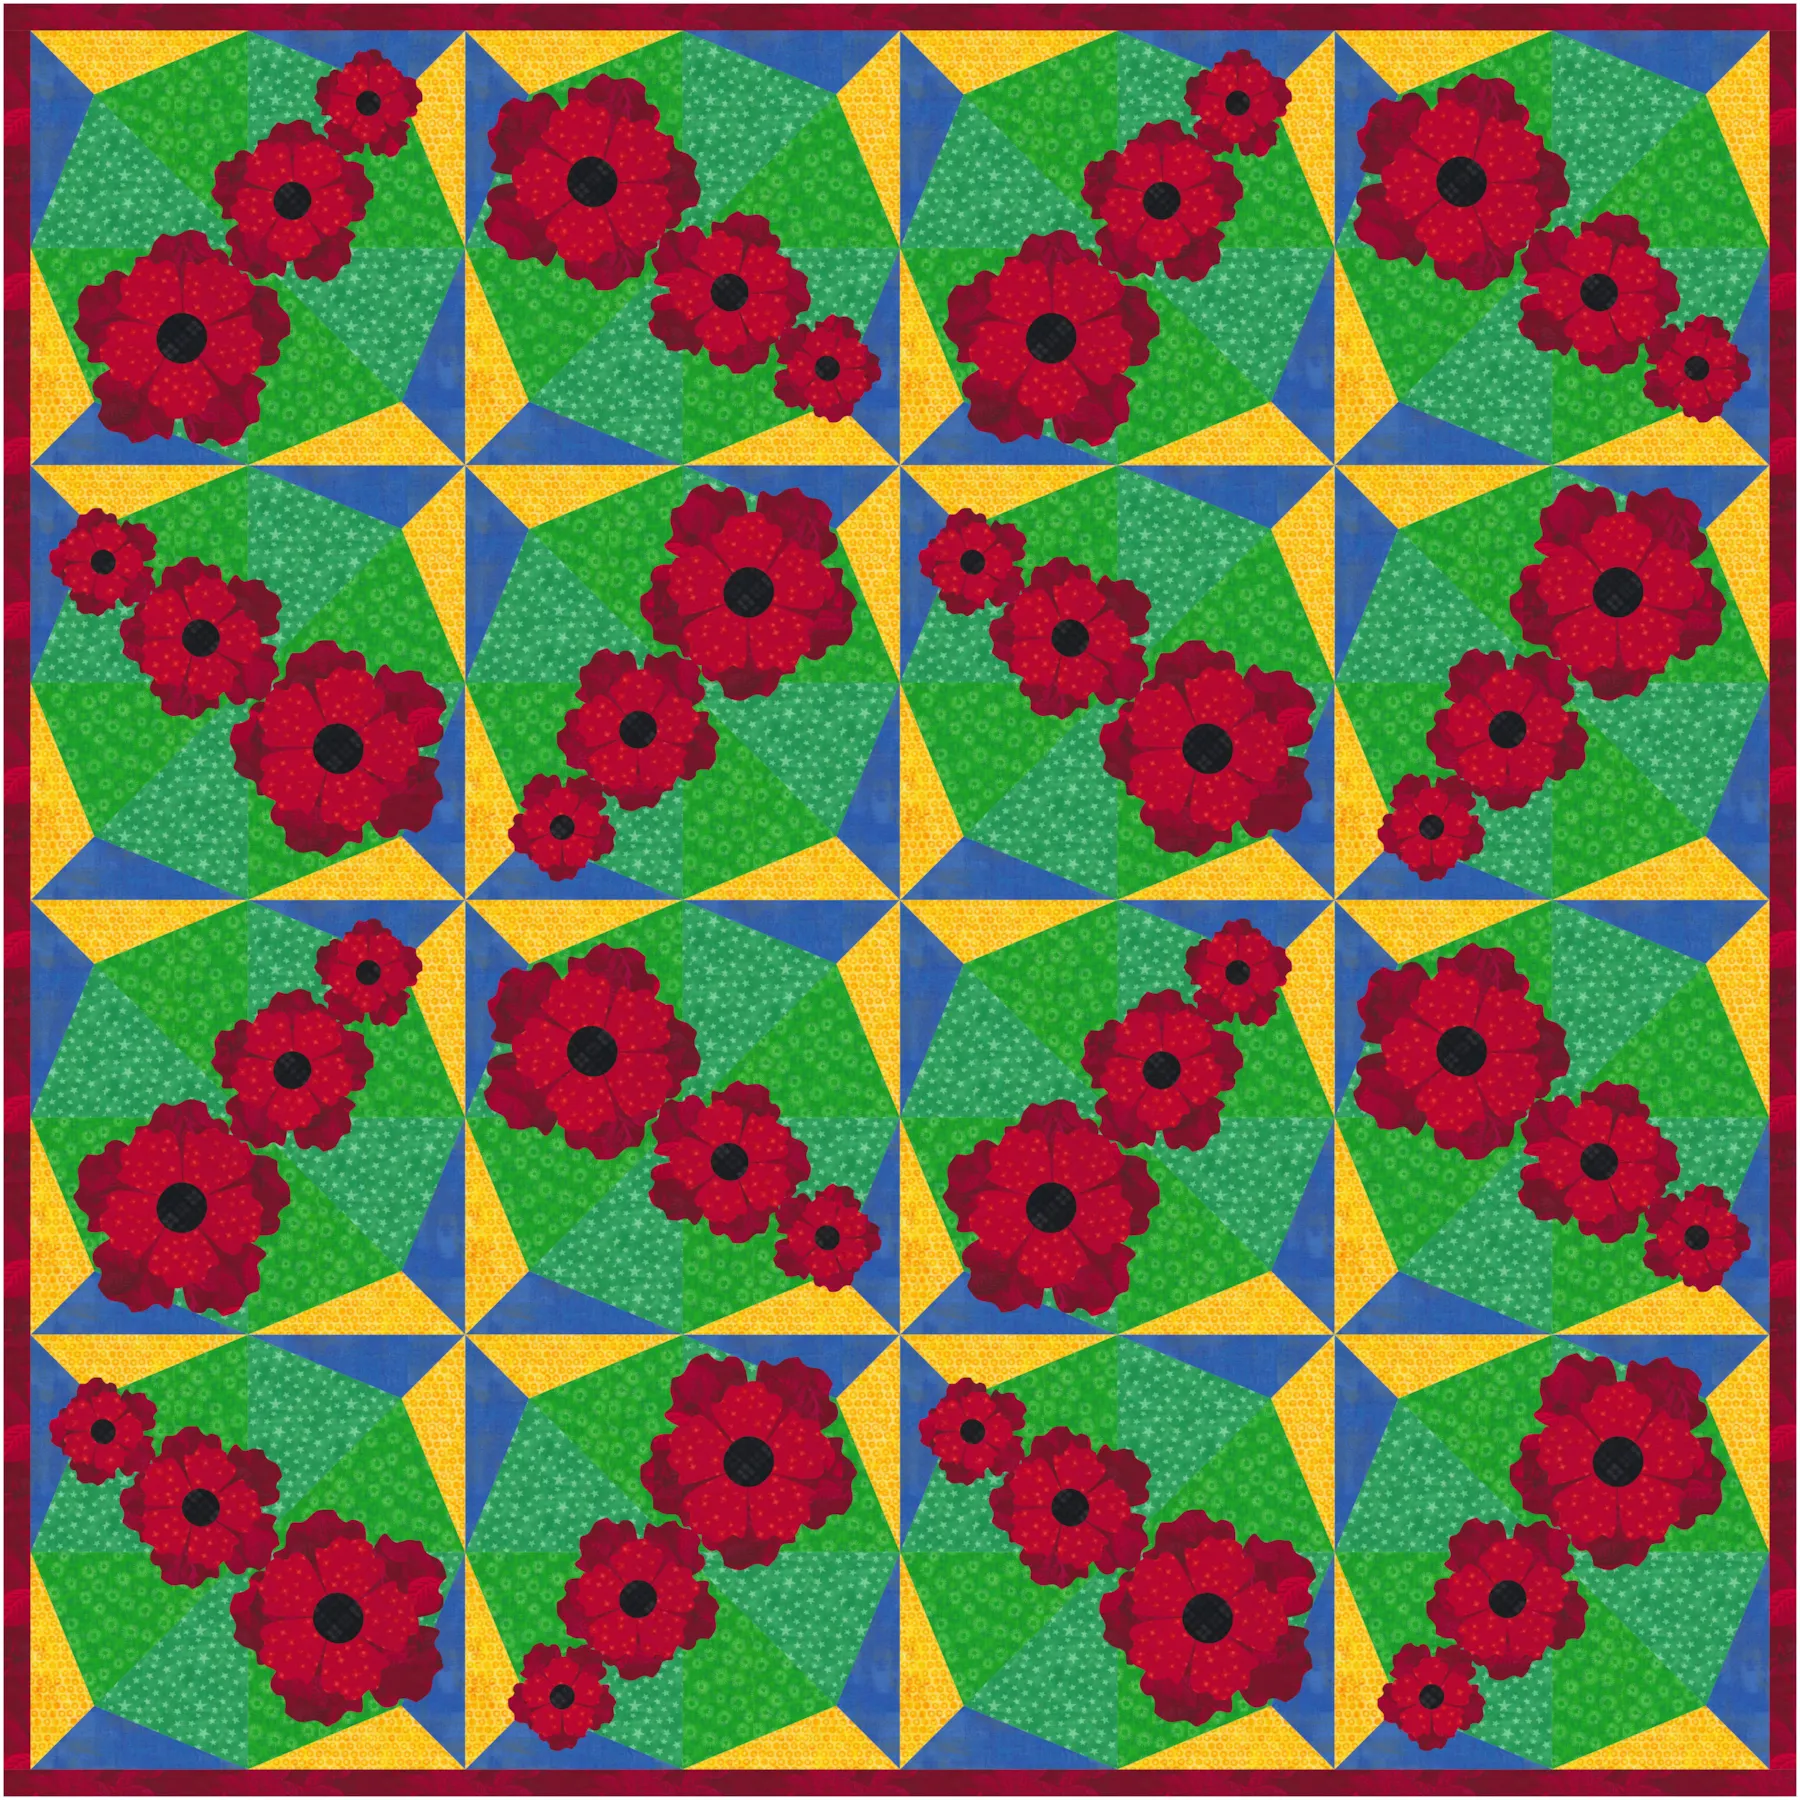
We have enough blocks from the first two lessons to create a quilt layout. You can use only one block and repeat it across a quilt or you can use several of the blocks to create a layout.
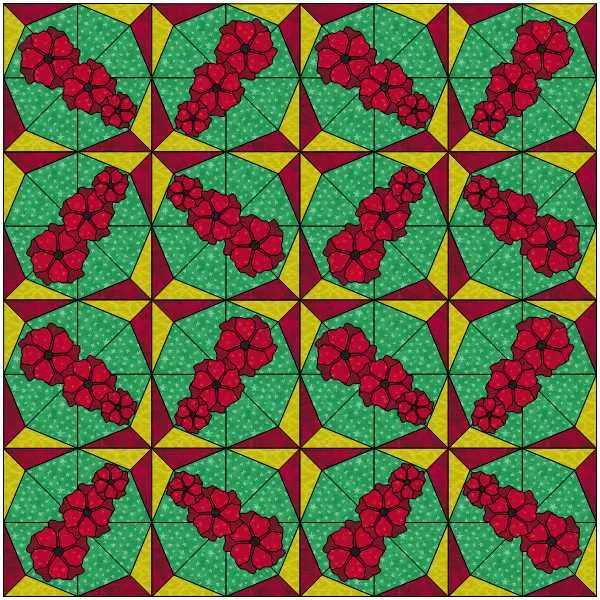
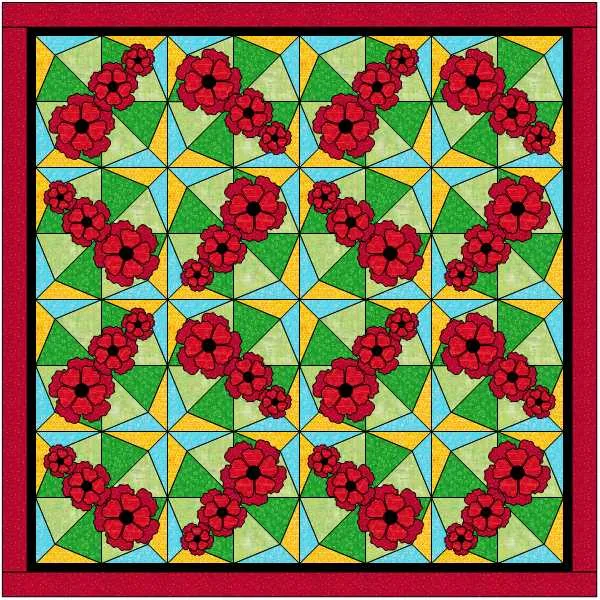
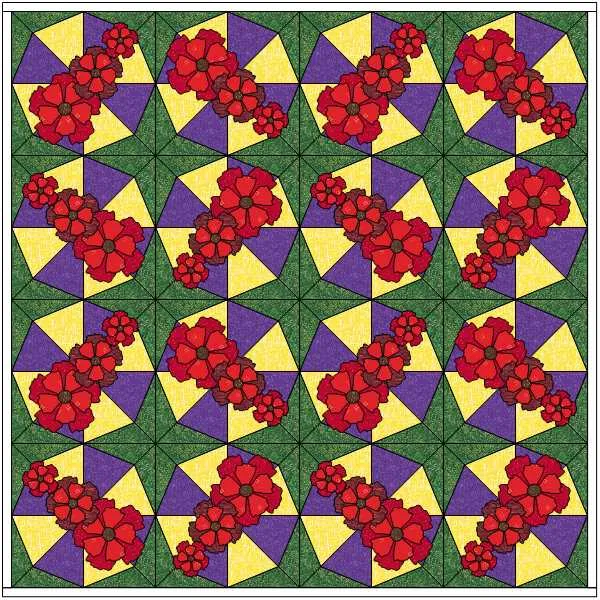
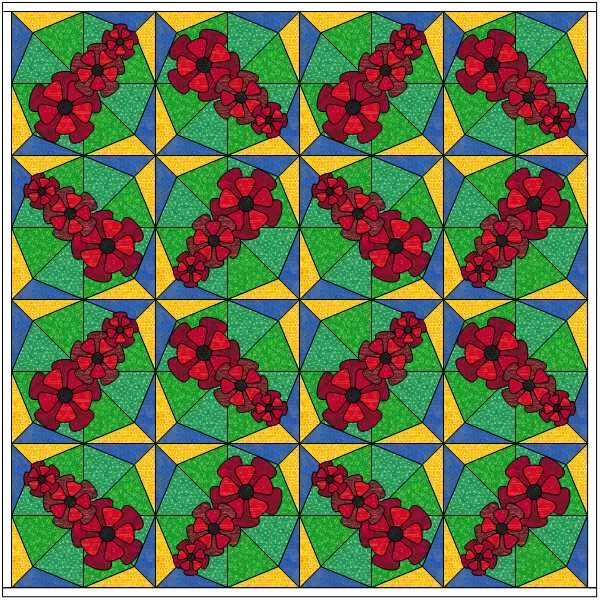
1. Click on the quilt worktable icon on the upper right side of the screen. Use the horizontal quilt layout and set the layout to have 4 blocks across and 4 blocks down with a 16-inch block space.
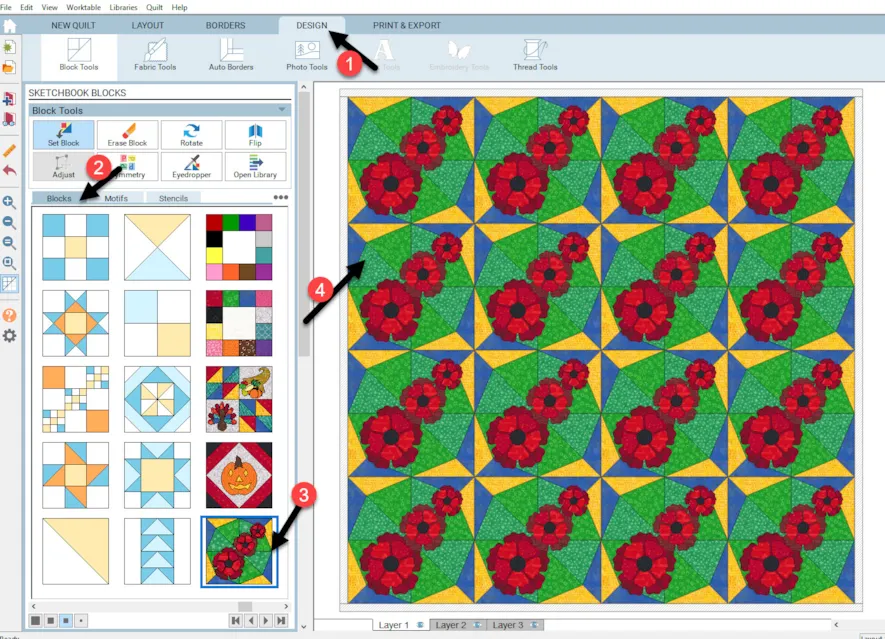
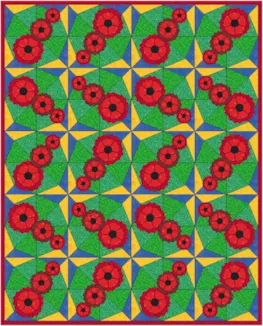
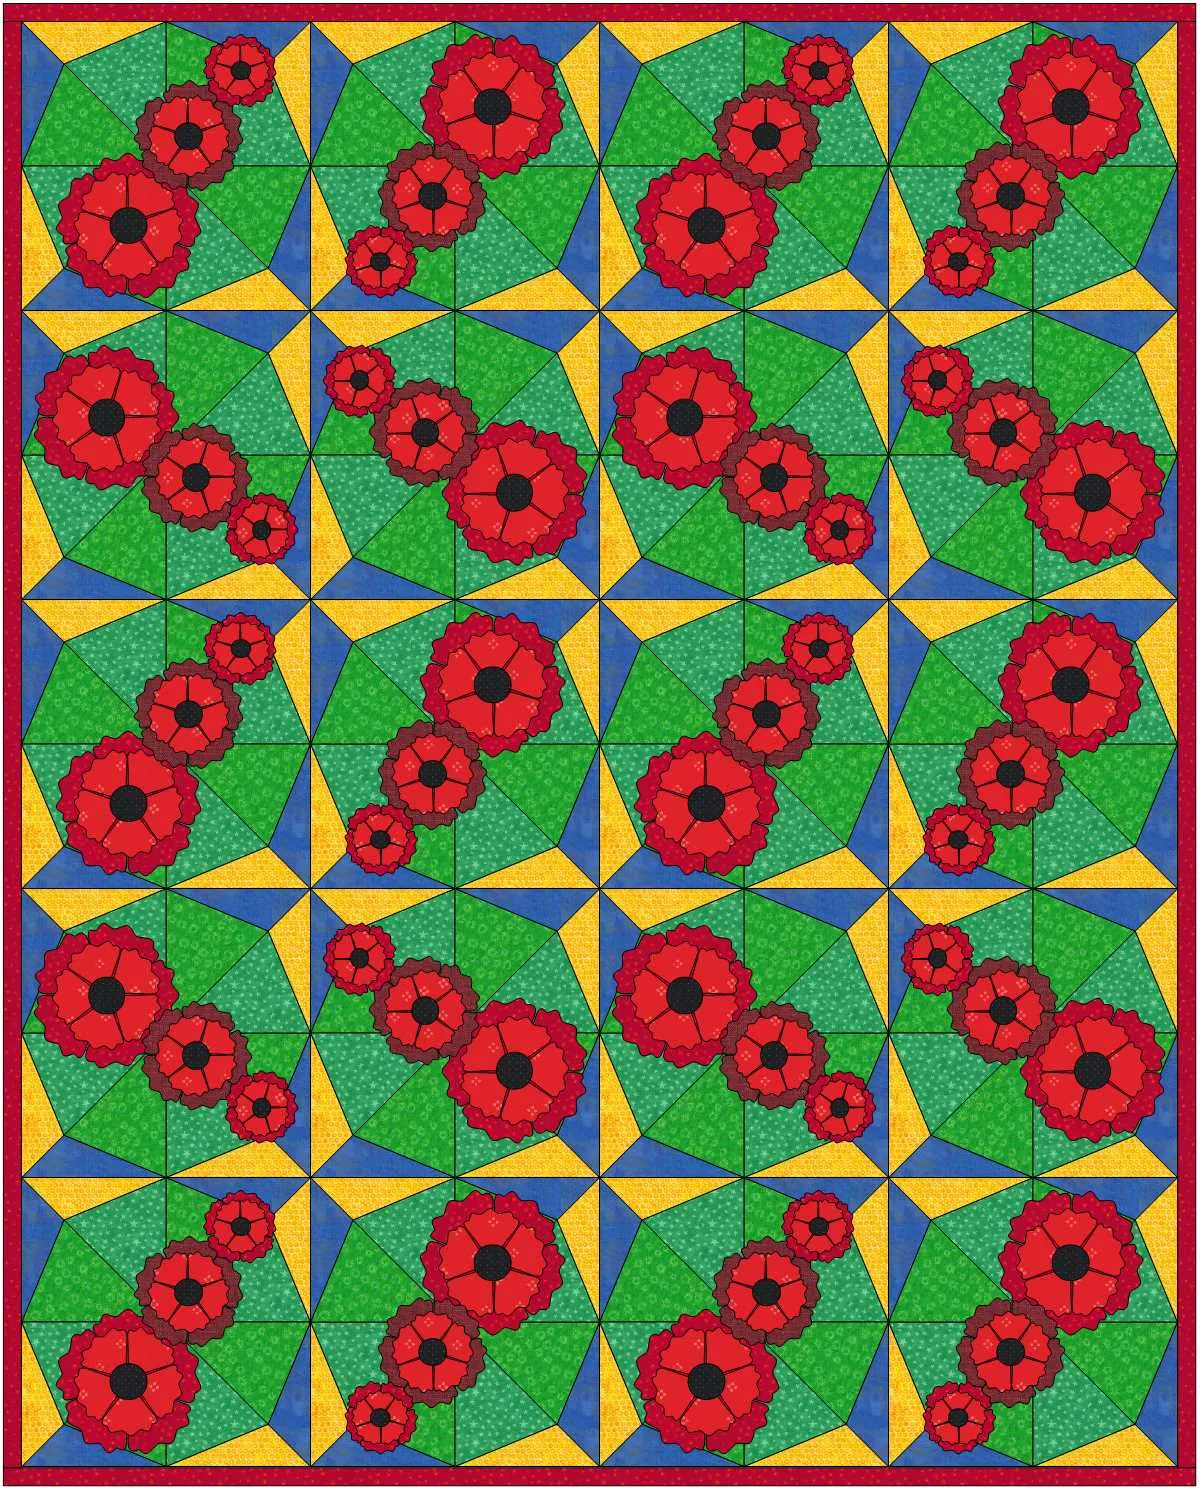
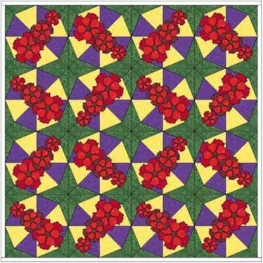
2. Click on the Design tab and look for the block we made for Remembrance Day. While holding down the control key, click on the block and click once on the quilt layout so all the quilt block areas are filled with one click.
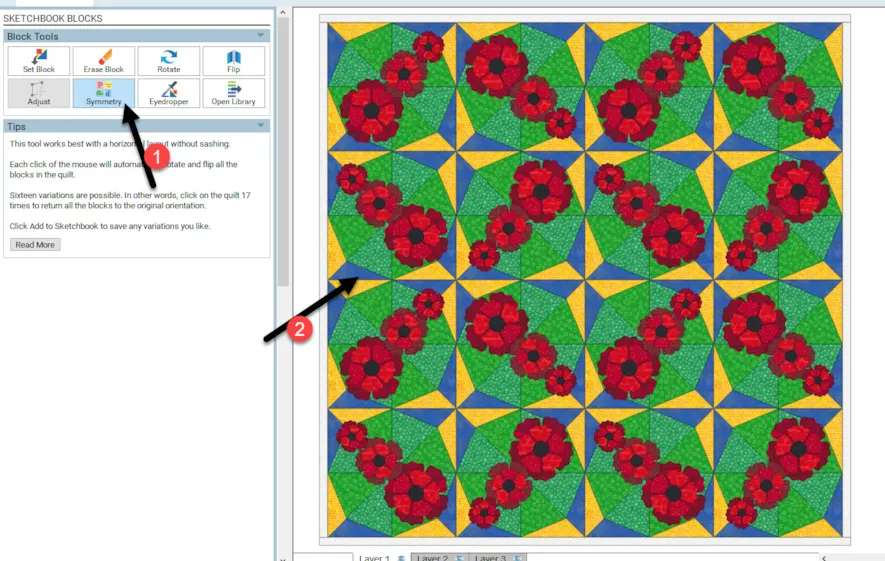
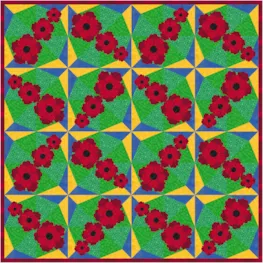
3. Click on the symmetry tool icon![]() to select it. Move the cursor over to the worktable and click up to 16 times to see various layout options for this block. When you see a layout you like, add it to the sketchbook
to select it. Move the cursor over to the worktable and click up to 16 times to see various layout options for this block. When you see a layout you like, add it to the sketchbook ![]()
You can choose any of the blocks to add to this horizontal layout. Symmetry only works with one block that has an asymmetrical pattern to the block.
Once you have your favorite block or quilt layout on the worktable make it an image and save it in the image folder of EQ8. Use that image to post to the blog page when you make your comments. (Refer back to lesson one if you don’t remember how to save an image of your worktable.)
Hope you enjoyed this class. We have so much more to explore in the program as we work through the seasons and holidays in a year. Hope to see you next time.
WATCH THE VIDEO BELOW
Want to download the video to watch later? Click an option below:


