
Whole cloth quilting can be accomplished by stitching free motion, in the embroidery hoop, or by printing templates and transferring the design to the quilt top to stitch through. The choice is yours. EQ8 aids us in this adventure of whole cloth quilting by providing stencil blocks in the Block Library built into the program.
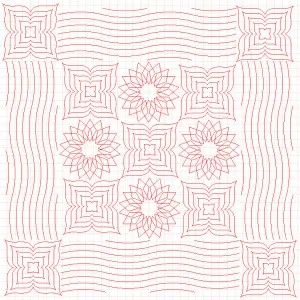
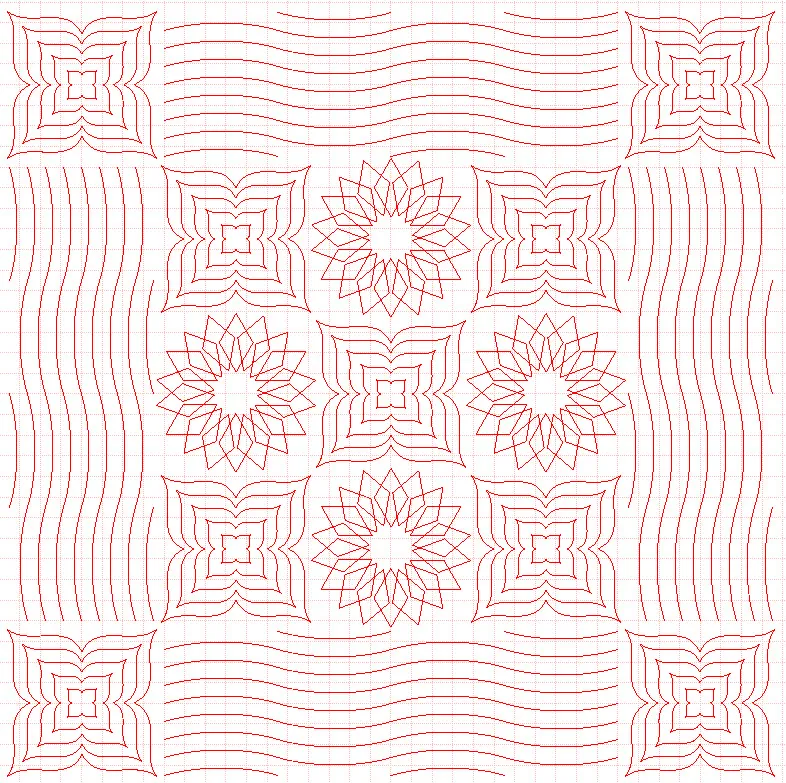
The EQ8 program gives us a visual of how the whole cloth quilt will look when stitched. You can always change the layout once you start working on the quilt material itself. For instance, on the quilt pictured above, I would not create a stencil for this wavy line border. I would most likely use the serpentine stitch on my machine at maximum width and length and repeat the rows one beside the other stitching with my walking foot until the outer border was filled to my satisfaction. I like to use this visual reference of how my quilt will look when completed by laying stencil blocks on layer 3 of a Custom Set Quilt layout in the EQ8 program.
My first step in creating my whole cloth quilt would be to search the extensive EQ8 Blocks Library and see if there are all ready designs in the library that I may want to use. I don’t need to draw my own blocks. Since there are so many blocks available to me, even if the exact block is not there, I can use one that is close to what I had in mind and then edit it to make it exactly what I wanted.
Open the EQ8 program. ![]()
I will start by clicking on the Quilt Worktable icon on the upper right side of the screen.
Next I will determine the type of layout I want my quilt to have. I decided it would work easiest to use the Custom Set quilt layout.
Click on the layout tab at the top of the screen and then click on the Custom Set layout icon on the selection ribbon at the top.

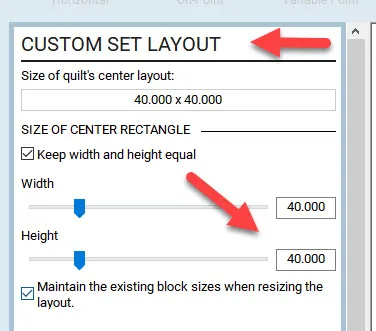
In the layout box I will enter the size of my whole cloth quilt. I have decided to make a 40 x 40 inch quilt.
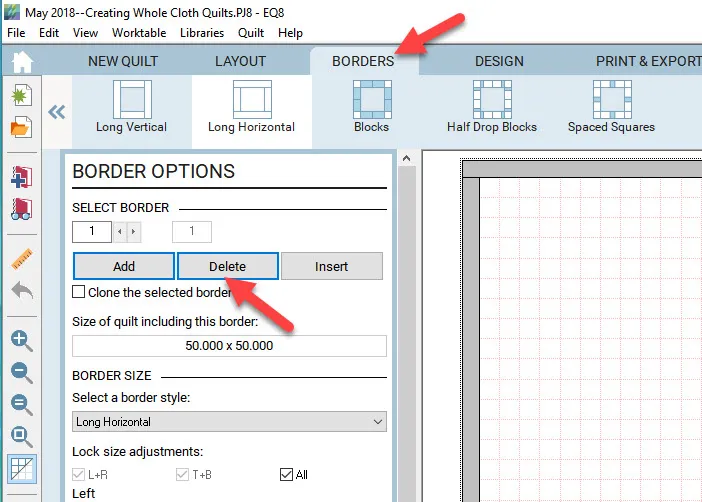
You can choose to have borders or delete borders from the layout on the Borders tab. I deleted the borders for my quilt layout.
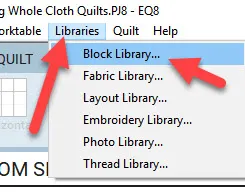
Now I need to gather the blocks I want to use on my whole cloth quilt. I need to find these in the Blocks Library.
Click on LIBRARIES>Block Library at the top of the screen.
Navigate to the 07>Stencils Library in the EQ Block Library Folder.
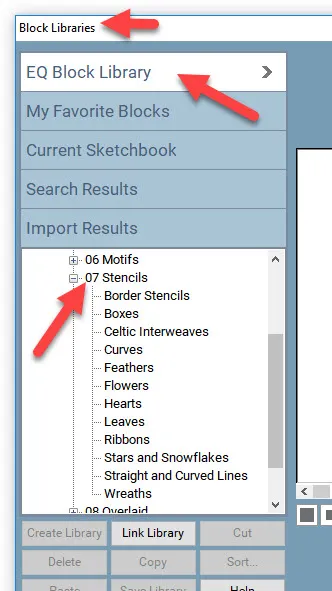
There are many different types of stencils available to us in this library based on different categories.
NOTE: When looking through the stencils available, you will note that some of the stencils have a solid outline around them. It is better to choose a block without this solid outline. Choose a design block that has a dashed outline so you will see the stitch design only and not the block outline.
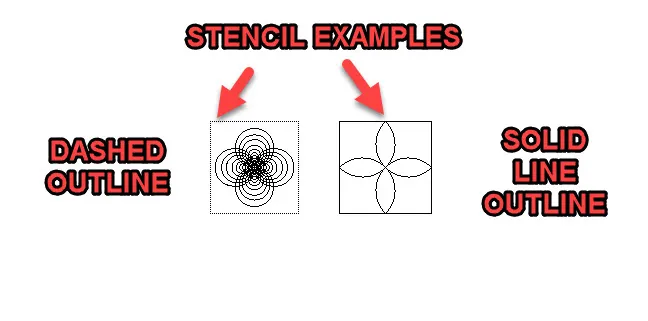
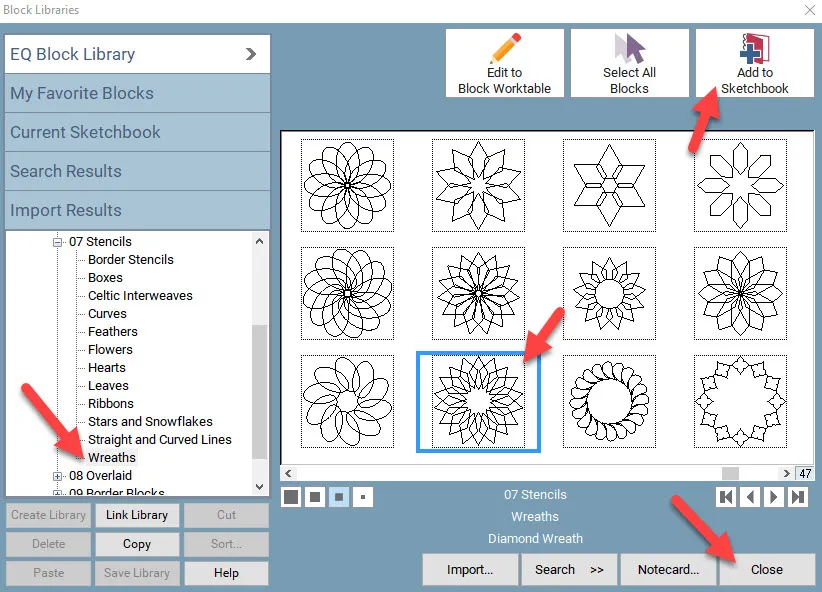
Navigate through the designs in the libraries and choose a couple that you would like to use. Pick whichever designs that appeal to you keeping in mind that you want the stencils without the box solid outline around them
Click on the designs of your choice and then click on the add to sketchbook icon ![]() in the upper right corner of the block library box. Click on the close at the bottom of the box once you have selected all the elements you wish to use.
in the upper right corner of the block library box. Click on the close at the bottom of the box once you have selected all the elements you wish to use.
Click on the Design tab at the top of the screen and then click on the Block Tools icon from the selection ribbon. You will be able to see all the blocks you chose from the library in the Sketchbook Blocks by clicking on the Set Block icon and then clicking on the Stencils tab on the left side of the screen.
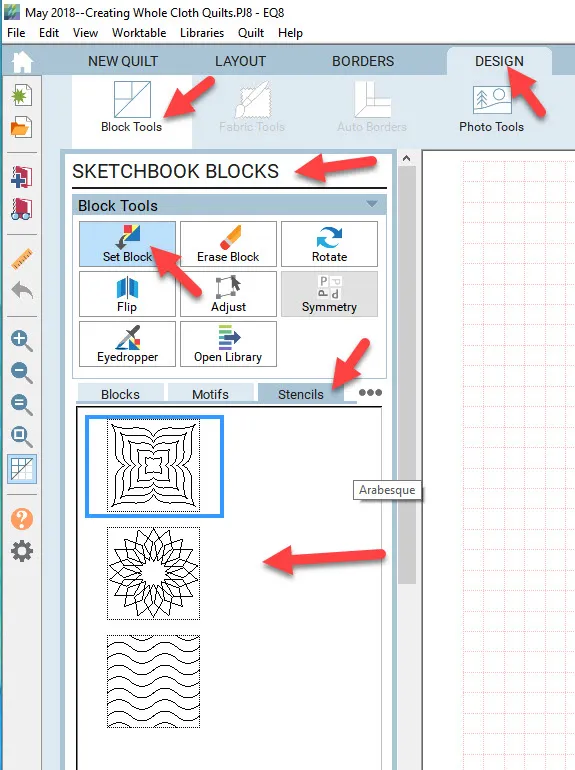
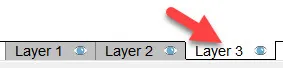
Click on layer 3 of the quilt worktable. Layer 3 is where you would generally lay your quilting stencil designs.
In the sketchbook blocks folder on the left side, click on any one of the stencil designs you have in the sketchbook to select it.
Move the cursor over to the worktable and while holding down the shift key on the keyboard, click/hold/drag release a box area for the quilt block stencil.
Click on the adjust tool icon ![]() in the sketchbook blocks menu and then click on the block on the worktable. You will see selection handles around the block area.
in the sketchbook blocks menu and then click on the block on the worktable. You will see selection handles around the block area.
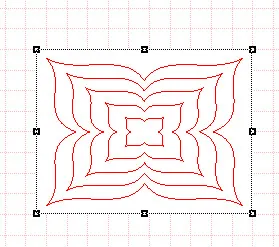
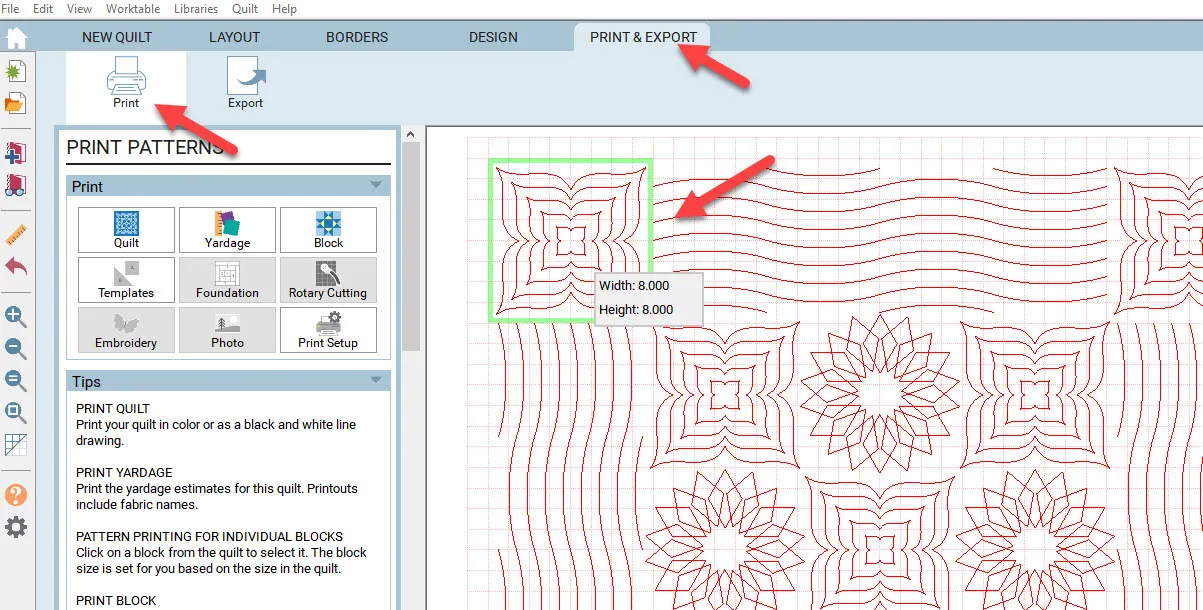
Once the stencil block is selected with the adjust tool, you can set the height and width of the block on the left side of the screen. I am making my block size to be 8 x 8 inches. Once I type in the size, I will place it directly in the center of the worktable by clicking on the center horizontal and center vertical icons in the sketchbook menu.

With the block still selected with the adjust tool, click on copy and then click on paste in the menu. This will place another copy of the design on the worktable. Click on it with the adjust tool and drag it to the position you want it to stitch in on the quilt. Repeat the process as much as you want to have the number of design elements you would like to have.
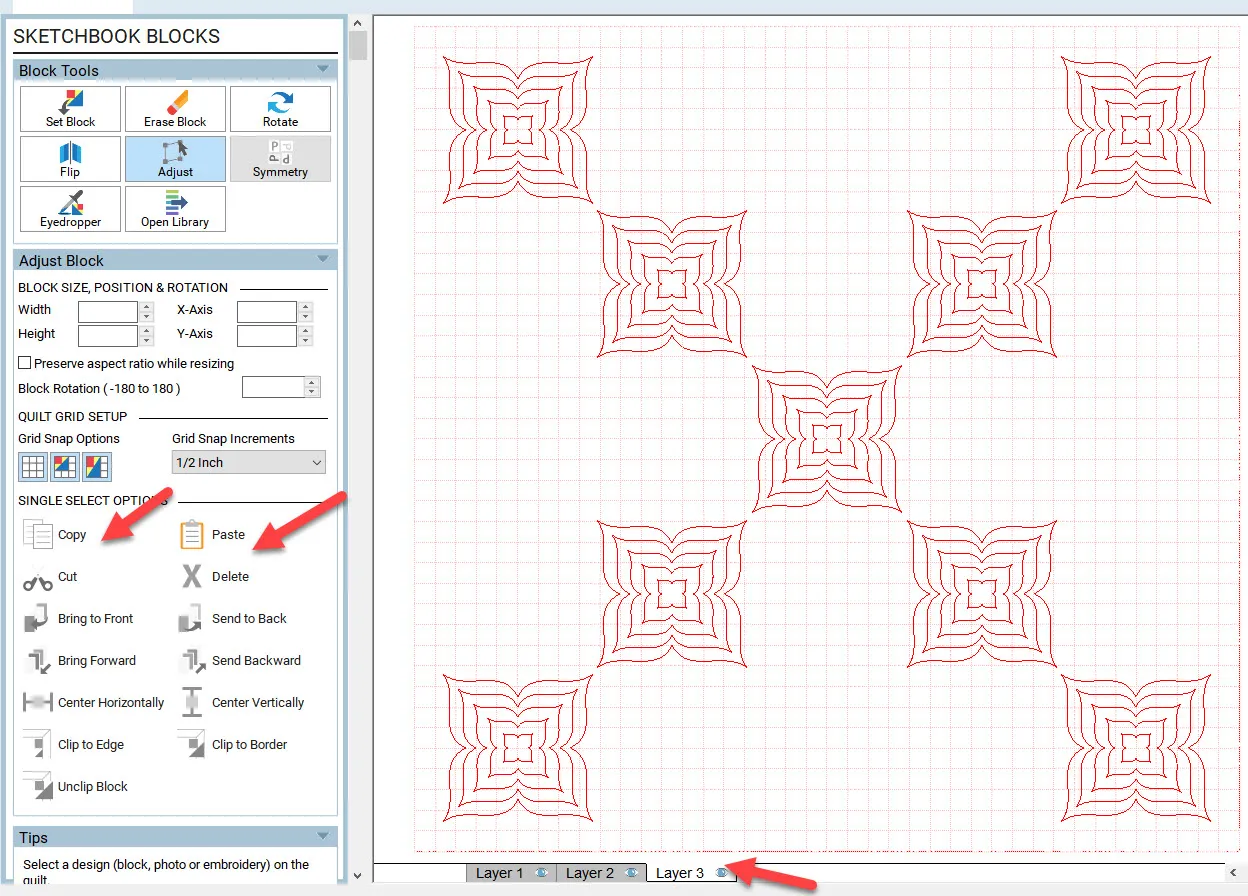
Choose another block and add it to the quilt worktable layout to fill in the whole cloth quilt design. Using the same process as above, select as many stencil elements as you want and resize them however you choose. Use the handy Adjust Block icons in the sketchbook at the left to resize, rotate, copy, and paste the elements around the center working your way to the outer edge of the quilt table layout. Be sure to add you completed design to the sketchbook. ![]() Remember this is your quilt and you are the designer so there is no right or wrong way to produce this. Just make it visually interesting to yourself.
Remember this is your quilt and you are the designer so there is no right or wrong way to produce this. Just make it visually interesting to yourself.
Click on the Print/Export tab at the top of the screen. Click on any one of the blocks to select it and then click on the printer icon on the menu bar to send the design to the printer. You can lay the paper template onto the quilt sandwich and stitch directly through the paper following the lines to create the pattern. Tear away the remaining paper after you complete your stitching.
The EQ company makes foundation sheets that are perfect to use to print your stencils. They are easy to see though for perfect placement on your quilt top. They tear away cleanly after stitching. Check them out on the EQ website.

You are on your way to creating awesome whole cloth quilts designed with the EQ8 program!!


05-20-2018
10:54 am
If you forgot to select layer 3, is there any way to move the design from layer 1? I would guess not, but I figured I might as well ask.
05-20-2018
1:03 pm
Excellent question Chris! Yes you can always move a block at a time to another layer of the quilt. EQ was designed to have blocks on layer 1, applique on layer 2, and quilt stencils and embroidery on layer 3. I usually stick to this when designing. I can always change my mind later and add blocks to the layer 1 and still have the stencils on layer 3 without disrupting them. Since this is a whole cloth quilt, the layer the stencil block is on is not as important since you will simply print the stencil and lay it onto your quilt to stitch the design. In my example here, I did not even bother to have the fabric layer added to the quilt design. I was strictly wanting a visual of the stitches only so I went straight to layer 3. Remember, you are the creator of the quilt and can build your layers according to your own wishes working within the definitions of the EQ program.
05-20-2018
3:29 pm
I love all the lessons eq gives. I am learning to use eq8 at a fast pace this lesson is perfect for my quilting.
05-20-2018
5:30 pm
Great Pat! There are so many different ways to use the EQ8 program. As you learn the tools you will have your own particular way of producing designs to fit your unique style.
05-21-2018
6:28 am
Brilliant lesson Yvonne – many thanks! I can see this being very useful in working through my many Qi(very long)Ws…
05-21-2018
1:52 pm
Thanks Toni. I love writing about the EQ programs. I use them every day in multiple different ways when designing projects for my students.
05-21-2018
12:42 pm
Dear Yvonne,
I can’t be the only one having this much difficulty with EQ8; can I? I had EQlite and did OK, not great, but OK. But even with your help I am floundering and wishing I hadn’t spent the money to upgrade. I really thought the new program would help me.
And before you offer the advice to take a class I must tell you that I can’t afford to travel, rent a room and pay for the class too.
Is there someplace online where I can get more help? I really want to learn this program.
Thank you,
Lynda
PS: Have you considered classes for instruction via Craftsy? I have learned many skills through them.
05-21-2018
1:51 pm
Hello Lynda. Thanks for you comments. I know learning a new program can be stressful and everyone learns differently. What comes easy to some is difficult for others. I also respect that the cost of travel for hands on classes can be too much for some to bear. Understanding this, I can recommend that you continue to follow the blogs here. Lori and myself will give helpful hints each month on various topics about EQ8. On the EQ website you can follow along with the Design and Discover series posted to learn even more tips about the program use. Under the help menu in EQ8 there are printable and video lessons built right into the program, a reference manual, and a quick start guide all there to aid in your learning. The support site on the EQ website will be there to answer any specific questions you may have in regards to using the program. And of course, you can always ask specific questions here about the blog that is being presented. By all means, reach out to us, we are here to help you. We take pride in our customer service and support.
05-23-2018
8:02 am
Lynda when I learned EQ7 I used the reference manual, Lesson book, and contacted Electric Quilt support when I couldn’t figure something out, so I learned from The Best Support in the business. I recommend contact them, also if you’re on Facebook – join this group : Learning Electric Quilt EQ8, EQ7 and EQStitch – very supportive. See you there
05-22-2018
10:12 pm
These classes are great. I am almost done with the shooting for the Stars tutorial with Kari S. I also printed all the tutorials in the help section from my software. I am signed up on the facebook site. In no time at all I am feeling fairly confident using this software. I have been meeting with a friend who purchased the software shortly before I did. When we have problems we found that the other one has it figured out. She asked a couple of questions and they were answered promptly on the site. I wish there were more utube videos, but I am really having fun with the program.
05-23-2018
1:00 pm
Hi Joan. Videos are indeed a great way to learn. A lot of us are visual learners. Producing quality videos takes time and requires some good editing programs go get the best results. Once they are posted on YouTube they are free for everyone to watch and learn. Unless you are paid by a company to produce the videos, all the expense falls on the shoulders of the individual. That is why not everyone is producing them. I did several videos on YouTube for EQStitch and then switched to teaching at EQUniversity. I am considering producing videos in the future for EQ8 but have yet to decide how I will do this and be compensated for my time. Thanks for your thoughts on having more videos available for EQ8.
07-29-2018
7:48 am
I would like to view a stencil on my quilt. How or where can I view this. Thank you for all your wonderful ideas and tips.
03-22-2019
3:46 am
I’m new to EQ8. I’m an experienced computer user with graphics. I have a Mac Probook with Mojave’s. I purchased the EQ8 Lessons for Beginners Blue book and am trying to work through it. Many items listed in book are not in my EQ dialog boxes. Ex Custom Libraries. I keep following the directions in the book, I make blocks, think they are saved but they are gone when I open the program again. However all the file names they tell me to type in are all there But nothing is ever saved. I have begun to save items in folders outside the program on my computer. Then I have to import them to use them . I know based on book directions these blocks, and fabric imports I’ve done should stay in the program. I have uninstalled and deactivated the software twice hoping to start fresh. All “my’
blocks and fabrics are gone. However the darn file names are all there clogging up my favorites libraries. Nothing in them. Any clues. I’m so frustrated.
03-22-2019
10:25 am
Hello Kathryn. I am not sure what it is you are doing when you say you are saving. When we have something on the worktable we ‘add to sketchbook’ using the icon on the screen. This ‘saves’ it in the project sketchbook. It does not save it to the EQ8 program. When we open that specific project again, it should be found in the project sketchbook. If we are opening a new project, we need to navigate to the old project sketchbook and import it into the current project sketchbook. If you are doing that and continue to have problems, please contact tech support through the EQ website. They may be better able to help you than I can here.
06-16-2019
9:17 am
Is there a way to overlap stencil designs and control which one “lays on top”?
06-16-2019
11:50 am
Jen, yes you can overlap the stencils but depending on the layer you are working on (quilt layer 2 or 3 usually) you may have a different effect. On layer 3 the stitches are transparent and you will see the stitches behind. You also need to use the the send to back or front on the sketchbook tools box at the left side of the screen. Remember, these are images of what something may look like and not actually a stitch pattern. You can print the patterns but how you layer them is up to you. The program does not create a ‘hole’ in one stencil pattern to insert another pattern into the space. I hope this answers you question for you. I am assuming you are using EQ8 when I refer to the tool locations
02-09-2020
11:10 am
Hi Yvonne. Is there a way to design and use your own stencils from scratch in EQ for this whole cloth quilt purpose rather than use ones already loaded into the stencil library?
02-09-2020
11:58 am
Christine- stencils can be drawn as a appliqué on the block work table. Then simply move it to the stencil tab in the sketchbook.
02-09-2020
4:34 pm
Ok, thank you!