
I am desperate for spring to come. I am tired of the gray and cold of winter. Since I can’t change the weather, I will use my EQ8 to brighten my day by creating my spring quilt pillow design.
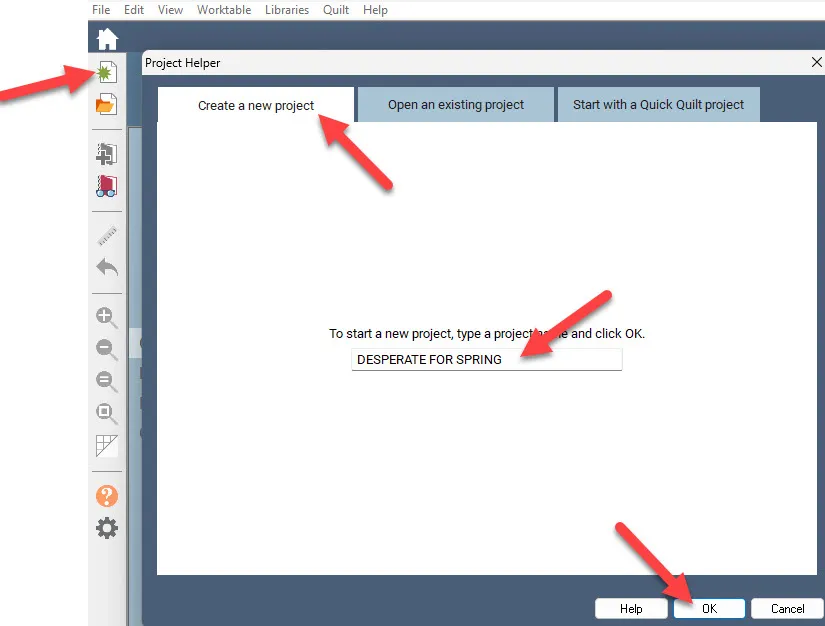
Launch your EQ 8 program, make a new project, and name it ‘DESPERATE FOR SPRING’. Click OK at the bottom of the box.
Thinking ahead, I want to depict both the gray colors of winter with the bright first colors of spring flowers blooming. I can accomplish this by using my EQ to create my fabric for the background and then adding applique fabrics to the foreground to show the contrast between the darkness and brightness of the days.
The first step is to create the gray background fabric that I want to use. I will use the EQ patterns in the library to design my fabric. At the top of the screen, click on LIBRARIES> Block Library.
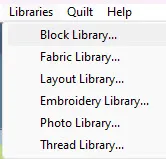
In the block libraries box, click on the 06 motifs heading and select the ‘flowers with stems’ subcategory. Click on the first flower to select it. There will be a blue box around it when it is selected. Click on the ‘add to sketchbook’ in the upper right corner of the libraries box to add it to your project.
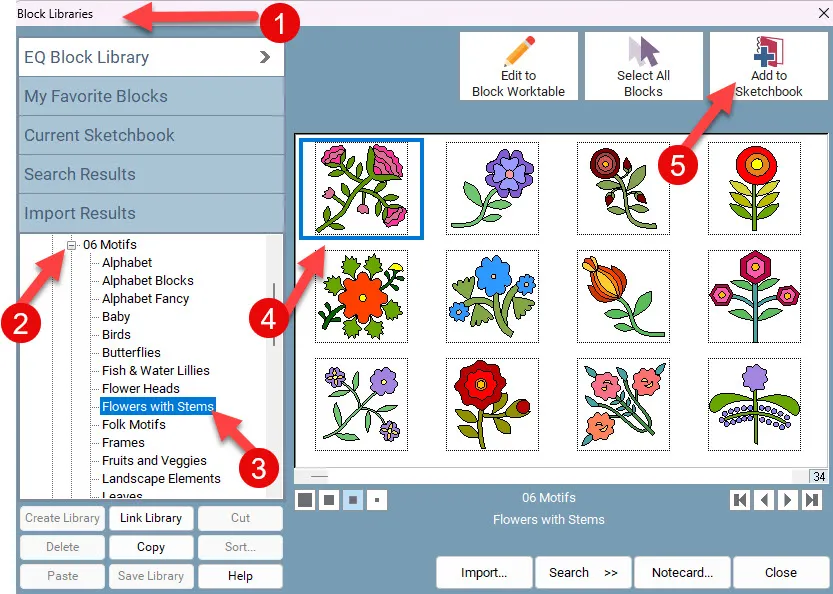
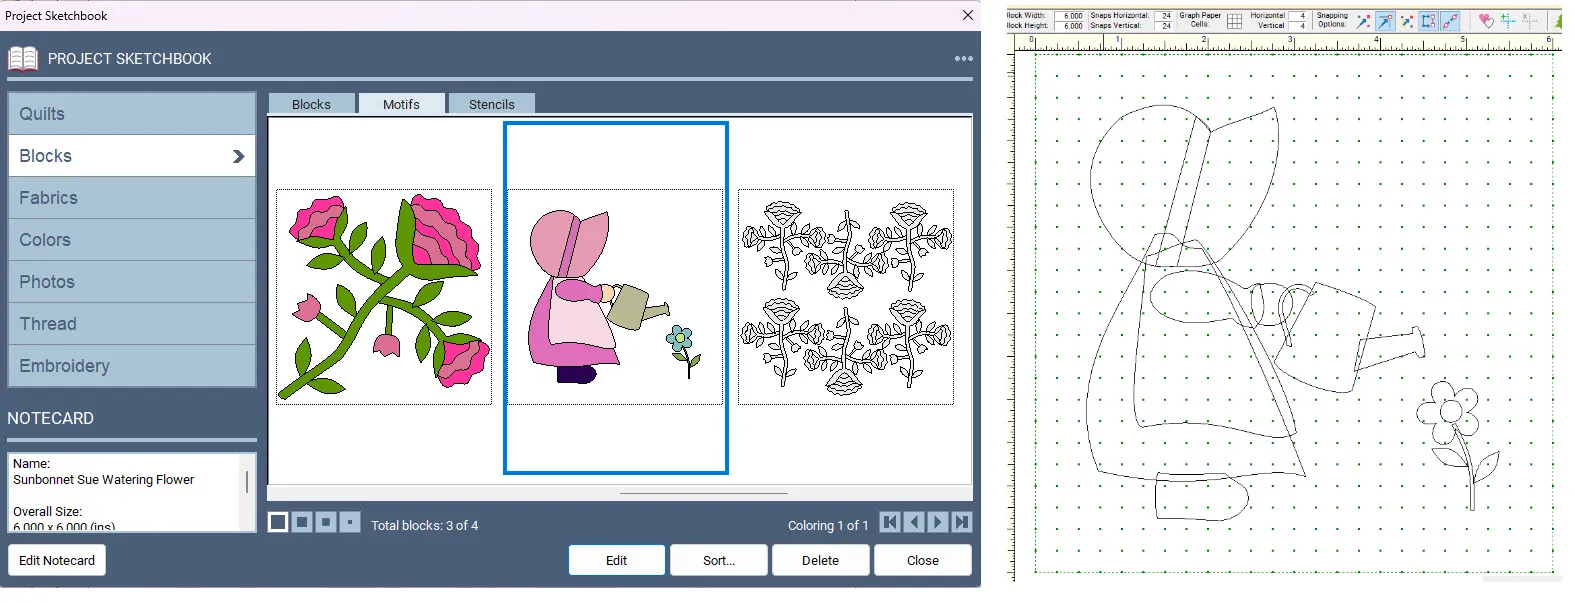
Still in the 06 motifs section, scroll down to the ‘sunbonnet motifs’ and select the sunbonnet with the watering can. Once it is selected, click on the ‘add to sketchbook’ in the upper right corner of the box. When done, click on the word ‘close’ at the bottom of the box.
These two designs are now added to our project sketchbook under the motifs tab.
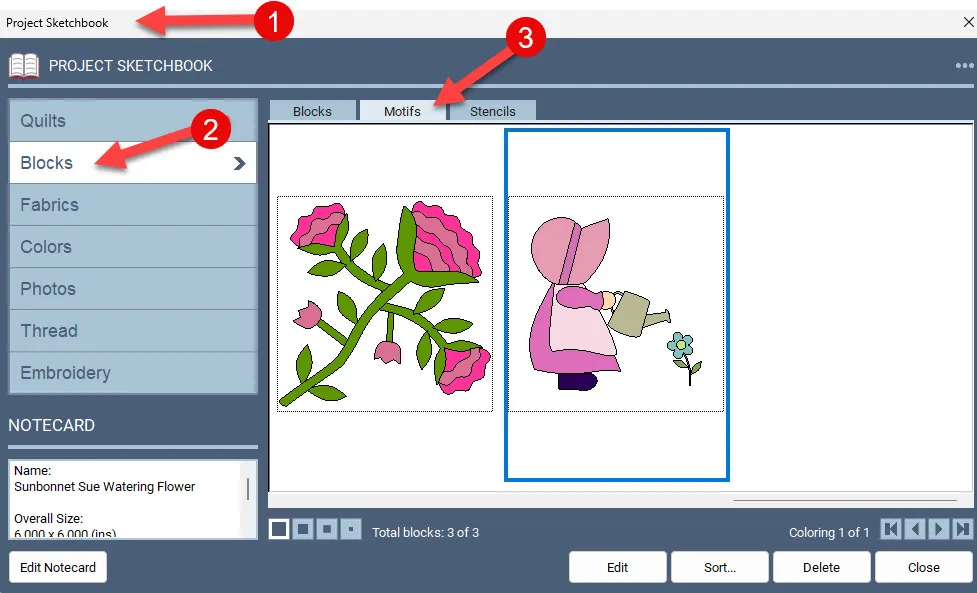
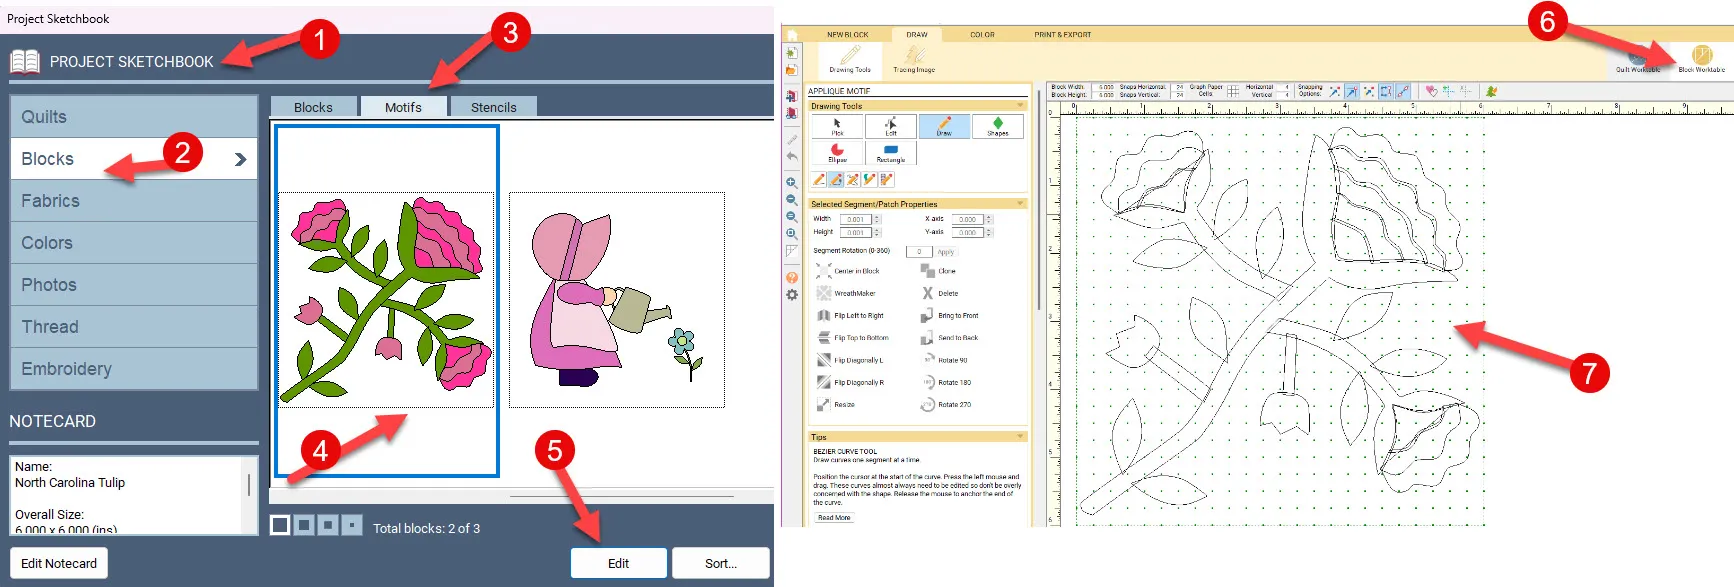
In the project sketchbook, click on the flower motif and then click on the word ‘edit’ at the bottom of the box. This will place the applique flower motif onto the block worktable.
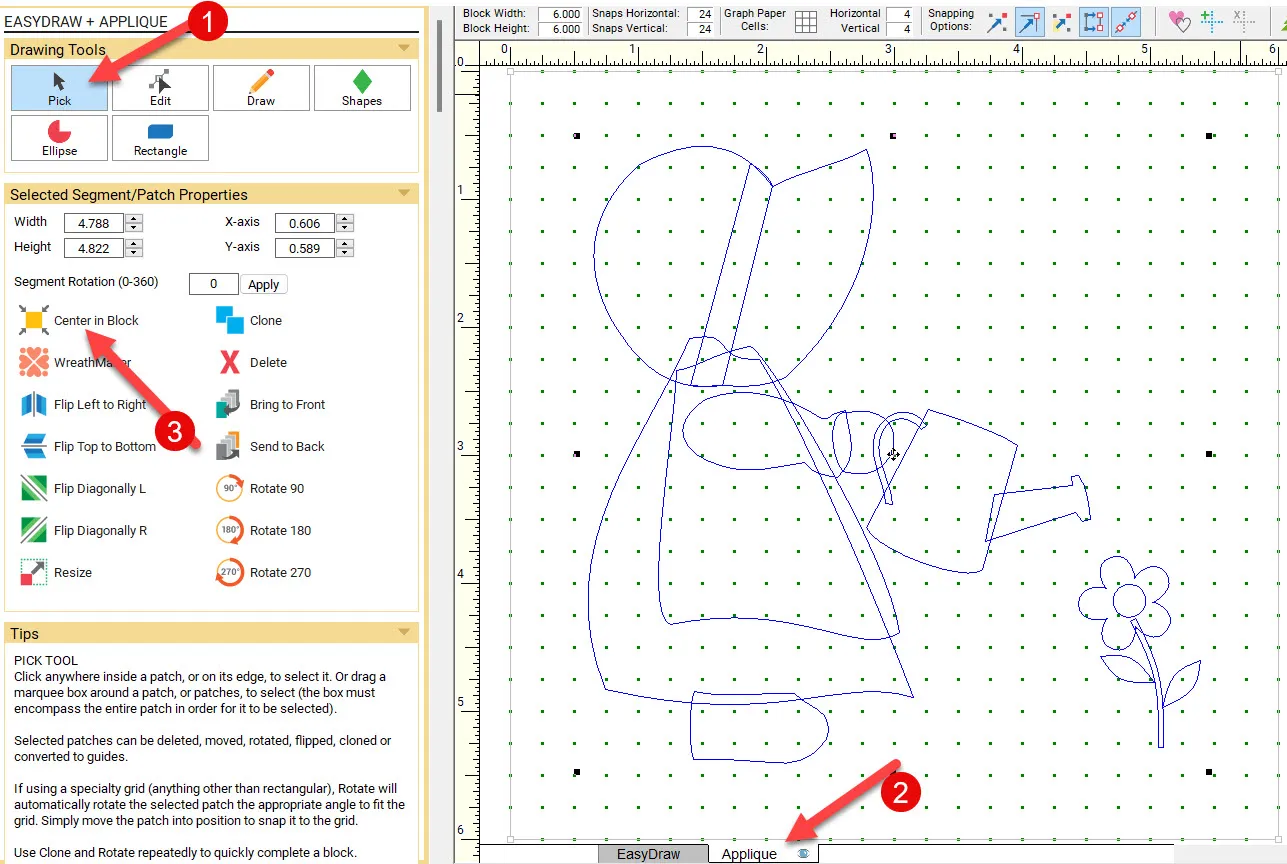
With the pick tool ![]() selected, click on CTRL + A on your keyboard to select the entire design page with all its elements. Once selected, you will see all the black edit boxes around the outer edge of the design.
selected, click on CTRL + A on your keyboard to select the entire design page with all its elements. Once selected, you will see all the black edit boxes around the outer edge of the design.
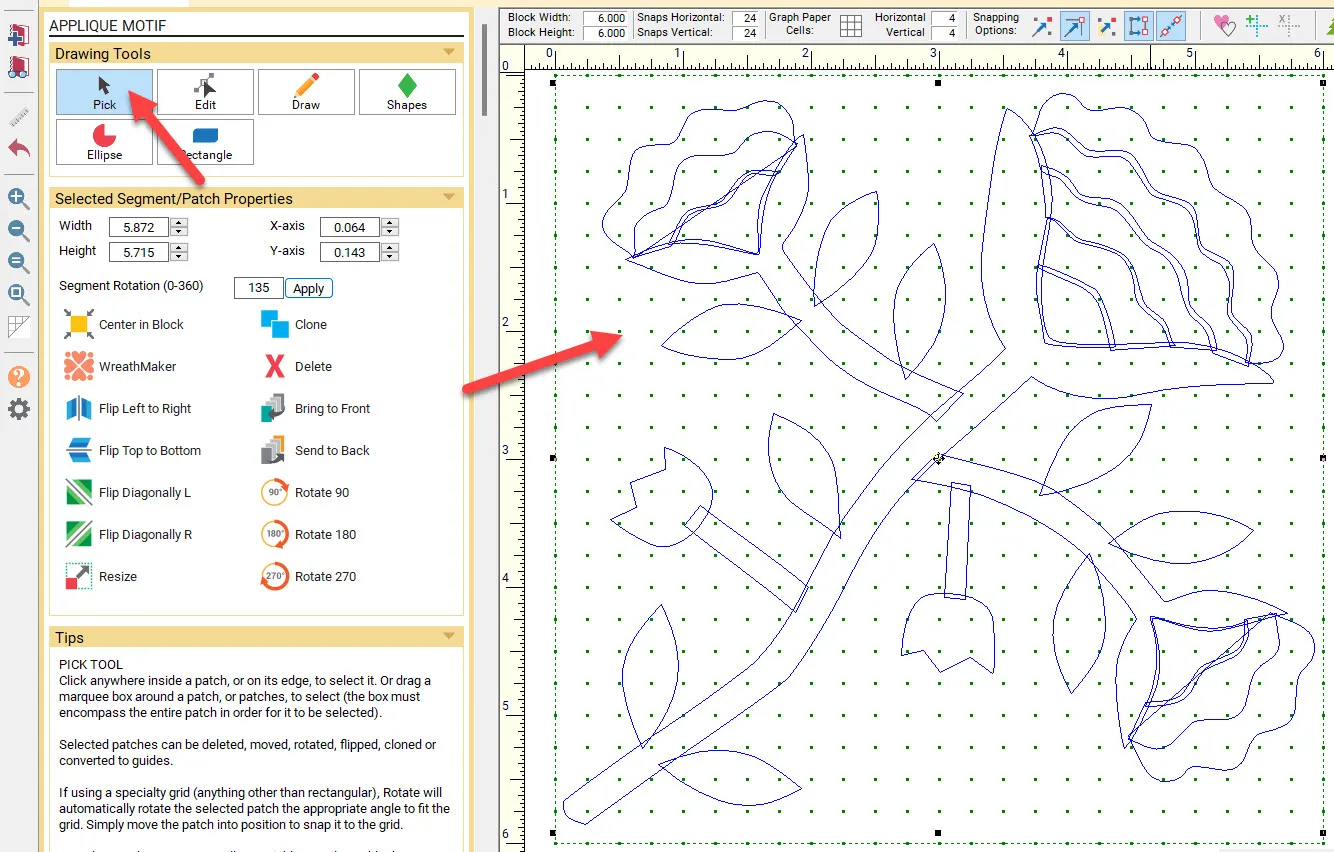
Resize the design to be 2 x 2 inches. Center the design in the block.
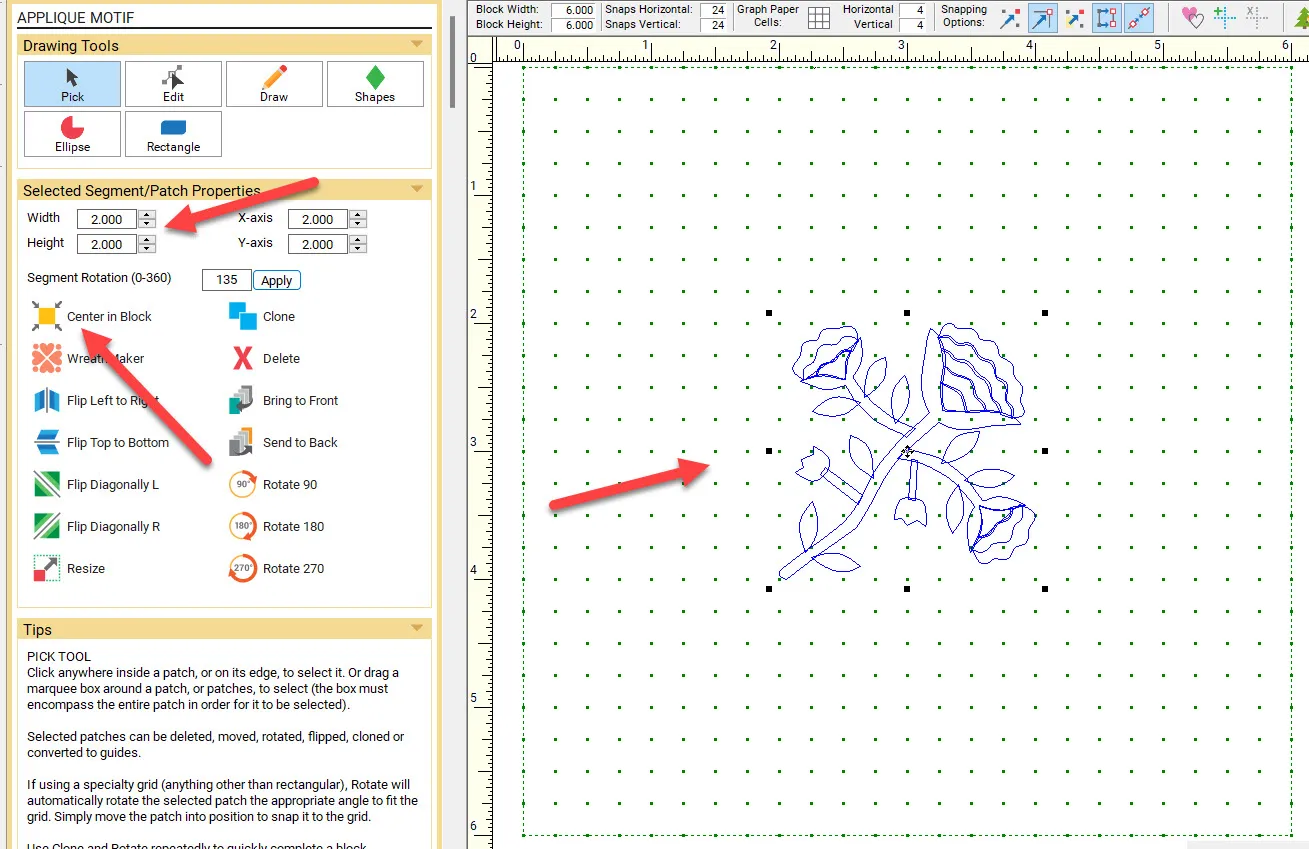
With the design still selected, type in the segment rotation to be 315 degrees and click on the apply button. This will rotate the design into an upright position.
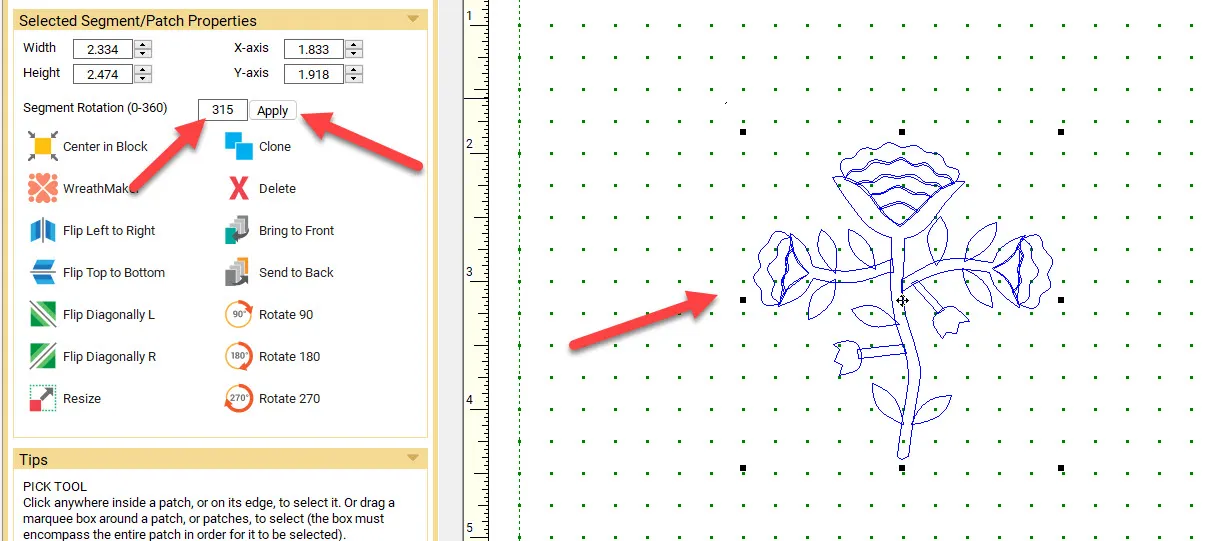
Click on the center crosshairs and drag the resized upright design to the upper left corner of the block.

With the design selected, click on the clone icon![]() and then click on the flip top to bottom icon
and then click on the flip top to bottom icon ![]() to turn the cloned copy upside down. Drag this copy up and next to the first design on the block.
to turn the cloned copy upside down. Drag this copy up and next to the first design on the block.
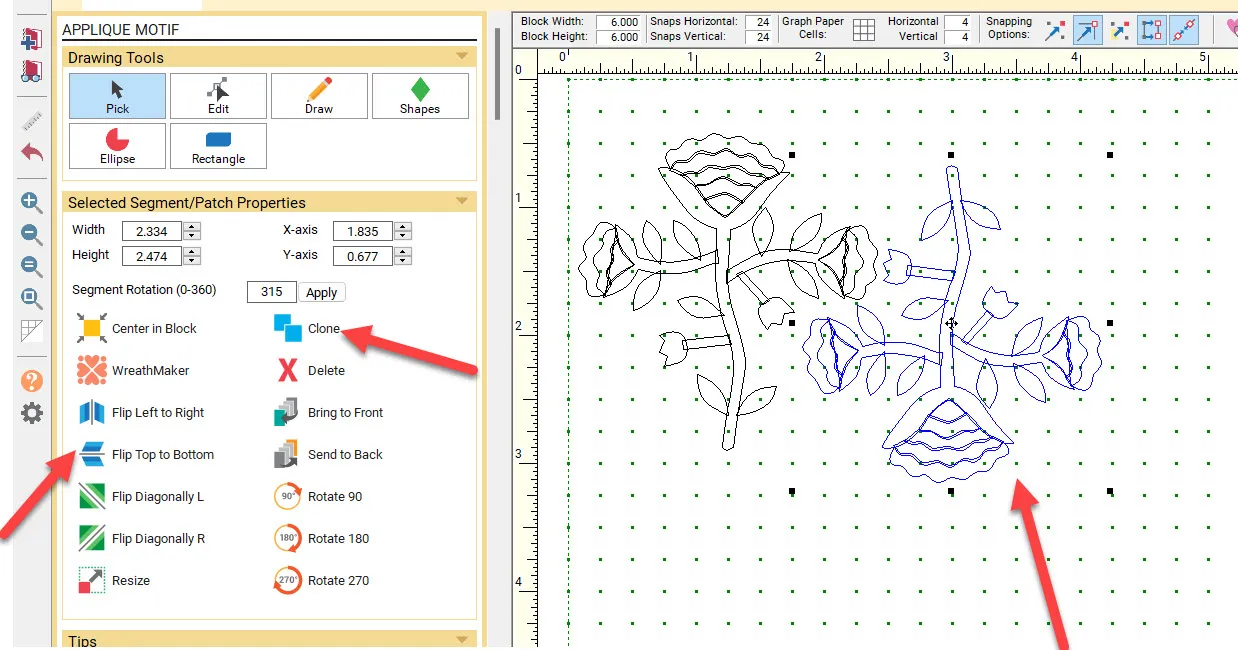
With the second copy still selected repeat the process of ‘clone’ and ‘flip top to bottom’ to the third copy of the design. Drag this to the top to have a row of flipped flowers.
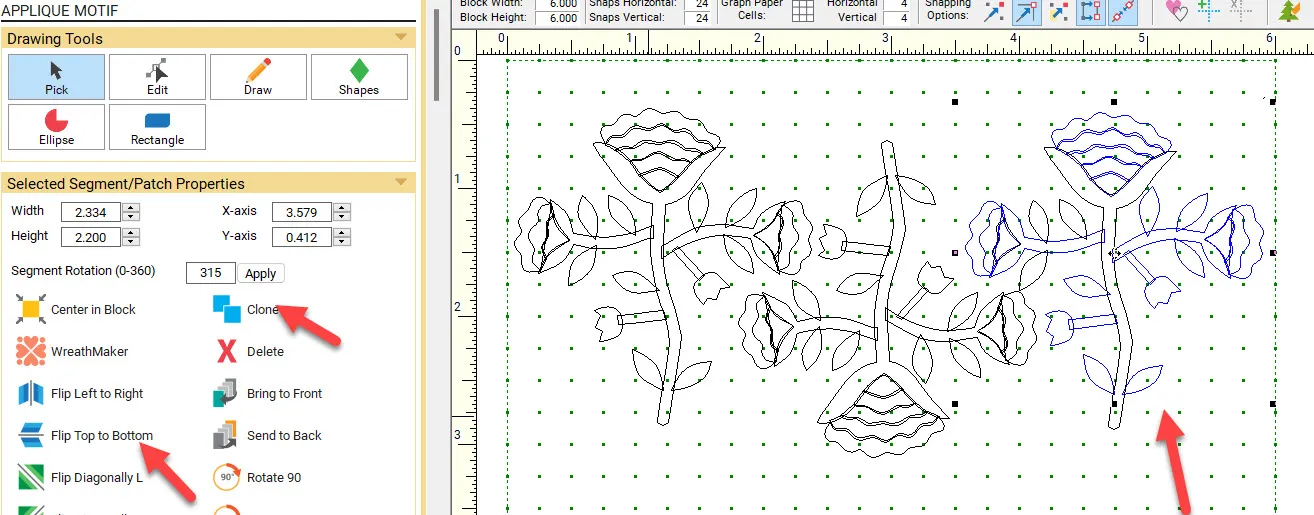
Once the row is completed, click on CTRL +A on your keyboard to select the entire row with all its elements. Click on ‘clone’ and then click/hold/drag/release the copied row to the bottom of the block.
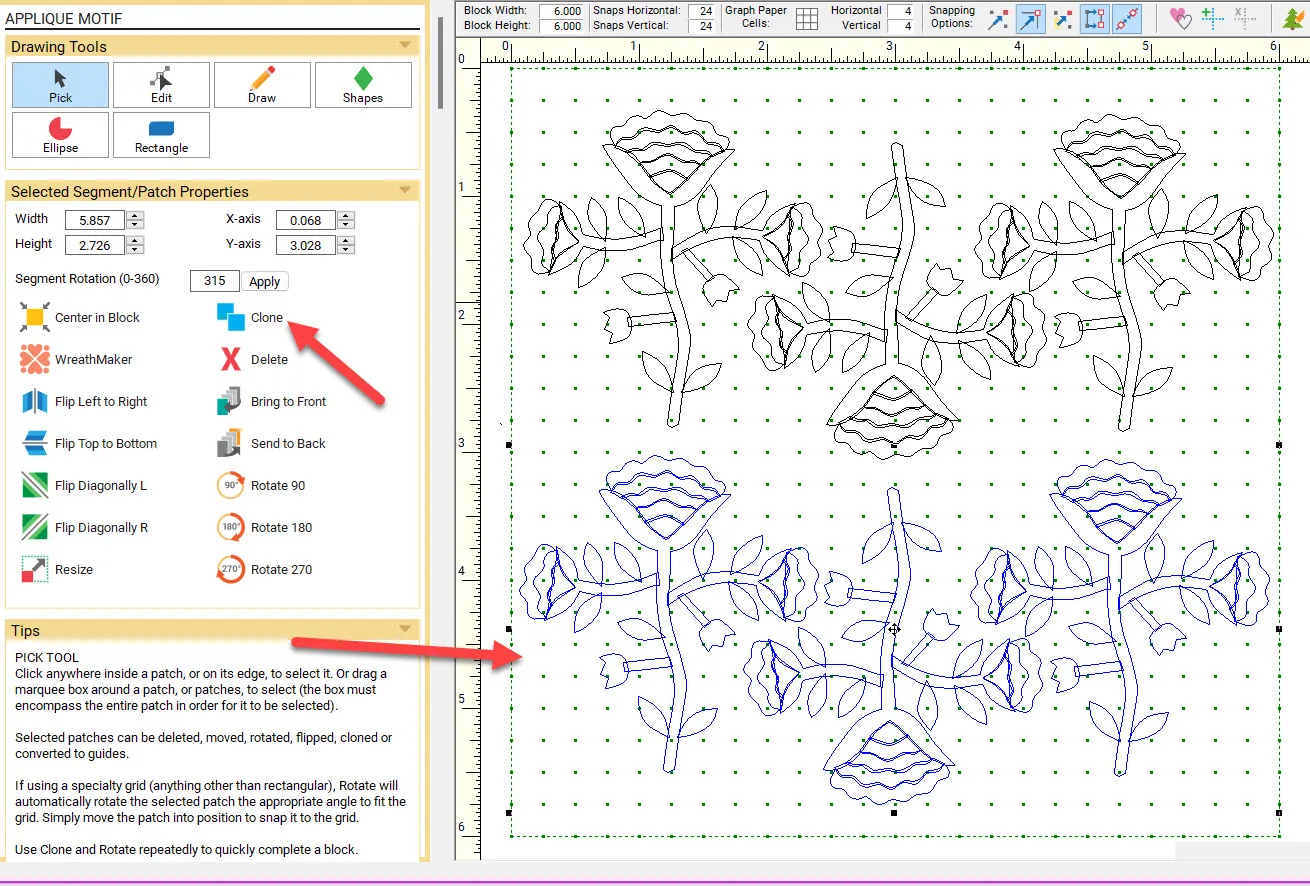
Add the design to the sketchbook. ![]()
Click on the color tab at the top of the screen. Click on the spray can icon![]() to select it. Under the color tab heading, scroll to the end of the colors and select a pale gray color. Move the cursor over to the worktable and click once on any of the applique elements to color all the elements the same color on the entire block.
to select it. Under the color tab heading, scroll to the end of the colors and select a pale gray color. Move the cursor over to the worktable and click once on any of the applique elements to color all the elements the same color on the entire block.
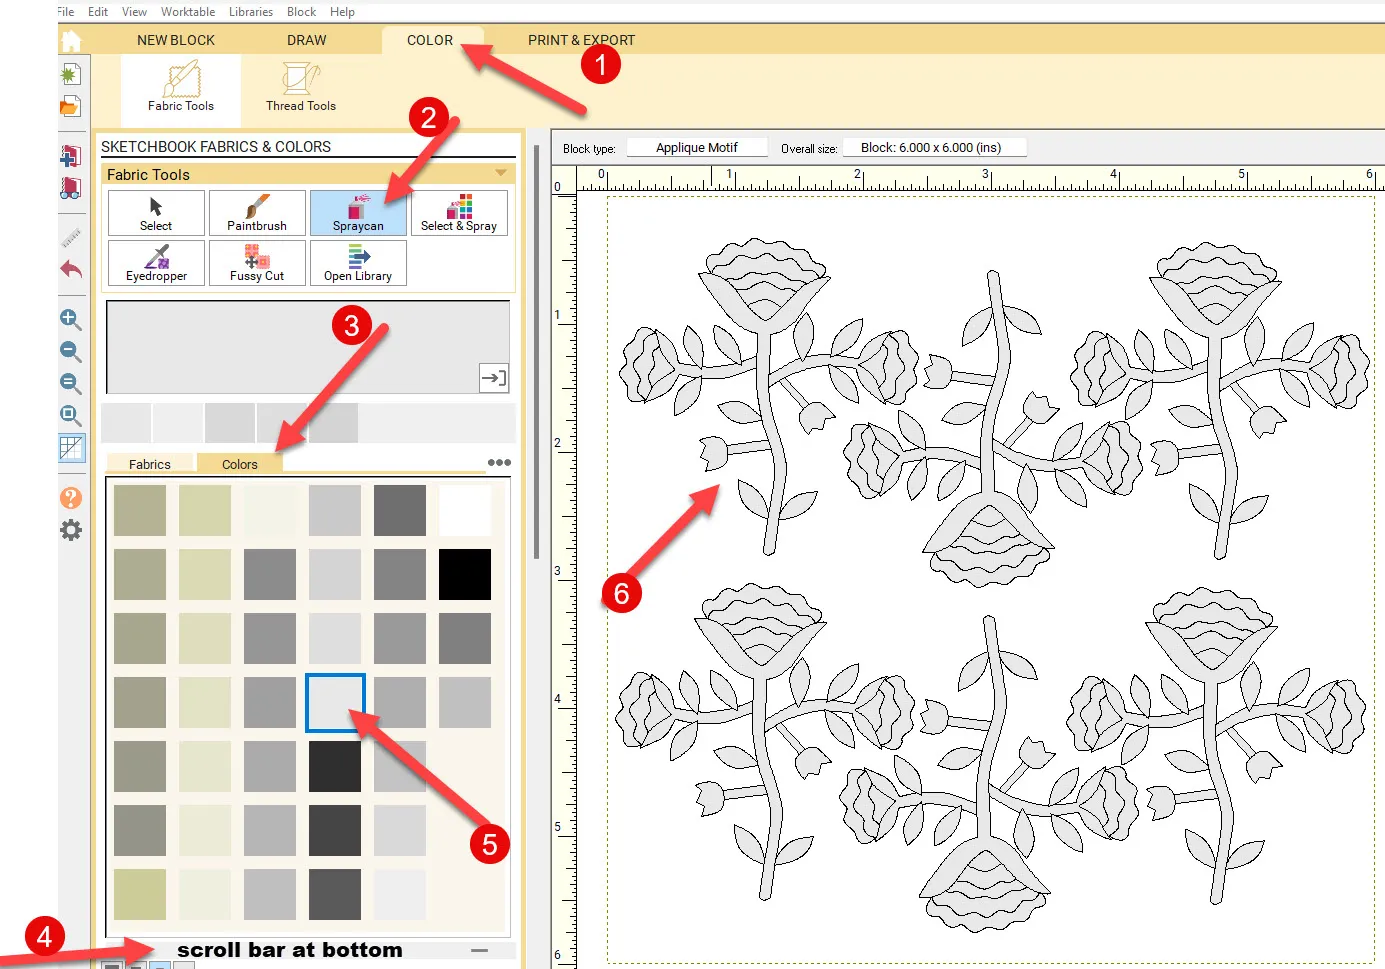
Click on the ‘hide/show outlines’ icon on the far left side of the screen to turn off the drawing lines so you only see the grayed image of the flowers.
Add the colored design to the sketchbook.![]()
I am not going to use the design as an applique. I want to use the design as a fabric for the background of the design that I will make into a pillow top. This means I need to turn it into an image and then use the image to create a fabric designed with my gray flowers.
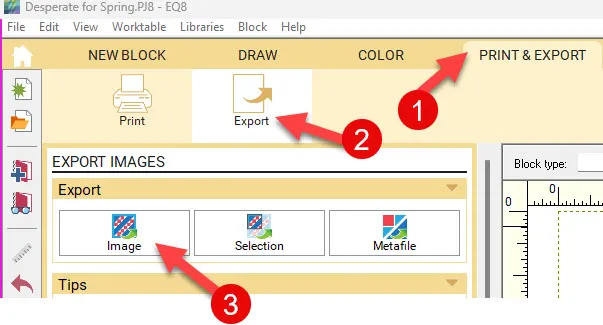
Click on the ‘print and export’ tab at the top of the screen. From the ribbon select the ‘export’ icon. Then click on the ‘image’ icon.
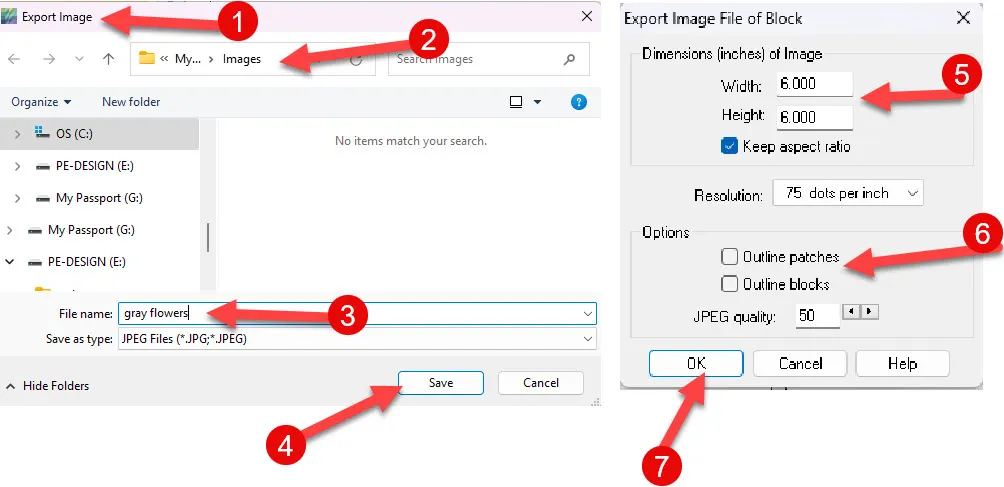
The ‘export image box’ will open. Name your image and then click on the ‘save’ at the bottom of the box. A second ‘export image file of block’ box will open asking you what size to save it at. The default size of 6 inches is perfect for this project. Uncheck the ‘outline patches and outline blocks’ in the options area of the box. Click on the OK at the bottom of the box. The image will be saved at the correct size in the images folder of the EQ program.
Click on the image worktable icon  on the upper right side of the screen.
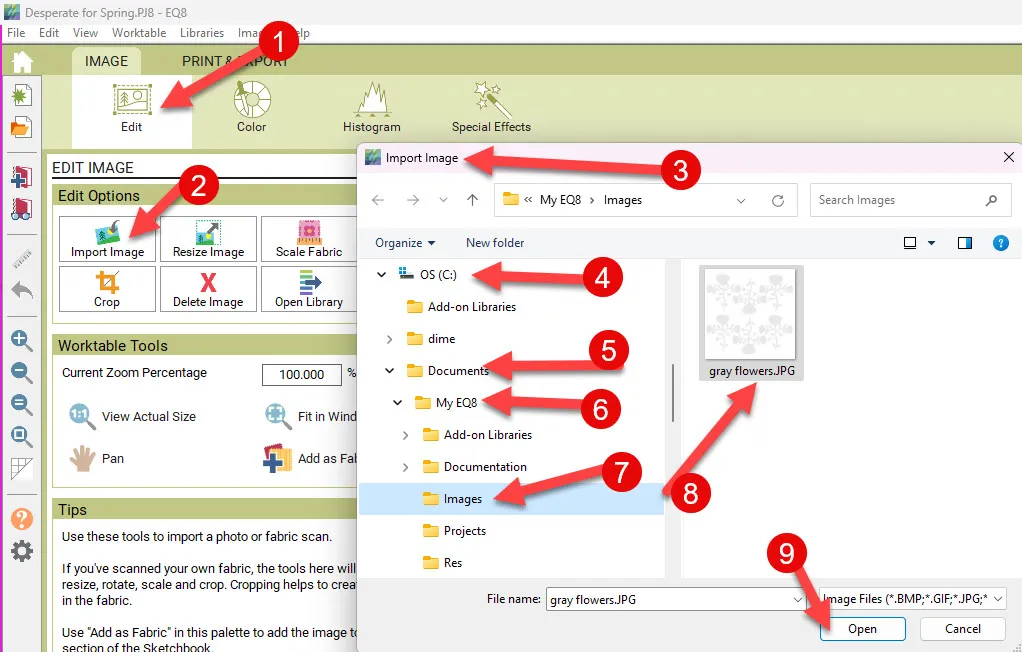
Click on the ‘edit’ icon on the ribbon at the top of the screen and select the ‘import image’ icon from the menu. The import image box will appear. Navigate to your EQ program. C>Documents>MyEQ8>Images. Click on the image of the flowers we saved to select it and then click on the word ‘open’ at the bottom of the box.
The image of the flowers will appear on the image worktable at the 6-inch size we specified. Click on the ‘add as fabric’ icon.
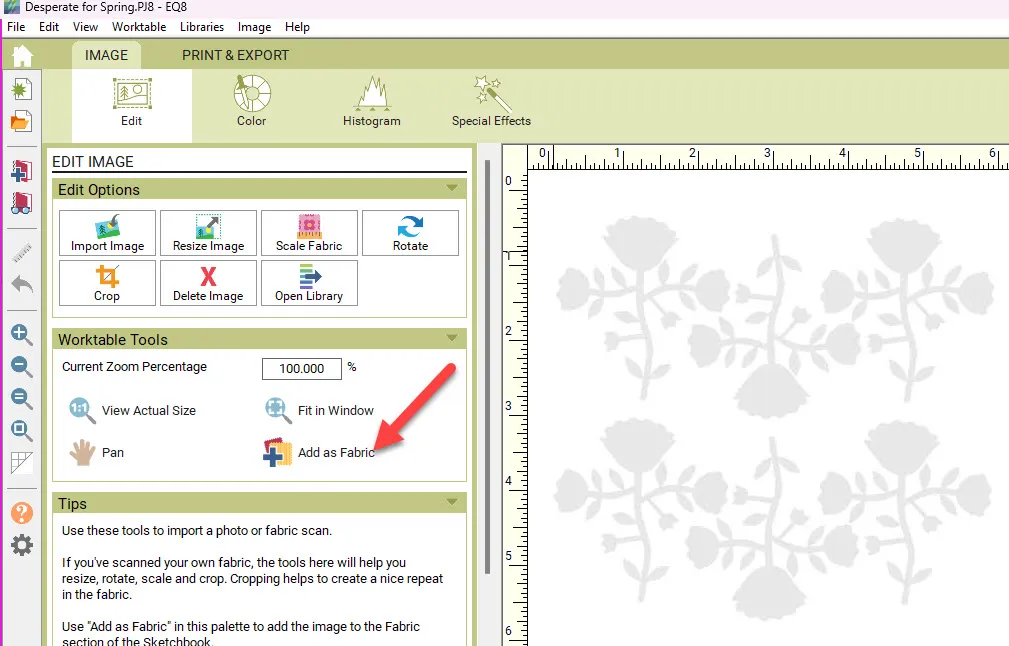
The image is now a fabric selection in the project folder at the end of the default fabrics. I would print my background block onto EQ printable fabric sheets to use as the foundation of the sunbonet applique. This can be done from the image worktable.
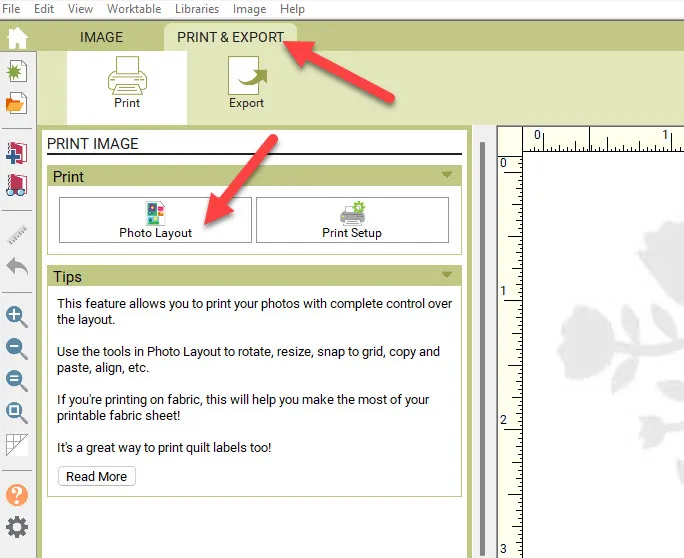
Click on the ‘print & export’ tab at the top of the screen. Click on the photo layout option.
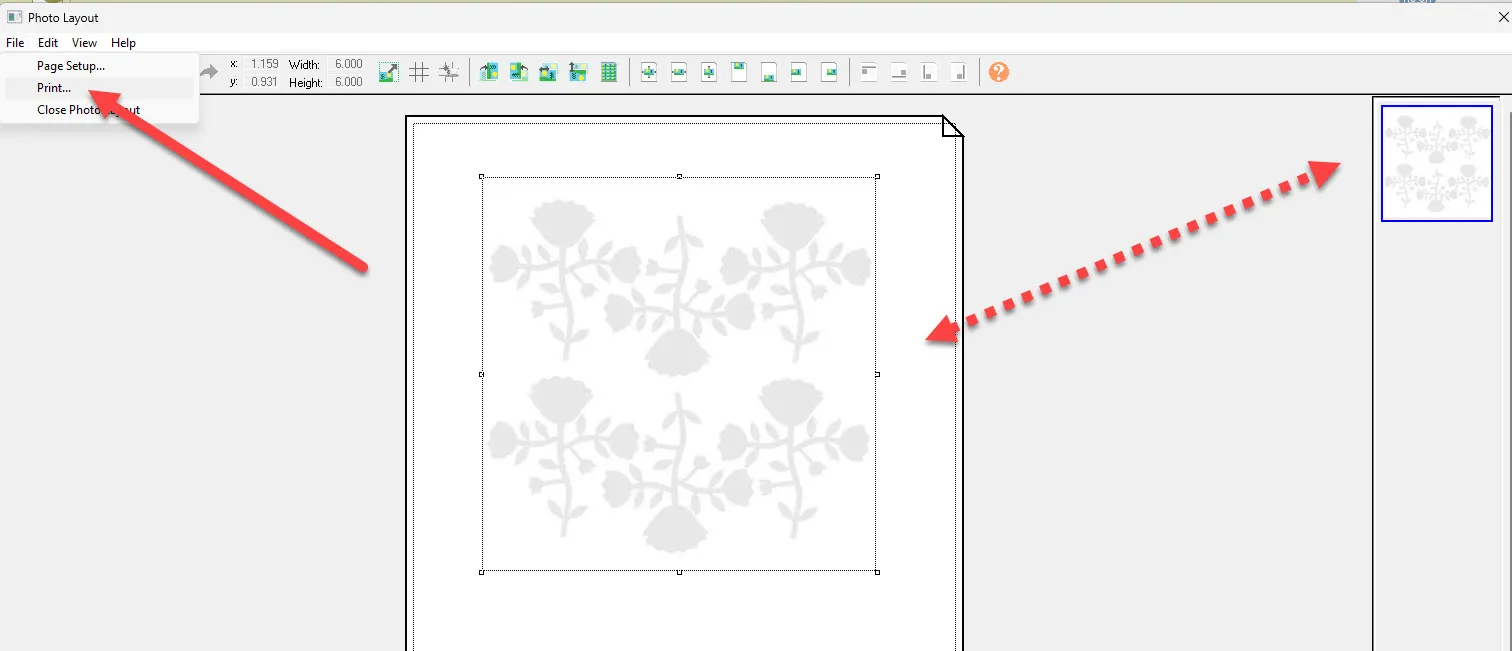
Click/hold/drag/release the image of the block onto the page. The size of the block to print is 6 x 6 inches. Click on FILE>print to print the design onto EQ printables fabric. This will be the background fabric to use when adding the applique elements to the pillow top design.
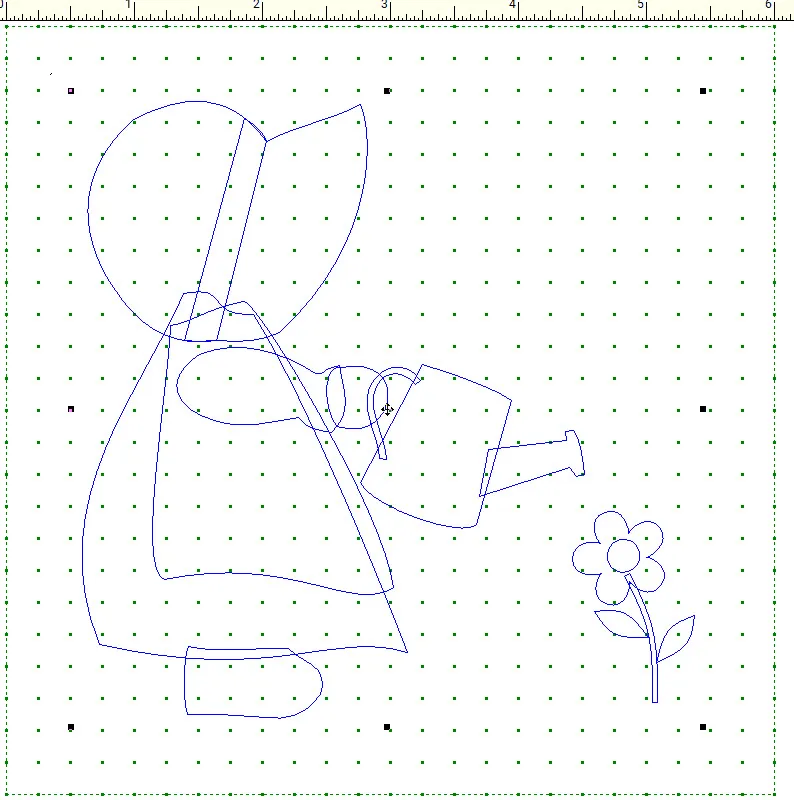
Click on the ‘view sketchbook’ icon ![]() on the far left side of the screen. Under the blocks heading, select the motifs tab. Click on the sunbonnet sue design and then click on the word ‘edit’ at the bottom of the box. This will open the design on the block worktable.
on the far left side of the screen. Under the blocks heading, select the motifs tab. Click on the sunbonnet sue design and then click on the word ‘edit’ at the bottom of the box. This will open the design on the block worktable.
The sunbonnet design is a motif. I want the motif to be on a background block so I need to copy the pieces and paste them onto a block with a background.
With the design on the worktable, click on CTRL + A to select the entire design with all its elements. When it is selected you will see the black selection handles around the design. and the elements turn blue.
On the keyboard, click on CTRL + C to copy the design elements. You will not see anything change, but a copy of the design is now on the clipboard.
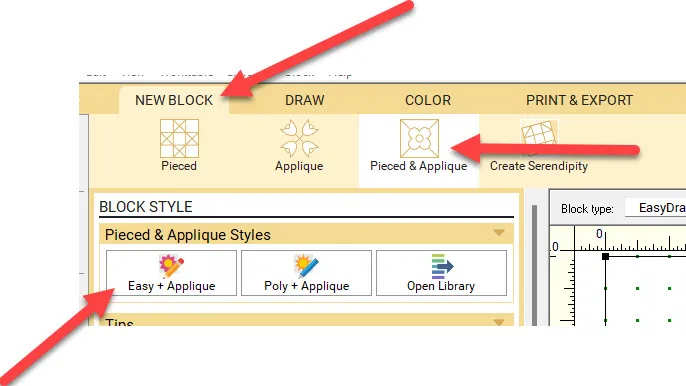
Click on NEW BLOCK>Pieced & Applique>Easy + Applique at the top of the screen.
On the new drawing board, click on the applique tab at the bottom of the screen. Right-click on the center of the block and choose the ‘paste’ option to place a copy of the sunbonnet design on the block. While it is selected, center it in the block. NOTE: You can also use the shortcut key CTRL + V to paste the design onto the new block.
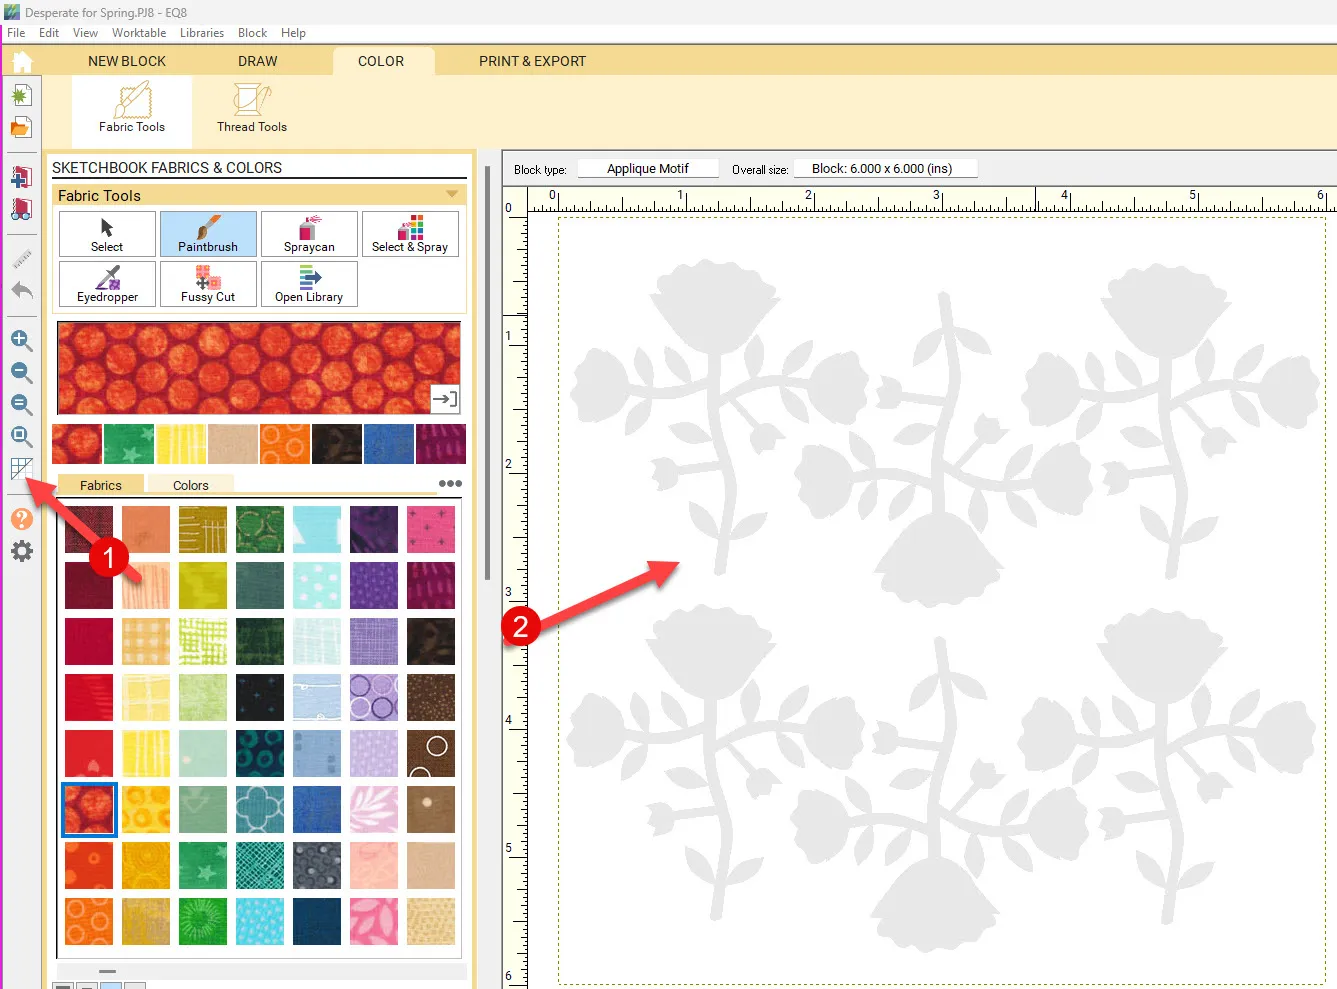
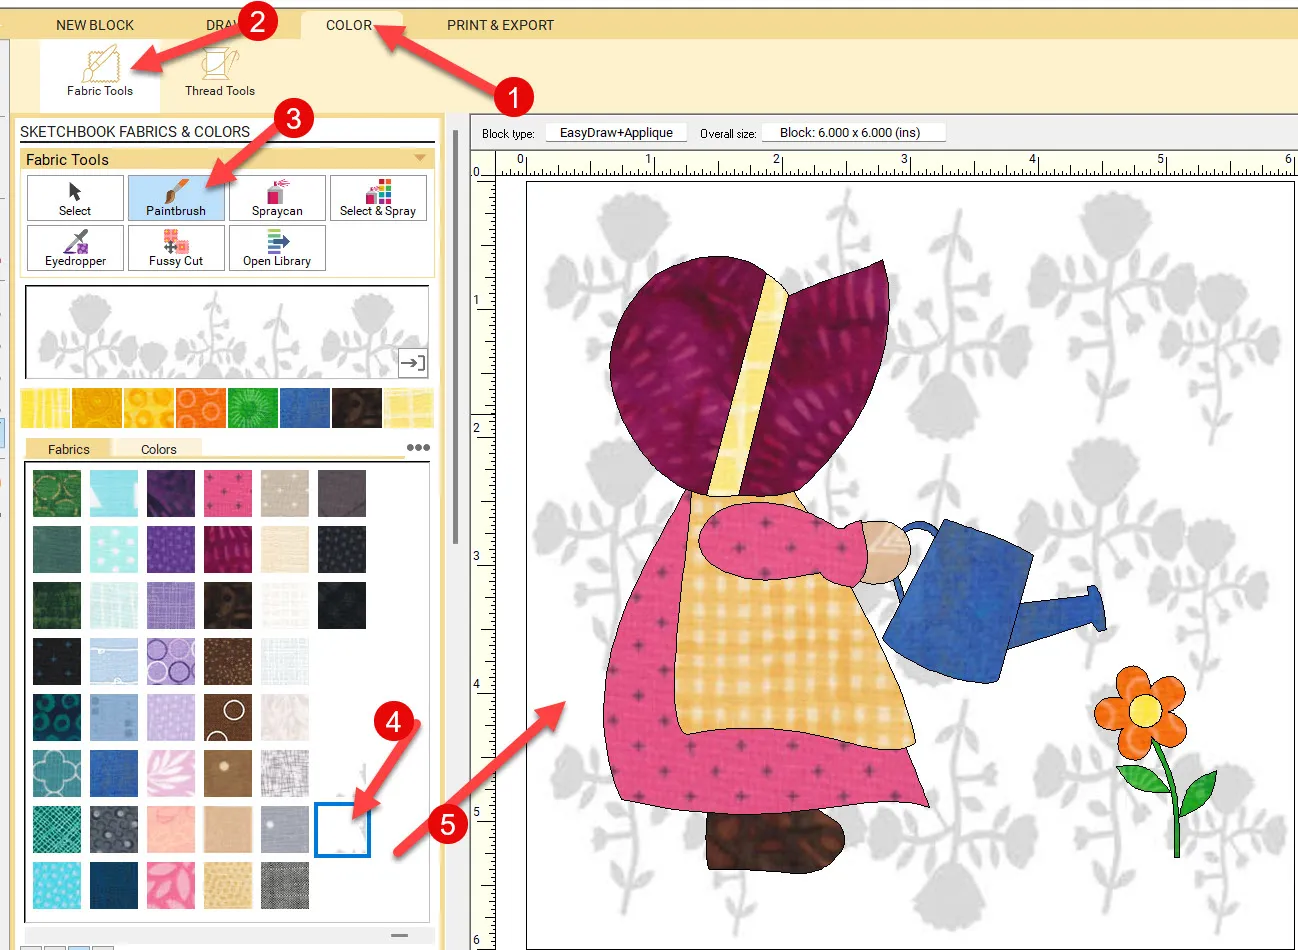
Click on the color tab at the top of the screen and then use the paintbrush tool ![]() to select fabrics to color the block. The gray image of the fabric we created is at the very end of the fabric selection box. Pick bright bold springtime colors for the sunbonet sue design and the other applique objects.
to select fabrics to color the block. The gray image of the fabric we created is at the very end of the fabric selection box. Pick bright bold springtime colors for the sunbonet sue design and the other applique objects.
Add the block design to the sketchbook.![]()
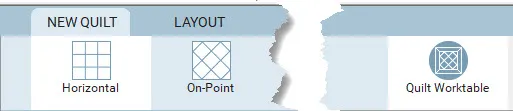
Click on the quilt worktable icon on the upper right side of the screen. Choose NEW QUILT>Horizontal from the ribbon at the top of the screen.
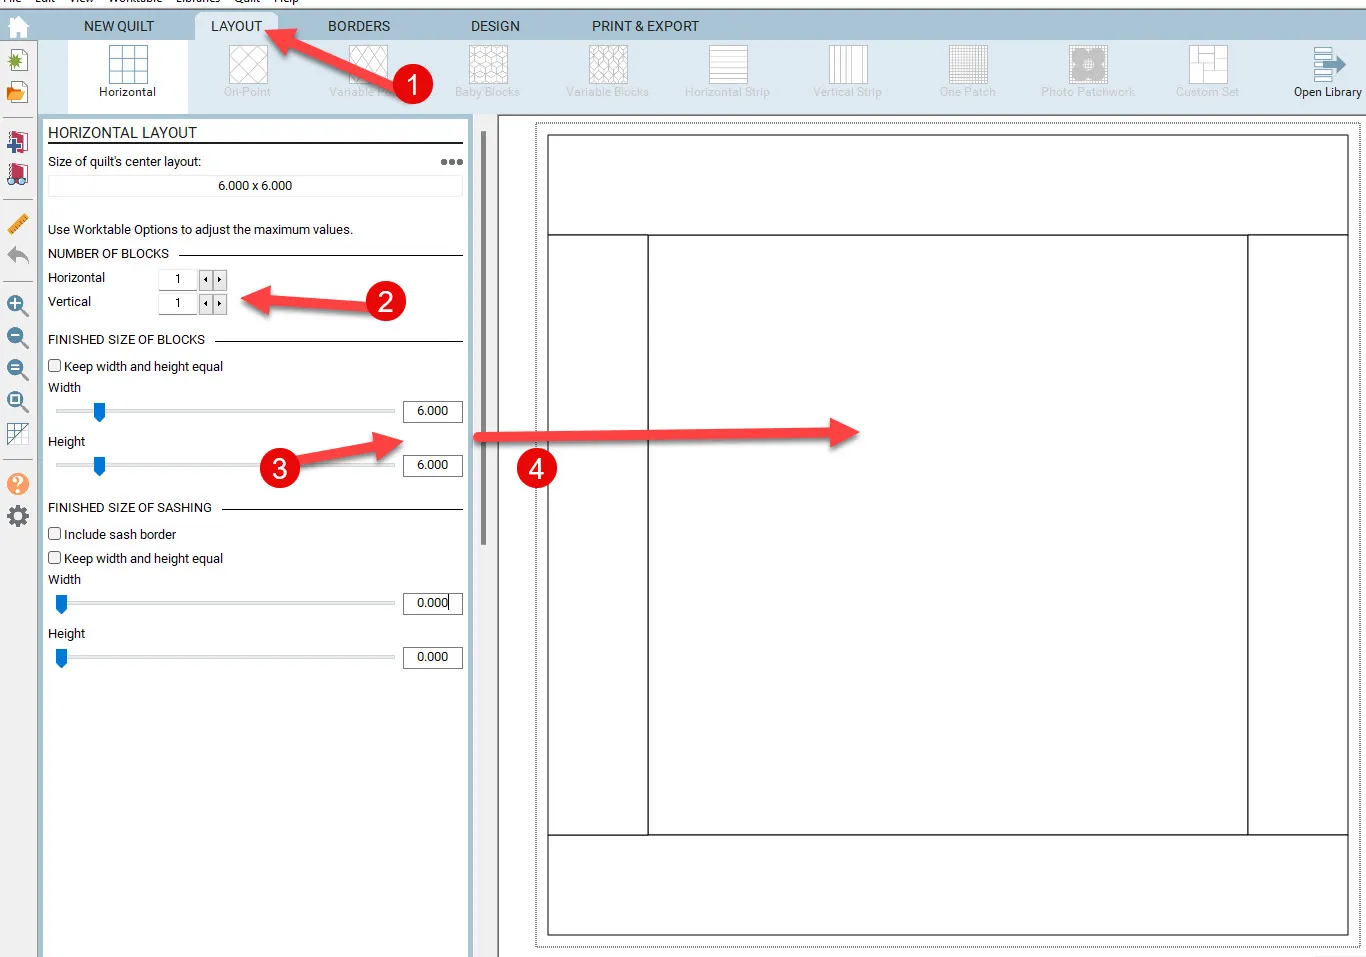
Click on the layout tab at the top of the screen. Change the layout to be 1 x 1 horizontal and vertical and the size to be 6 x 6 inches.
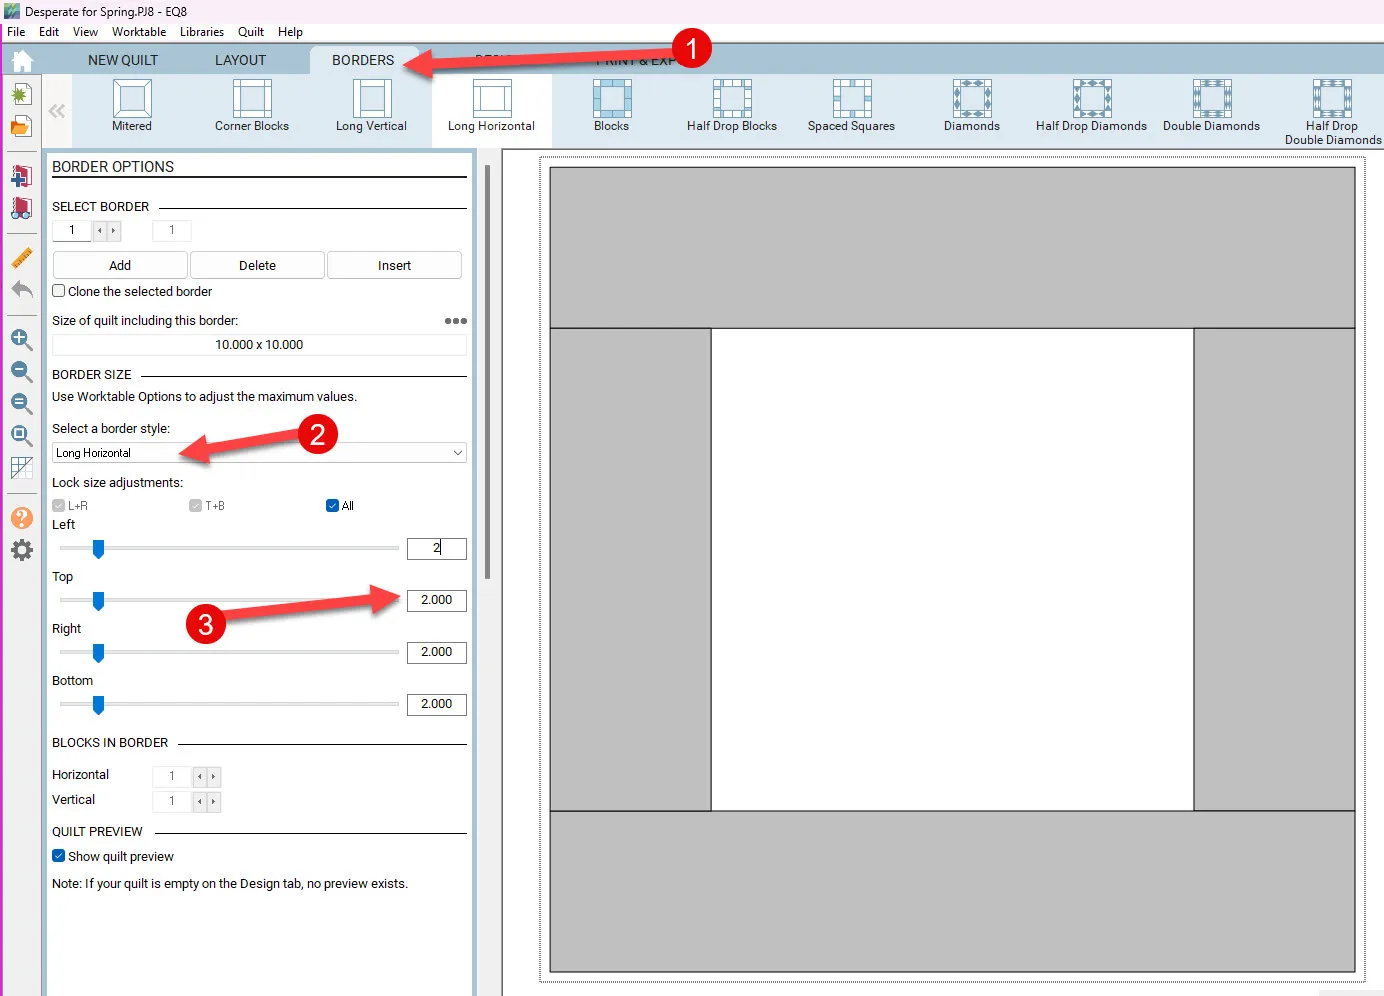
Click on the borders tab at the top of the screen. Select the long horizontal border style and set the size to 2 inches on all sides.
Click on the design tab at the top of the screen and select the block tools from the ribbon. Using the set block tool, scroll to the end of the blocks and select the sunbonnet block we created. Click on it to select it and then click on the middle section of the quilt layout to set the block in the center area.

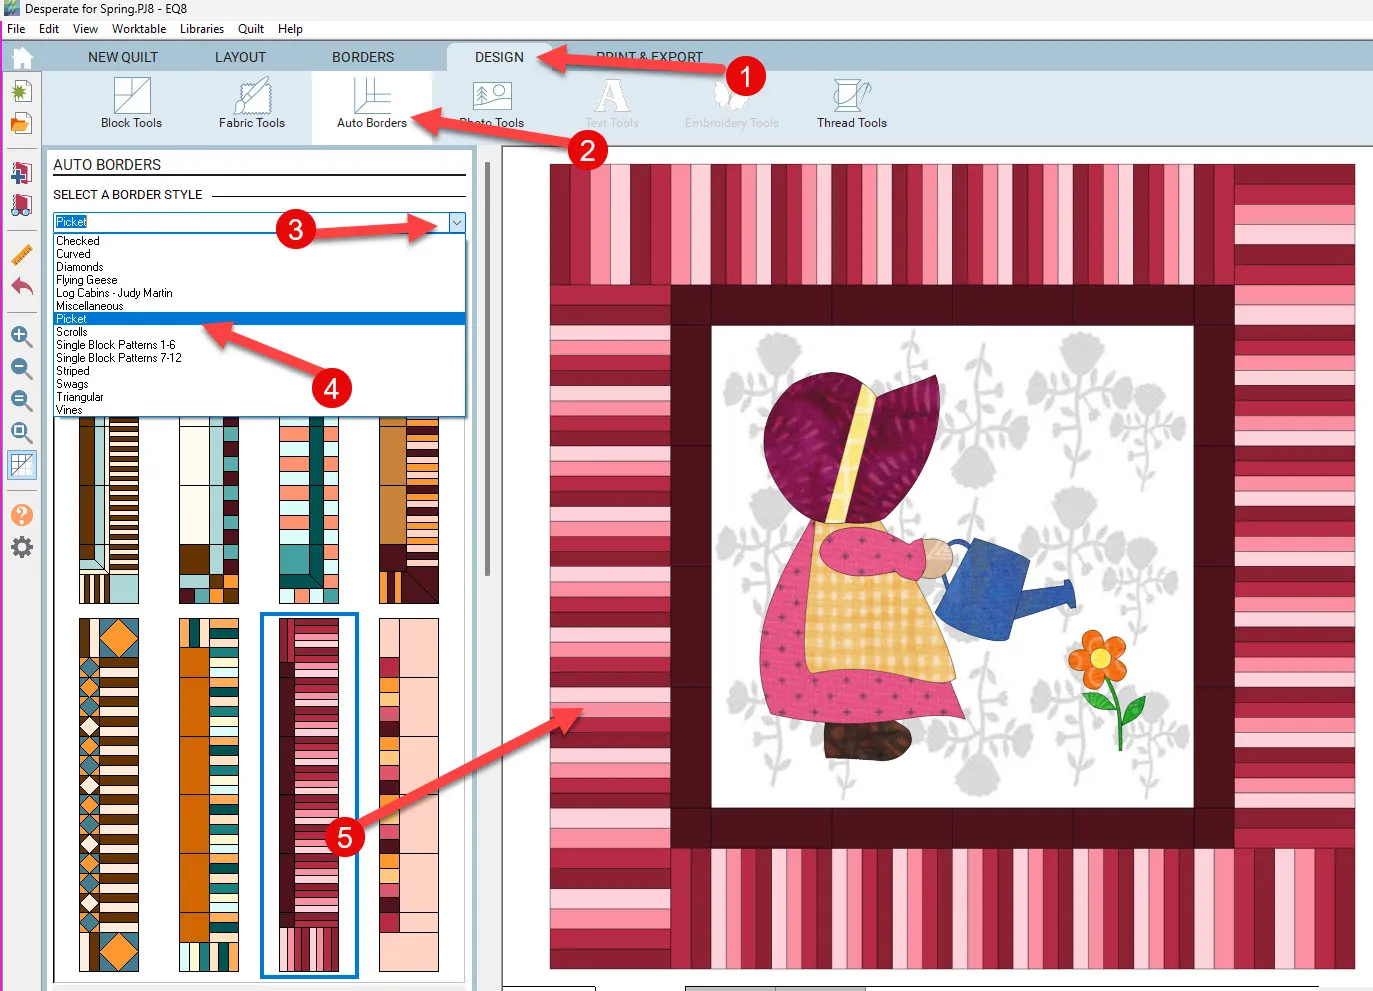
On the design tab a the top of the screen, click on the auto borders from the ribbon. From the drop-down menu, select any border option you wish to use and then click on the border of your choice to select it, and then click once on the border on the worktable to fill all four borders with one click.
Add the quilt layout to the sketchbook ![]()
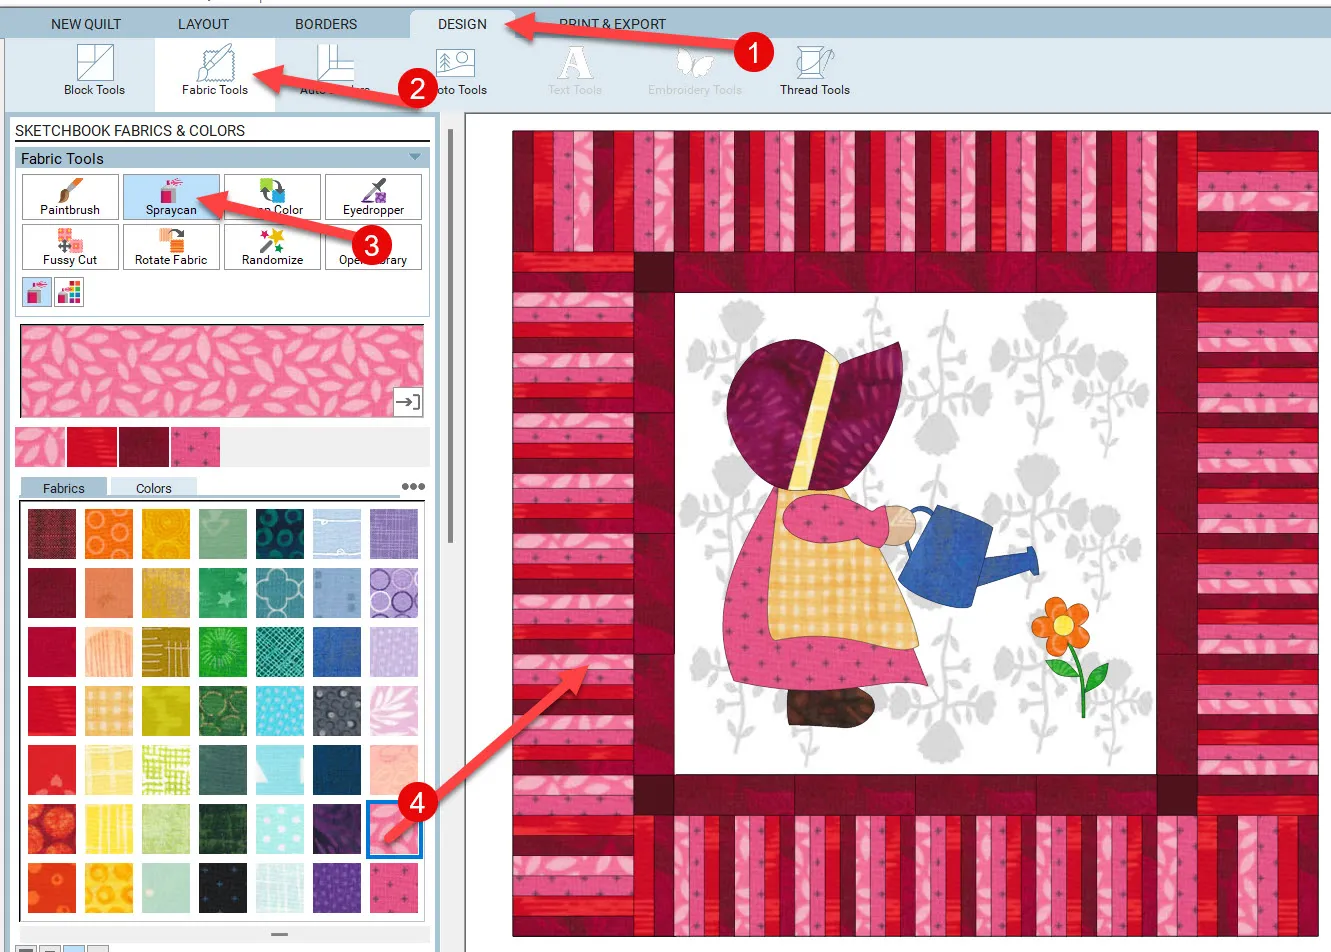
Click on the fabric tools from the ribbon at the top of the screen and select the spray can. Click on any color of your choice and while holding down the CTRL key on the keyboard, click on any segment of the border to color all similar segments with the same color with one click of the mouse.
Add to sketchbook ![]()
Playing with my EQ8 to lighten my dreary wintery day with a springtime design has been great fun. Even if I choose to never use the designs I create in EQ8, playing with the possibilities is a great pastime for me. Enjoy your creative experience when using the EQ8 program!


03-18-2024
3:04 am
Hi Yvonne,
That is a fab tutorial, basically covers everything what I have been looking for.
One of the questions I want to ask is the background that you created is it possible to be printed on to a fabric like a home printer with the current availability of fabric rolls . Just a thought.
Thanks again.
Sheela.
03-18-2024
11:56 am
So glad you found this blog helpful. Yes I print onto fabric sheets using my home printer.
03-18-2024
1:53 pm
I sew want this program! Getting there! Have the laptop to use the program on, next is to save for program! Love all that you showed! Amazing and detailed description on what to do! Thank you!!
03-18-2024
1:58 pm
Therese–You will absolutely love all you can do with the program!
05-08-2024
3:29 pm
Thanks, I did it! You are a great teacher!
05-08-2024
4:32 pm
Cherie I am glad you gave this a try. Enjoy your EQ8!