

I would prefer not to quilt in the summer months. I find handling a quilt in summer to be too hot during warm weather. Instead, I do all my planning and designing during the summer using my EQ8 and then I am ready to go when the cooler weather starts. I sit outside in the sunshine with my computer and get lost in the design process of creating quilts.
Double click on the EQ8 icon to launch the program.![]()
On the opening screen, click on the new project icon ![]() on the upper left side of the screen.
on the upper left side of the screen.
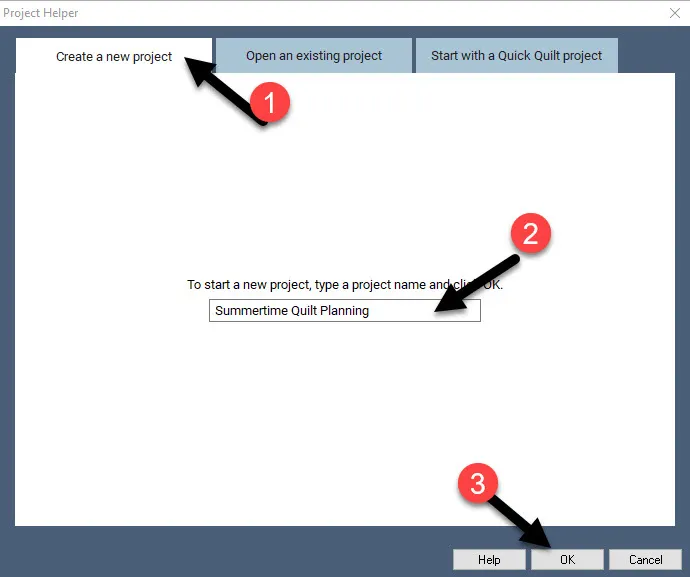
In the project helper box, click on the ‘create a new project tab’ and then type in the name ‘Summertime Quilt Planning’. Click the OK at the bottom of the box.
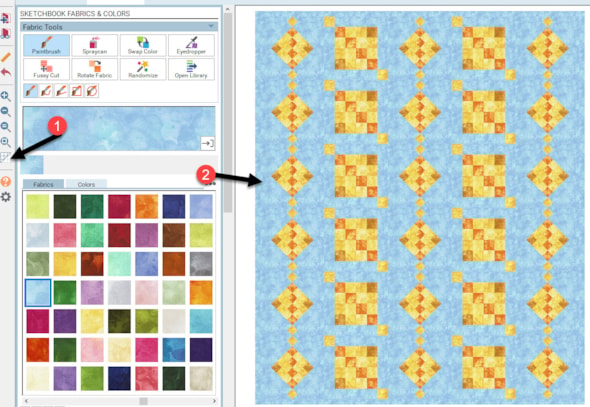
I used the colors of the clear blue sky and the bright oranges and yellows of the summer sunshine to be my inspiration for my quilt design.
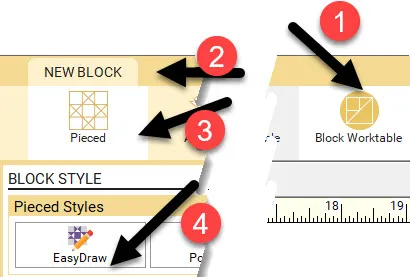
Click on the block worktable icon on the upper right side of the screen. Click on the NEW BLOCK>Pieced>EasyDraw from the ribbon at the top of the screen.
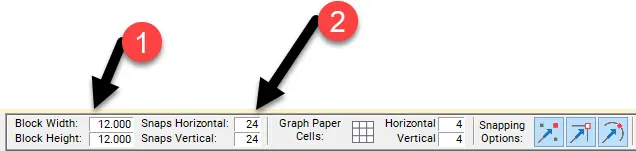
On the properties bar at the top of the screen change the properties to block width and height 12 inches and the snaps horizontal and vertical 24.
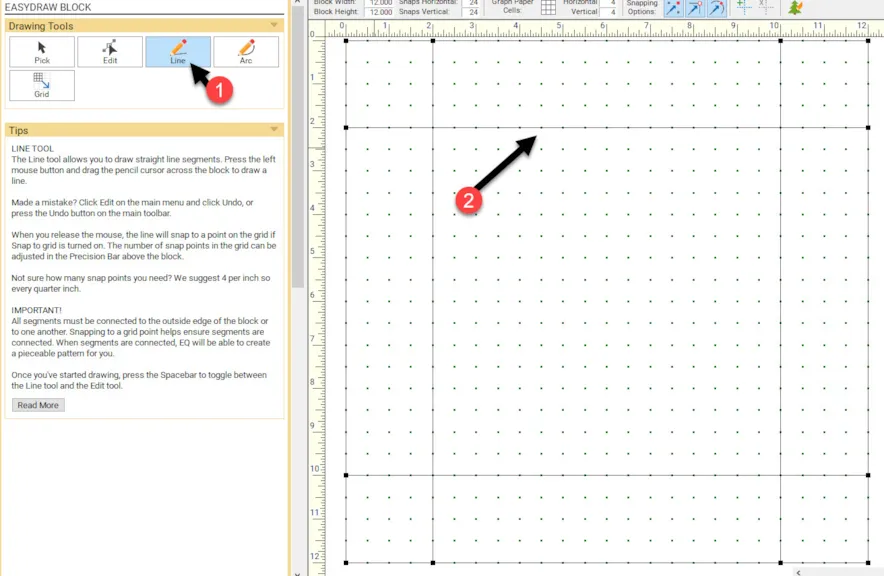
Click on the line drawing tool ![]() to select it. Move the cursor over to the worktable and click/hold/drag/release a line both horizontal and vertical 2 inches from the outside edge of the block.
to select it. Move the cursor over to the worktable and click/hold/drag/release a line both horizontal and vertical 2 inches from the outside edge of the block.
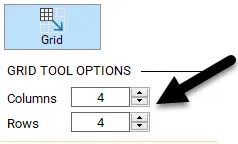
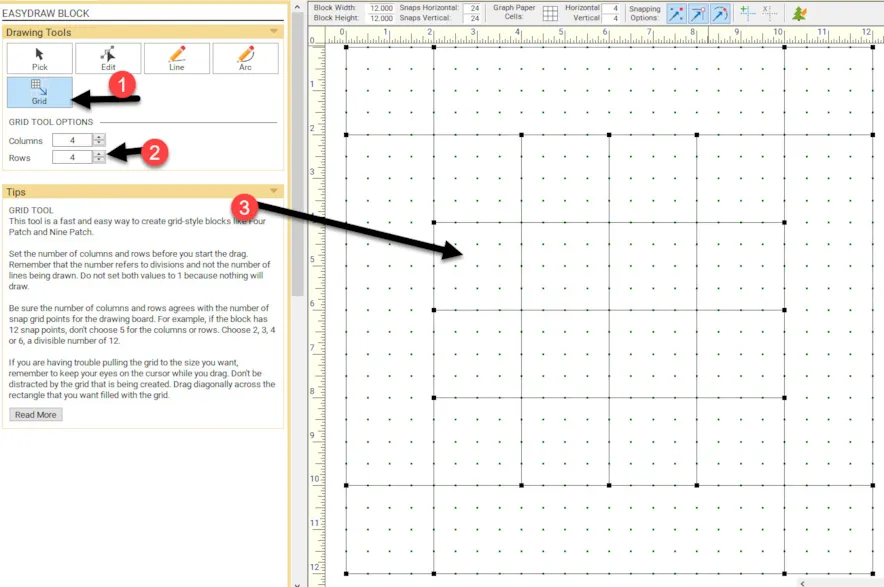
Click on the grid tool ![]() to select it. In the grid tool options, set the columns and rows to be 4 x 4.
to select it. In the grid tool options, set the columns and rows to be 4 x 4.
Move the cursor over to the center of the block workable and click/hold/drag/release a grid from the upper left corner to the lower right corner of the inner square on the block.
Click on the color tab at the top of the screen. Click on the Fabric Tools from the ribbon at the top of the screen and then select the paintbrush tool. ![]()
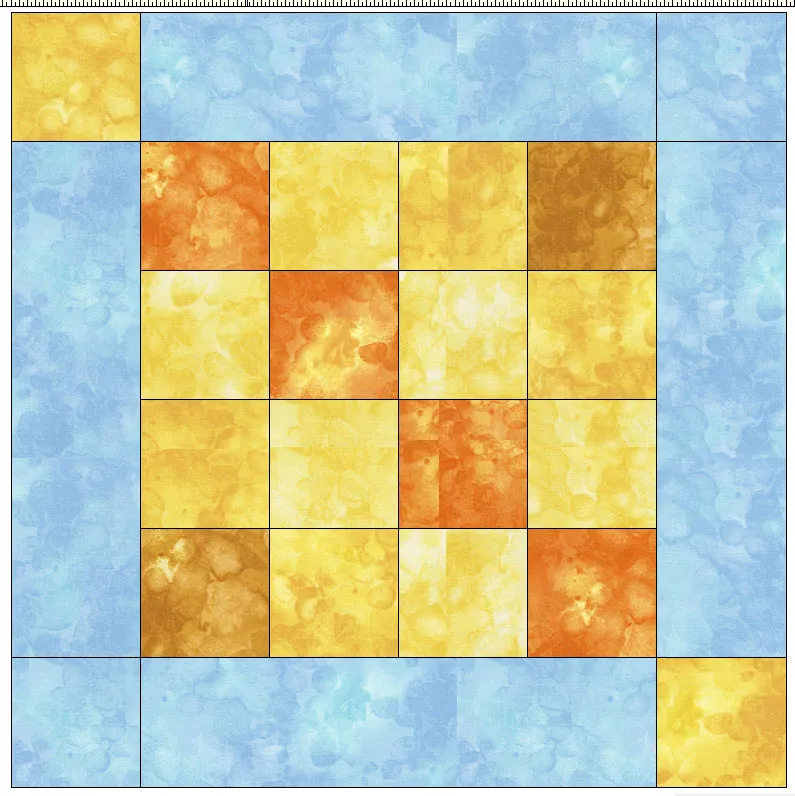
Using the colors of the sky and sun, color in the block. Make the upper left and lower right corners a bright sunshine color.
 Add to sketchbook
 ![]()
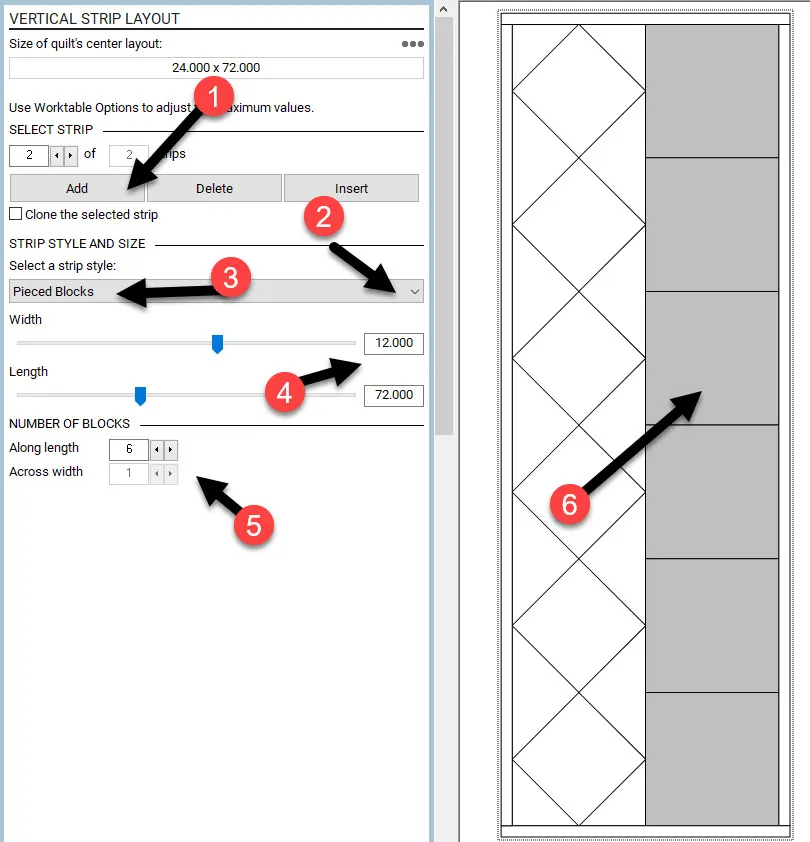
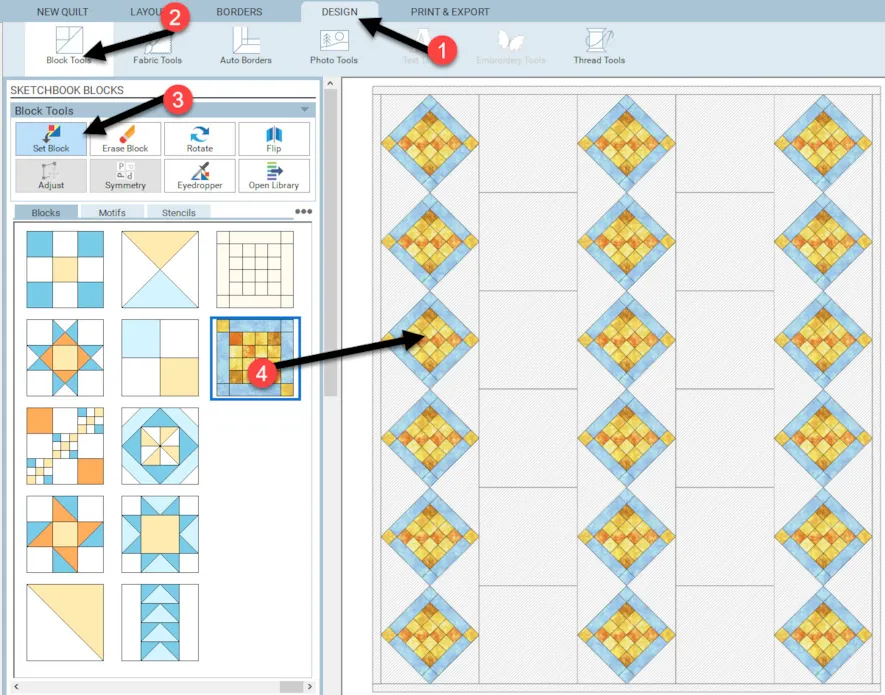
Click on the quilt worktable icon on the upper left side of the screen. Click on the NEW QUILT tab and select the Vertical Strip layout from the ribbon at the top of the screen.

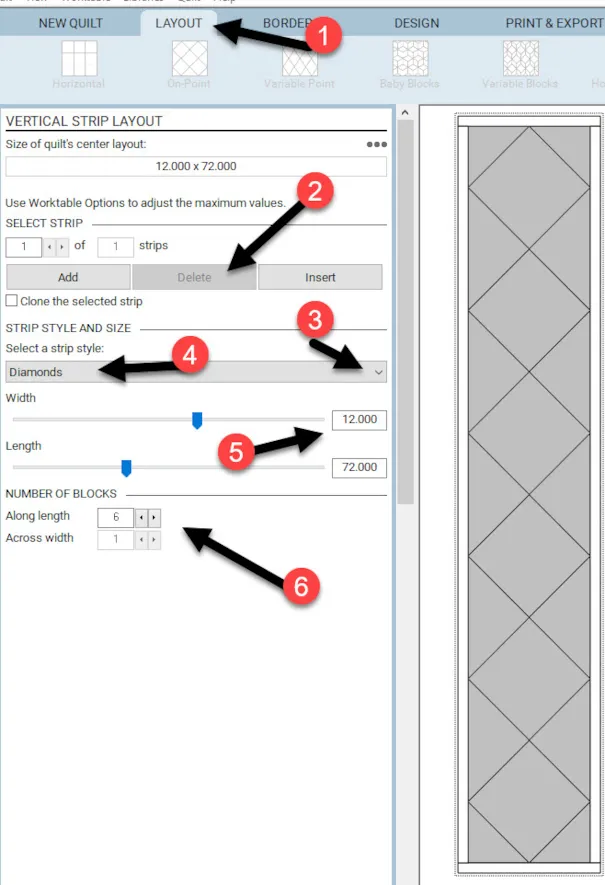
Click on the layout tab at the top of the screen. Click on the word ‘DELETE” three times so you only have one strip remaining. In the drop-down menu, select the ‘diamonds’ style. Set the size of the remaining strip to be 12 inches wide and 72 inches long. Set the number of blocks to be 6 along the length and 1 across the width.
Still, under the layout tab, click on the word ‘ADD’ to add another strip. Set the properties of this strip to be Pieced Blocks from the drop-down menu. Set the width to 12 inches and the length to 72 inches. Set the number of blocks along the length to be 6 blocks.
Click on the diamond’s block strip to select it. It will be gray when selected. Place a checkmark in front of ‘clone the selected strip’ and then click on the word add to add another diamond layout strip.
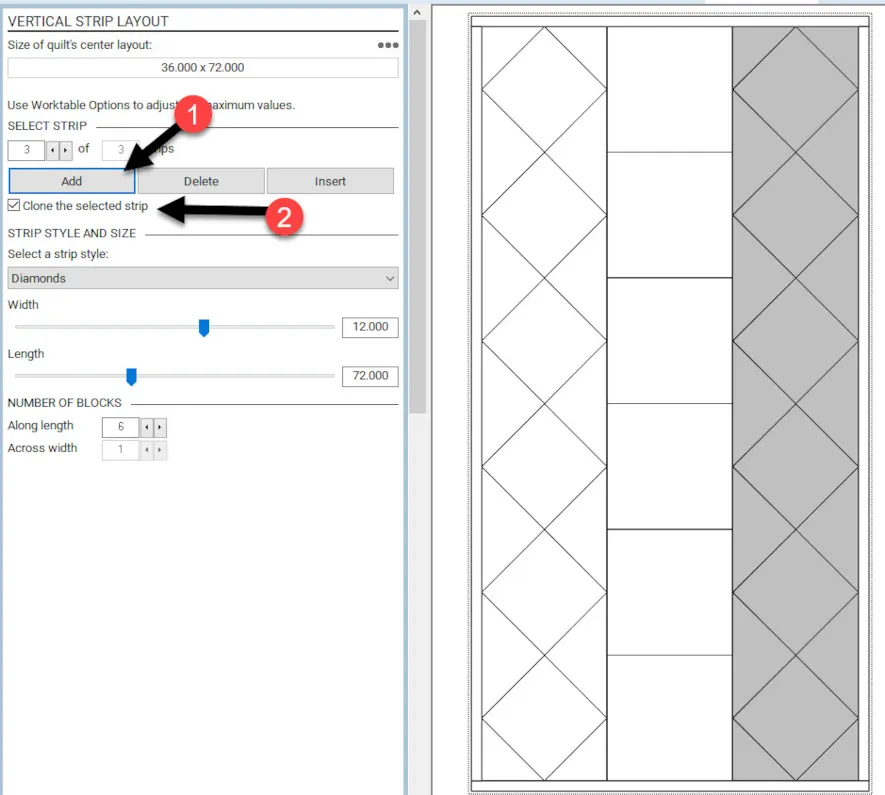
Click on the blocks strip to select it. Click on the word ‘ADD’ to add a cloned strip to the layout with blocks.
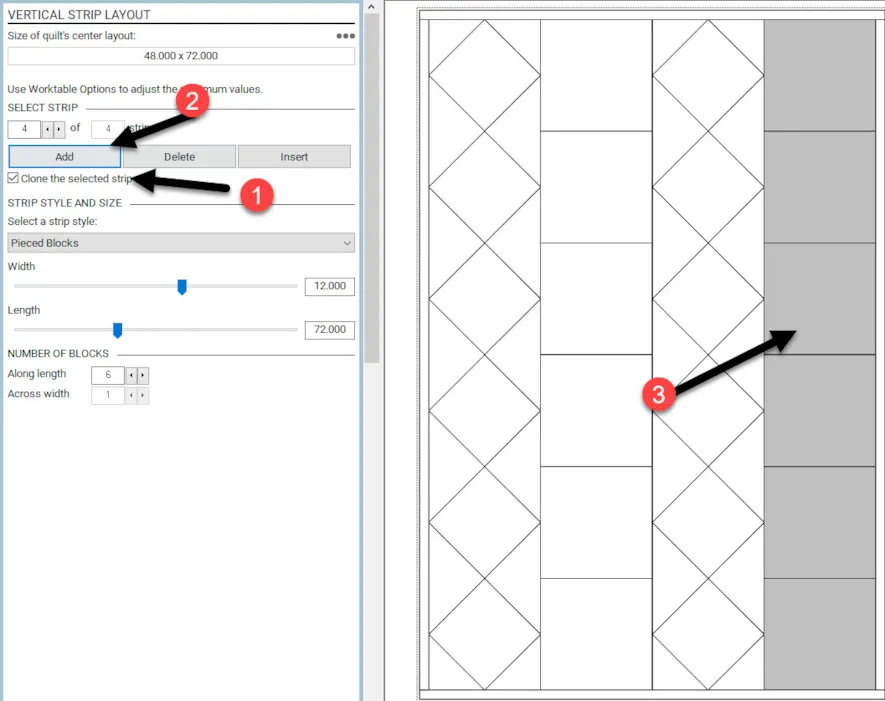
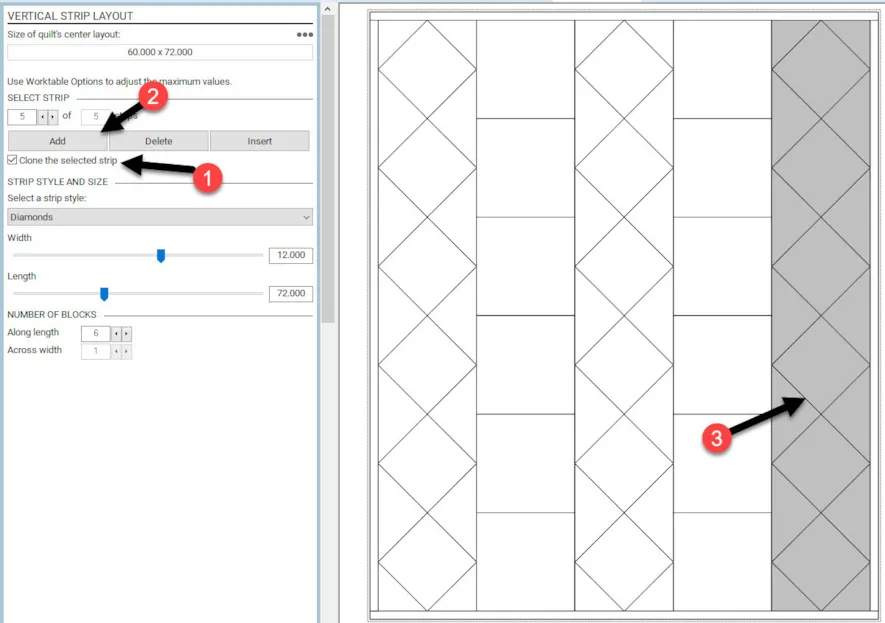
Click on the diamonds strip one more time and clone and add it to the quilt layout.
 Add to sketchbook
 ![]()
Click on the Design tab at the top of the screen and select the block tools from the ribbon. Click on the set block tool. ![]() Scroll to the end of the blocks to find the colored block we created. Click on it to select it. Move the cursor over to the worktable and click on each of the diamonds to set the block on the worktable.
Scroll to the end of the blocks to find the colored block we created. Click on it to select it. Move the cursor over to the worktable and click on each of the diamonds to set the block on the worktable.
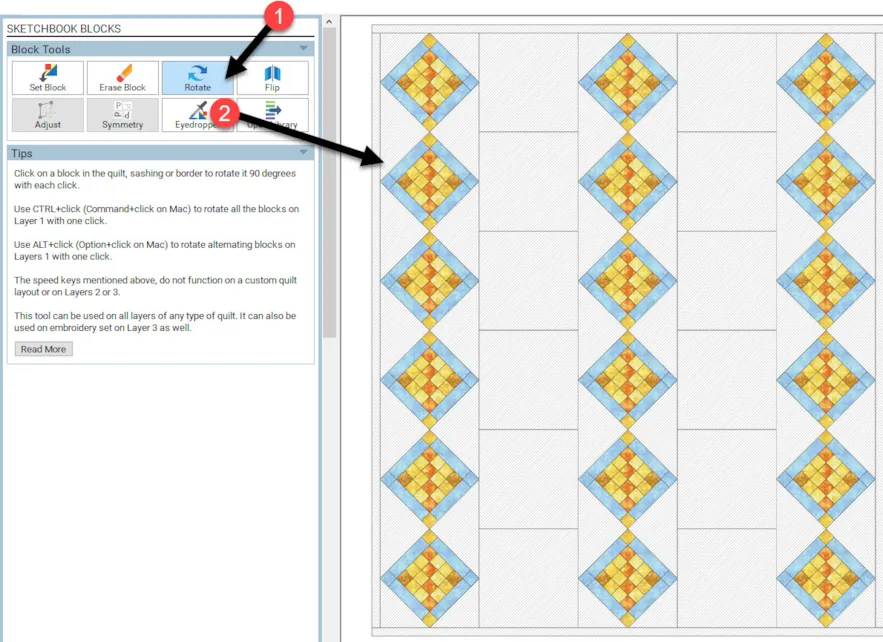
Click on the rotate tool ![]() to select it. Move the cursor over to the worktable and click on the blocks so they rotate within the setting so the yellow outer squares on the block are vertical in the layout.
to select it. Move the cursor over to the worktable and click on the blocks so they rotate within the setting so the yellow outer squares on the block are vertical in the layout.
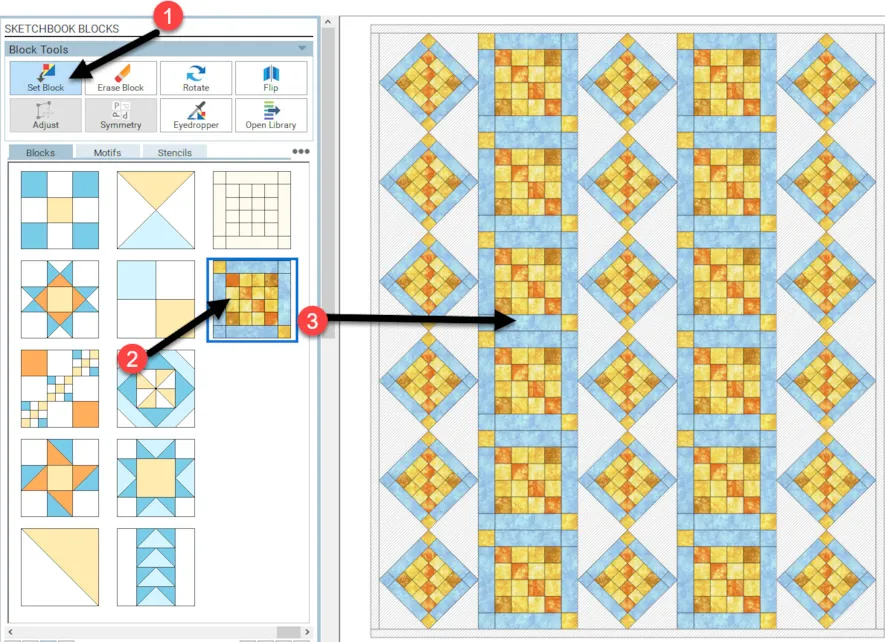
Click on the set block tool. ![]() Select the block and then fill in the blocks strips of the quilt with the block.
Select the block and then fill in the blocks strips of the quilt with the block.
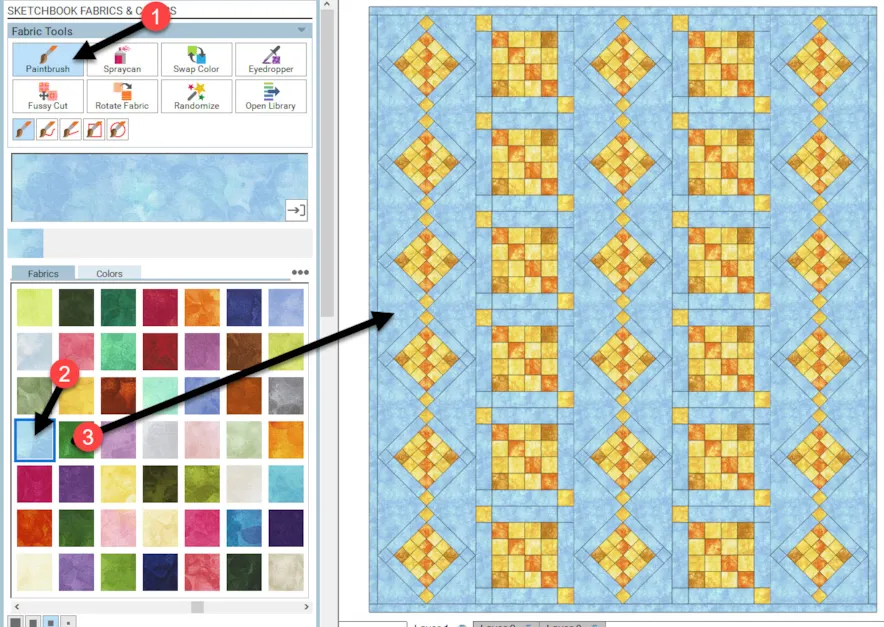
Click on the fabric tools from the ribbon at the top of the screen and use the paintbrush ![]() to select the same color used for the block’s blue background. Click on the remaining open layout area to complete coloring the quilt.
to select the same color used for the block’s blue background. Click on the remaining open layout area to complete coloring the quilt.
 Add to sketchbook
 ![]()
Turn off the block outlines by clicking on the ‘hide/show patch outlines’ tool ![]() on the far left side of the screen. This is a toggle switch and can be turned on and off with a simple click. Be sure to turn it back on before you continue with your design. This will give you a better idea of how the quilt will look as fabrics and not as a drawing.
on the far left side of the screen. This is a toggle switch and can be turned on and off with a simple click. Be sure to turn it back on before you continue with your design. This will give you a better idea of how the quilt will look as fabrics and not as a drawing.
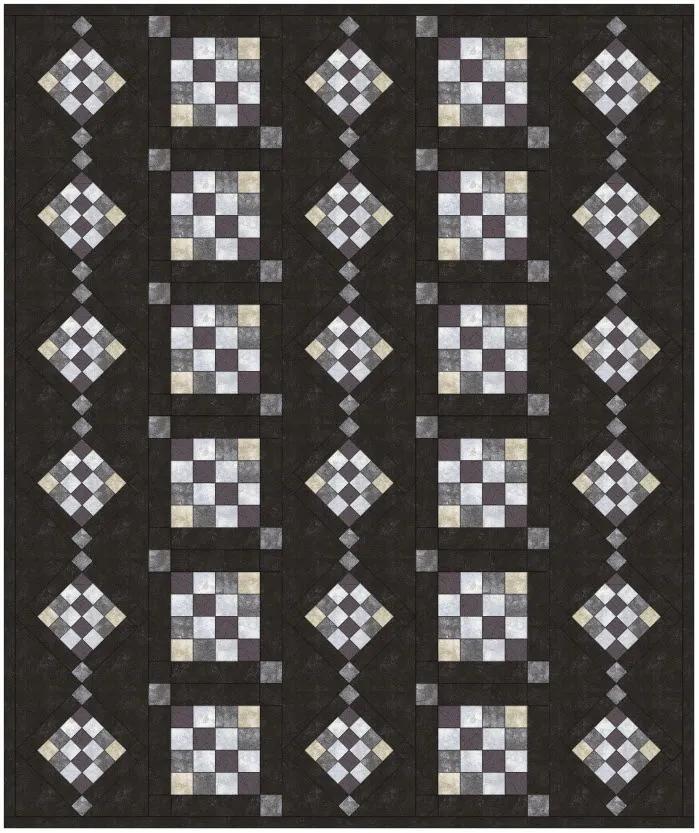
Want a more dramatic look? Simply change the colors of your fabrics for a totally new look.


07-17-2022
11:12 am
Thank you for giving us a review of how to use EQ8. I am a newbie when it comes to designs, but I’m working on a LONE STAR that I would like to add to, so this helps quite a bit.
07-17-2022
3:34 pm
Kathryn- as a new user to EQ8 you will discover many different ways to accomplish a block and quilt layout design. Take it one step at a time. Over time, you will discover what ways work best for you.
07-17-2022
12:08 pm
Excellent tutorial. Best I have seen for using EQ8. I struggle so much with this program and this tutorial was an eye opened. Lots of great information.
Thanks,
Carol
07-17-2022
3:35 pm
Carol-Thank you. Keep working with it. The more you use the program the more you will feel comfortable with it. You will find your way!
07-17-2022
12:51 pm
Didn’t know about adding a grid. What a great timesaver vs drawing all the lines individually!
07-17-2022
3:36 pm
Julia-there are many tools in the program that can be used in different ways. As you work along and discover the tools you will see different ways in which they can be applied.
07-17-2022
1:03 pm
Tips for efficiency to set blocks; Diamond strip style, hold down keyboard key ALT & click in one diamond. Likewise for Blocks style, hold down keyboard key CTRL & click one block. Try these speed keys in all strip styles and, try them to use fabric tools, paintbrush and spraycan.
07-17-2022
3:40 pm
Kayjay-You are correct that there are many different ways to create our blocks and quilt layouts. In my description, I was coloring my blocks on the block worktable first. I could have colored them with the tools you suggest on the quilt worktable also. As a beginner, it is often easier to learn one step at a time. Over time you can discover how to do things more efficiently and get quicker results. The great thing about this program is that everyone can work with it to their own level of understanding. I love that it is so flexible.
07-20-2022
1:20 pm
First-time beginner EQ8 users love the speed key features, it makes EQ8 easier to use and lots more fun. The learning curve is about a minute long. I came back to say, BTW there’s a chart of speed keys in EQ8 Reference Manual, sorry if that’s not permitted here.
07-17-2022
1:41 pm
I finally got some time to sit down with my EQ8 and using you straight forward and detailed instructions managed to design a quilt that I hope will look as good when finished as the image I have on my screen – great fun.
07-17-2022
3:37 pm
Sally- I am happy to hear you are spending some time with your program and experimenting with the tools to create the design you want. I hope you continue to have fun with it.
07-17-2022
11:15 pm
The best EQ8 tutorial yet. Thanks!!
07-17-2022
11:21 pm
Terri thanks. Glad you enjoyed it.
07-18-2022
1:17 am
Thank you , Yvonne. This is the best tutorial I have seen so far very simple and easy to follow.
Thanks again!
07-18-2022
4:10 pm
Shela Thank you. You can pick up many quick tips on how to use the EQ8 program from all the bloggers on the EQ website. There is so much information to share.
07-18-2022
10:08 am
Thank you Yvonne and EQ. What I also love about EQ is the after sale service. It is so nice to learn using EQ in this professional way. Not many computer programs have education in place like you have. xx Elize
07-18-2022
4:11 pm
Elize–Yes I agree about the ongoing service from the company. They are the best group of people I have ever worked with. They are always so very supportive of the users of the programs they produce. Support is always needed.
07-29-2022
1:18 pm
Спасибо огромное. Я новичок в EQ8 Хочу ее хорошо знать, чтобы шить красивые одеяла. Всего Вам самого доброго7
07-29-2022
1:33 pm
Natalya–Welcome to EQ8. Visit the blog frequently to learn how to use different aspects/tools of the program. I am glad you are liking this.