


I was at an EQ8 class not too long ago and we were all making quilt layouts. I was laughed at because my layout was so intricate that one observer said “You would never make that!”. It had so many details to the piecing pattern in multiple sizes that it would indeed have been a challenge. I often play with my EQ8 program to see what I can create. But, I may not necessarily have the time to make it in fabrics. No problem! EQ8 lets me still be creative and use the most intricate of patterns I can think up.
I find designs very interesting if they are one block only made in multiple sizes and all sewn together. This can be accomplished easily using the custom set quilt layout options in the EQ8 program.
Open your EQ8 program. ![]()
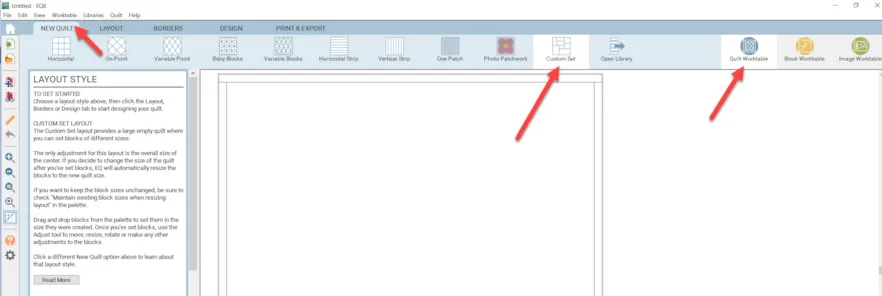
On the opening page, click on the work on quilt icon to open the quilt worktable.
From the New Quilt tab, select the custom set quilt option![]() at the top of the screen.
at the top of the screen.
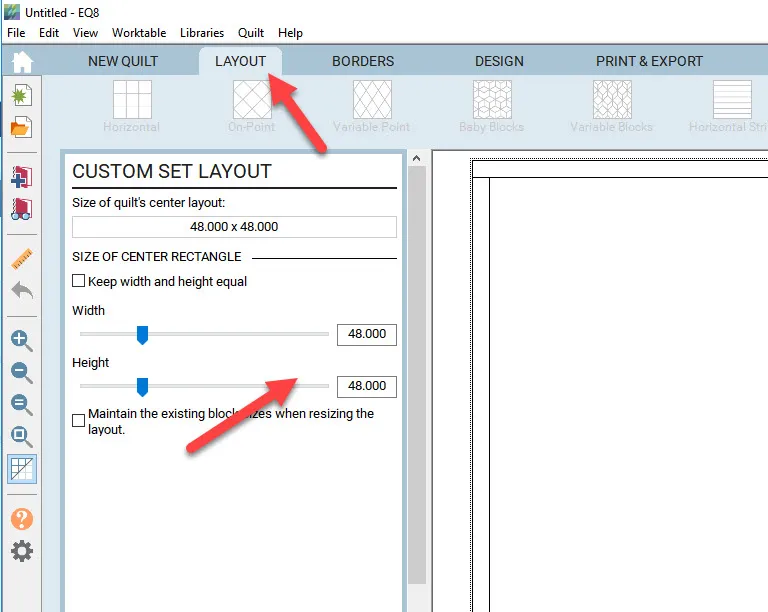
Click on the layout tab at the top of the screen. Set the size for the quilt to a 48 x 48 inch layout.
Click on the design tab at the top of the screen. Click on the adjust tool ![]() and set the grid layout to be 2 inches.
and set the grid layout to be 2 inches.
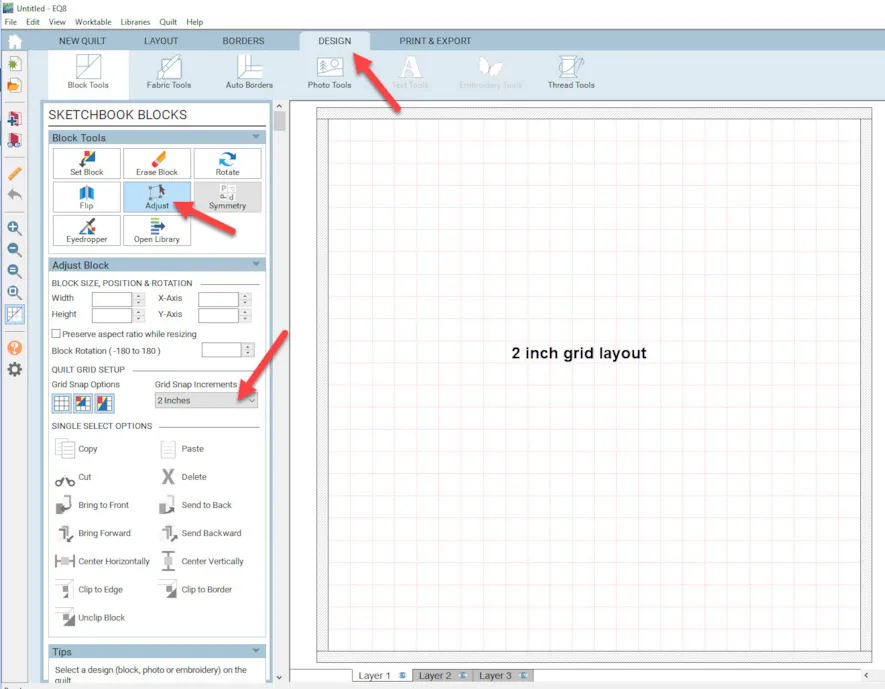
The grid layout will snap your blocks into place to align with the 2 inch grid markings. This is a visual guide to your block placement.
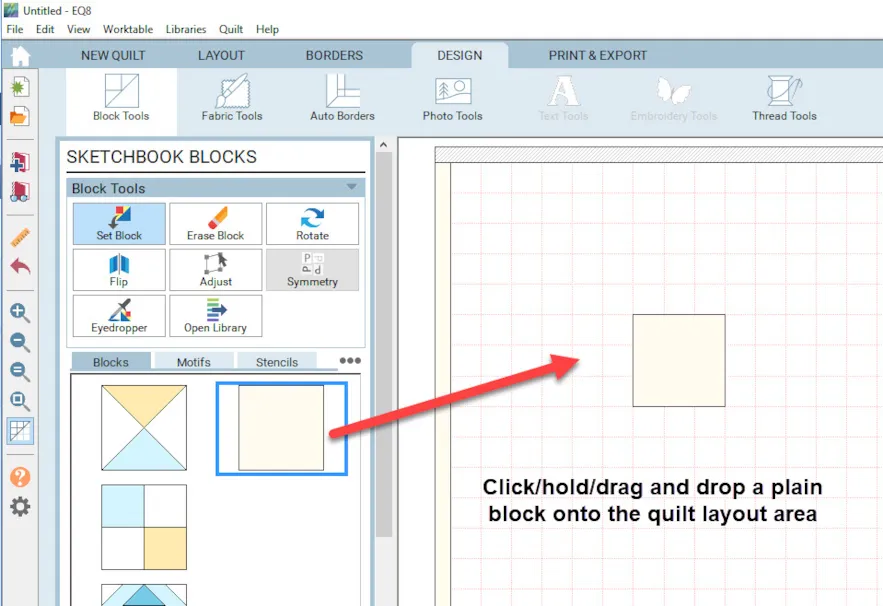
Click on the set block icon at the left and then click on the three little dots in the block box to get a fly-out menu. Click on ‘Add a Plain Block’.
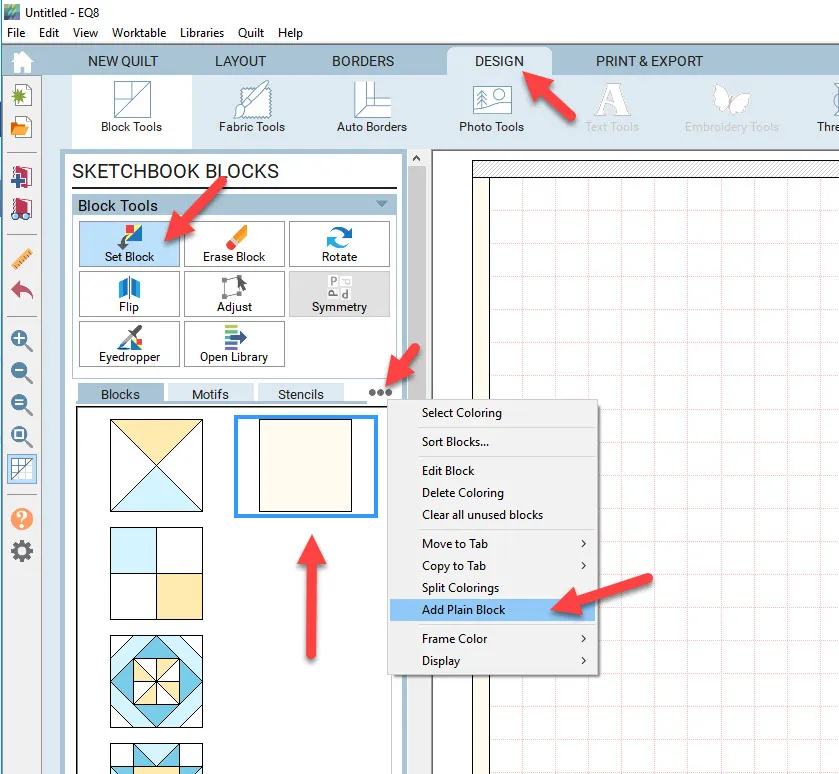
Adding a plain block will allow you to set up a layout that works with the grid. I know I have a 48 inch quilt layout so I will make my plain blocks a size that is divisible into 48 inches. Therefor, my blocks will be designed as a 4 inch, 8 inch and 12 inch block sizes that will completely fill my layout area on the quilt. They will snap into place because of the 2 inch grid pattern I preset for the layout.
Click/hold/ and drag the plain block to anywhere on the layout area.
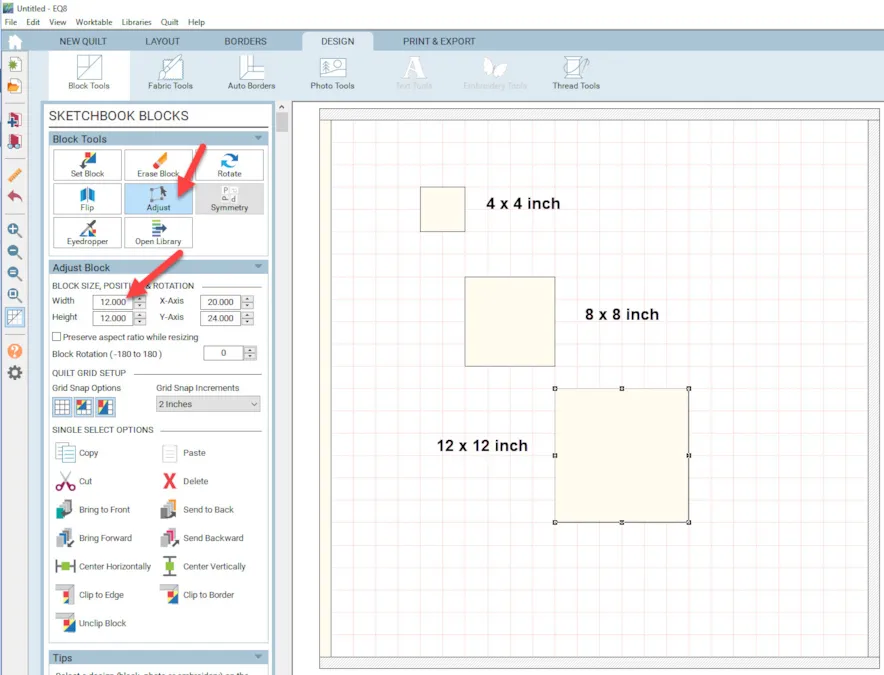
Repeat this process so you have 3 plain blocks on the worktable.
Click on each block and change their size with the adjust tool ![]() to 4 x 4 inches, 8 x 8 inches, and 12 x 12 inches. All of these sizes are divisible by 2 (grid snaps) and will fit equally into a 48 inch quilt layout.
to 4 x 4 inches, 8 x 8 inches, and 12 x 12 inches. All of these sizes are divisible by 2 (grid snaps) and will fit equally into a 48 inch quilt layout.
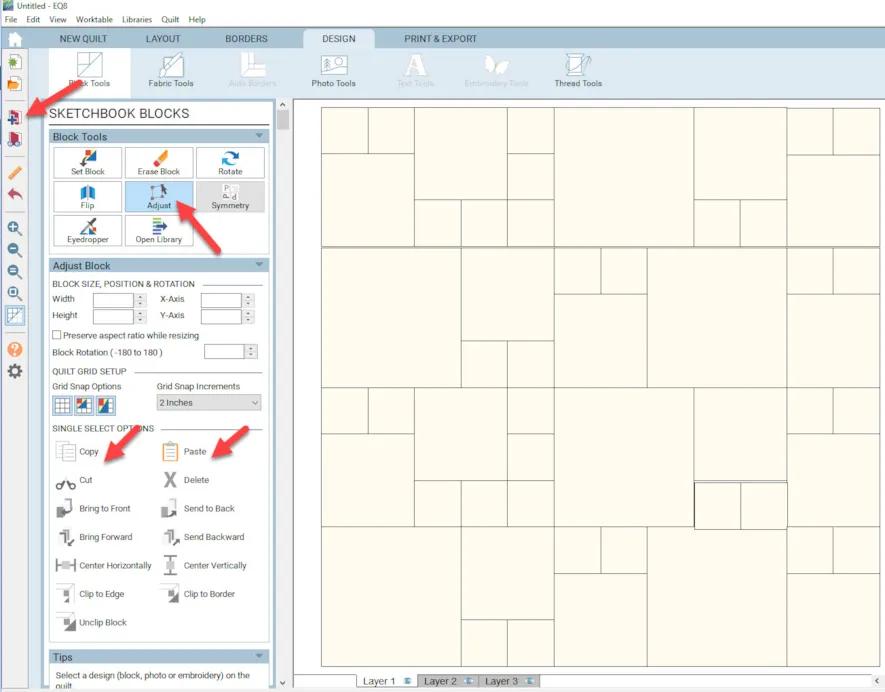
Click onto each of the blocks and then copy/paste to make multiple blocks of each of the sizes enough to fill the quilt. Use the adjust tool ![]() to click/hold/drag/release the blocks to different areas. Be sure to add the quilt layout to the sketchbook when done.
to click/hold/drag/release the blocks to different areas. Be sure to add the quilt layout to the sketchbook when done. ![]()
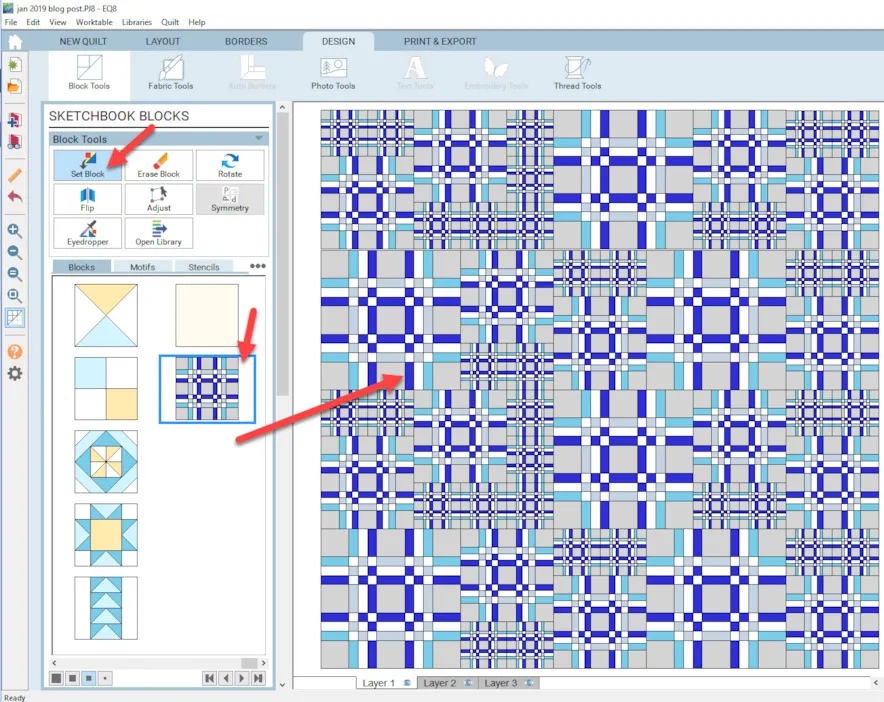
Now that you have your layout complete, you can add any block to the layout area and it will fill the preset sizes you created. Select a block you have saved into your sketchbook and then while holding down the control key (CTRL) on your keyboard, click onto any block in the layout and all the blocks will fill at once.
There is no way I will make all these small pieced blocks and stitch this quilt! But, If I love the design, I can still work with it by saving the quilt as an image and printing the image several times and then piece those printed images on fabric to create a design that I would stitch together.
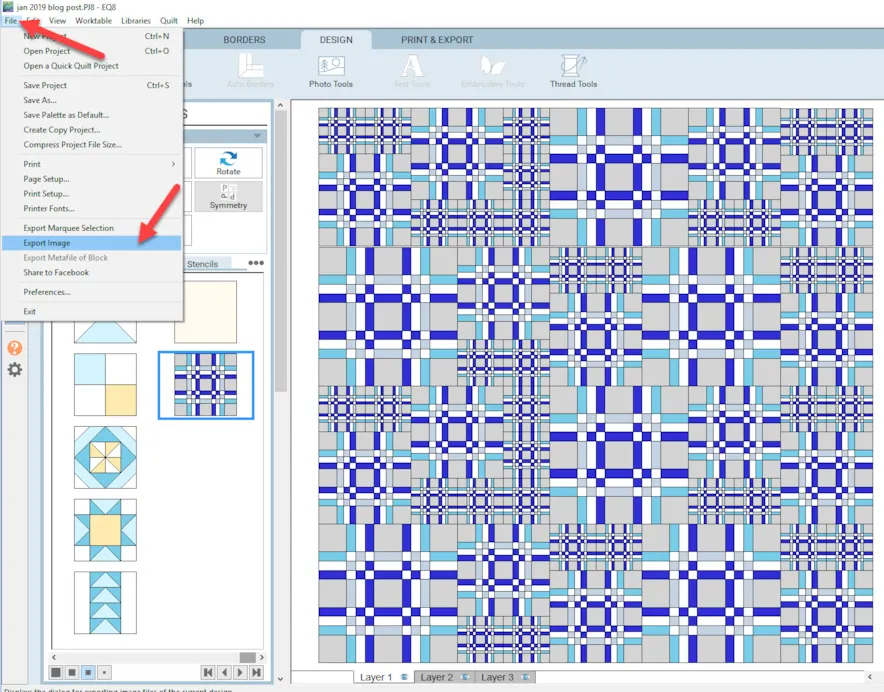
Click on File>Export Image and save it anywhere on your computer.
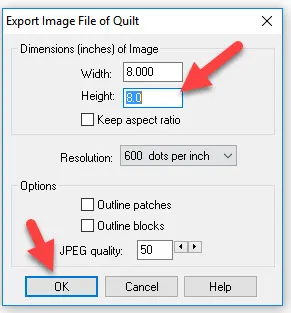
In the pop up menu, select the size you want to save it as. I know I will use my printer that accepts 8.5 x 11 inch paper and fabric sheets so I choose to save the image as an 8 x 8 inch image. From here I can just send it to the printer.
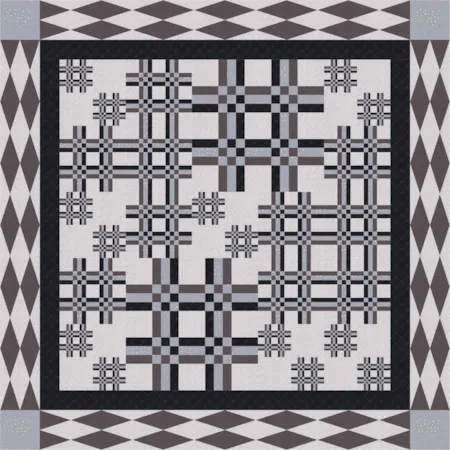
There are several ways you can create the image of the quilt to print onto fabric. I created a similar quilt layout in another color way and printed the quilt layout image 4 times at an 8 inch block. I then stitched the 4 blocks together to create a 16 inch block. This was then used to make a pillow with the quilt layout I loved but I knew I would never actually piece together.
Here is the pillow I made by printing my quilt layout onto printer fabric and sewing it together. Makes a very intricate pieced design simple to ‘sew’.


01-20-2019
11:08 am
Wow!! That is absolutely stunning! Thanks for the tip on making it sew easy!
01-20-2019
11:36 am
Wow! great lesson, and marvelous quilt!
01-20-2019
11:36 am
fantastic lesson – marvelous quilt! Thank you!
01-20-2019
11:53 am
Amazing. You make it look so easy. Thank you for this lessons.
01-20-2019
11:55 am
I’ve considered printing a block on fabric, more times than I should admit too LOL! Yvonne, you are tempting me, with your gray-scale version! It’s printer ink cost that stops me from daring to do this, so gray-scale is brilliant! ;-p
01-20-2019
12:13 pm
Just what I was looking for! thank you so very much
01-20-2019
1:12 pm
I LOVE the idea of printing the blocks on fabric. There are not enough hours to sew all that i want to sew but this method will satisfaction some of the creative urges.
01-20-2019
4:19 pm
Wow, it’s absolutely stunning. I‘m really new with EQ8 and Hope to learn quickly. Thank you Dir this interesting post.
Kind regards from Germany yours Ariane
01-20-2019
5:12 pm
Person who laughed as obviously never been to a quilt show! I frequently come across quilt made with extremely intricate design… next time reply..”I know its past your skill level…but not mine!”..
Just gonna point out the fear Jane quilt probably was viewed the same way during its contruction… under candle light I might add…SMH at people these days
01-20-2019
6:59 pm
I often use the custom layout, but haven’t tried this. Thanks a lot!
01-20-2019
7:03 pm
Fantastic lesson. I printed it out for filing but would love to have been able to download and save the file. Is there anyway i can do this.
01-21-2019
10:20 am
Pauline-There is a printer icon at the top of the blog page. Click on it and a box will open asking what your printer connection is. Change the printer to a PDF. Now you will get a save box when you hit print. You can save the blog as a PDF file to your computer from here
01-20-2019
8:54 pm
What a great idea! I’ll be using this idea for sure. Thanks for the inspiration and the step by step.
01-21-2019
8:08 am
That is amazing! I have to recreate in EQ & quilt I bought fab for but the shop had no pattern for. So this block idea will help. Thank you.
01-21-2019
10:21 am
Thanks everyone for responding that this lesson is helpful in your learning of EQ8.
01-21-2019
10:50 am
this was fun.
I have a question: Can I select multiple blocks to make a new block?
Thanks
Marlu
01-21-2019
12:22 pm
Marlu E Allan–I am not clear as to what you want to do. When you are on the block worktable you can click on BLOCKS>Serendipity> Merge blocks to make two blocks into one. Where are you trying to select multiple blocks? Quilt worktable or block worktable? You can always copy/paste elements of one block onto another applique block.
01-22-2019
10:07 am
I tried the merge, but it didn’t work. I started over and tried to add the different size squares to the sketchbook and they did not add. Without those blocks in the sketchbook I had nothing to merge. So I drew the block and added it to the sketchbook. Is there a way to add the 4″sq and 8″sq blocks to the sketchbook? The message I get is the ‘Worktable quilt is in the sketchbook” when I try to add the two smaller blocks.
01-22-2019
3:11 pm
Marlu e Allan–could you email me your project file and explain exactly what it is you are trying to do? menear.yvonne@gmail. com. I would be happy to help you privately. The blog is for inspiration and quick questions about how the specific project highlighted in the blog is created. More involved questions about other ways of creating in EQ8 should be answered privately. I look forward to hearing from you.
01-21-2019
1:44 pm
What a great idea!!!! Thanks
01-21-2019
1:50 pm
What king of printer are you using, inkjet or Laser?
01-21-2019
1:55 pm
Monique-I use a ink jet printer. I don’t use laser because it burns in the image and I don’t want to break down the fibers of my printer fabric.
01-23-2019
1:49 am
Hi All, Hi yvonne!
I was at the class and that pillow and its fabric looks terrific I saw it up close. Also, if you ever EVER can take a class with Yvonne (worth traveling to) DO IT!
See you Yvonne at the EQ8 Academy!
01-23-2019
12:29 pm
See you at EQ Academy. So glad to hear you will be attending. There are some great teachers there and you will meet the EQ staff also.
01-30-2019
10:51 pm
Ooohhh. I like this. Thank you for the lesson.
12-31-2019
12:56 pm
This will save me so much time and frustration! I was using the shift and drag method and always had a hard time getting my blocks to fill the space perfectly. Your grid and drag/drop/adjust is so much better!
THANK YOU!!!!