November Challenge: Your first EQ8 Quilts!
We want to see them! What are you making in EQ8?!?
Here are some of my first quilts that I made in EQ8. Both are from Quick Quilts!
Here is how I did the first one:
- File > Open a Quick Quilt Project

- I chose T-Shirt Quilts and clicked OK.

- I like the first layout so when it opened in Sketchbook I clicked Edit.

- Now this says it’s for a t-shirt quilt but I want to use photos.
- So, under the Design Tab, I clicked Photo Tools

- Then I clicked Open Library

- I clicked the Import button > From Image files and navigated to my photo files.

- Use your Shift key on your keyboard to select more than one at a time and click Open.

- Click Select all Photos

- Click Add to Sketchbook

- Click Close

- Click the Set Photo tool and click on a block that has the T-shirt space holder.

- I only put photos in the square blocks.

- The rectangles would be good for certain t-shirts, but I didn’t want to put photos into those spaces. So, I just clicked the Erase tool and erased all the rectangular space holders.

- Then, I clicked the Fabric Tools.

- Clicked the Paintbrush tool and clicked in a rectangle.

- Of course you can change the fabrics as you wish…now, don’t forget to Add to Sketchbook!

- Since we haven’t saved the project yet, we’ll get this message

So, be sure to name your project to save it!
For the second quilt I also started with a Quick Quilt project.
- Click File > Open a Quick Quilt Project
- Choose – Table Runners and click OK.

- I clicked the first quilt in the project and clicked Edit.

- I just recolored this quilt to give it a different look.
- Click the Design tab and then click Fabric Tools

Some of the blocks are placed on Layer 1 and some are on Layer 2.
The new Layer Icons make it easy to see which blocks are on which layer.
First I hid Layer 2 and recolored Layer 1. - Click on the Layer 2 layer icon to hide Layer 2.

- Now click on the Layer 1 Layer Icon to hide Layer 1, and the Layer 2 Layer Icon to unhid Layer 2 and recolored Layer 2.

Now, everything should have your new coloring. - Unhide Layer 1 by clicking the Layer 1 Layer Icon.

- Make sure you Add it to the Sketchbook and to name your project!
 If you want to post images of your quilts, here is how to export the images.
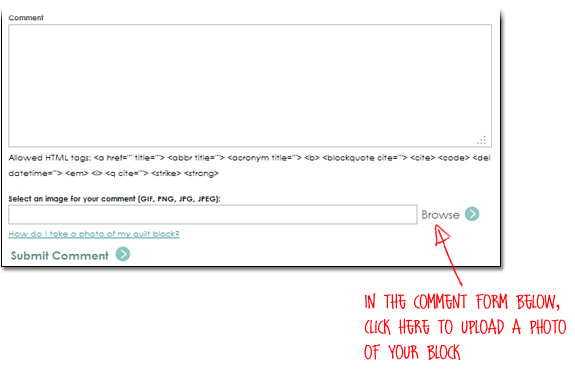
To post your image click to comment on this post. Fill in your info and then click Browse.Go to: Documents\My EQ8\Images
I can’t wait to see what you’ve done! I hope you enjoyed the lesson!
If you have questions about the lesson feel free to post them below.
If you have questions about something else EQ related, please contact techsupport@electricquilt.com.
If you have suggestions for new Design & Discover lessons feel free to comment below or email Heidi@electricquilt.com


11-02-2017
12:10 pm
Danke,die Anwendungsbeispiele sind sehr hilfreich.
Mit freundlichen gruß
Birgit Schröder
11-03-2017
10:53 am
Thank you! I’ve wanted to make a memory quilt for years. Finally with these clear directions accompanied with excellent step by step photos I will be able to. Thanks again. I’m glad that I upgraded to EQ8.
11-03-2017
10:53 am
Thank you. This is very helpful. I am just beginning to get into my new software
11-07-2017
4:43 pm
I did the tutorial on the Quick Projects Tablerunner. I did the hidden layers icon thing, and recolored the patches on each layer. Per instructions, I then went to add my tablerunner to sketchbook and name it.
I named it “Nov 2018 Blog Red and White Tablerunner.”
“Nov 2018 Blog Red and White Tablerunner” isIt now the top item in my “Most recently used projects”
When I click on this, it opens up the Quick Projects sketchbook and has all the other default tablerunners there as well.
Why did it do this?
Why didn’t my tablerunner save by itself in the list?
11-09-2017
9:24 am
Hi Judith,
The original project you opened had multiple quilts so when you save it saves everything in the project. If you want the other quilts gone, you can just delete them from your sketchbook.
Thanks,
Heidi
11-07-2017
7:41 pm
Hi,
I have never submitted a quilt to an EQ challenge.
Are there instructions somewhere on how to do this?
Thank you!
11-09-2017
9:26 am
Hi again,
Here are there the steps https://doyoueq.com/clubeq/monthly-challenge-rules/ You submit the image on the side of the Club EQ page. If you have any other questions please contact Heidi@electricquilt.com
Thanks!
11-12-2017
9:15 am
I just want to say that I am in LOVE with EQ8!!! I don’t really have anything to show and tell, but I’ve been working on custom table runner mock-ups for a repeat Etsy shop customer, and it is so quick and easy! I can design some options and send her jpeg images in just a matter of minutes. It used to take me forever to figure out what I was doing in EQ7, but EQ8 is so much more intuitive, I’m so glad I upgraded!