Although EQStitch was designed for the beginner level using auto digitizing, it can indeed create some pretty amazing works of art with just the simplest tools.
1. Launch your EQStitch program
2. Click on the ‘stitch worktable’ icon ![]() at the top of the screen
at the top of the screen
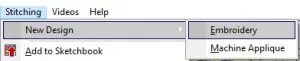
3. Click on STITCHING>New Design>Embroidery
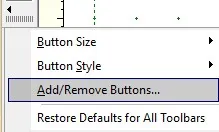
4. On the toolbar at the left side of the screen, click on the little black arrow![]() at the bottom.
at the bottom.
In the pop up menu box, click on the words ‘add/remove buttons’
Place a check mark in front of all the tools by clicking on them.
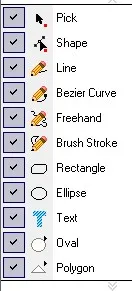 Click anywhere on a white space of the screen to close the box
5. Click on the ‘drawing board options’ box ![]() on the object properties bar at the top of the screen.
on the object properties bar at the top of the screen.
In the drawing board options box under the ‘stitch’ heading, set the embroidery edge stitches to ‘no stitch’ and the embroidery fill setting to a ‘smooth’ fill stitch.
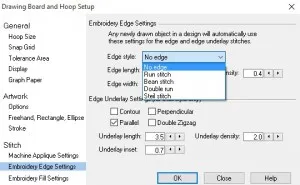
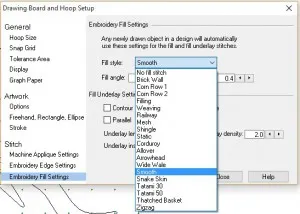
Be sure to click on the ‘OK’ at the bottom of the box to set the drawing properties.
6. Click on the ‘brush stroke’ tool ![]() to select it.
to select it.
7. On the stroke properties bar at the top of the screen, click on the down arrow next to contour and end cap to select the style of stroke you want to create.
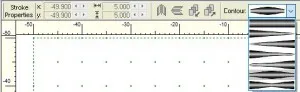

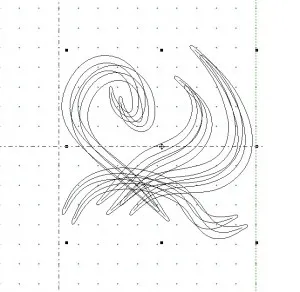
8. Move the cursor over to the drawing board and click/hold/drag/release to create a few squiggle lines on one side of the worktable only.

9. Click on EDIT>Select All

This selects all the lines you drew and groups them as one object.
10. With lines all selected, click on the ‘clone selected objects’ icon ![]() on the multiple select property bar at the top of the screen.
on the multiple select property bar at the top of the screen.
A second copy of the design will appear on the worktable.
11. Click on the ‘flip left and right’ icon ![]() on the multiple select property bar.
on the multiple select property bar.
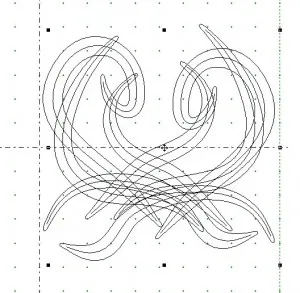
12. Click on the ‘pick tool’ ![]() to select it. Move the cursor over the crosshairs on the cloned copy and click/hold/drag it to the opposite side of the worktable aligning it with the first image.
to select it. Move the cursor over the crosshairs on the cloned copy and click/hold/drag it to the opposite side of the worktable aligning it with the first image.
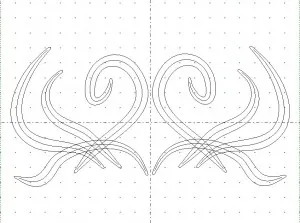
13. Click on EDIT>Select All

Click on the ‘center selected objects’ icon![]() on the multiple select property bar at the top of the screen.
on the multiple select property bar at the top of the screen.
The entire object will now be centered on the worktable.
 Add to sketchbook
![]()
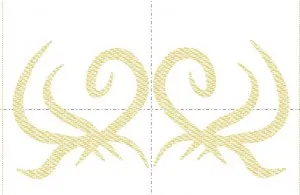
14. Click on the ‘stitch tab’ at the bottom of the screen. The design is filled automatically with the smooth stitches and no outline that we set as the properties in the drawing board options box.
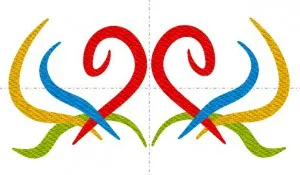
15. Click on the ‘set thread’ icon ![]() on the toolbar at the right to see the color palette.
on the toolbar at the right to see the color palette.
Click on any color to select it. Move the cursor over to the stitch design and click once to set the new colors.
 Add to sketchbook
![]()
16. Click on STITCHING>Export Stitching File
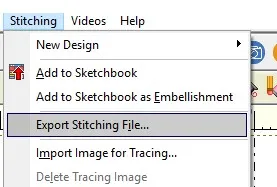
Name your file and select your file extension for your own embroidery machine.
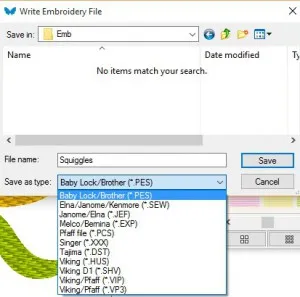 Click on ‘SAVE’
17. Send the files to your machine and stitch the design. Here is what I created using the squiggle designs. This is my entry into the silent auction for the Houston Quilt Festival 2015.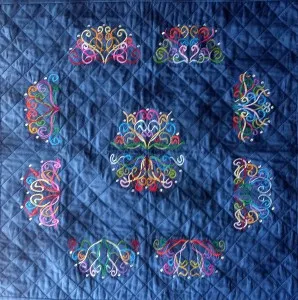


08-02-2015
9:16 am
Thank you
08-04-2015
9:06 am
I have had EQStitch for a while and have never been able to learn that much about it. Even though I bought the helper manual, it still was too confusing for me to comprehend. This tute may get me on my way. Thanks for making it look easy. I look forward to seeing new blog entries from you.
THANKS!!!!!
08-04-2015
11:40 am
Can you do the same thing, but not make it a fill design, to do a quilting design?
08-25-2015
9:13 pm
Kay–Yes you can do it as a quilting outline. Just assign a running stitch to the edge and remove the fill. Now it is an outline
08-04-2015
4:43 pm
Thank you . Looking forward to your next posting.
Your quilt entry for the silent auction is beautiful, very colorful.
08-25-2015
9:13 pm
Thanks Annmarie–I do love bright colors and high contrast in my works.
08-05-2015
8:05 am
Brilliant – thanks so much. Look forward to seeing more in future
08-05-2015
12:12 pm
Love the Sunday blog post of that great design idea!!! Thanks Yvonne
08-24-2015
10:29 am
can I print this somehow. I am one of those people that needs the instructions in one hand and the mouse in the other. Memory is very short as I get older
08-25-2015
9:15 pm
Granny you can indeed print the blog. I use a free program called PDF995. It converts the text on the screen to a PDF file to save to your computer and print out as you wish.
09-01-2015
8:16 am
You make it look easy! Thanks a bunch.
09-01-2015
7:22 pm
Hi Yvonne,
Thanks for the great courses on EQ stitch… I embroidered some towels for a shower gift and they looked really good (if I do say so myself!) … I needed to increase the size and move the original design, it was good to have the lessons as a base.
09-01-2015
7:23 pm
Great Brigid! Keep practicing with the EQStitch software to see how creative you can be.