It’s our turn to post for Marian Pena’s Row-A-Long! I have written a tutorial on how to combine rows from different EQ7 projects. So, you can have fun mixing all the rows in EQ7!
Also, be sure to check out what people have been making in the Flickr group, and the Facebook group is also great for more info and pictures. CHECK OUT HOW TO WIN AN EQ7 (and lots of other great prizes)! Sorry the contests are over.
First download the EQ7 Row-A-Long Block Library. Put the “EQ Seasons.BLK” file into your My EQ7 > User folder and access them through your My Library. The block library will only be available until 10/31/15 so please make sure you download it beforehand.
Now download all the EQ7 project. Sorry the projects are no longer available. Please check the designer’s website’s for more information on the projects/patterns.
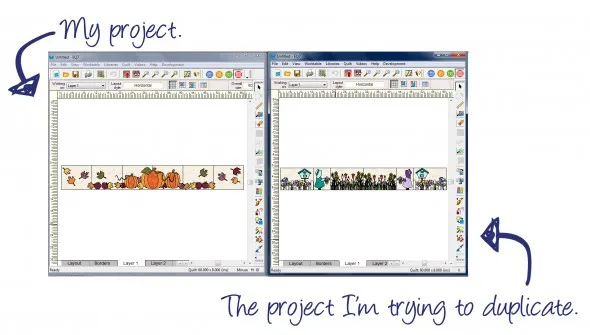
I found the easiest way for me to merge rows was to have one EQ7 project open with my project and another EQ7 window open with the project you are trying to duplicate. I would get the layout information from the designer’s project and then duplicate it in my project.
Click on any of the images to make them larger.
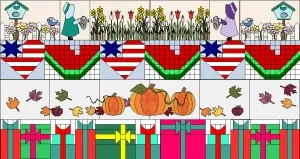
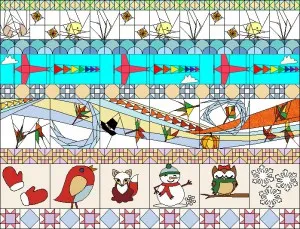
Quilt 1
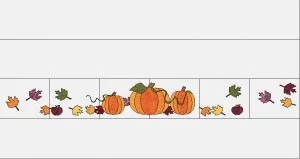
Row 1 – from Loreen Bogdan at Miss Loreen’s Schoolhouse Quilts
I thought Loreen’s “Fall Harvest” Row-A-Long would be the hardest to reproduce, so I actually started working off of her row.
Open Loreen’s project (LoreenBogdenSchoolhouse.PJ7).
Click File > Save As > name your project “MyRAL” (or whatever you prefer)
Click Library > Block Library > My Library > My Custom Libraries > EQ Seasons. Copy all of the blocks to the Sketchbook.
Click the Layout tab.
Row 1- plain 8 x 60 inches
Row 2 – plain 8 x 60 inches
Row 3 – pieced 8 x 60 with 6 blocks
Row 4 – plain 8 x 60 inches
Click the Borders tab and delete the border.
Click on Layer 2
Use the Select ![]() tool and draw a rectangle around the whole quilt.
tool and draw a rectangle around the whole quilt.
Press Ctrl + C on your keyboard
Click on the Layer 2 tab.
Ctrl + V on your keyboard.
Drag the shapes to the third row of the quilt.
Row 2 – from Marian Pena at Seams To Be Sew
Open Marian’s project (MarianPenaSpringSueBirdhouse.PJ7)
Click on Layer 2.
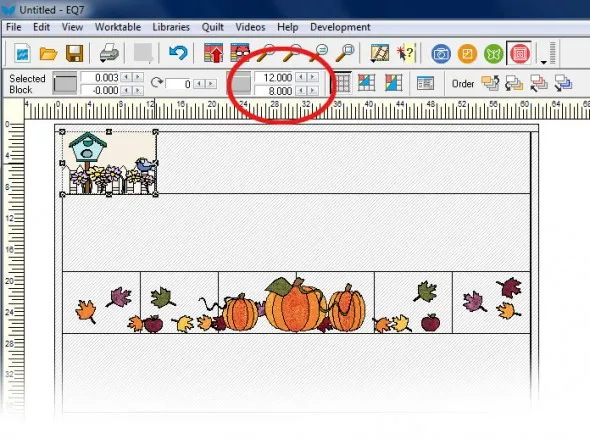
Place the blocks with the Set Block ![]() tool and make sure they are the right size with the Adjust
tool and make sure they are the right size with the Adjust ![]() tool.
tool.
Row 3 – from Dorice Cotten Rice at The Quilting Queen Online
Click the Layer 2 tab.
Place the blocks with the Set Block ![]() tool and make sure they are the right size with the Adjust
tool and make sure they are the right size with the Adjust ![]() tool.
tool.
Row 4 – from Lynn Zydon Provencher at Thimblemouse & Spouse
Place the blocks with the Set Block ![]() tool and make sure they are the right size with the Adjust
tool and make sure they are the right size with the Adjust ![]() tool.
tool.
We’re done with our first quilt!
Recolor it if you’d like then don’t forget to Add to Sketchbook. ![]()
Quilt 2
Quilt > New Quilt > Horizontal Strip Quilt
Click the Layout tab.
Row 1- plain
Row 2 – pieced 8 x 60 with 5 blocks
Row 3 – pieced 6 x 60 with 8 blocks
Row 4 – pieced 7 x 60 with 12 blocks
Click the Borders tab and delete the border.
Row 1 – from Marlene Oddie at Kissed Quilts
All Marlene’s blocks are 8 x 8 except for the “trunk” which is 4 x 8. In her quilt the trunk is a border, but we can’t do it that way in a horizontal strip quilt.
Click the Set Block ![]() tool and right click in the block palette. Choose Add Plain Block. Use that for the trunk.
tool and right click in the block palette. Choose Add Plain Block. Use that for the trunk.
Place the rest of the blocks and use the Adjust ![]() tool to make sure all the blocks are the right size.
tool to make sure all the blocks are the right size.
Row 2 – from Reeze Hanson at Morning Glory Designs
Use the Set Block ![]() tool to place the blocks as shown.
tool to place the blocks as shown.
Row 3 – from Marian Pena at Seams To Be Sew
Use the Set Block ![]() tool to place the first 3 blocks and the 3 three blocks in the squares as shown.
tool to place the first 3 blocks and the 3 three blocks in the squares as shown.
Click Layer 2.
Select the middle block and use the Adjust ![]() tool to make it 15 x 6.
tool to make it 15 x 6.
Row 4 – from Patti Carey at Patti’s Patchwork
Click on Layer 2.Place the blocks with the Set Block ![]() tool and make sure they are 5 x 5 with the Adjust
tool and make sure they are 5 x 5 with the Adjust ![]() tool.
tool.
Please note: If you are sewing this blocks you will have to add an inch of fabric to the top and bottom of some blocks, 2 inches at the top, or 2 inches at the bottom. Patti did not include that in her block, so EQ7 won’t include it in the yardage or patterns.
And, we’re done with our second quilt! Recolor it if you’d like and don’t forget to Add to Sketchbook ![]() !
!
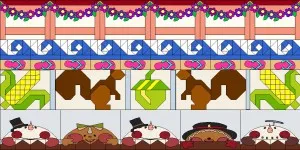
Quilt 3
Quilt > New Quilt > Horizontal Strip Quilt
Click the Layout tab.
Row 1- pieced 8 x 60 with 6 blocks
Row 2 – pieced 6 x 60 with 10 blocks
Row 3 – plain
Row 4 – pieced 8 x 60 with 5 blocks
Click the Borders tab and delete the border.
Row 1 – from Nancy Myers at Patchwork Breeze
Use the Set Block ![]() tool to place the blocks as shown.
tool to place the blocks as shown.
Row 2 – from Amy Warner at Sew Incredibly Crazy
Use the Set Block ![]() tool to place the blocks as shown.
tool to place the blocks as shown.
Row 3 – Lorna McMahon at Sew Fresh Quilts
Lorna has not made her EQ7 project available so please visit her site for the pattern.
Row 4 – from Marian Pena at Seams To Be Sew
Use the Set Block ![]() tool to place the blocks as shown.
tool to place the blocks as shown.
And, we’re done with our third quilt! Recolor it if you’d like, and don’t forget to Add to Sketchbook![]() !
!
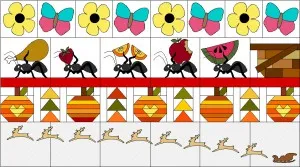
Quilt 4
Quilt > New Quilt > Horizontal Strip Quilt
Click the Layout tab.
Row 1- pieced 7.5 x 60 with 8 blocks
Row 2 – pieced 10 x 60 with 6 blocks
Row 3 – pieced 7 x 60 with 9 blocks
Row 4 – pieced 9 x 60 with 6 blocks
Click the Borders tab and delete the border.
Row 1 – from Carol Steely at Fun Threads
Use the Set Block ![]() tool to place the blocks as shown.
tool to place the blocks as shown.
Row 2 – from Amy Heaton at Country Junk’tion
Use the Set Block ![]() tool to place the blocks as shown.
tool to place the blocks as shown.
Row 3 – from Carol Swift at Just Let Me Quilt
Use the Set Block ![]() tool to place the blocks as shown.
tool to place the blocks as shown.
Row 4 – Darlene at Quilt Shop Gal
Click on Layer 2.
Use the Set Block ![]() tool to place the blocks as shown.
tool to place the blocks as shown.
And, we’re done with our fourth quilt! Recolor it if you’d like and don’t forget to Add to Sketchbook! ![]()
Quilt 5
Quilt > New Quilt > Horizontal Strip Quilt
Click the Layout tab.
This quilt includes some filler rows.
Row 1- pieced 2 x 60 with 20 blocks
Row 2 – pieced 6 x 60 with 10 blocks
Row 3 – pieced 3 x 60 with 20 blocks
Row 4 – pieced 6 x 60 with 6 blocks
Row 5- pieced 3 x 60 with 20 blocks
Row 6 – pieced 10 x 60 with 6 blocks
Row 7 – pieced 3 x 60 with 20 blocks
Row 8 – pieced 9 x 60 with 6 blocks
Row 9 – pieced 4 x 60 with 15 blocks
Click the Borders tab and delete the border.
Row 1 – from Bea Lee at Be A Quilter
Use the Set Block ![]() tool to place the blocks as shown. Use the Flip
tool to place the blocks as shown. Use the Flip ![]() tool to flip every other block.
tool to flip every other block.
Row 2 – from Jennifer Ofenstein at Sew Hooked
Use the Set Block ![]() tool to place the blocks as shown.
tool to place the blocks as shown.
Row 3 – from Anneka Kornelis at Stof Genoeg
Use the Set Block ![]() tool to place the blocks as shown.
tool to place the blocks as shown.
Row 4 – from Carla Henton at Creatin’ in the Sticks
Use the Set Block ![]() tool to place the blocks as shown.
tool to place the blocks as shown.
Click on Layer 2.
Place the clouds and hook as shown. Use the Adjust ![]() tool to make sure all the blocks are the right size.
tool to make sure all the blocks are the right size.
Row 5 – from Bea Lee at Be A Quilter
Use the Set Block ![]() tool to place the blocks as shown.
tool to place the blocks as shown.
Row 6 – from Janeen van Niekerk at Quilt Art Designs
Use the Set Block ![]() tool to place the blocks as shown.
tool to place the blocks as shown.
Row 7 – from Bea Lee at Be A Quilter
Use the Set Block ![]() tool to place the blocks as shown. Use the Flip
tool to place the blocks as shown. Use the Flip ![]() tool to flip every other block.
tool to flip every other block.
Row 8 – from Darlene at Quilt Shop Gal
Use the Set Block ![]() tool to place the blocks as shown.
tool to place the blocks as shown.
Row 9 – from Bea Lee at Be A Quilter
Use the Set Block ![]() tool to place the blocks as shown.
tool to place the blocks as shown.
And, we’re done with our last quilt! Recolor it if you’d like and don’t forget to Add to Sketchbook! ![]()
I hope you have been enjoying the Row-A-Long so far!
Don’t forget to CHECK OUT HOW TO WIN AN EQ7 (and lots of other great prizes)! Sorry this contest is over.











09-29-2015
8:57 am
I Love how this tutorial turned out Heidi, Thank you so much for creating it. It’s perfect. Huge thanks to Electric Quilt, and Penny and Heidi also for working with me thru this Row-A-Long. I was truly honored that you allowed me to host this Row-A-Long and that you offered the software as a giveaway along with this great tutorial. I truly Love EQ and recommend it to everyone. Ya’ll are the absolute best.
09-29-2015
9:44 am
Thanks Marian! You’ve been great to work with! We’re happy to be a part of it
09-29-2015
2:13 pm
These rows have been so much fun. Thank you so very much for being a sponsor and helping out! It is very much appreciated!
09-29-2015
2:34 pm
Thank you Heidi, for the great tutorial. And of course a huge thank you for sponsoring this Row-A-Long and featuring the bloggers every week.
09-29-2015
4:44 pm
Thanks ladies! You both did great jobs as well! I think it was fun for everyone involved!
09-29-2015
9:32 pm
This has turned out to be a great experience and from comments I received, people have really liked it and got lots of quilting ideas from all the designers. Thanks to EQ and you, Heidi.
10-01-2015
10:22 am
Thanks Nancy! Glad you had a good experience! Marian, you, and all the designers have been great to work with!
10-01-2015
11:19 pm
Thank you for all of the inspiration. A lot of work went into these rows thank you for sharing.
10-02-2015
12:04 pm
Thanks Janie! Glad you are enjoying the Row-A-Long!
10-10-2015
5:25 pm
I have no EQ7. Is this tutorial also for not EQ7ler?? Are for us no Tutorial?? I didn´t find it.
Greeting Guilitta
10-13-2015
9:29 am
Hi Guilitta,
Most of the designers were also offering PDFs or other versions of their patterns for people who do not have EQ7. Without EQ7 you would not be able to combine them like this tutorial shows but you would still be able to use the patterns.
Thanks,
Heidi