
Start the new year by using up your scraps from the previous year’s projects. Scraps seem to grow even faster than my collection of yardage. My scraps get out of control so quickly. EQ8 to the rescue! Many blocks are suited exactly for the usage of scraps.
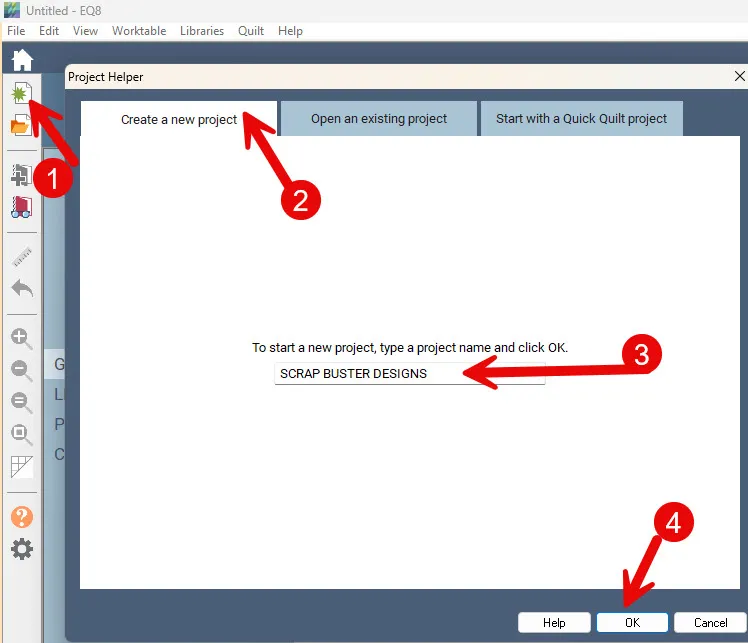
Open your EQ8 program.![]() On the main page splash screen, select the ‘Create a New Project’ tab, and then type in the name ‘SCRAP BUSTER DESIGNS’. Click the OK at the bottom of the box.
On the main page splash screen, select the ‘Create a New Project’ tab, and then type in the name ‘SCRAP BUSTER DESIGNS’. Click the OK at the bottom of the box.
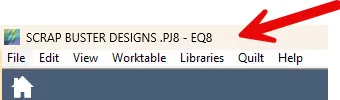
The name of the project should now show at the top of your screen.
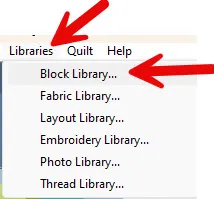
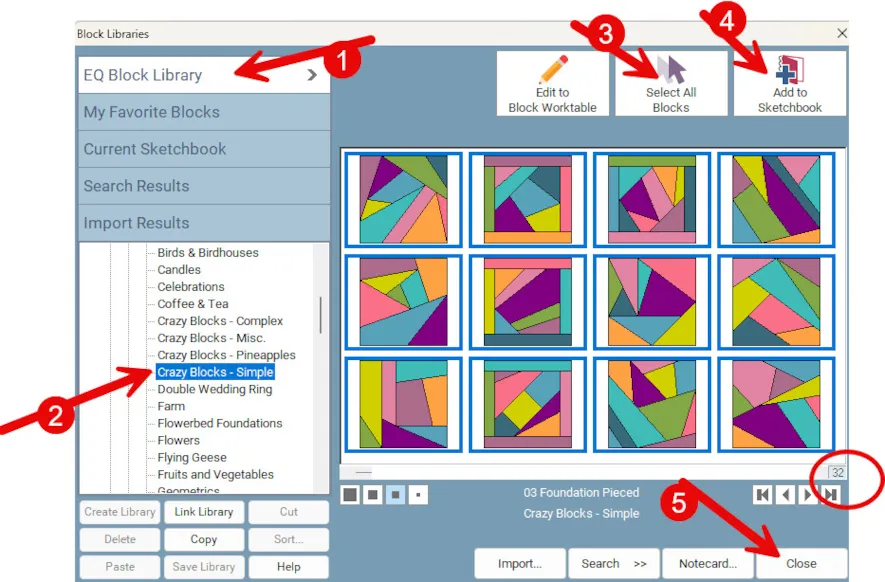
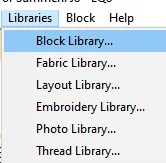
At the top of the screen, click on LIBRARIES>Block Library.
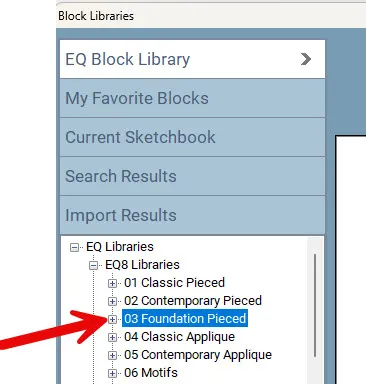
In the Library box, click on the + sign in front of the category 03 Foundation Pieced.
In the subcategory, Crazy Blocks-Simple. Select all the blocks in the category. There are a total of 32 blocks in this section. Once the blocks are selected, you will see a blue selection box around them. Click on the ‘Add to Sketchbook’ icon at the top of the libraries box to add them to your project. Click on the word ‘close’ at the bottom of the box.
Click on the block worktable icon ![]() on the upper right side of the screen. Click on the ‘view sketchbook’ icon
on the upper right side of the screen. Click on the ‘view sketchbook’ icon ![]() on the left side of the screen.
on the left side of the screen.
In the sketchbook box, click on the blocks heading and select a foundation pieced block of your choice. I usually pick a block that does not have seams running into the corners of the block. It really won’t matter here as we will heavily edit our blocks.
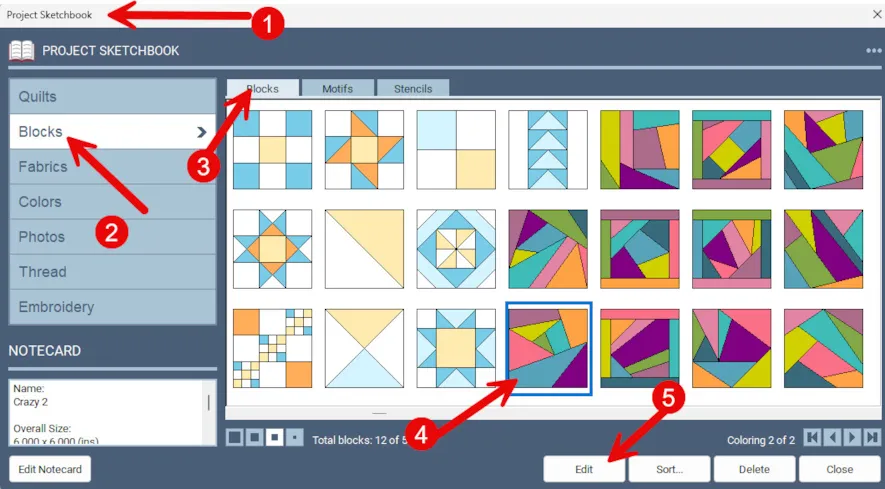
The block will open on the block worktable under the Draw tab. The default for the program is to open the design as a 6 inch block.
I plan on creating/sewing scrap designs to add them to a background block/fabric. I want to have my image of how I can use the scraps in my EQ8 as a reference only. I will not be making the block exactly as shown on the screen. It will only be a guide for me to reference.
I will begin by sewing my scrap pieces together on a muslin foundation fabric. My scraps will be of various sizes and colors. I will not piece them together. I will place them on the muslin foundation fabric as raw edges and roughly stitch around each piece as I lay it down to adhere the fabrics to the background foundation fabric. This way I can use various sizes of fabrics and not worry about seams or perfect placement. This is truly using up scraps in a random order.
I need my EQ8 image to reflect using very small fabric scraps. I can edit this block on the worktable to reflect even smaller pieces of fabric.
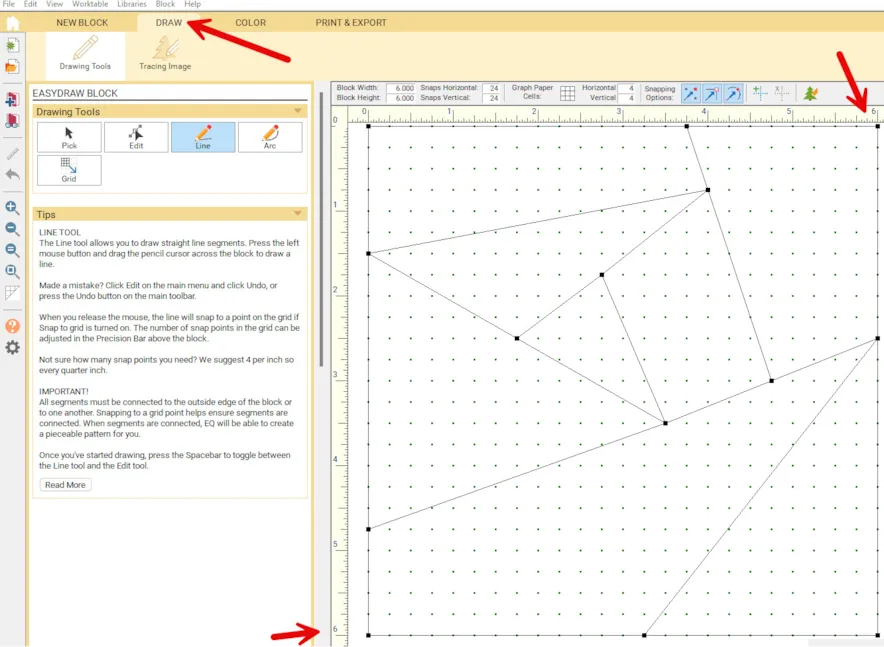
On the block worktable under the draw tab, select the line drawing tool icon.![]()
Move the cursor over to the worktable and click/hold/drag/release the tool to draw lines that intersect two other lines on each segment. This will create smaller pieces. You do not need to draw exactly line to line. When you click on the color tab after drawing multiple lines, the intersecting lines will automatically snap to the original two lines that you intersected.
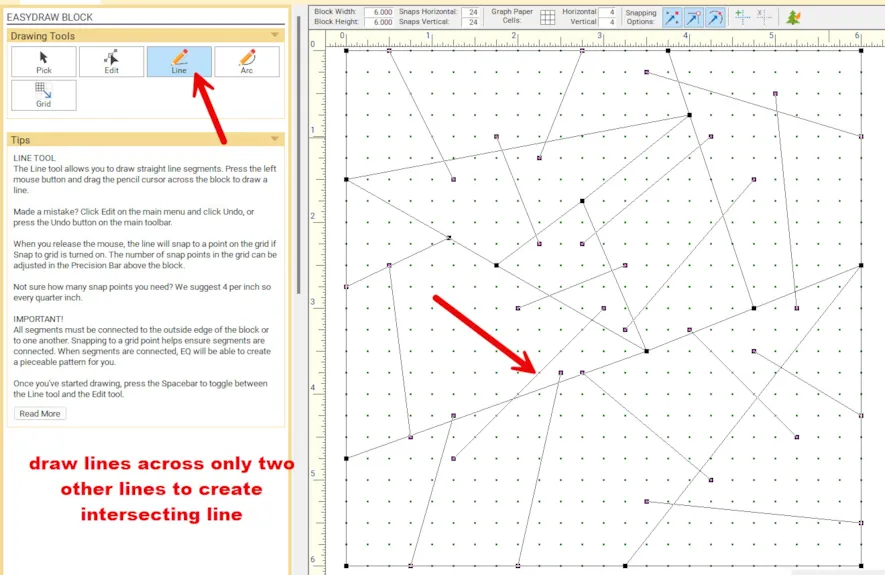
Using this technique, you will effectively be ‘chopping up’ the pieces into smaller segments.
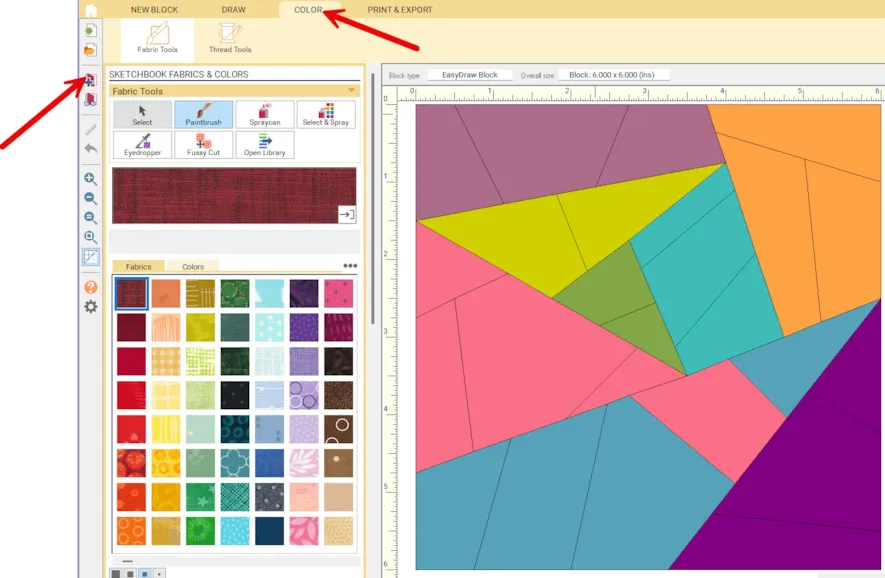
Click on the color tab at the top of the screen. The block will appear with the new smaller segments we created. Add this to the sketchbook.
 Add to sketchbook
![]()
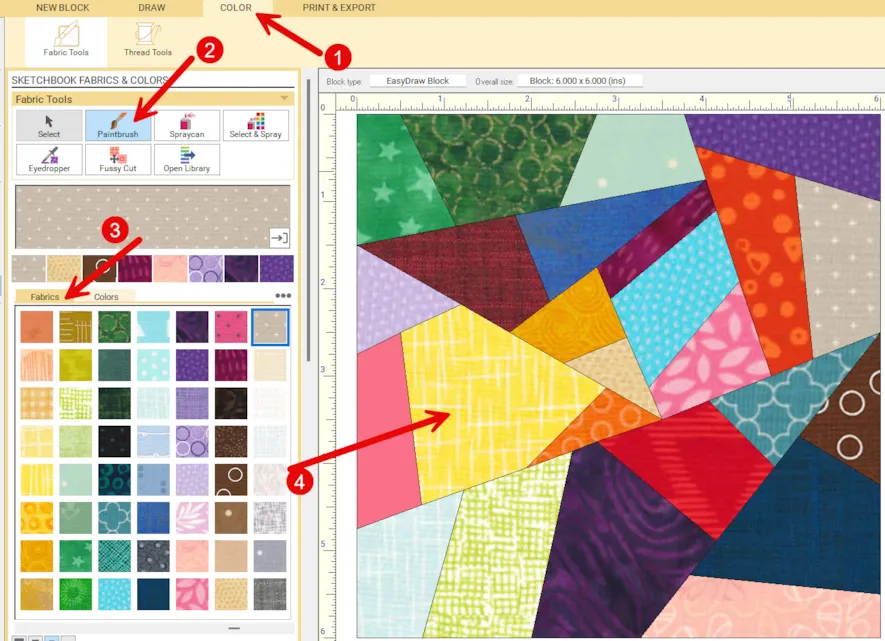
Use the paintbrush tool ![]() and select any fabric colors you wish. Move the paintbrush to each of the segments and color them to create a scrappy fabric block. Be sure to add the fabric block design to the sketchbook when complete.
and select any fabric colors you wish. Move the paintbrush to each of the segments and color them to create a scrappy fabric block. Be sure to add the fabric block design to the sketchbook when complete.
 Add to sketchbook
 ![]()
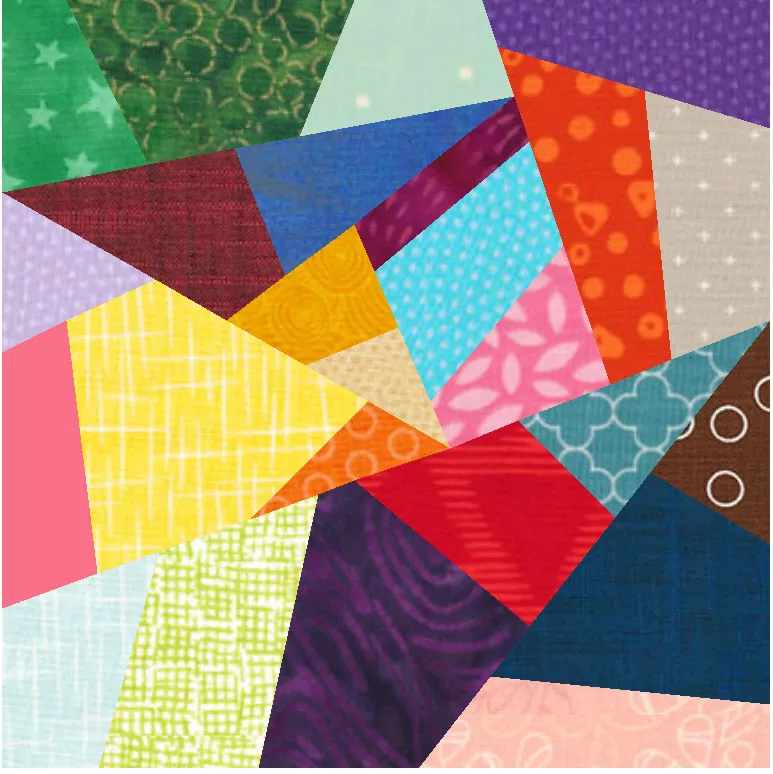
Click on the ‘hide/show patch lines’ icon ![]() on the far left side of the screen to turn off the drawing lines. This gives a softer look to the block and is more representative of how the block pieces will look when sewn.
on the far left side of the screen to turn off the drawing lines. This gives a softer look to the block and is more representative of how the block pieces will look when sewn.
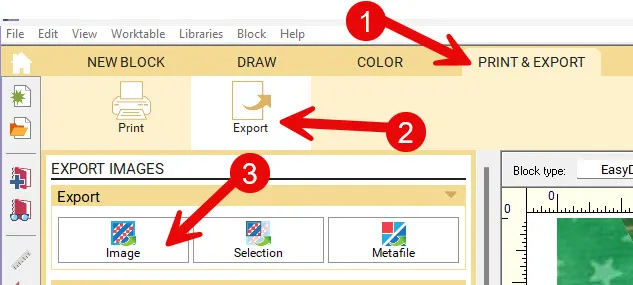
At the top of the screen click on the ‘print & export’ tab. Select the ‘export’ icon from the ribbon and then click on the ‘image’ selection.
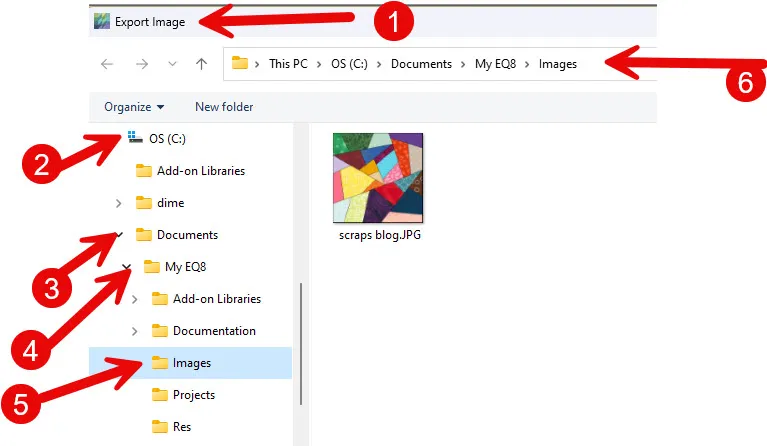
Save the image of the block to your computer. The default location for images is saved to PC>C drive>Documents>My EQ8>Images folder. You may choose to save your images elsewhere but you must remember where you saved them for future use.
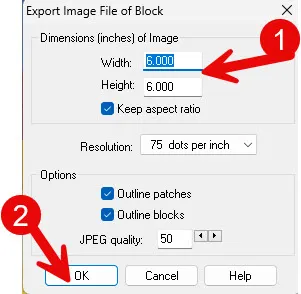
The default size is to save it as a 6-inch block. This is fine for what we are working on here. Just click the OK in the bottom of the box to save the image.
This block is just an image. I want to use this block with all its pieces as a fabric. To do this we need to use the image worktable to convert the image to fabric.
Click on the image worktable icon  on the upper right side of the screen.
On the image worktable, click on the image tab at the top of the screen and select the edit icon on the ribbon. Click on the ‘import image’ icon. In the import image box, click on the scraps blog image and then click on the word ‘open’ at the bottom of the box. This will place the image on the image worktable.
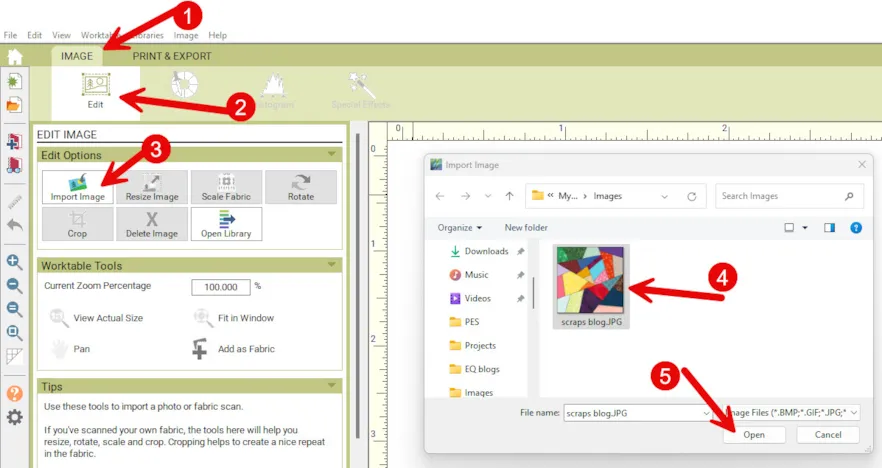
The image comes in at the default size of a 6-inch block. In the Wortable tools at the left side of the screen, click on the icon ‘add as fabric’ ![]() to add the fabric scraps to the fabric selections in this project sketchbook.
to add the fabric scraps to the fabric selections in this project sketchbook.
![]()
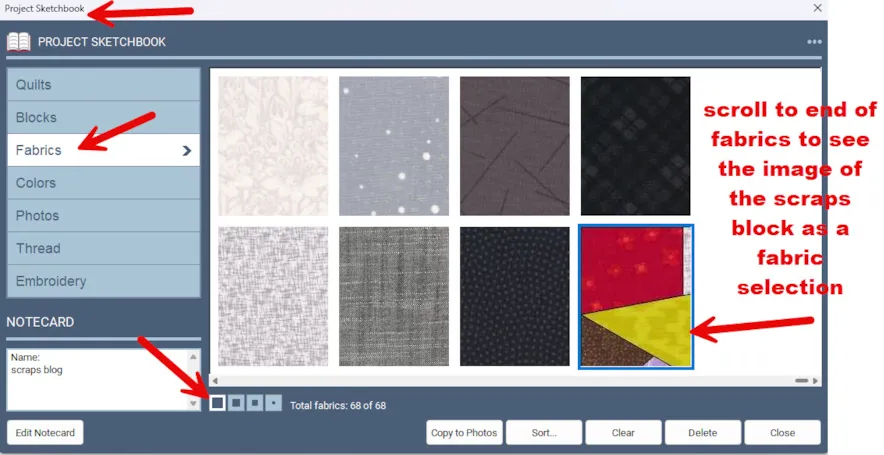
The fabrics added to the project sketchbook fabrics library will always appear at the end of the default fabrics in your sketchbook. They may not show all the scrappy colors you chose based on the size of the image in the scrapbook. If you choose the largest size for your fabrics to show in the sketchbook, you will indeed see the individual pieces of the block. If you choose the smallest size of image viewing in the sketchbook, you may only see one color of the block.
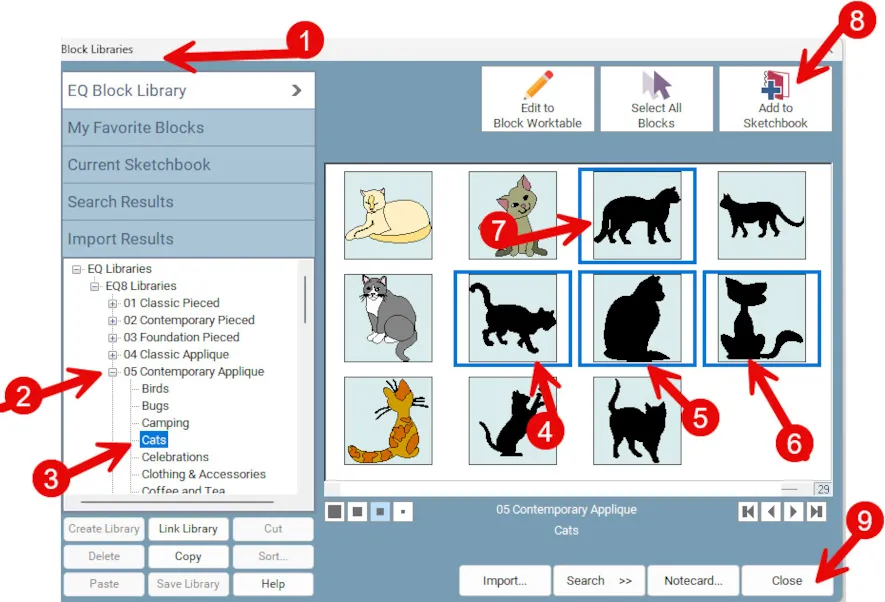
Click on LIBRARIES>Block library at the top of the screen.
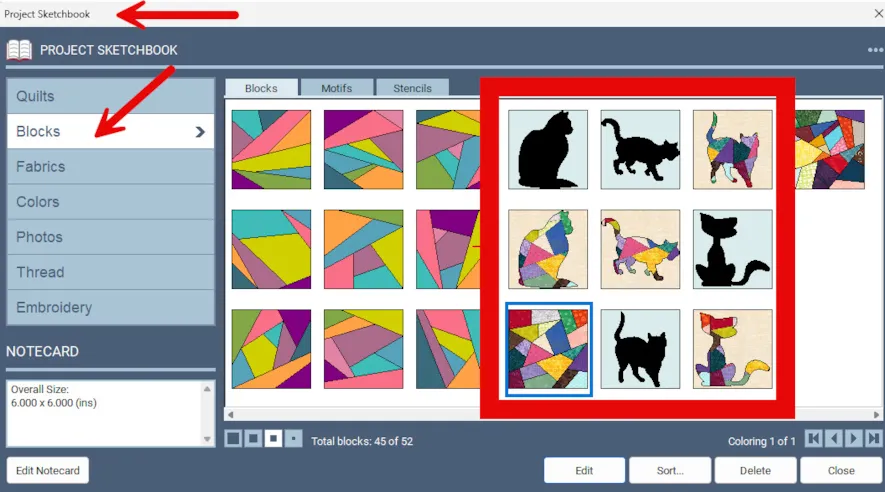
In the block libraries selection box scroll down to 05 Contemporary applique category. Select the cats group and then scroll all the way to the end to see the cats black sillouhettes. Select 4 of them by holding down the control key on your keyboard (CTRL) and then once they are all highlighted, click on the ‘add to sketchbook’ at the top of the box. Close the box when done.
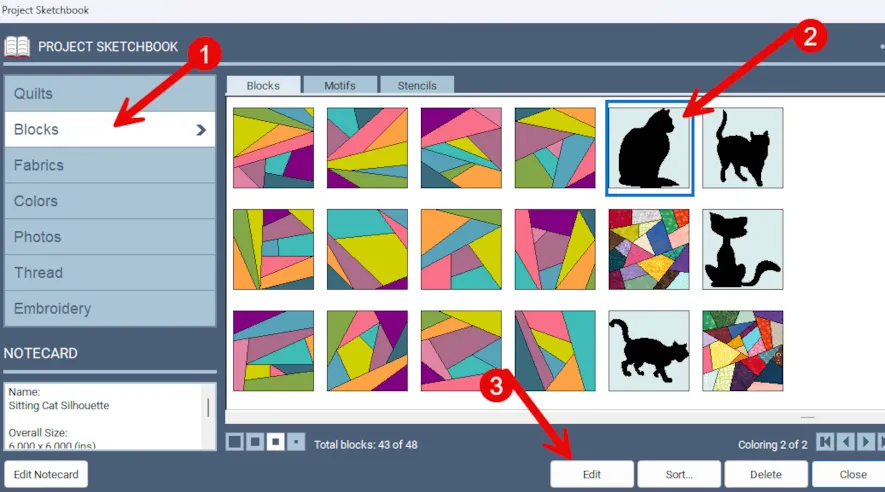
Click on the view sketchbook icon on the left side of the screen. In the sketchbook, under the blocks heading, click on one of the cats to select it. Click on the word ‘edit’ at the bottom of the box.
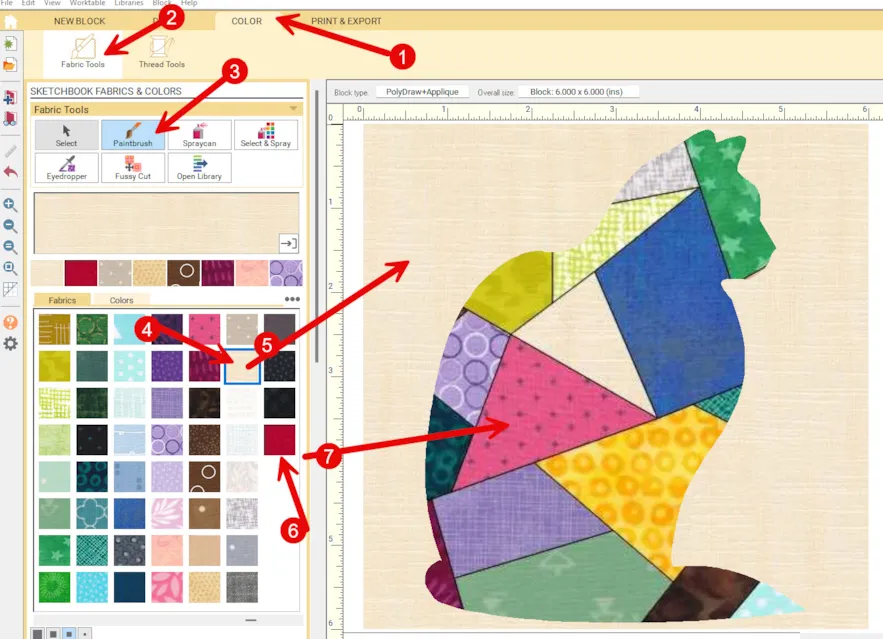
The cat you select will appear on the block worktable. Click on the color tab at the top of the screen and using the paintbrush tool, ![]() scroll to the end of the fabrics and choose the last one. This will be the image of our pieced fabrics. Move the cursor over to the worktable and click on the cat to apply the pieced fabrics. Choose a neutral color of fabric for the background and color it also. Click on the ‘hide/show patch outlines’ icon
scroll to the end of the fabrics and choose the last one. This will be the image of our pieced fabrics. Move the cursor over to the worktable and click on the cat to apply the pieced fabrics. Choose a neutral color of fabric for the background and color it also. Click on the ‘hide/show patch outlines’ icon ![]() on the far left of the screen to turn off the drawing lines on the block. Add the newly colored block to the sketchbook.
on the far left of the screen to turn off the drawing lines on the block. Add the newly colored block to the sketchbook.
 Add to sketchbook
 ![]()
Repeat the above process for all 4 of the cats you chose from the library.
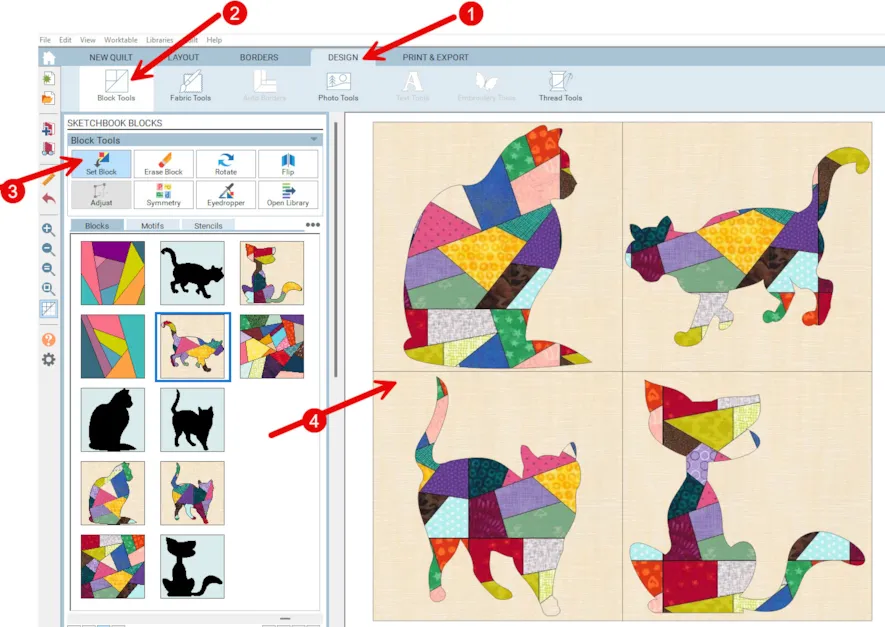
Click on the quilt worktable icon at the top of the screen. Choose NEW QUILT> Horizontal for a layout. On the Layout tab set the layout to be 2 x 2 and the size of the blocks to be 8 inches. On the Borders tab, delete the default border.

Click on the Design tab at the top of the screen. Select the block tools icon from the ribbon and then select the set block tool. Click on each of the cats you colored with a scrappy fabric and set each one into a block on the worktable by clicking on the block area after selecting the cat.
Add the quilt to the sketchbook.![]()
This is simply an image of how the quilt will look when complete. The actual pieces of your scrappy fabric may indeed be stitched differently, but the idea of how they will look is on this quilt layout.
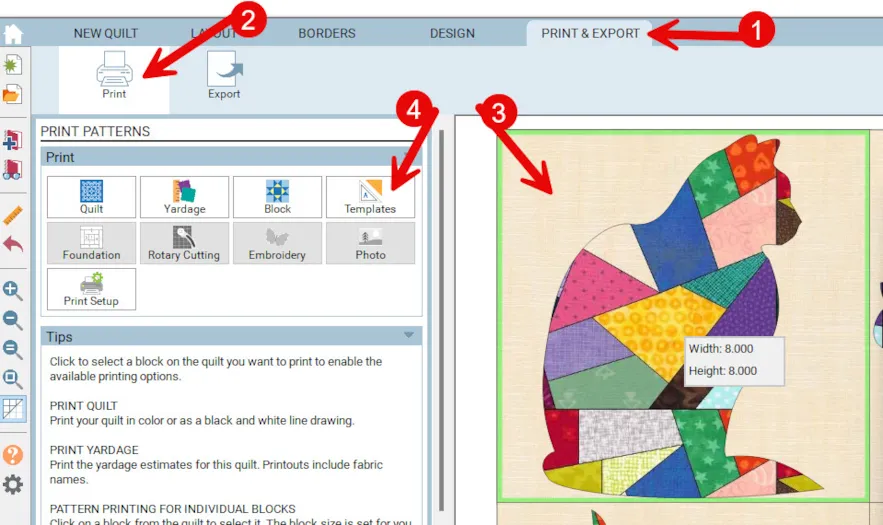
Click on the print & export tab at the top of the screen. Click on one of the blocks to select it. It will be highlighted in green. Click on the templates icon to print the shape of the cat you have selected.
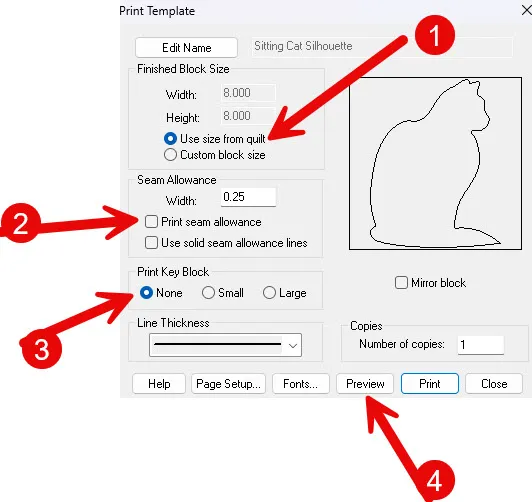
In the print template box, click on the ‘use size from quilt’. Uncheck the ‘print seam allowance’ and select the print key block as none. Click on the preview word at the bottom of the box.
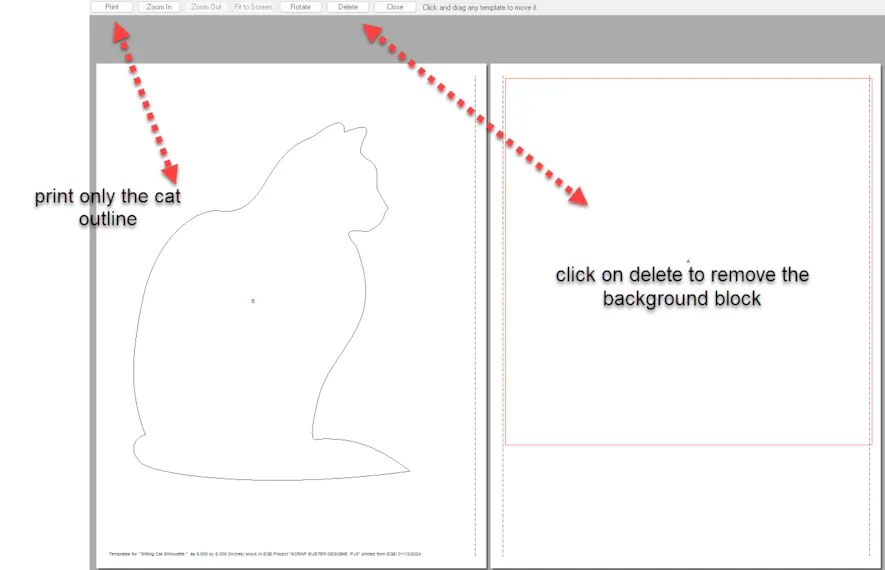
Once you print the cat pattern, you can transfer this outline to the paper backing on a fusible web. (Wonder Under, Steam A Seam, etc.) Iron the fusible cutout onto the back of your scrappy fabric piece and cut out the cat pattern. You now will have the cat made of scraps as a fusible applique that you can add to any block background you wish to use.
Although EQ8 can produce wonderful pieced patterns for us, we can still use the program to improvise with your scraps and use the basic shape in the program to create a perfectly sized applique piece. EQ8 is so versatile this way. You can use the program in a way that best suits your stitching styles.


01-21-2024
12:01 pm
I really kike your take on this, thank you!
01-21-2024
12:03 pm
Yvette I love thinking outside the box and using my EQ8 as my tool to create designs. The patterns are there just waiting for us to be inventive with how to use them.
01-21-2024
2:43 pm
Yvonne,
I love your lessons! You are so creative and I’m thankful that you do these lessons as I learn so much from them. So thank you for taking the time to do these for us!
Linda
01-21-2024
2:45 pm
Linda thanks so much. I love working with the EQ program.
01-21-2024
3:16 pm
Thank you for this lesson. It was nice to see all I can do with EQ8. I just got into to create a quilt using crown royal bags. Thanks!
01-21-2024
3:17 pm
Olivia your crown royal bags sound really interesting.
01-21-2024
3:55 pm
Wow, haven’t worked EQ for years. Saved the lesson, I think I will have to do it a couple (or more ) times to get it down. Thank you for the time to put it together. You ladies are appreciated, just in case you forgot!!
01-21-2024
5:51 pm
Thanks Arlene. Enjoy working with your EQ8
01-21-2024
4:42 pm
Wow, very cool! Thank you for your great lessons. I will definitely be trying this out.
01-21-2024
5:53 pm
Theresa this is a great way to use those little scraps. I often sew my raw edge pieces to muslin squares and save them until I decide what to apply them to. It is a great way to teach young children to sew.
01-21-2024
8:51 pm
Love this! Thank you so much for sharing!
01-21-2024
8:52 pm
Thanks Tracey
01-22-2024
4:57 pm
love the idea of using the silhouettes
01-22-2024
5:00 pm
P. Keeley the silhouettes and the stencils are great to use. You can also use appliques if they are a simple single shape. These work well for adding the fabrics to see how they would look.
01-23-2024
11:26 am
Thank you for the silhouette/applique idea.
01-23-2024
11:49 am
Joan you are very welcome. I love playing with my EQ.
01-28-2024
7:50 pm
I use EQ to design my own quilts and draw the blocks I need. I haven’t checked the block library in quite a while and didn’t know you had foundation blocks. THANK YOU. I am so gland you had this article.
01-28-2024
8:05 pm
Barbara I often find stuff I forgot was there. It is such a large comprehensive program. I am glad you are enjoying it.
02-01-2024
9:00 am
I’m just learning EQ8, but have been so impressed with the quality of the tutorials. Work exactly as described and still leave us some room to improvise. Thank you. This was a fun technique and I may try it with some of my mound 0′ scraps.
02-01-2024
9:20 am
Nancy I am so glad these little tutorials are helping you to learn the program.
02-23-2024
5:03 am
I have been EQ-ing since EQ4, but still often feel like a beginner. Your lessons seem to expand my knowledge each time I read through one. Thanks for helping me to more fully explore EQ8 and learn so many new things. EQ8 is such a powerful, wonderful program. I love to EQ!
02-23-2024
12:35 pm
Sherrie I agree. I love playing with my EQ8 and creating things that are an alternative to the standard blocks. I keep learning every day!
02-28-2024
8:15 pm
Love this Lesson. Thank you