
I love my EQ8 program. It is the most important tool in my sewing room. I have been in love with EQ since I first began using it when it was version EQ4. In teaching lessons on how to use the program to create quilts, I noticed two different mindsets with the students. One is that they just want to accomplish what can be done to create quilts/blocks with the program. Another is how to interpret the designs into something unique for themselves. This goes much further beyond the design process alone. Individual interpretations of the designs are what make our work come to life.
Launch your EQ8 program from the desktop by double-clicking on the icon. 
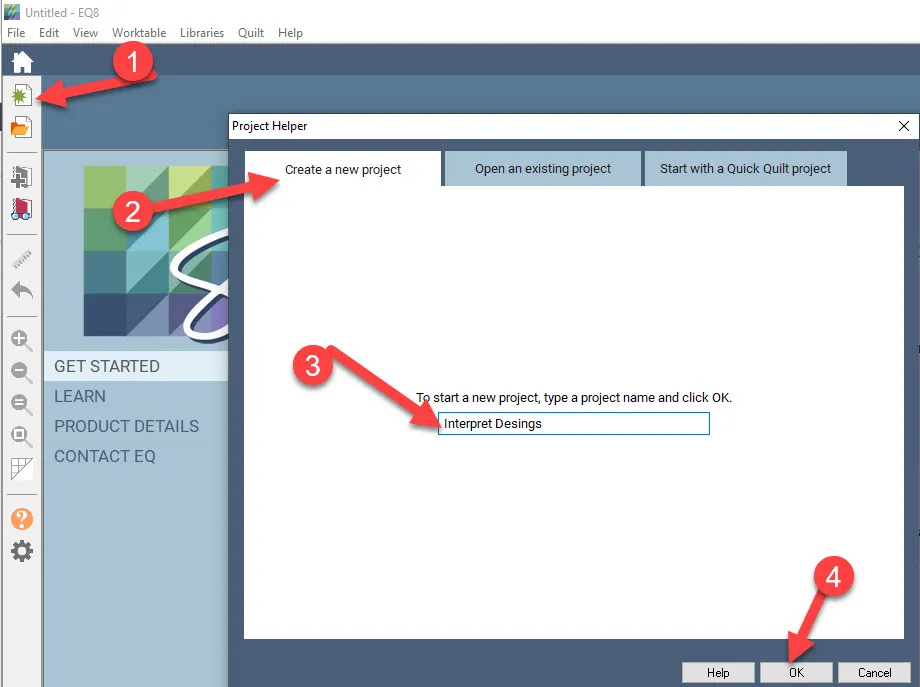
On the opening screen, click on the New Project icon![]() and the project helper screen will open. Type in the name of the new project to be ‘Interpret Designs’. Click the OK at the bottom of the box.
and the project helper screen will open. Type in the name of the new project to be ‘Interpret Designs’. Click the OK at the bottom of the box.
Once you have named your project, the name should appear at the top of your screen.

Click on the block worktable icon![]() at the upper right side of the screen.
at the upper right side of the screen.
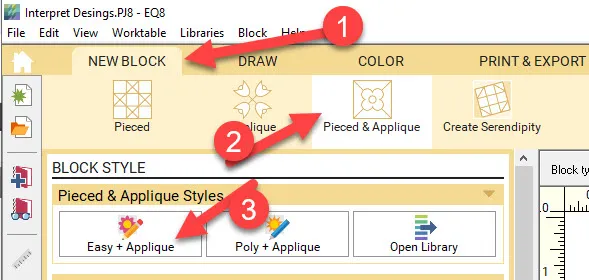
Click on NEW BLOCK>Pieced & Applique>Easy + Applique on the ribbon at the top of the screen.
On the property bar at the top of the worktable, set the block size to be 8 x 8 inches and the snaps to be 16 x 16 horizontal and vertical.

Click on the line drawing tool![]() to select it. Make sure you are on the EasyDraw tab at the bottom of the worktable. Move the cursor over to the worktable and click/hold/drag/release lines to create an X across the block but do not draw the lines into the corners of the block.
to select it. Make sure you are on the EasyDraw tab at the bottom of the worktable. Move the cursor over to the worktable and click/hold/drag/release lines to create an X across the block but do not draw the lines into the corners of the block.
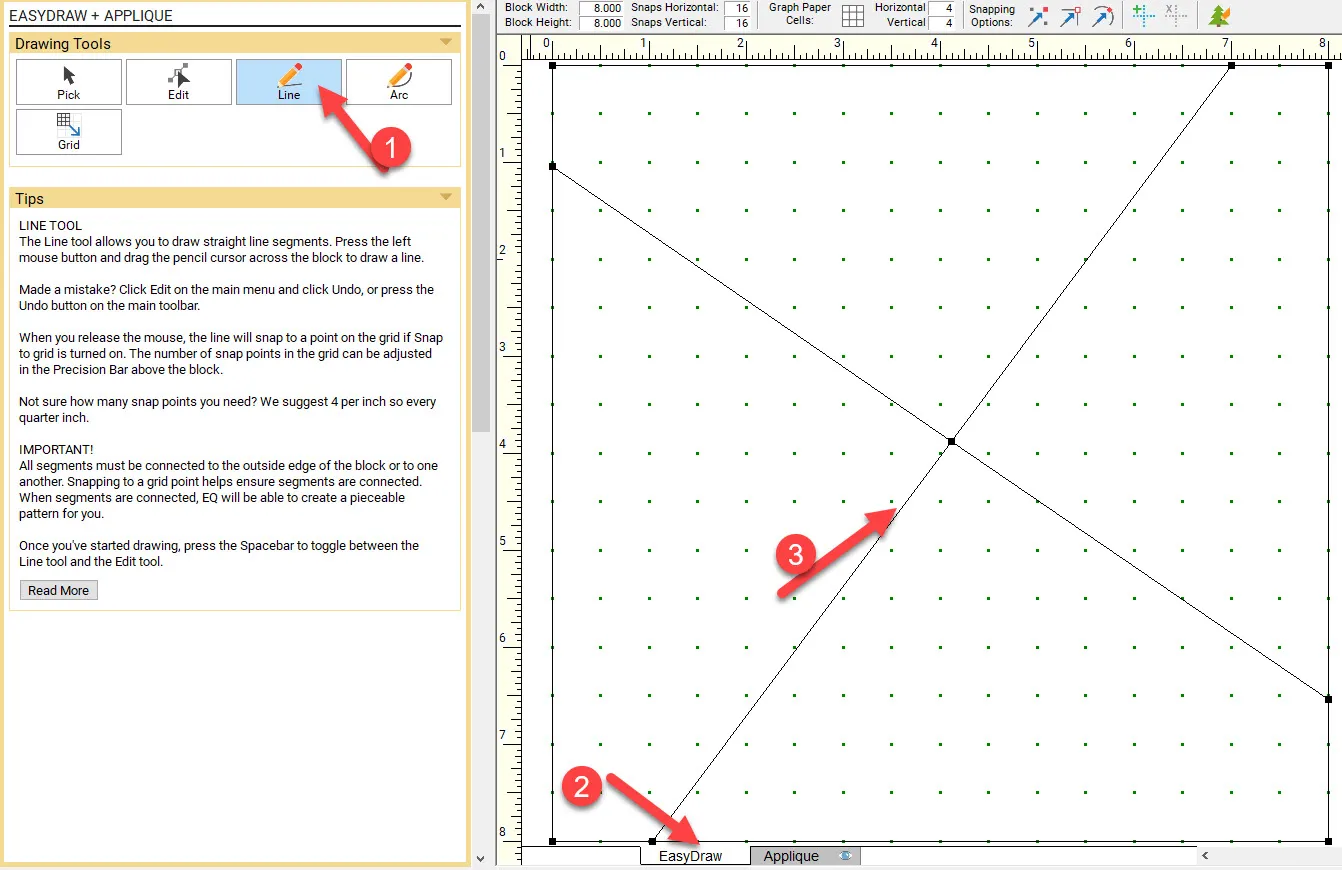
NOTE: When you piece these segments together you don’t sew into the corners, the bulkiness will be removed when joining multiple blocks together. This makes piecing the blocks together easier.
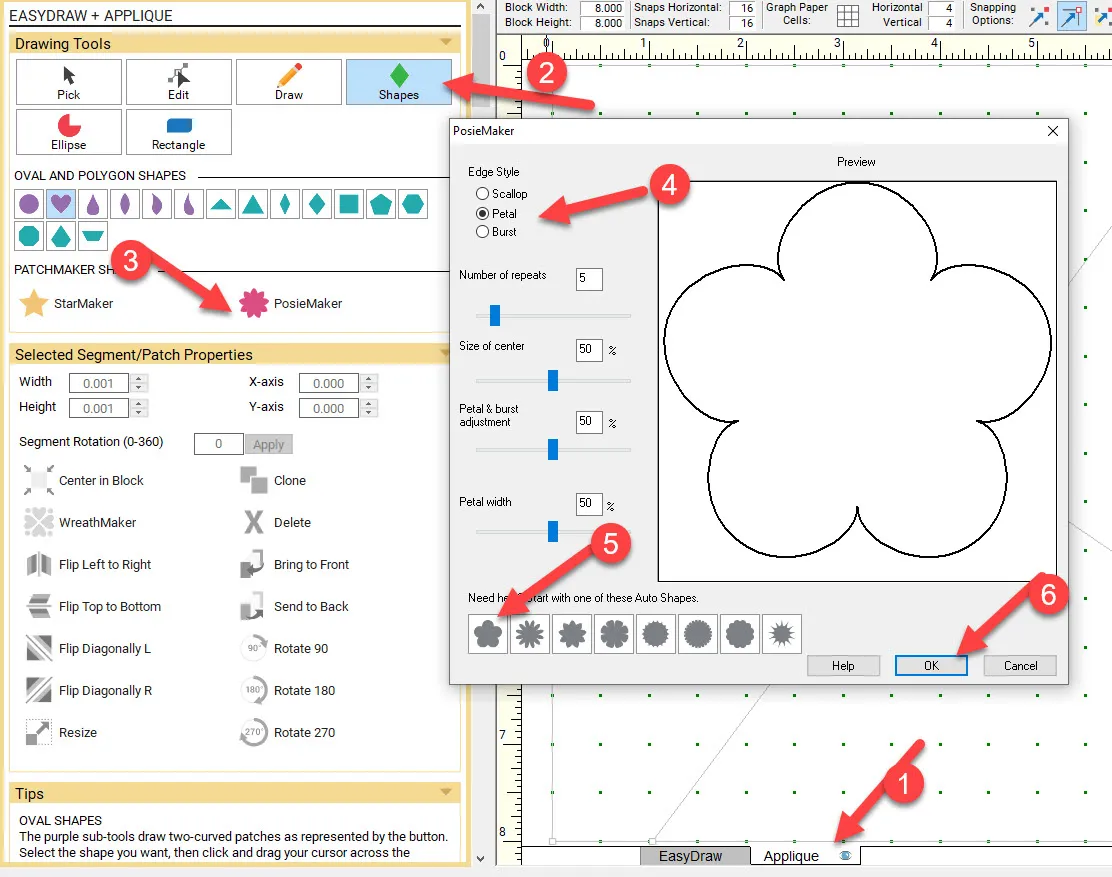
Click on the applique tab at the bottom of the worktable. Choose the shapes tool![]() and then select the PosieMaker tool. In the properties box, select the petal auto shape and set the number to 5. Click OK at the bottom of the box.
and then select the PosieMaker tool. In the properties box, select the petal auto shape and set the number to 5. Click OK at the bottom of the box.
The new Posie shape will appear on the upper left side of the block worktable.
Click on the pick tool![]() to select it. Move the cursor over to the center crosshair of the Posie and click/hold/drag/release to move it to the upper-middle section of the worktable. This will give you more room to edit the design further.
to select it. Move the cursor over to the center crosshair of the Posie and click/hold/drag/release to move it to the upper-middle section of the worktable. This will give you more room to edit the design further.
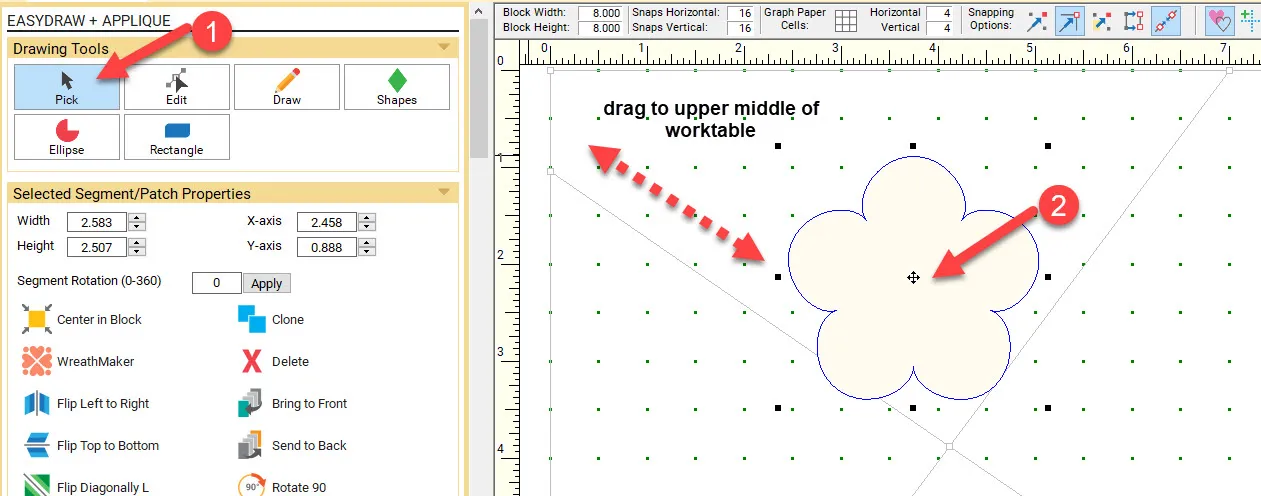
Click on the wreath maker tool![]() to select it.
to select it.
In the wreath maker property box, click/hold/drag/release the slider bar to increase the cluster spacing of the individual Posies. Once they are a spacing that you like, click the OK at the bottom of the box.
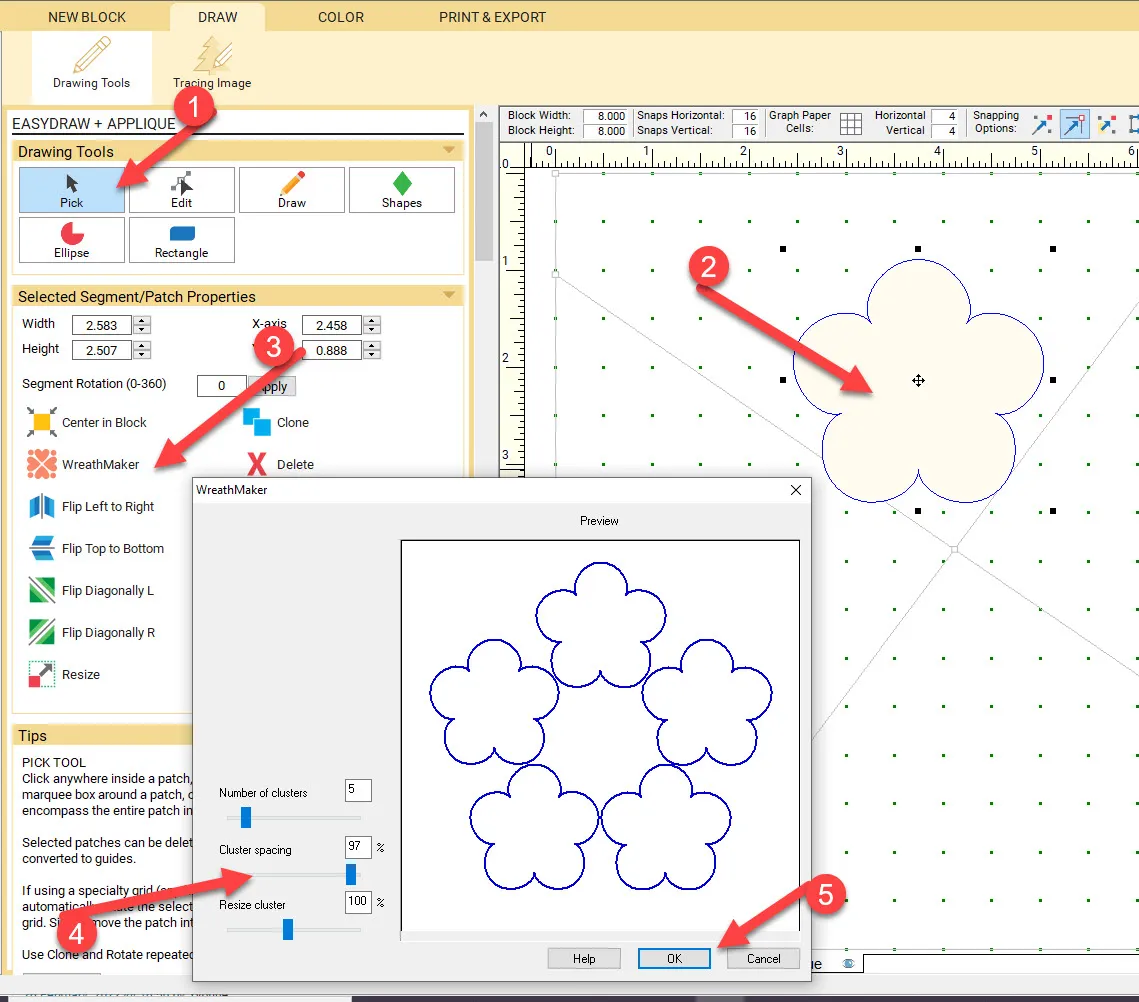
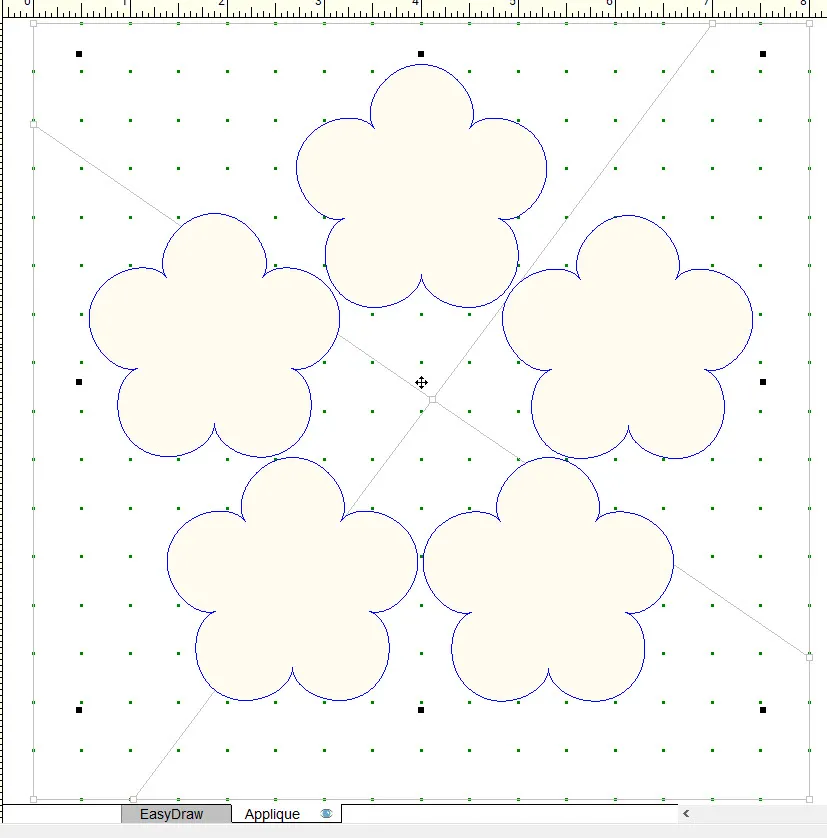
The Posie wreath will now appear on the worktable. You can see the lines of the pieced block in the background with the Posie shapes on top.
Add to sketchbook ![]()
NOW THE PERSONAL INTERPRETATION WILL BEGIN.
Option one
Click on the Print and Export tab at the top of the screen. Choose the printer from the ribbon at the top of the screen. Click on the block icon![]() to print the image of the entire block.
to print the image of the entire block.
In the print block property box, change the size of the block to be 8 x 8 inches and print as an applique pattern.
Click on the word ‘preview’ at the bottom of the box.
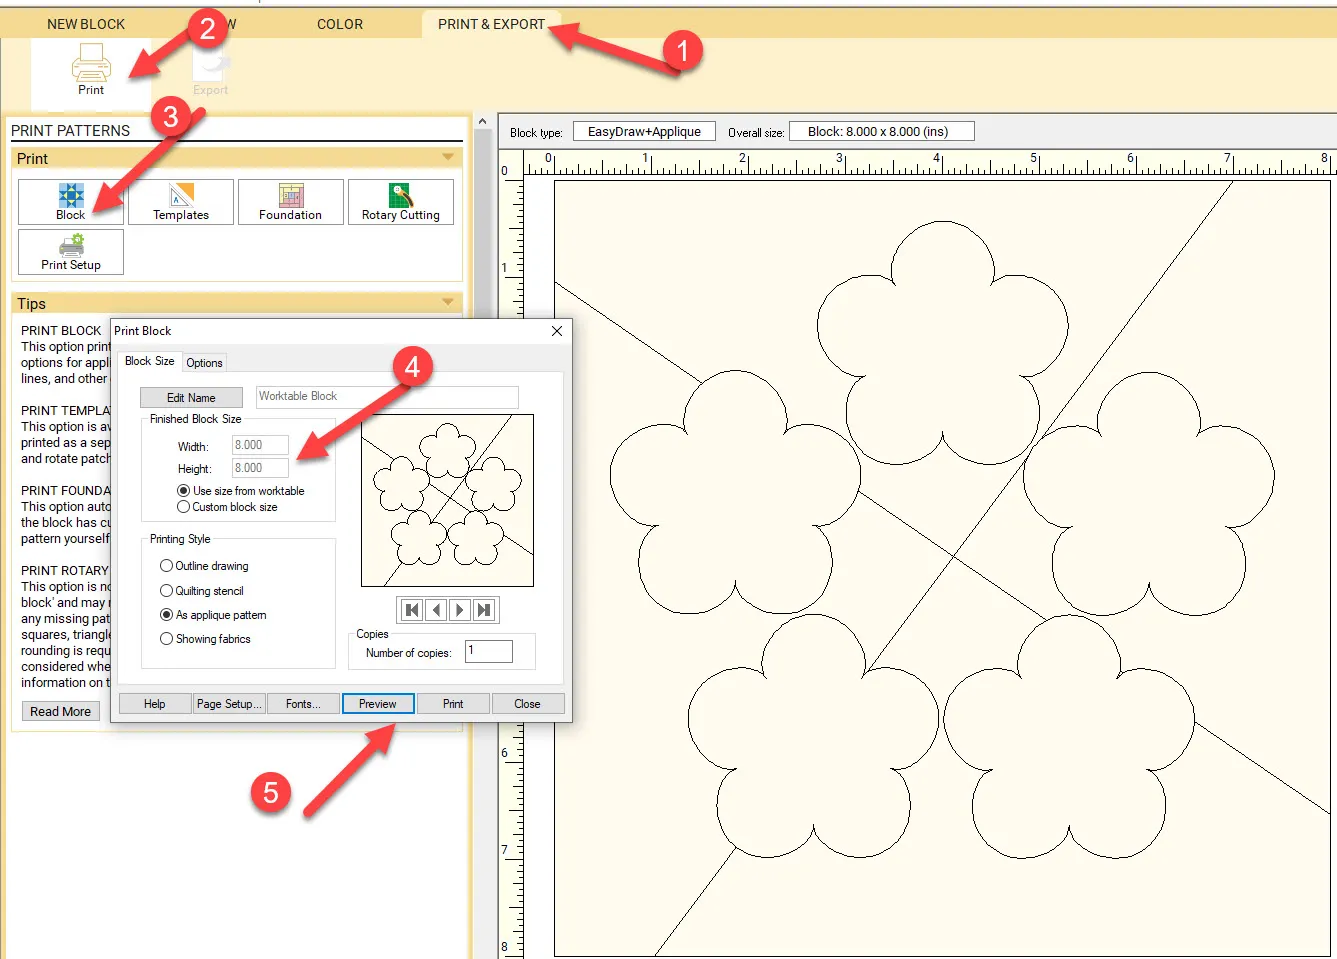
Print the block line drawing from the print preview page onto printer fabric.
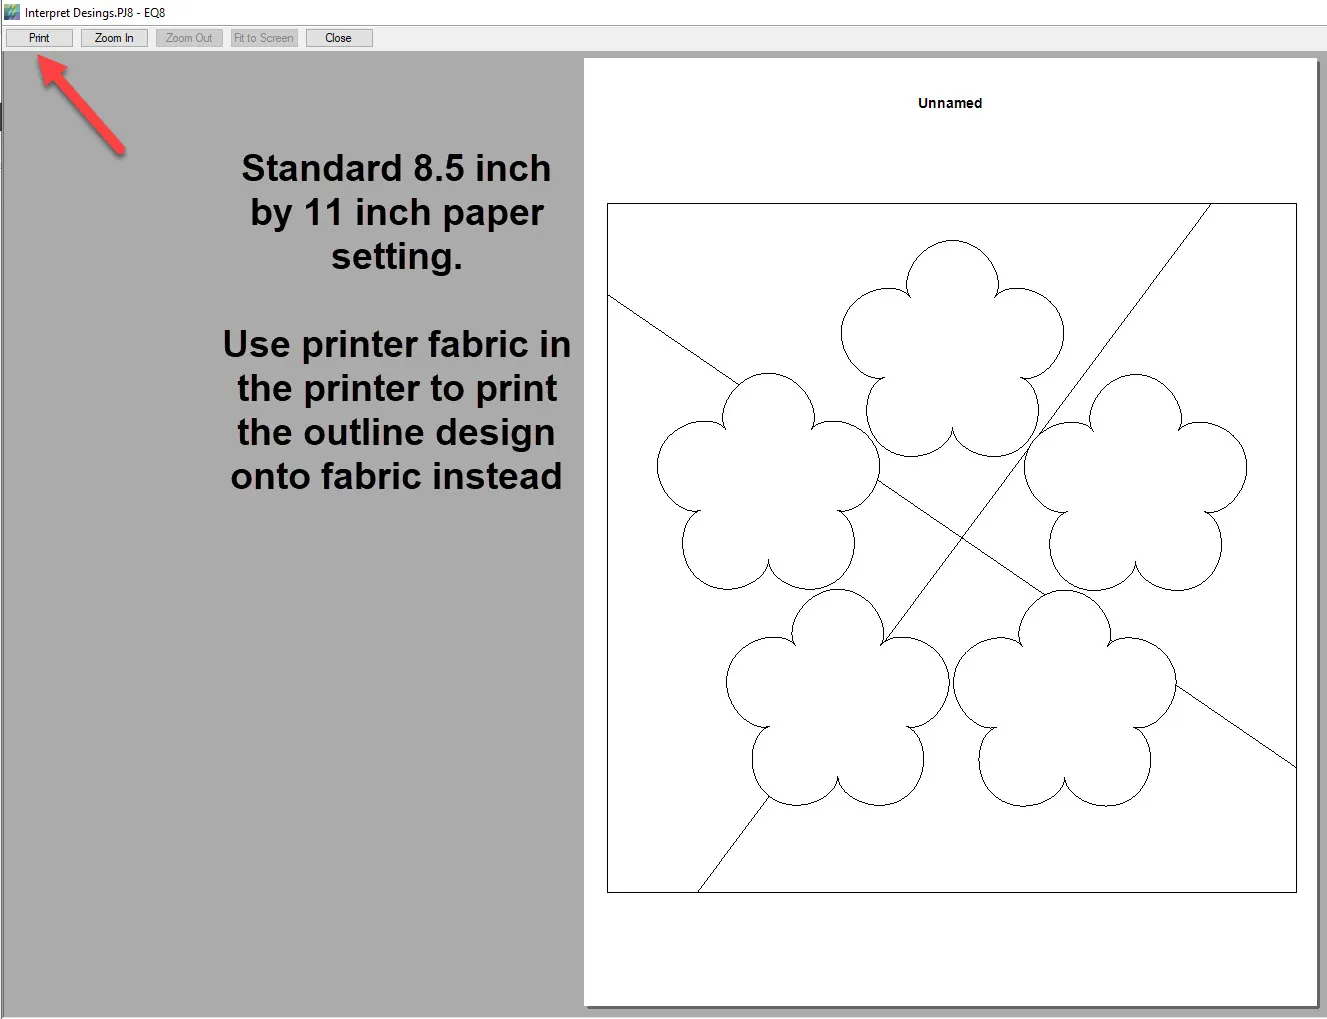
Close the print options box when done.
Now, instead of sewing this block and applique you can choose to use the printed design on printer fabric and color it with fabric markers. It fits perfectly onto a printer sheet that will give you the trimming option of having an 8.5-inch block so you can easily sew it together with other blocks to create an 8-inch finished block.
Option two
Click on the color tab at the top of the screen.
Select the fabric tools from the ribbon on the top of the screen and choose the paintbrush tool.
![]() Click on either the fabrics tab or the color tab in the middle of the property box, and click on any color choice. Move the cursor over to the worktable and click on the objects to color the elements of the block.
Click on either the fabrics tab or the color tab in the middle of the property box, and click on any color choice. Move the cursor over to the worktable and click on the objects to color the elements of the block.
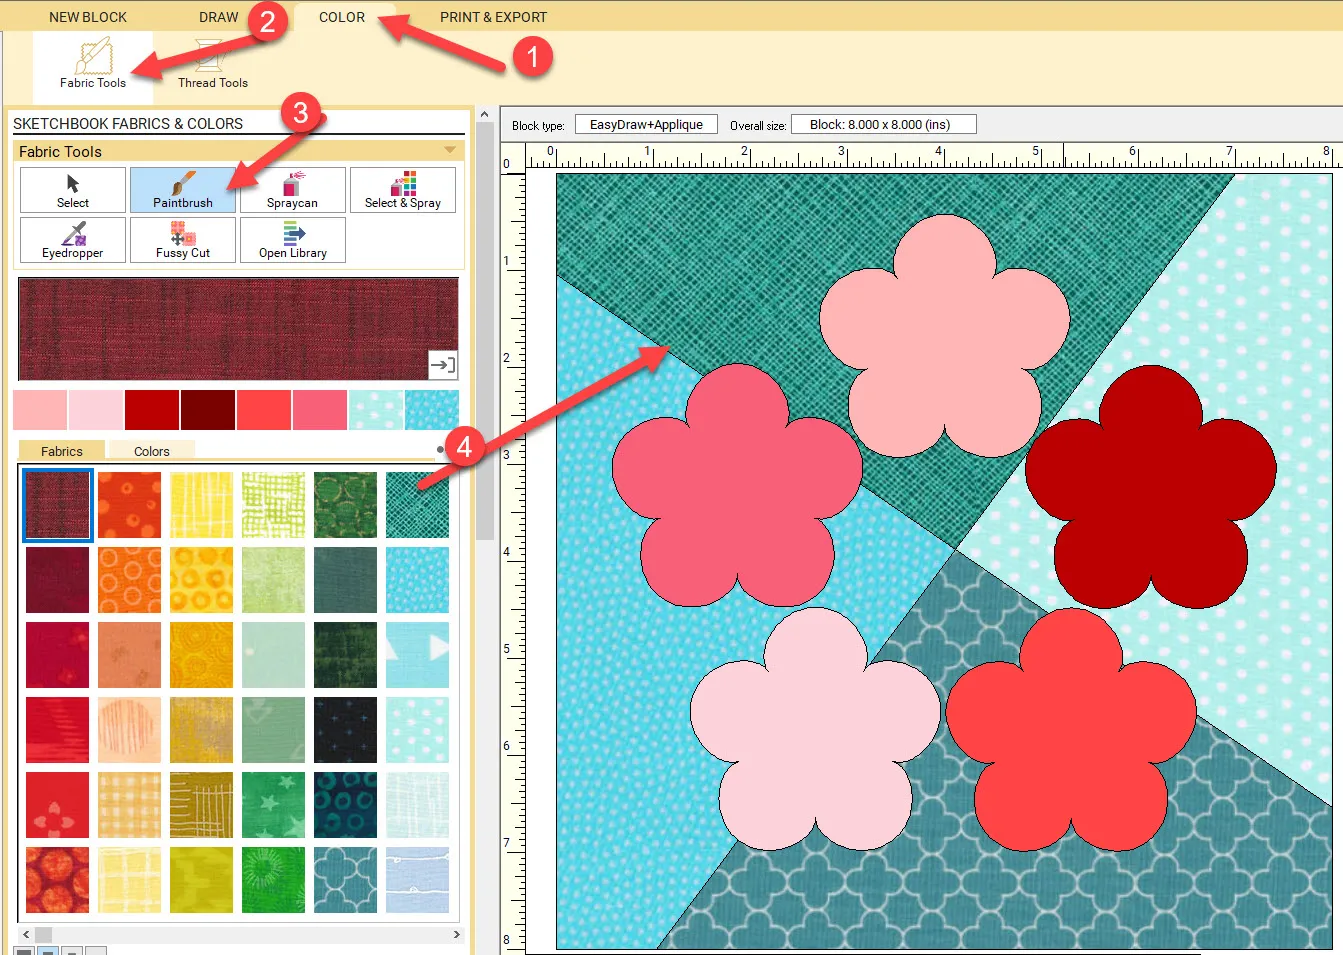
Add to sketchbook when done coloring.![]()
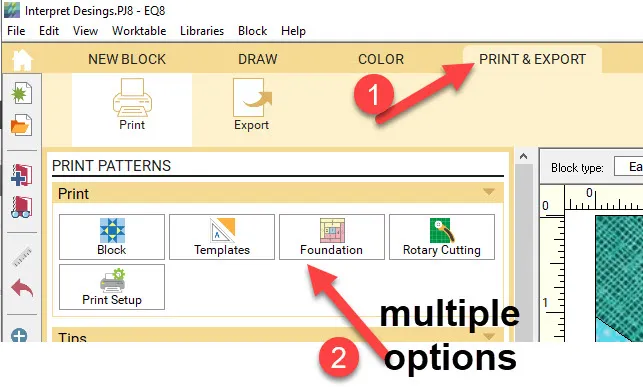
Click on the Print and Export tab at the top of the screen. There are multiple options available to you for printing a pattern for your design. You will find which one works best for you.
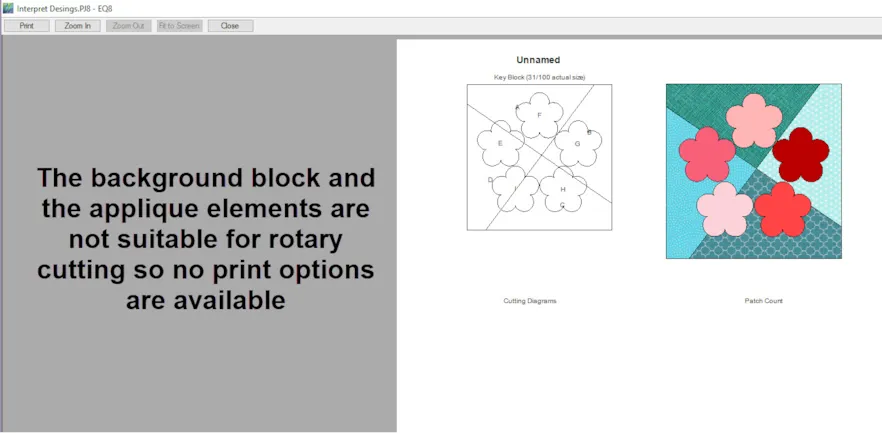
Click on the rotary cutting tool icon. ![]() In the preference box, click on the word ‘preview’ at the bottom of the box.
In the preference box, click on the word ‘preview’ at the bottom of the box.
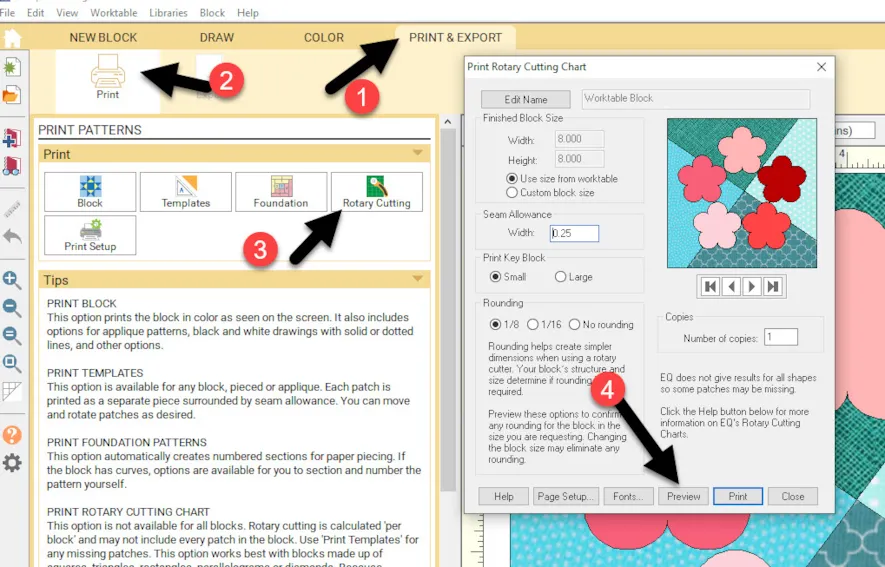
Rotary cutting does not show as an option when you select rotary cutting and then preview the pattern. These pattern pieces are not suitable for rotary cutting.
Close the print screen and the rotary cutting screen options.
OPTION Three
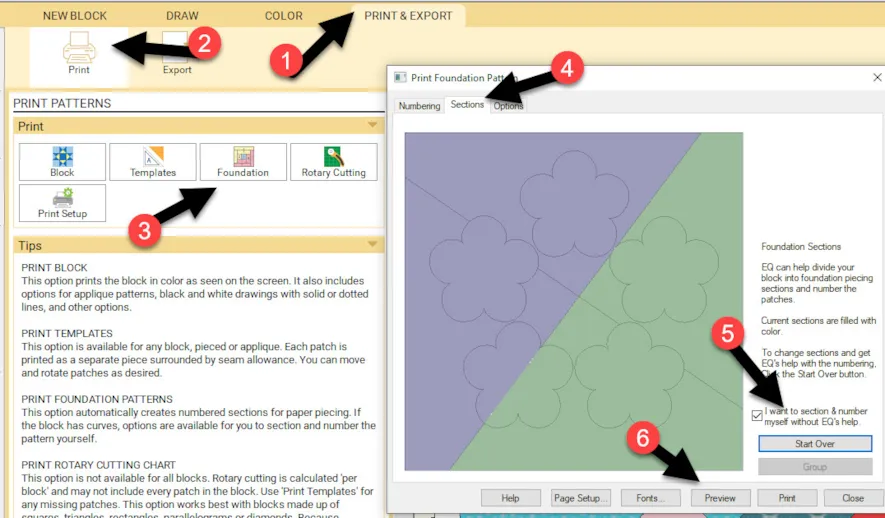
Click on the foundation piecing icon.![]() In the print foundation pattern box, under the sections tab, you need to select and group your pattern pieces for the program to be able to print the patterns. Click on the word ‘preview’ at the bottom of the box.
In the print foundation pattern box, under the sections tab, you need to select and group your pattern pieces for the program to be able to print the patterns. Click on the word ‘preview’ at the bottom of the box.
On the preview screen, you will see the background blocks only. You can click and drag the pieces so you only use 1 page to print both pieces. You would print from this screen.
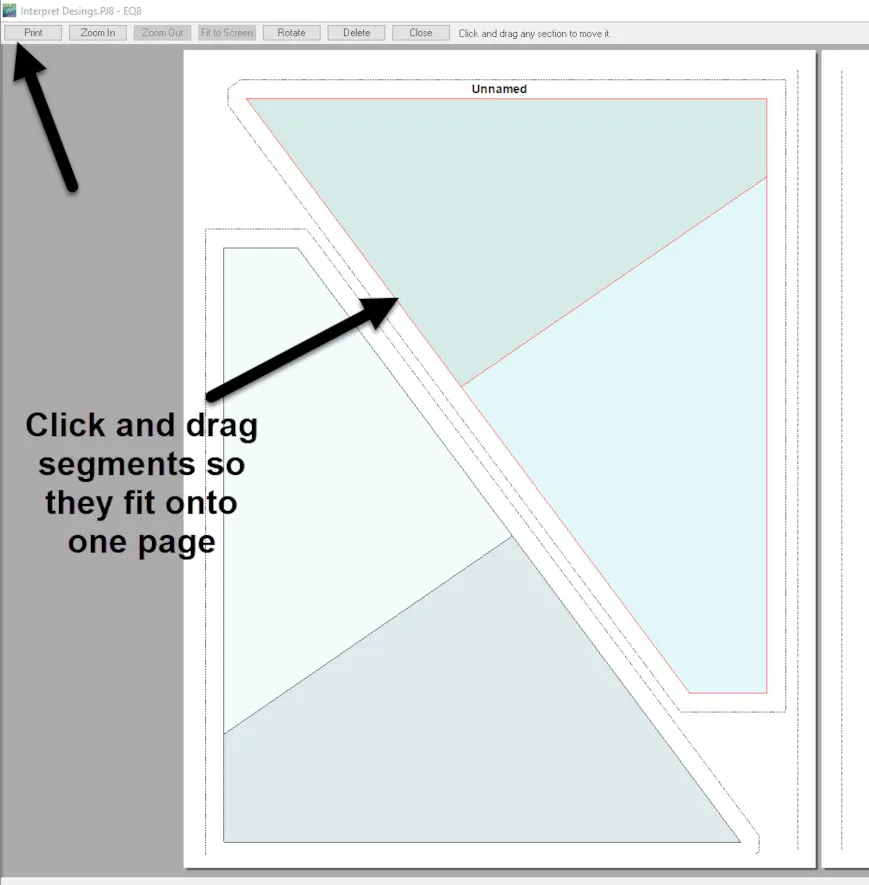
NOTE: You can not print the posie flowers as a foundation pattern.
Close the print screen and the foundation pattern screen.
OPTION Four
Click on the templates icon. ![]() In the print template box, click on the word ‘preview’ at the bottom of the box.
In the print template box, click on the word ‘preview’ at the bottom of the box.
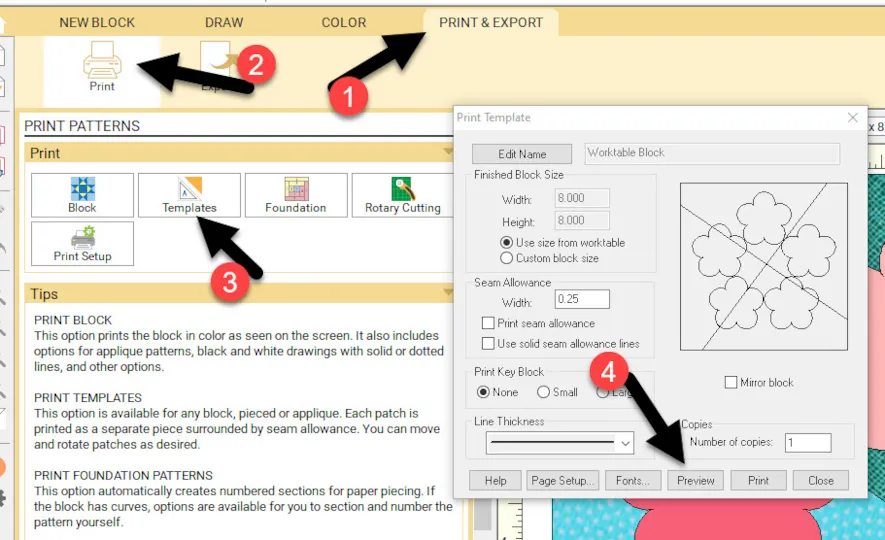
On the print screen, you can see all the pattern pieces needed to create the entire block. There is no seam allowance around the posie shapes so this would be used to create a fusible applique pattern.
Use the rotate feature to rotate pieces and then click and drag them into better positions on the paper for printing. Print from this screen.

Close the print page.
OPTION Five
In the foundation properties box, place a checkmark in front of ‘print seam allowance’ and click on the word ‘preview’ at the bottom of the box.
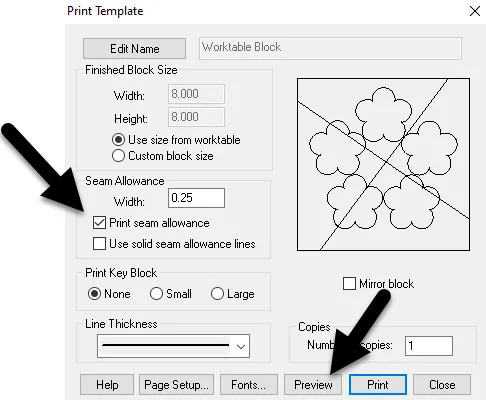
On the print screen, the Posies now have a seam allowance so you can print the pattern for the edges of the Posie to be turned under for applique with a finished edge instead of a raw edge. You can move the elements around for a better fit on the page.
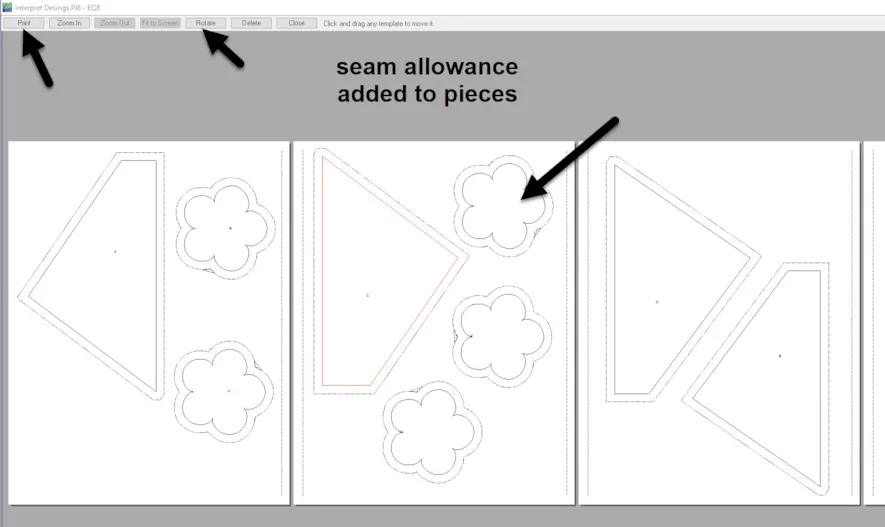
Close the print page and the templates box.
EQ8 makes it easy for us to interpret a pattern so that we can construct it in any style we like to work with. You can print the background block with one type of style pattern and the applique pieces using a different type of style pattern. The flexibility of the program makes it useful for all quilters regardless of their style of block construction methods.


03-20-2022
11:46 am
Thank you for your instructions. One question. When opening up the templates, I want to make 12 sets for 12 blocks of this template. How can I duplicate each template as many times as I will need that specific template to make that many templates for as many blocks I am making? I don’t want to waste the paper and it seems that I can’t duplicate the template to repeat as many times as I want to fit on 1 page for printing on 1 piece of paper. Is there a way to do this?
03-20-2022
12:52 pm
Kathleen when you are on the print and export tab choose your style of cutting. On the properties box you can type in the number of copies you want to print. Now go to the preview screen and arrange your pieces to have the best layout for the minimum number of pages. Once it is arranged properly you would print from this screen. It will automatically print the number of copies you preset in the properties box.
03-20-2022
12:48 pm
Very helpful, thank you. I would like to take my applique design to my cutter. How do I export my pieces as SVG files to my Cutter, Please?
Thank you,
Jayni
03-20-2022
12:56 pm
Jayni unfortunately at this time we can not save or print as an SVG file from EQ8. Hopefully we will be able to fo this in the future. The best we can do for now is print as an PDF and save it to the computer. From there you need to use another software program to convert it to SVG. I am not sure but I believe this conversion can be done in Inkscape software.
03-22-2022
8:24 am
Is there a way to add blocks to the library?
03-22-2022
9:19 am
Sheryl you absolutely can and more blocks to the library. EQ has many block designs you can purchase from the website. If you have BlockBase+ you can link that library to EQ8. Also, you can add any block you draw to the library by adding it to favorites to use again in another project.
04-03-2022
6:35 am
Bonjour,merci pour vos cours traduits en francais qui me sont bien utiles pour commencer avec EQ8,je ne maîtrise pas trop l’engrais et l,informatique,.aïs on apprend à tout âge et vous êtes mon meilleur professeur
04-03-2022
9:57 am
Rabatel thank you for your compliment. I am glad you are able to learn EQ8 from the blog posts.
10-14-2022
2:21 am
I’m glad finally I can use EQ8.
I bought this program almost 3years but never used it yet until I found this email due to I don’t know how to make a design.
Tku Yvonne…I must learn too much now…
Rgds
Trisna
10-14-2022
10:08 am
Trisha using the blogs to learn EQ8 in small steps is a great way to learn how to navigate the program. Keep up trying new things with the program and you will be creating beautiful quilts before you know it.