Our quilts are often about color. Sometimes it is the design itself that is the focus, but the eye sees color before it sees patterns. I love designs that have a bit of a dimensional look and are quickly created with color.
Launch your EQ8 project to start. 
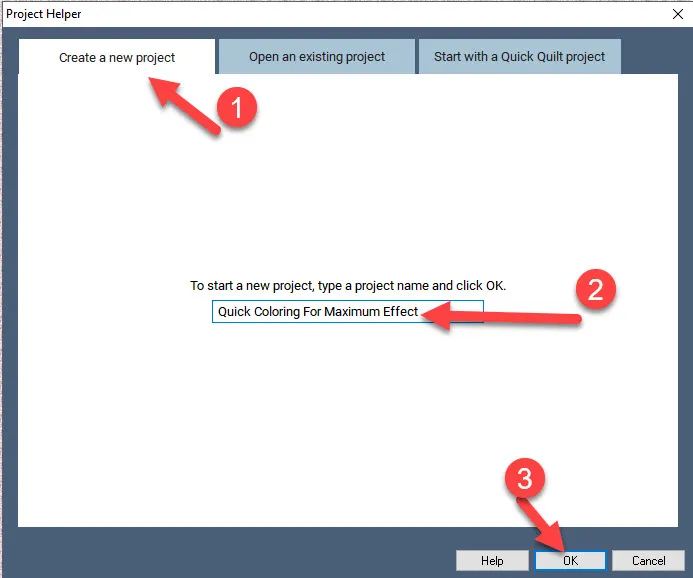
On the opening screen, click on the little piece of paper with the green starburst on it on the upper left side of the screen. This is the new project icon.![]()
In the project sketchbook, name your project ‘Quick Coloring for Maximum Effect’.
Click on the quilt worktable icon ![]() on the upper right side of the screen.
on the upper right side of the screen.
Choose NEW QUILT>One Patch from the ribbon at the top of the screen.
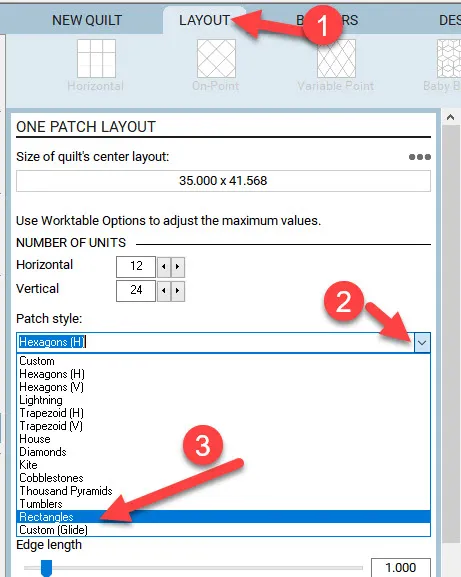
The default for the program is to open to the Hexagon one patch layout.
Click on the Layout tab at the top of the screen. In the drop-down menu, select the rectangle option.
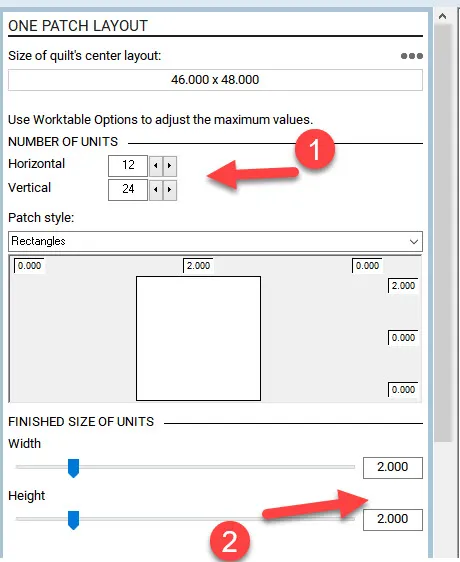
On the rectangle layout, the default size is 2 inches. This works perfectly if you want to use a jellyroll for your design. The 2.5-inch jelly roll strips would save a lot of cutting time. Keep the layout properties just as they are for now.
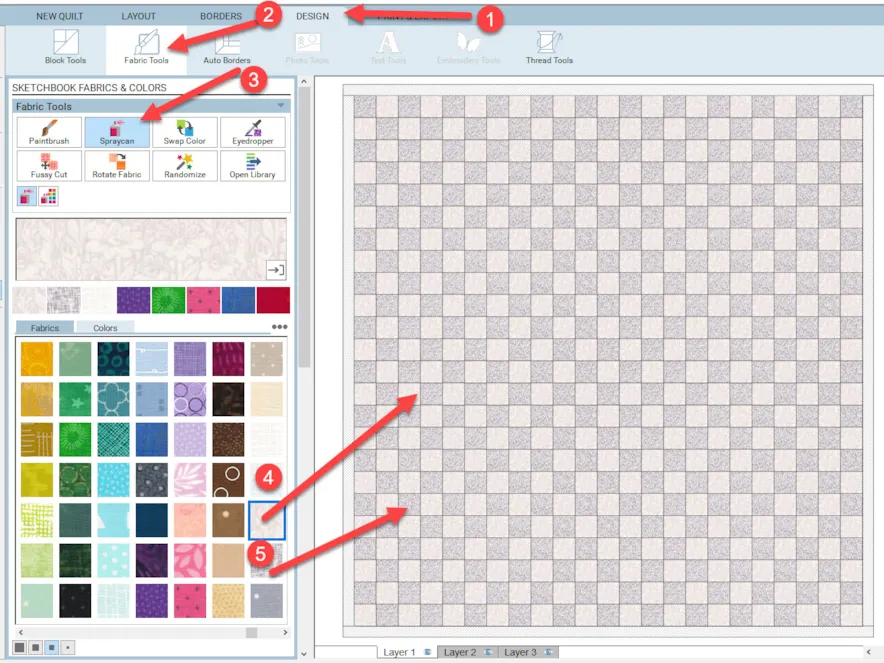
Click on the Design Tab at the top of the screen and select the Fabric tools from the ribbon. Click on the spray can icon ![]() and then select a light color for the background. Move the cursor over to the worktable and while holding down the control key (CTRL) on the keyboard, click once to fill alternating block spaces. You will need to click on more than one row to color all the alternating blocks. Choose a second light color and repeat the process to finish coloring all the alternating blocks with light colors.
and then select a light color for the background. Move the cursor over to the worktable and while holding down the control key (CTRL) on the keyboard, click once to fill alternating block spaces. You will need to click on more than one row to color all the alternating blocks. Choose a second light color and repeat the process to finish coloring all the alternating blocks with light colors.
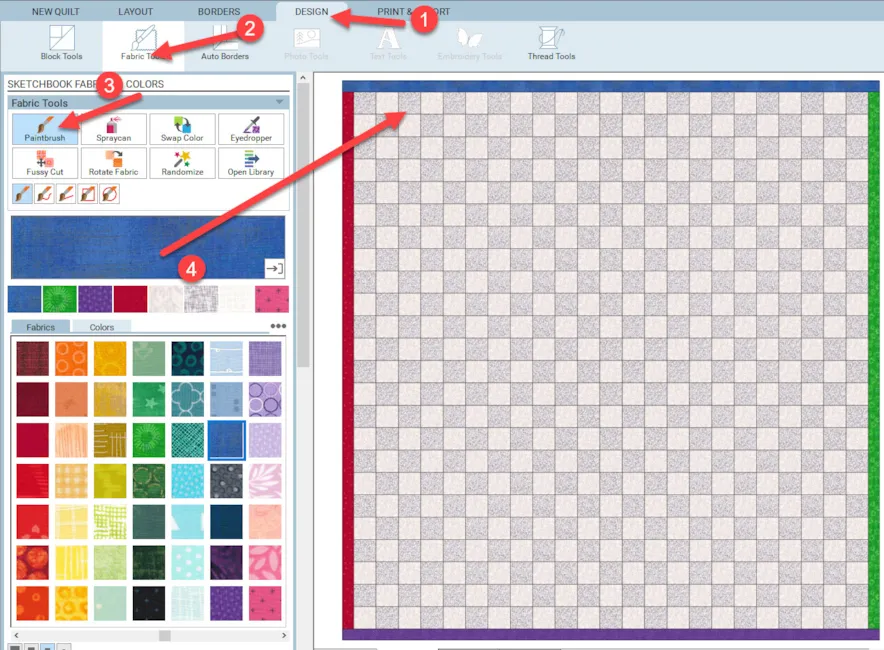
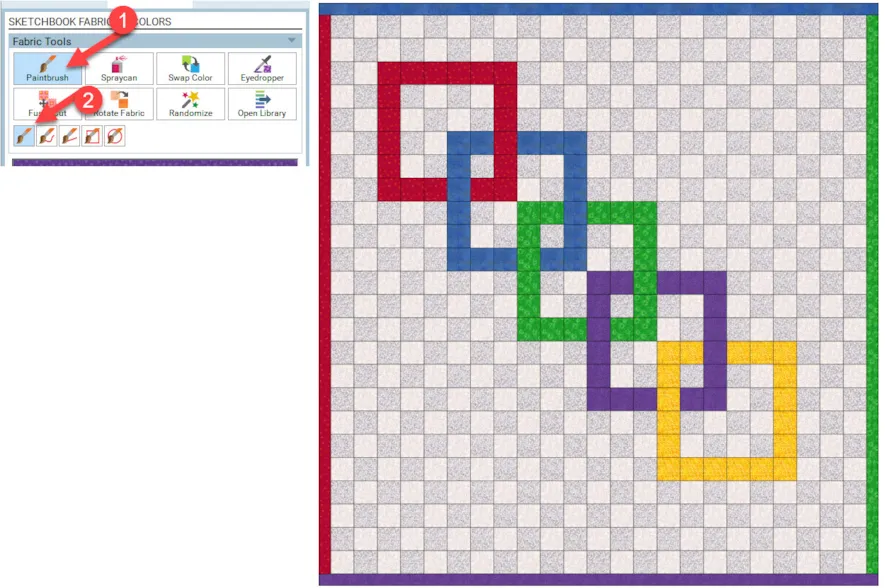
Click on the paintbrush tool icon![]() to select it. Click on colors of your choice for your border strips. Click onto each of the borders to apply the colors. Choose a different color for each of the border strips.
to select it. Click on colors of your choice for your border strips. Click onto each of the borders to apply the colors. Choose a different color for each of the border strips.
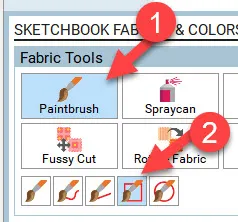
Still using the paintbrush tool, select the rectangle brush icon from the brush types selections.
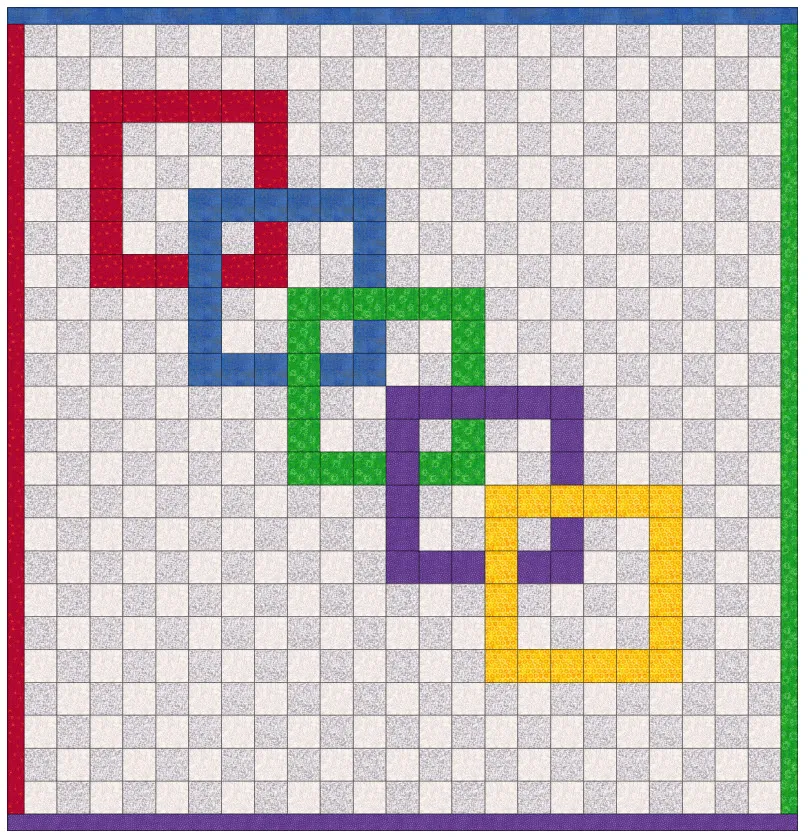
Click on a bold color fabric for your rectangle. Move the cursor over to the worktable and click/hold/drag/release a rectangle that covers 6 squares across and 6 squares down.
Repeat this process using different colors of fabric and have the rectangles overlap so there is a corner background block showing in the overlap designs.
To create an over/under feel for the square links, click back on the one dot paintbrush tool![]() and then click on the color of the squares in one intersection point to create a ‘linked look’ for the squares.
and then click on the color of the squares in one intersection point to create a ‘linked look’ for the squares.
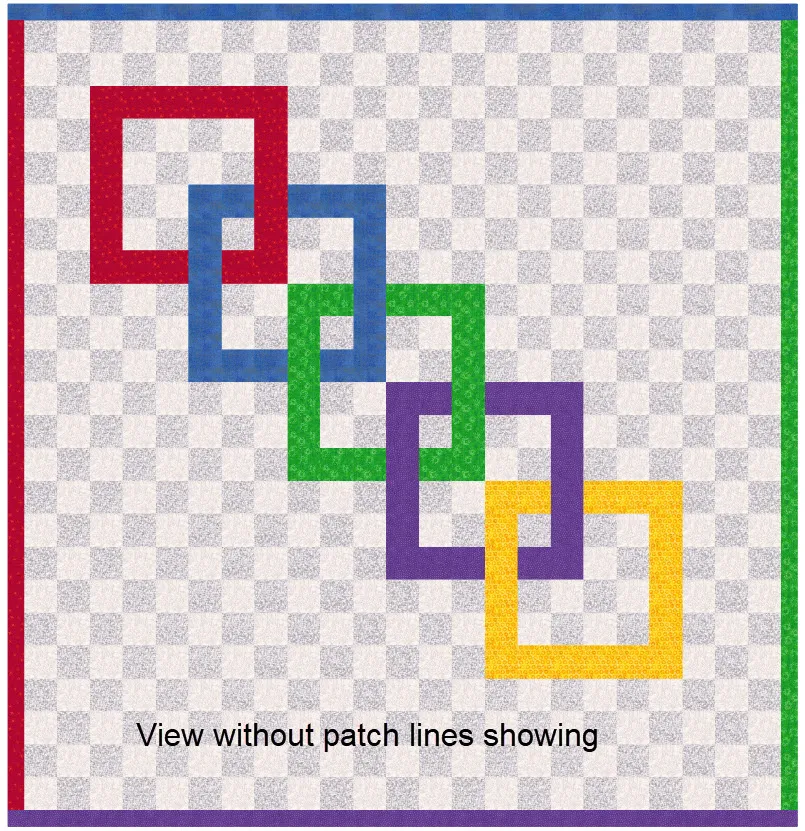
To get a better view of the linked squares on the quilt layout without the drawing lines, click on the ‘show/hide patch lines’ icon![]() on the far left side of the screen. This is a toggle switch that can be turned on or off at any time.
on the far left side of the screen. This is a toggle switch that can be turned on or off at any time.
Add your design to the sketchbook. ![]()
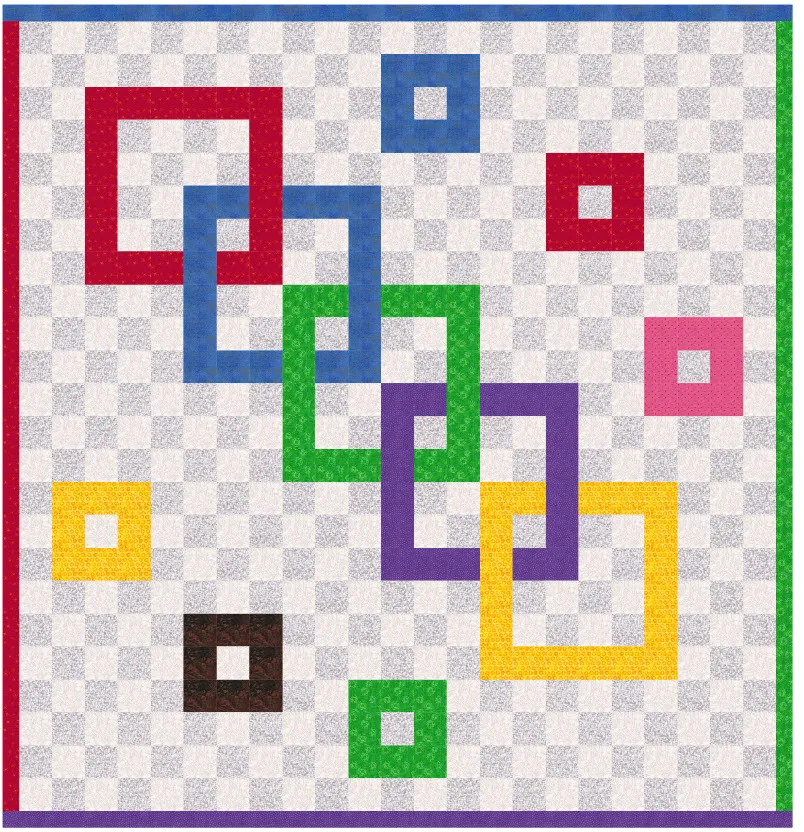
By choosing a different type of paintbrush tool property, you can quickly create a quilt with dimension and precision coloring patches. Try this design with various sizes of rectangles floating across the top of the quilt layout for another variation.







09-19-2021
11:24 am
This doesn’t have anything to do with EQ. Who don’t fabric companies have available to EQ users to download pictures of each fabric line so we can input that into our fabric library. That way we can use them to see how our quilt will look with the fabric we are actually going to use.
09-19-2021
11:43 am
Marsha some fabric companies do indeed have fabric you can download and use in the EQ software. EQ has fabric lines on their website you can also add to the fabric library. You can also take a picture of your own fabrics and use the image work table to bring it into EQ to use.
09-19-2021
11:49 am
Thank you, Yvonne. That was fun!
09-19-2021
12:45 pm
Teresa glad you liked it.
09-19-2021
12:29 pm
love it
09-19-2021
12:46 pm
Sharon the quick and easy design is fun to work with.
09-19-2021
2:02 pm
What a fun layout. I can not wait to make it with EQ8 and for real. I have been thinking of how I was going to use up some bright left overs.
09-19-2021
2:09 pm
Linda this would indeed work well with bright scraps.
09-19-2021
2:05 pm
Really enjoyed this tutorial and learned so much. EQ8 is great!
09-19-2021
2:10 pm
Sherri I can get lost in designing with EQ for hours on end. It is so inspirational discovering new quilt layout ideas.
09-19-2021
3:40 pm
Great lesson!! I’ve been using just a few basic design tools all these years (since EQ3 or 4) and didn’t know anything about how to do this. Of course, if I bought an EQ instruction book I might learn some new techniques.
09-19-2021
3:47 pm
I had never even noticed the different paintbrush styles. Thanks for bringing that to my attention.
09-19-2021
5:04 pm
Thank you for this kind of lesson! It helps me understand the use of EQ8. I didn’t understand anything about the software until I started doing these lessons. I get excited, every time I learn something new. Still have a long way to go, but starting to use it little by little, now!
09-19-2021
7:45 pm
That was interesting. I am always thinking so linear and symmetrical. Nice to change it up and get something interesting and entertaining to boot.
Thank you
Leah A. Seals
09-19-2021
11:46 pm
Thank you for my first lesson Yvonne! I am excited for my EQ8 to arrive. I bought it Friday can’t wait to learn all I can do and make. What would be 1 important item also to go with EQ8 to help me succeed with this program. I’m very new to quilting and EQ.8
Thank you,
Theresa
09-20-2021
12:05 am
These lessons really help my sharpen my EQ skills. Thanks so much.
09-20-2021
9:14 am
Laurie you are welcome. Glad you are finding these little lessons helpful.
09-20-2021
10:10 am
Thanks for a great tutorial. I’ve known there was a way to color several blocks at a time (shop owner showed me) but I couldn’t remember how to do it. Now if I can just remember how she filled quilt blocks in the same way. Still catching up on lessons. I’ll get there. I love my EQ8 program!
09-20-2021
12:04 pm
Patricia I am glad you are still working at learning your EQ8. There are loads of tutorials on the EQ website for more information also.
09-20-2021
2:36 pm
Thank you Yvonne! This was my first time doing one of the lessons, so glad I did! I actually never even noticed the different styles of the paintbrush. Great lesson!
09-20-2021
2:50 pm
Great lesson. I learned several things. Short but sweet.
09-20-2021
4:15 pm
Kim so glad you enjoyed this.