This month we’ll be using the Layout Library to design quilts. In this lesson you’ll see how quick it can be to design a twin and queen sized quilt when you start with a pre-designed layout. We’ll also design a king sized quilt and get into a little more detail modifying the layout and adding stencils.
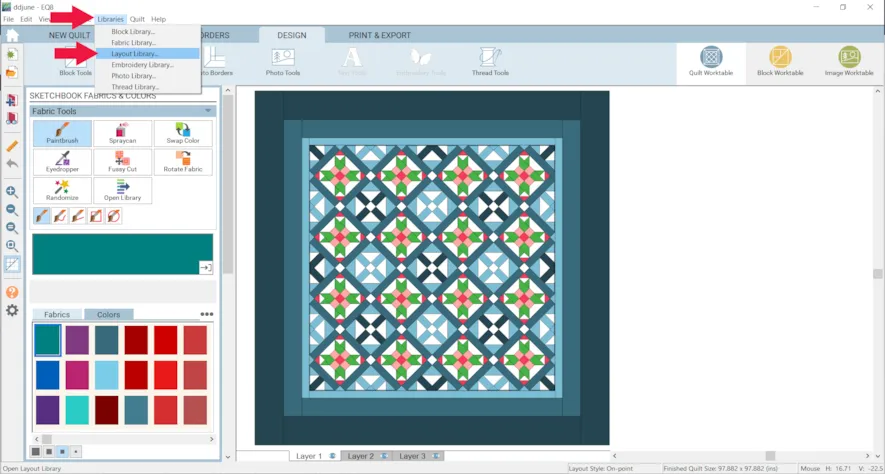
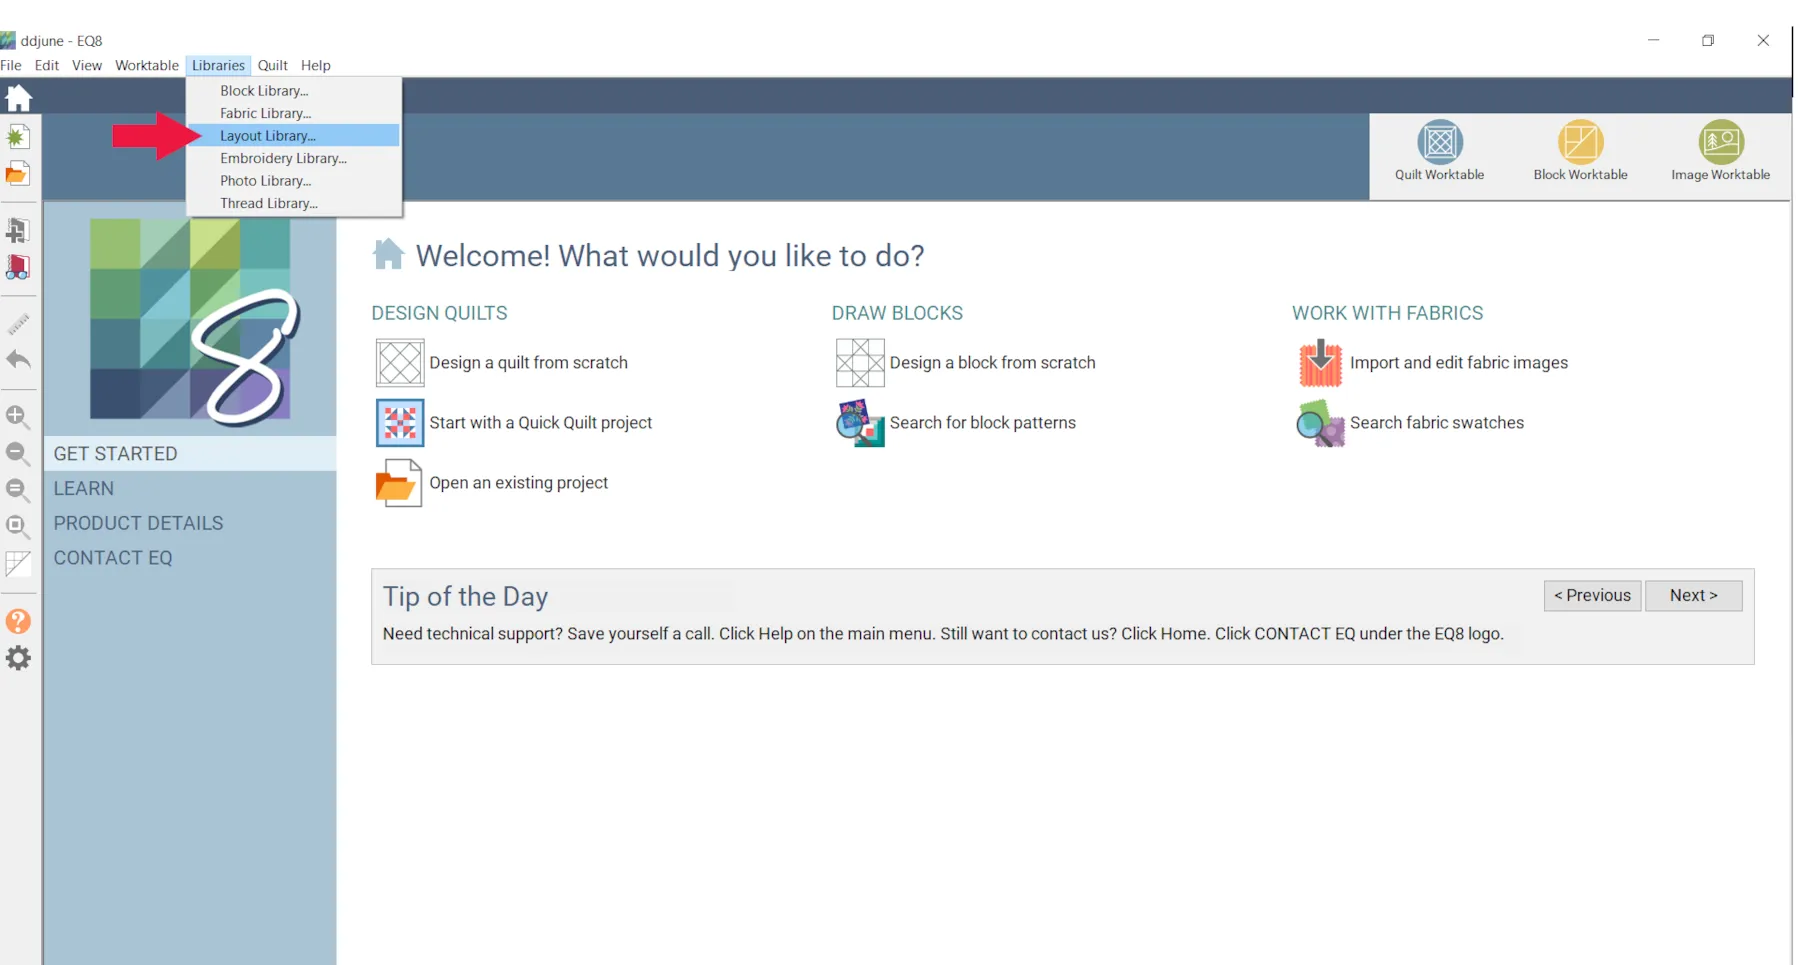
- Click Libraries > Layout Library

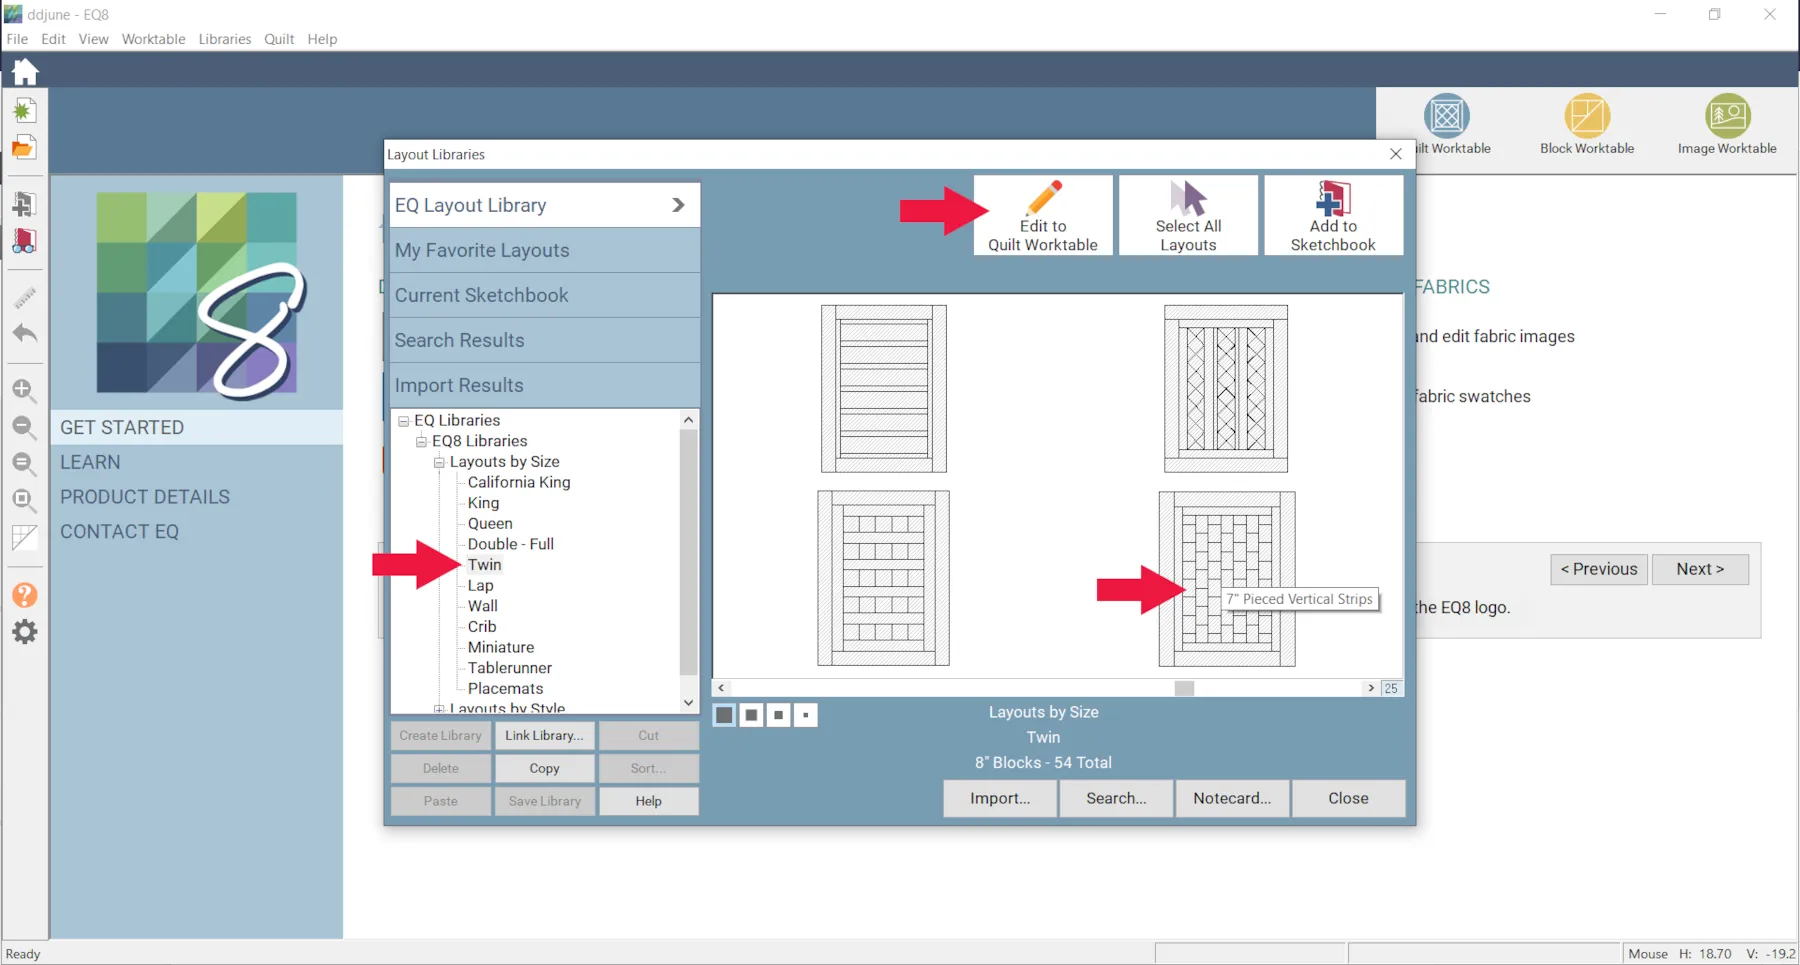
- Under Layouts by Size click Twin
- Click 7″ Pieced Vertical Strip
- Click Edit to Quilt Worktable

- It will open to the DESIGN tab
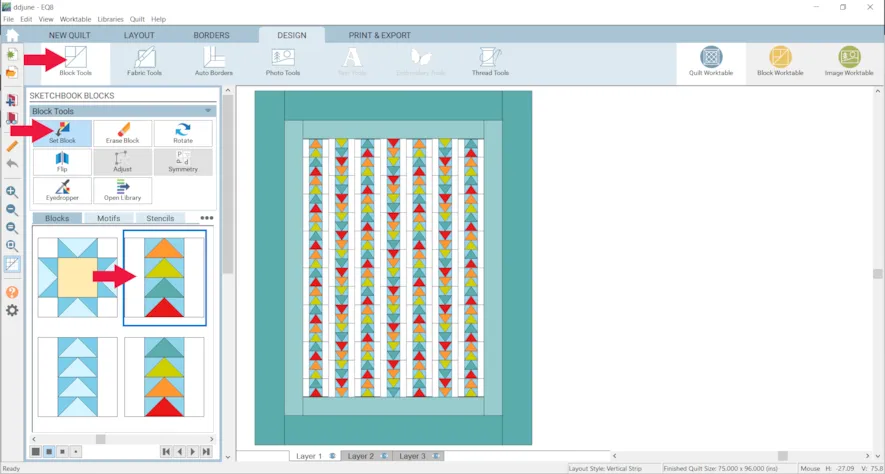
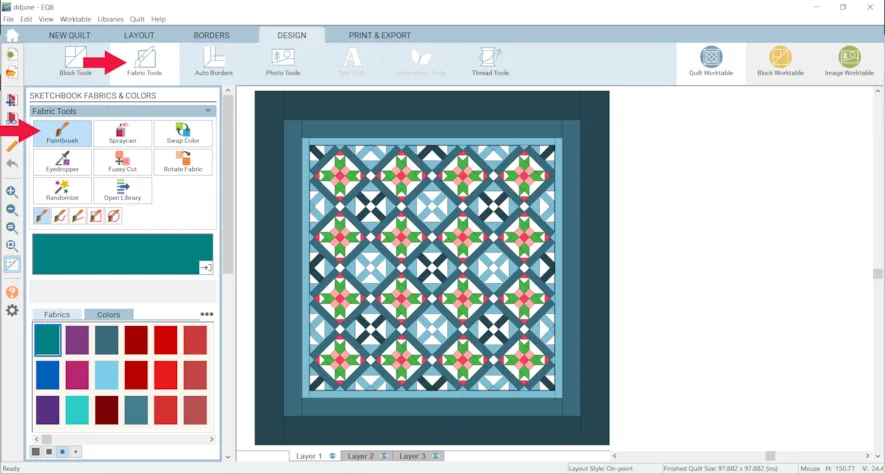
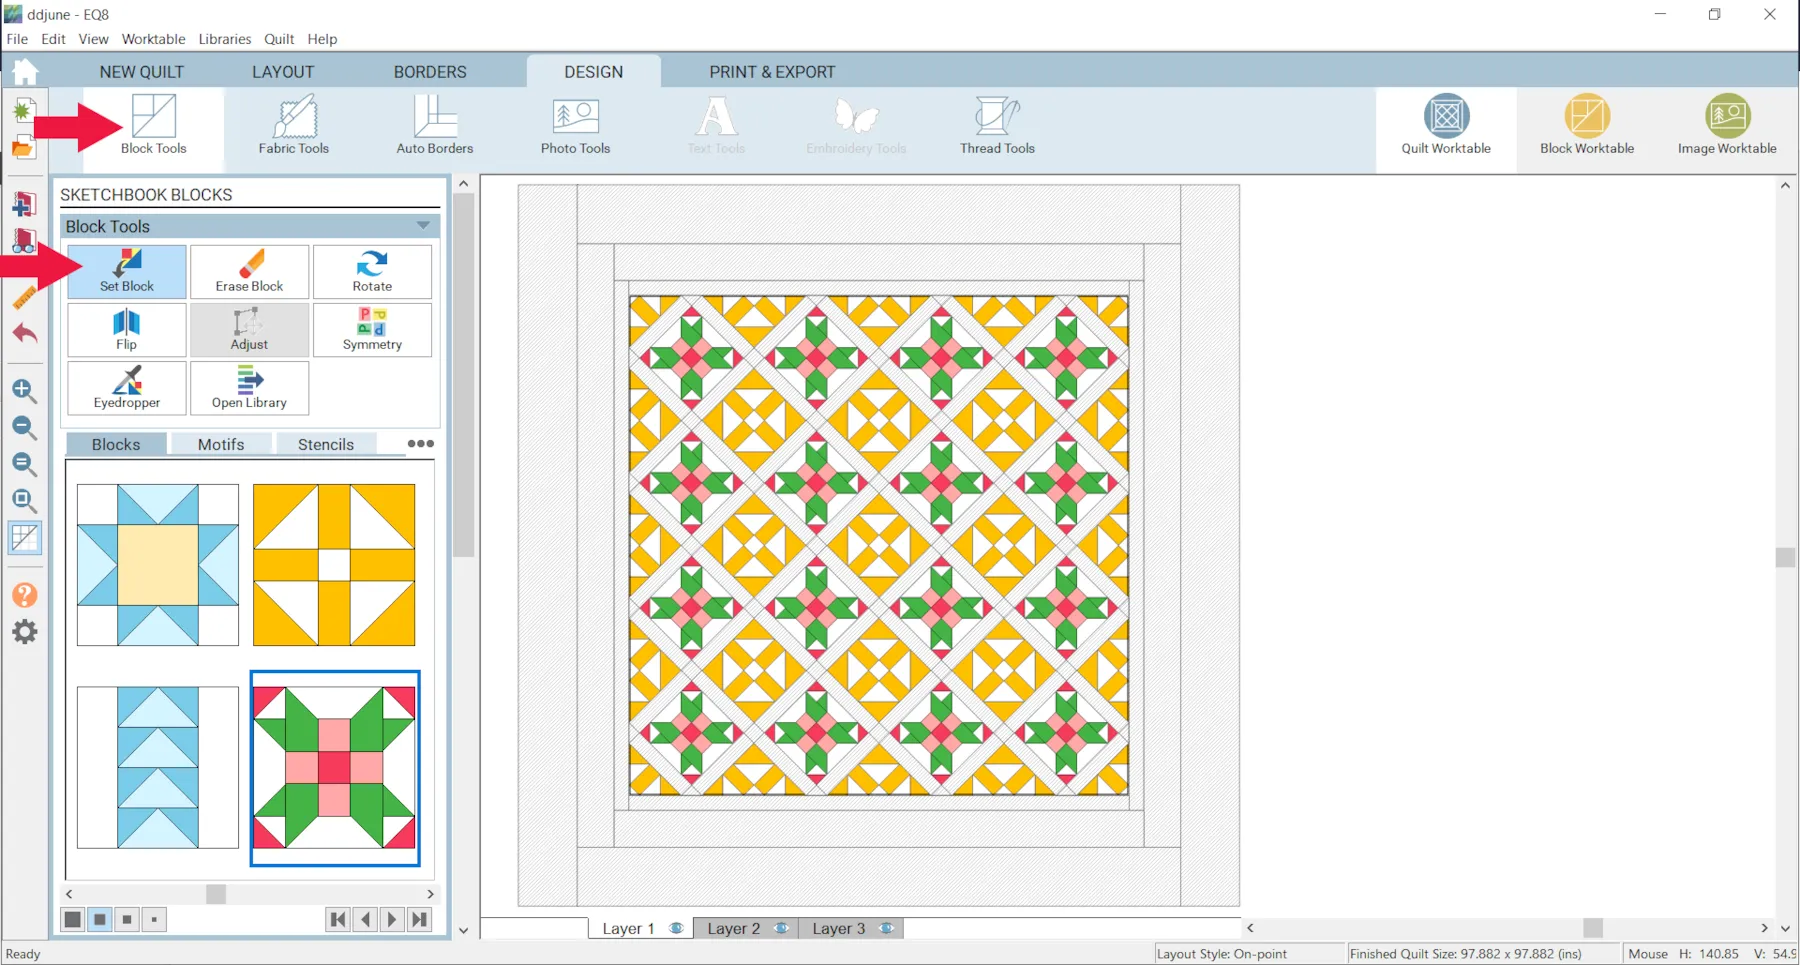
- Click Block Tools > Set Block
- Click on a block of your choice and click on a patch on the quilt. EQ Default Flying Geese is used in the example.
If you’d like a block in every patch, since this is a Vertical Strip layout, hold down the Ctrl/Command key on your keyboard and click in each strip.
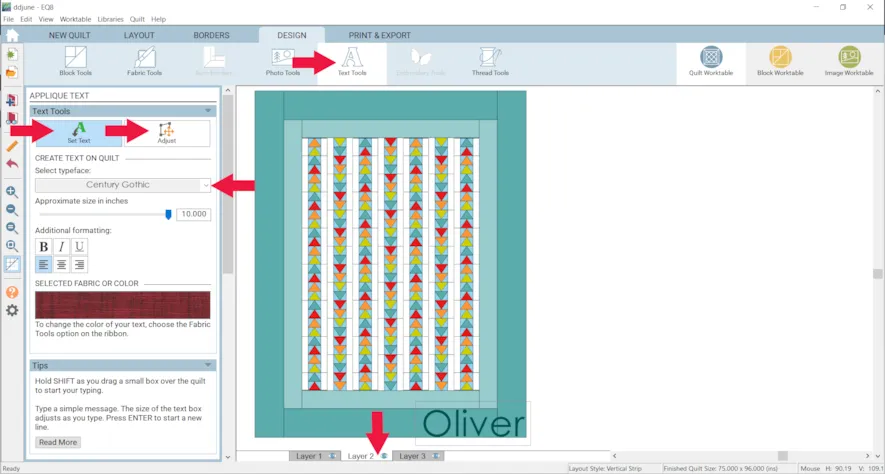
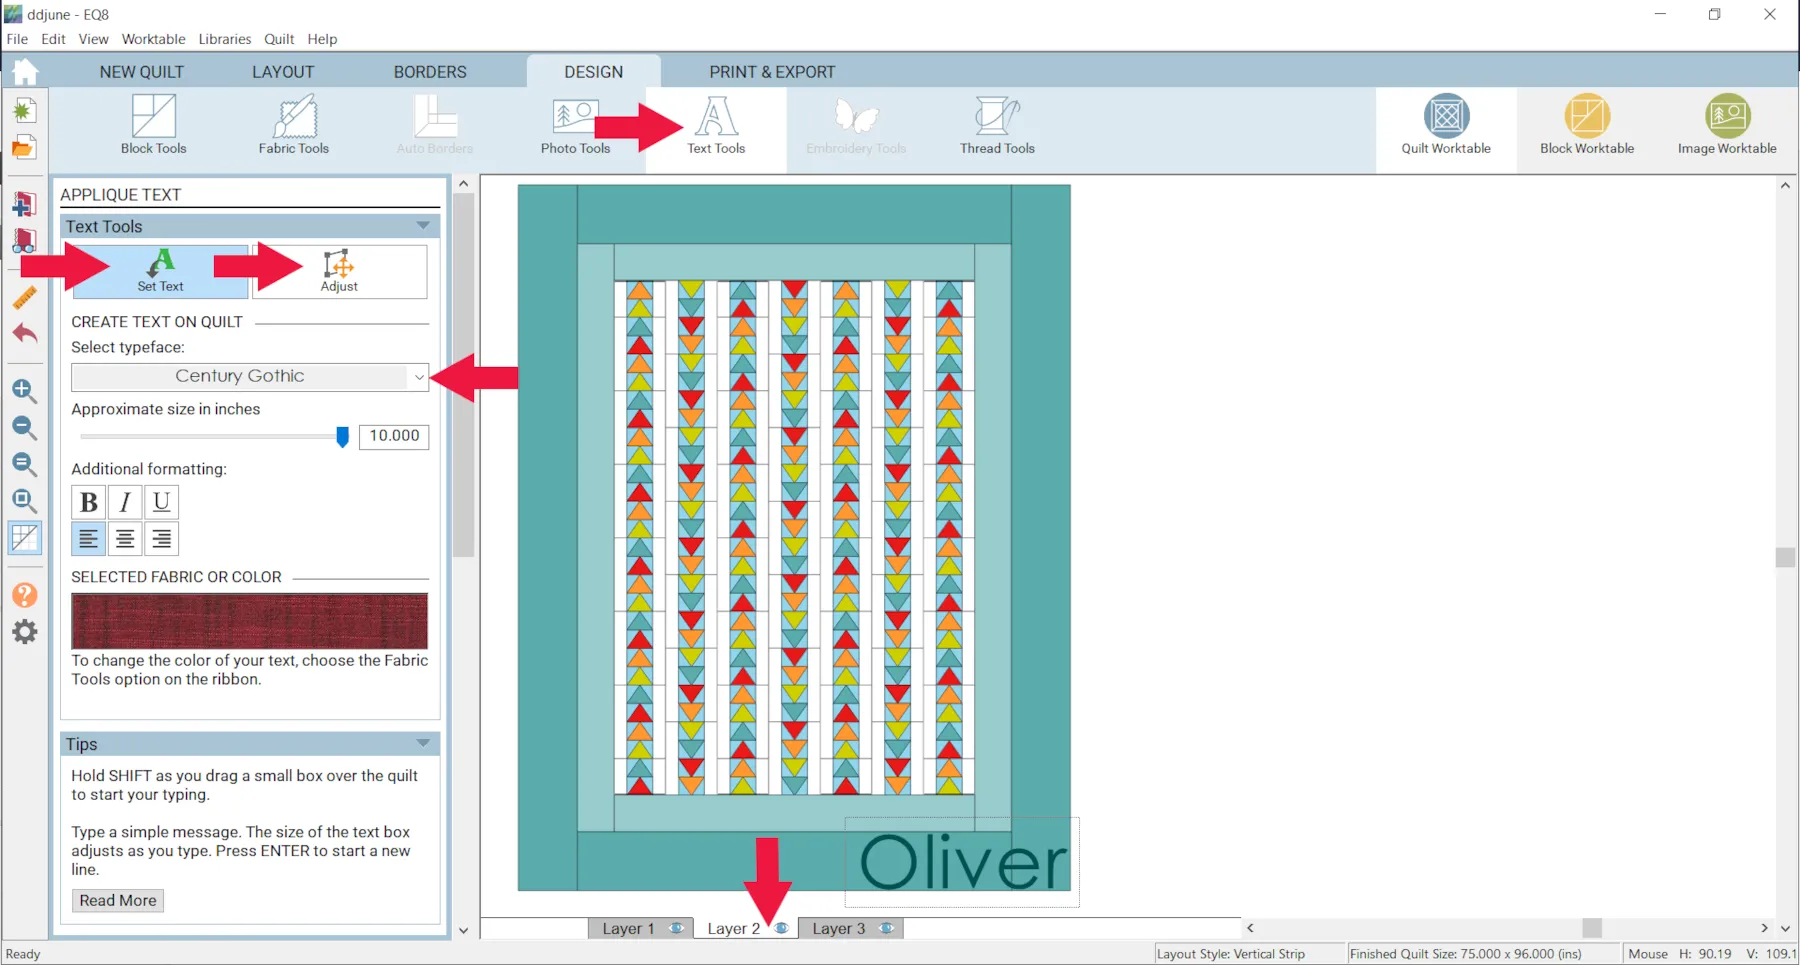
- Click Layer 2 at the bottom of the screen
- Click the Text Tool
- Click Set Text
- Hold down the SHIFT key on your keyboard and click and drag out a box for your text.
- Type the name or whatever text you would like on your quilt.
- Use the Select Typeface menu to choose a font.
- Use the Approximate size in inches to determine the size.
- Use the Adjust tool to move, resize, or rotate the text. Here is more information about the text tool.
- Click Add to Project Sketchbook
 . If you haven’t named your project yet, EQ8 will prompt you to do so. (To be saved, your item needs to be in the Sketchbook AND your project needs to be named. Here is more information.)
For the next quilt we’ll be making a queen sized quilt.
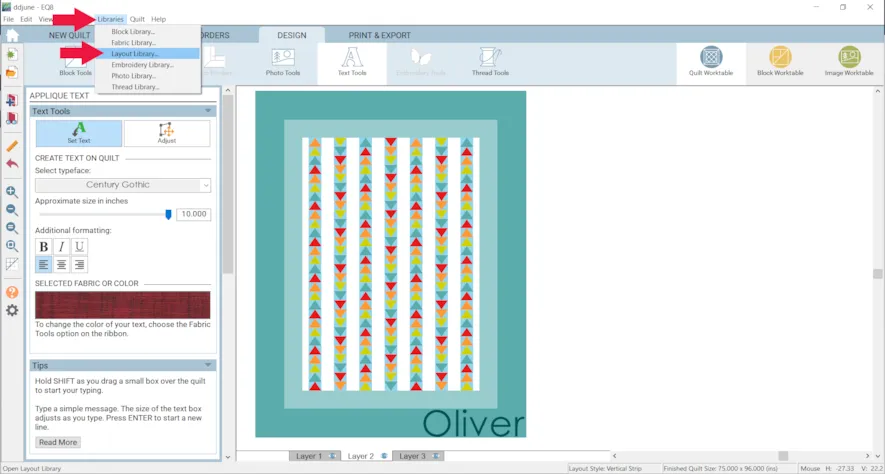
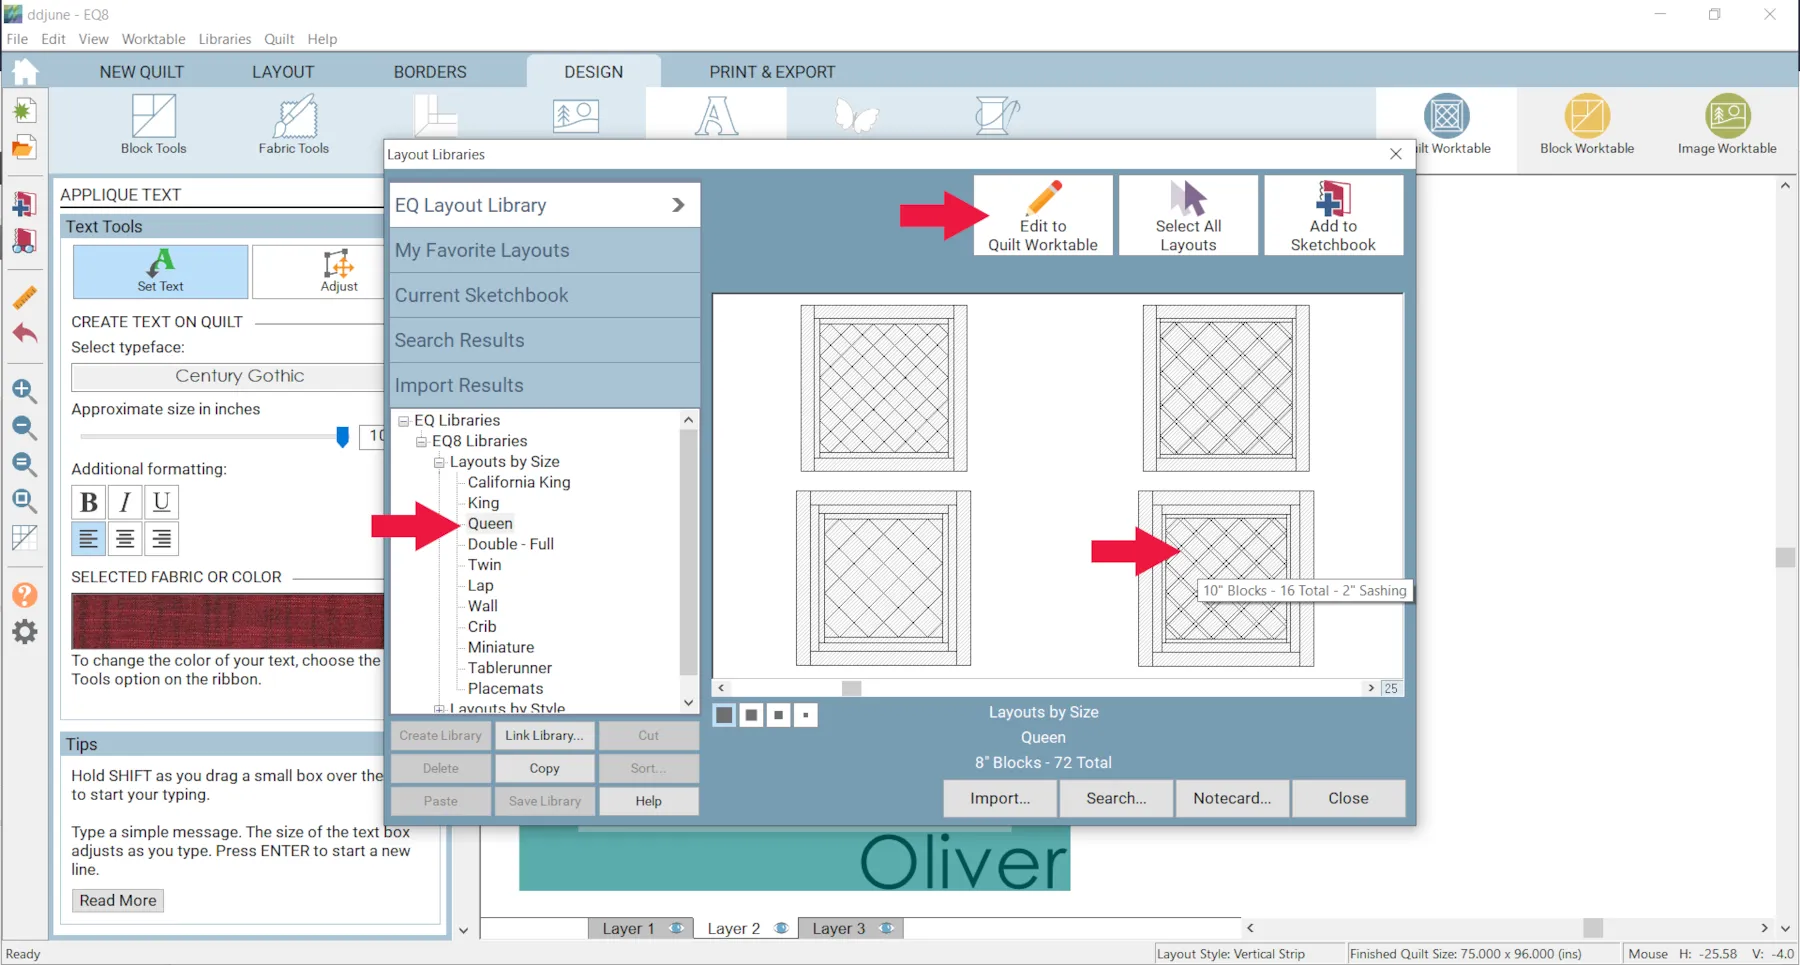
- Click Libraries > Layout Library
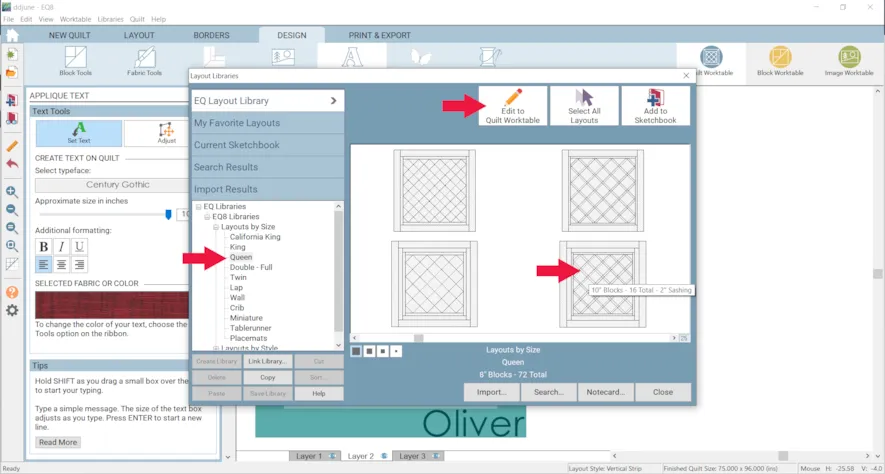
- Under Layouts by Size click Queen
- Click 10″ Blocks – 16 Total – 2″ Sashing
- Click Edit to Quilt Worktable
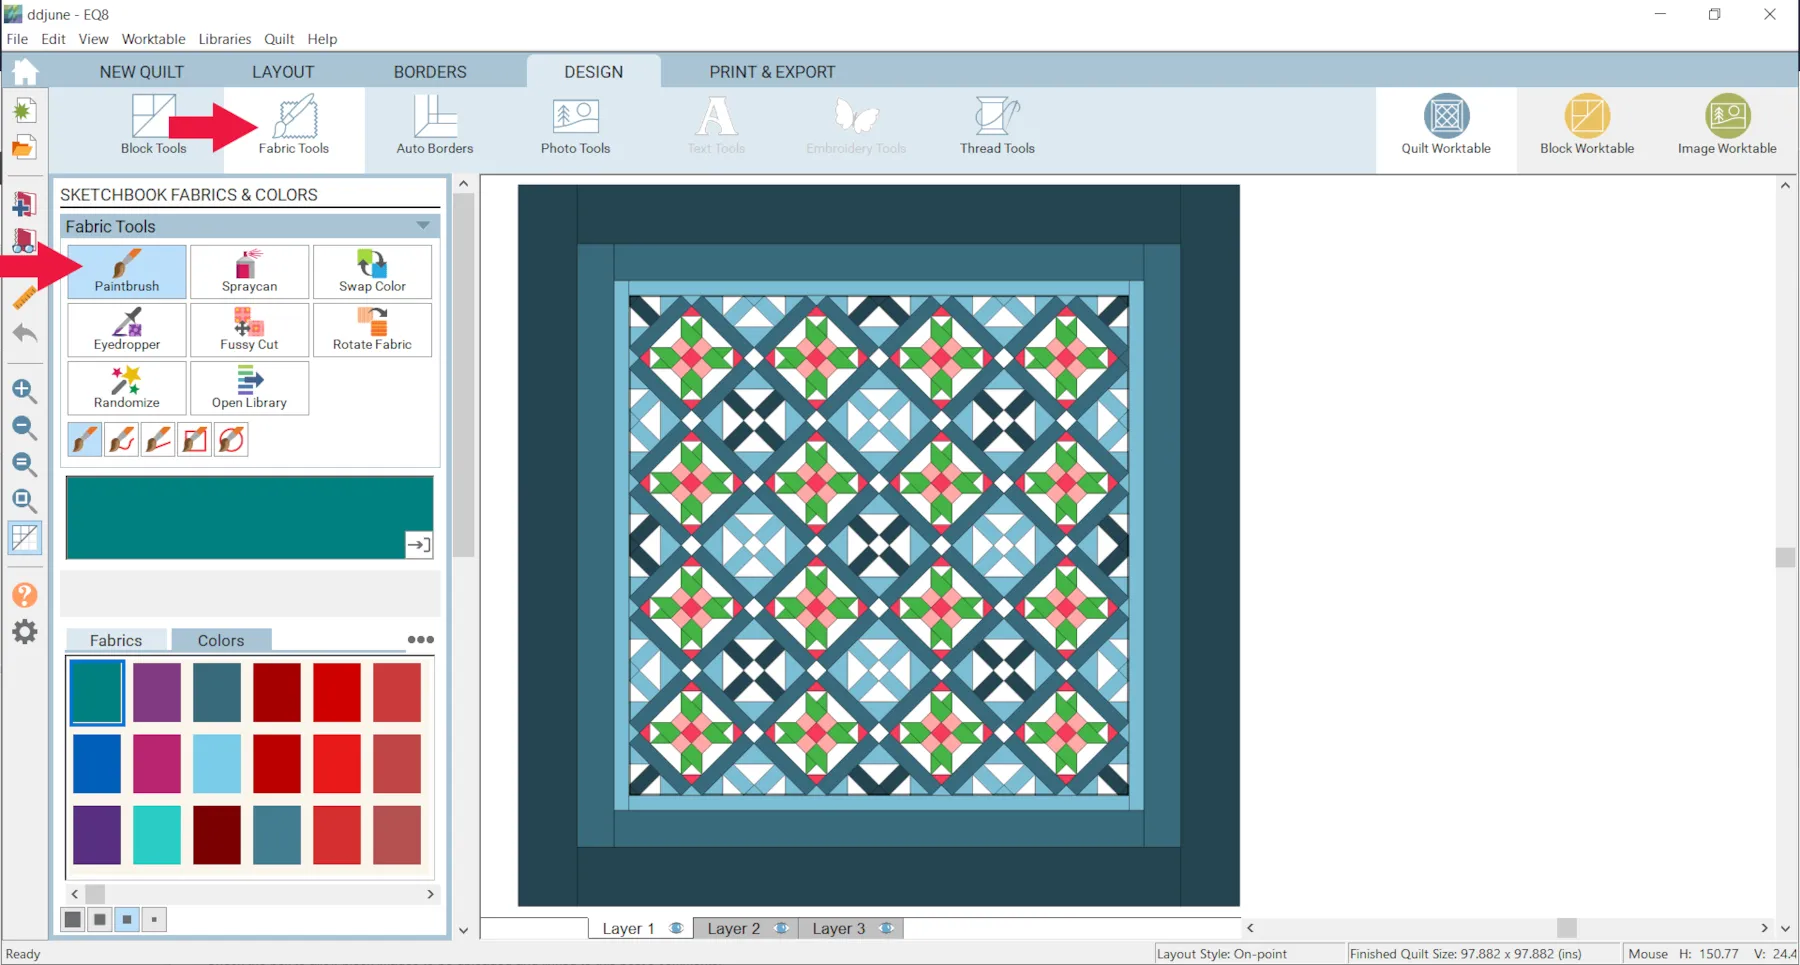
- Click Block Tools > Set Block
- Start placing blocks as desired. The example uses Five Patch Shoo Fly and Fool’s Square. Read more about how to search for blocks by name.

- Click Fabric Tools > Paintbrush and colored as desired.
- Click Add to Project Sketchbook
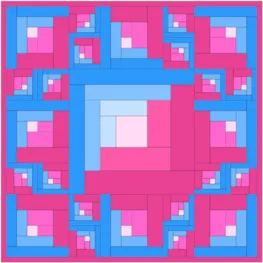
Let’s try one more. We’ll design a king size quilt that would be perfect for a wedding gift.
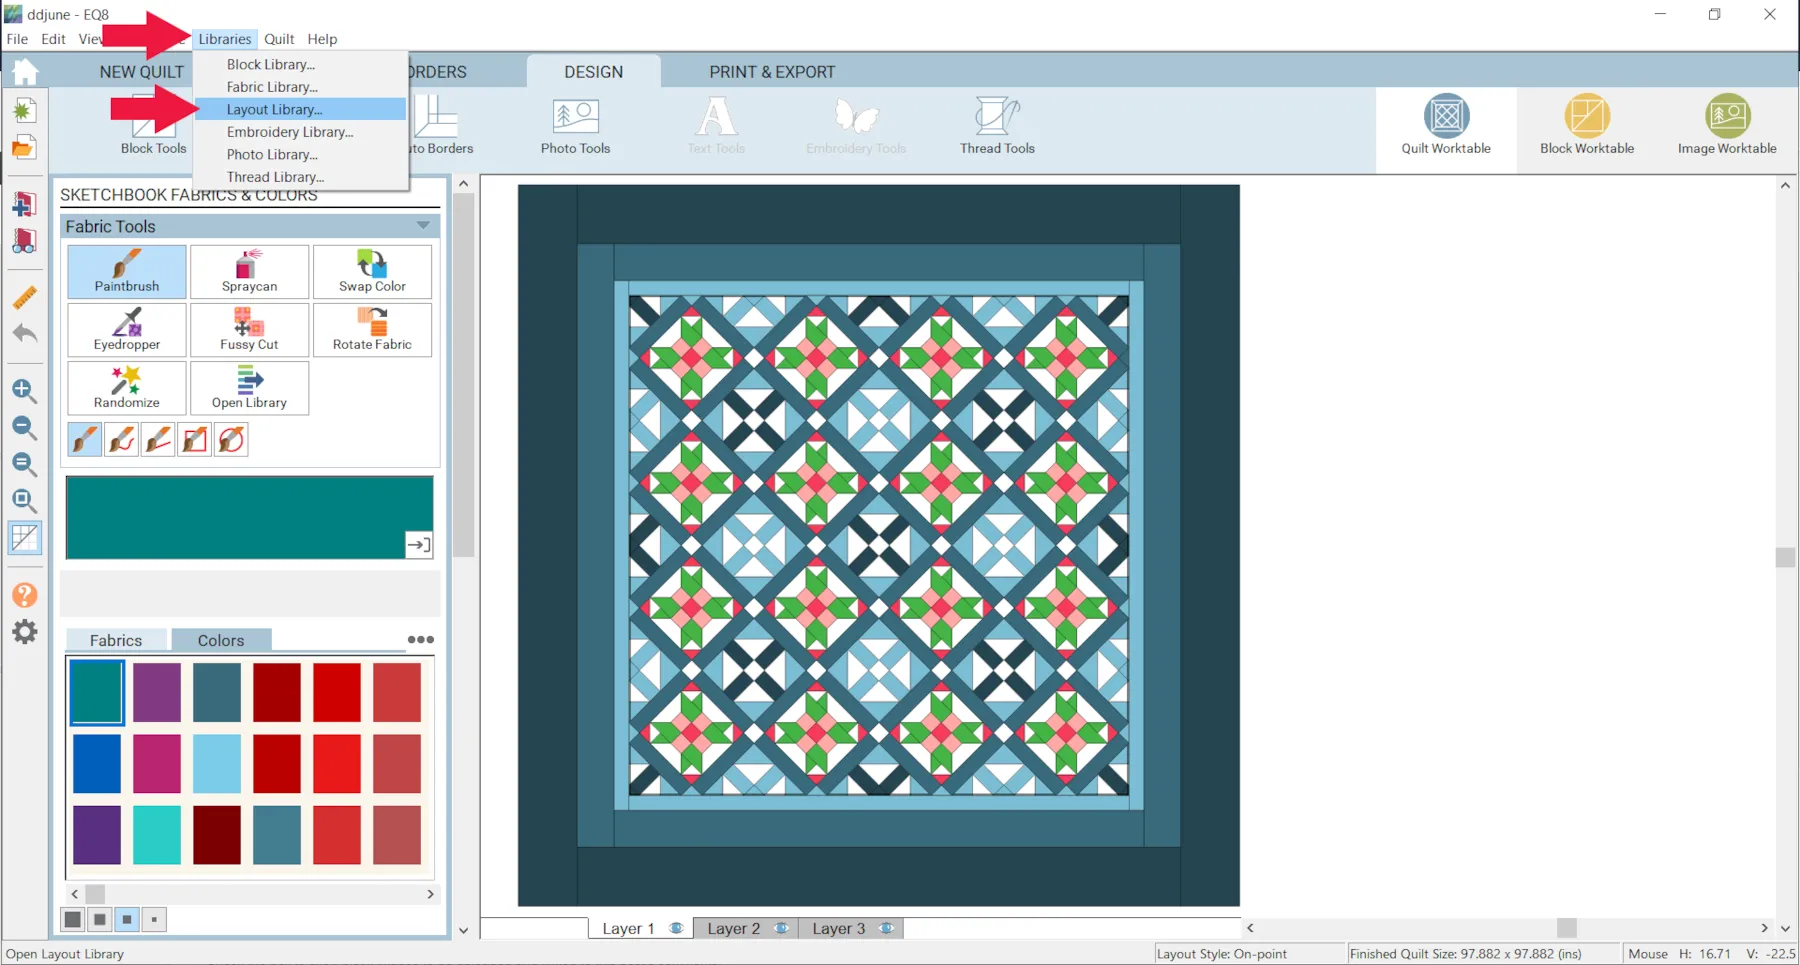
- Click Libraries > Layout Library
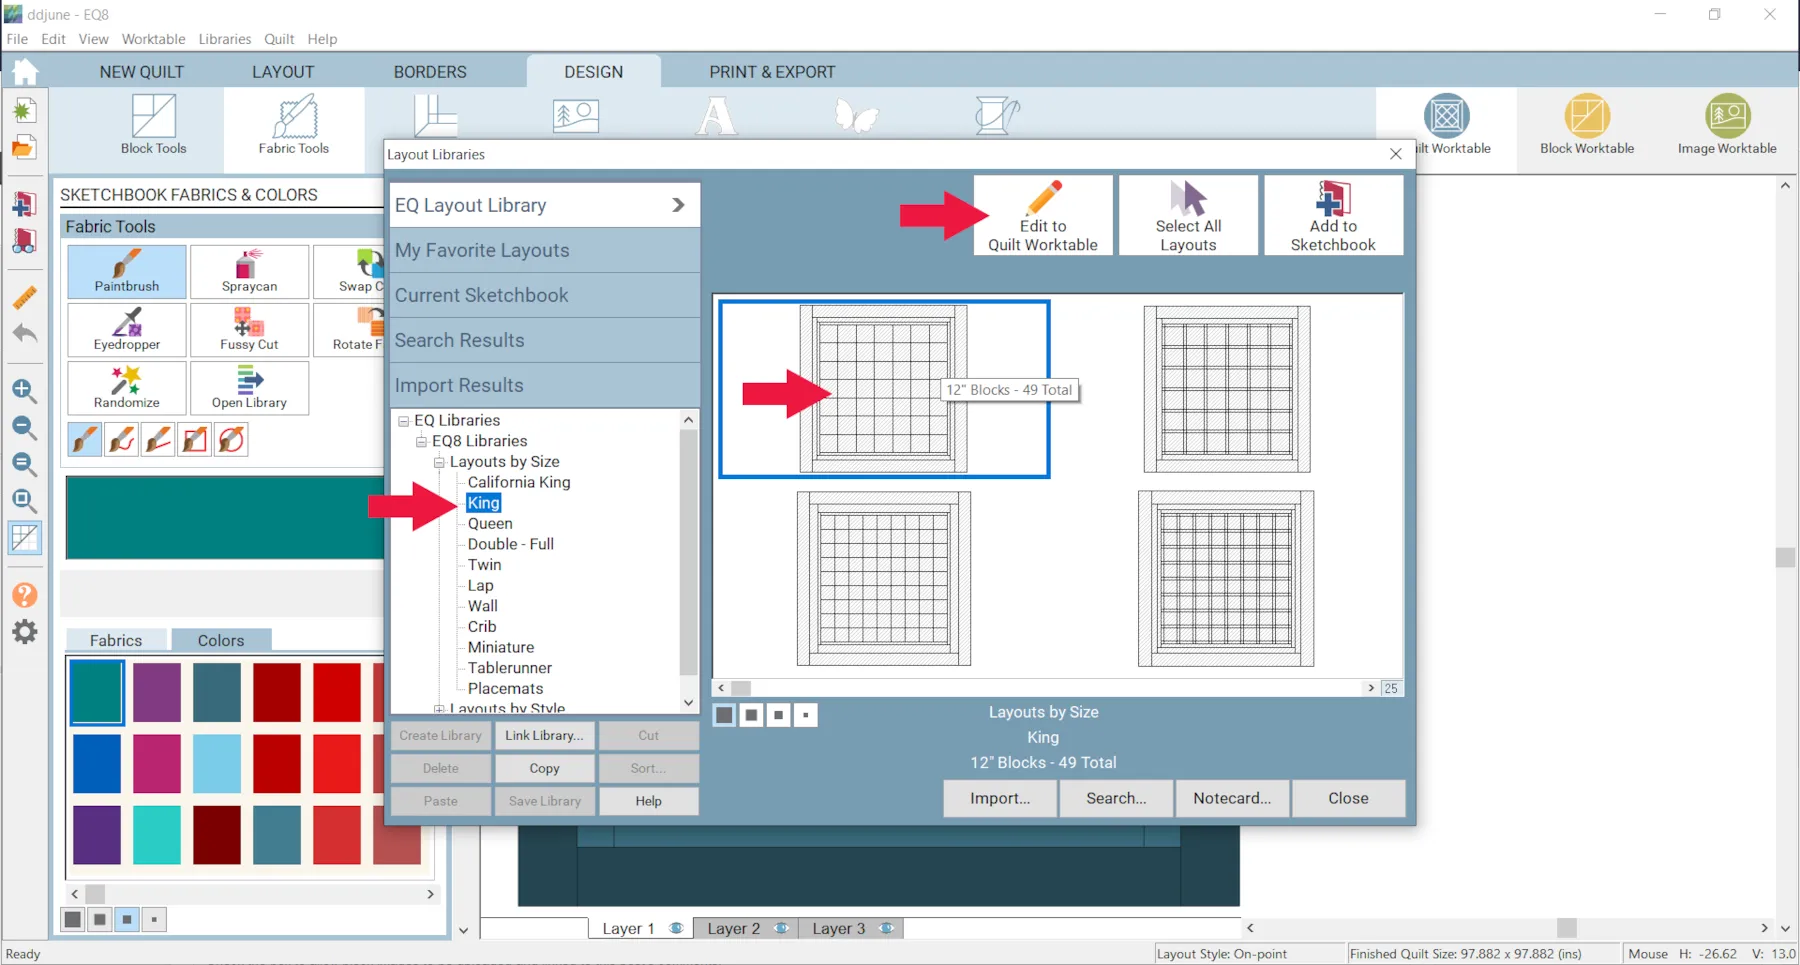
- Under Layouts by Size click King
- Click 12″ Blocks – 49 Total
- Click Edit to Quilt Worktable

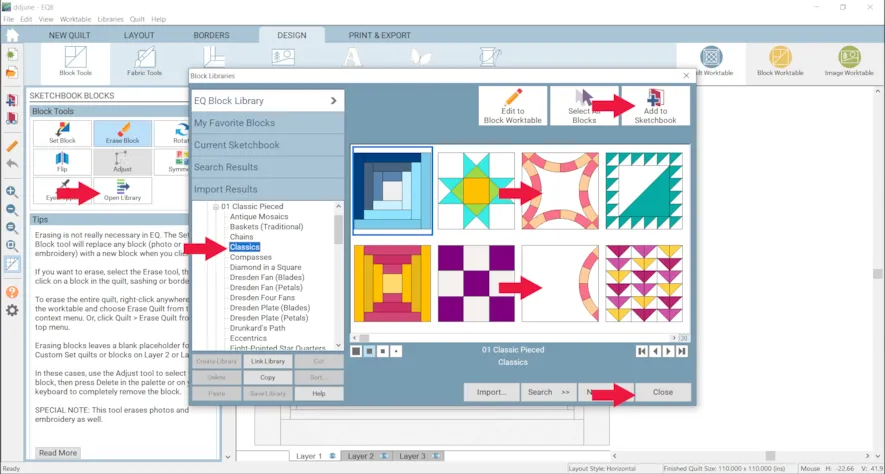
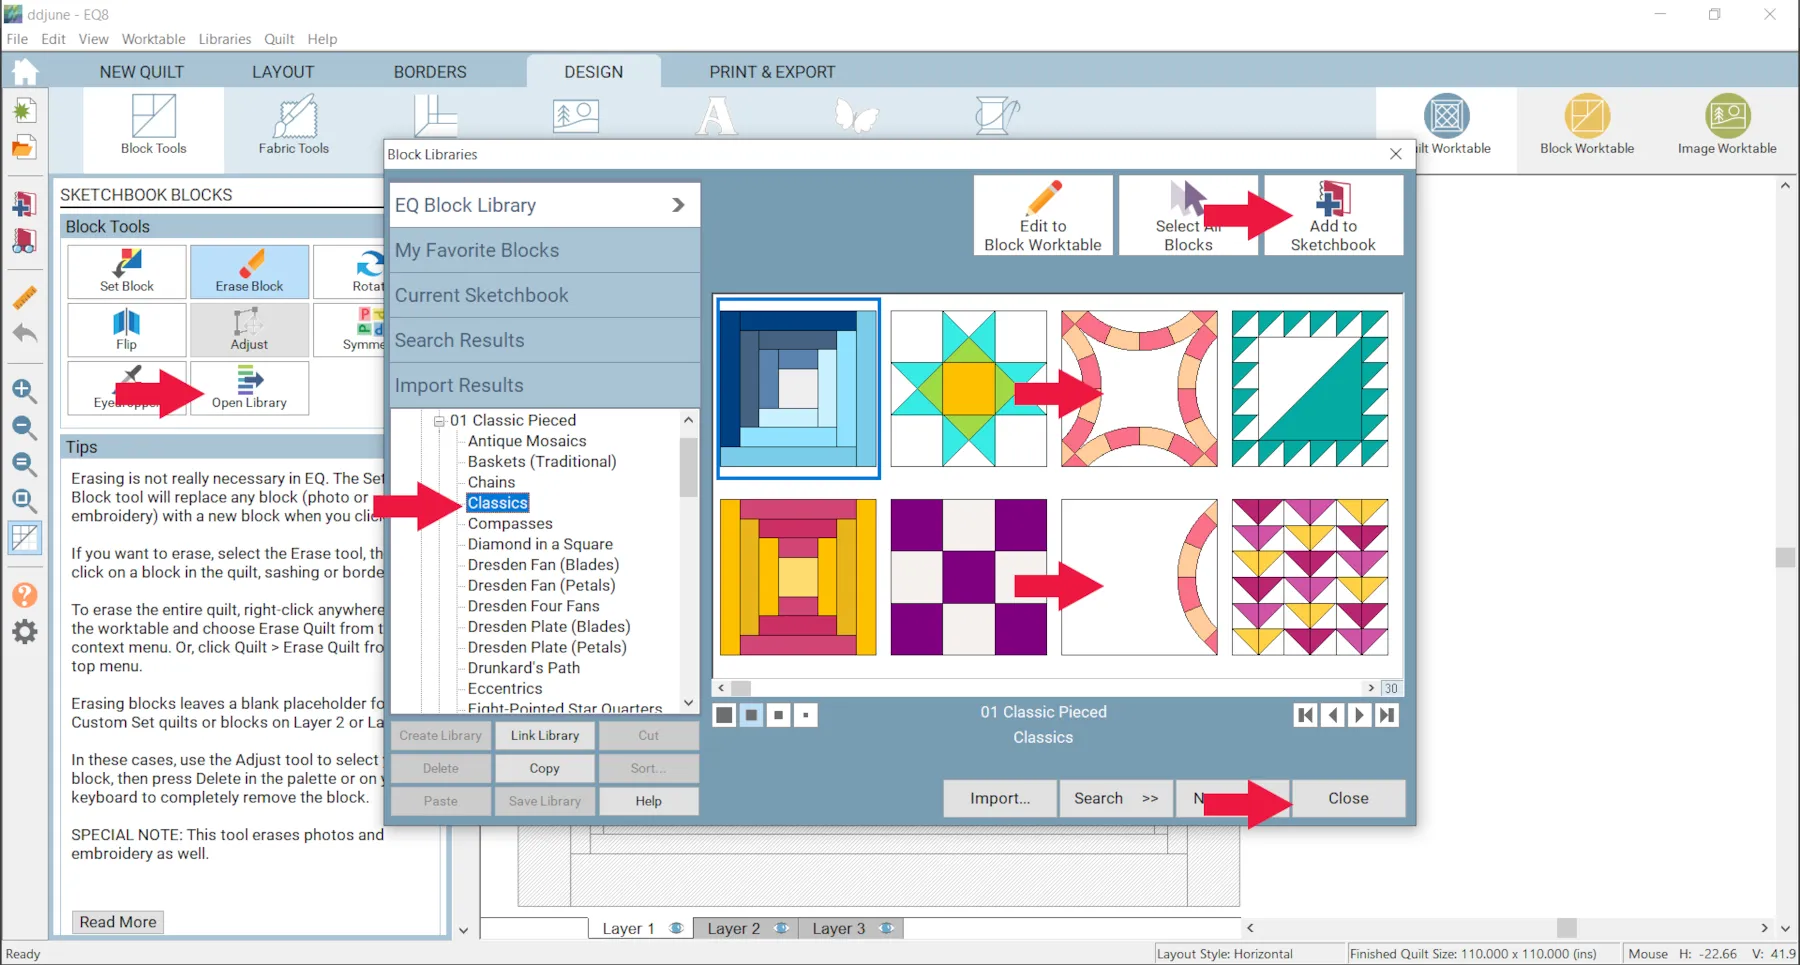
- Click the Block Tools
- Click Open Library
- Under Classic Pieced click Classics
- Click Double Wedding Ring and click Add to Sketchbook
- Click Quarter Wedding Ring and click Add to Sketchbook
- Click Close
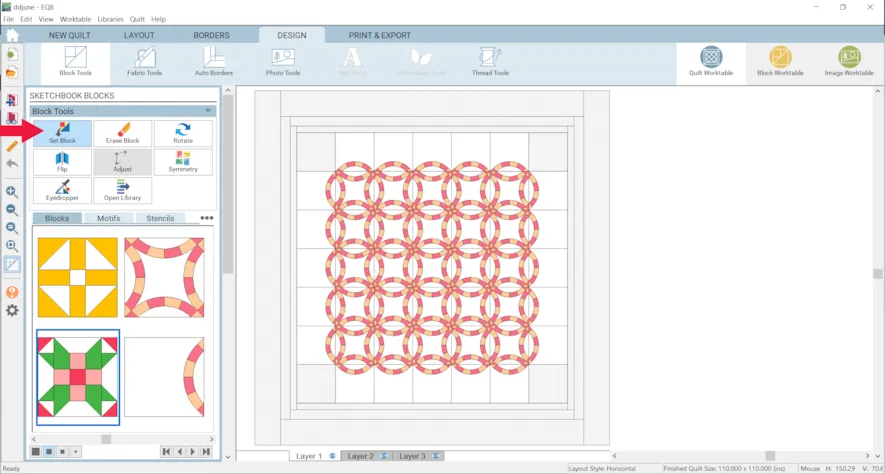
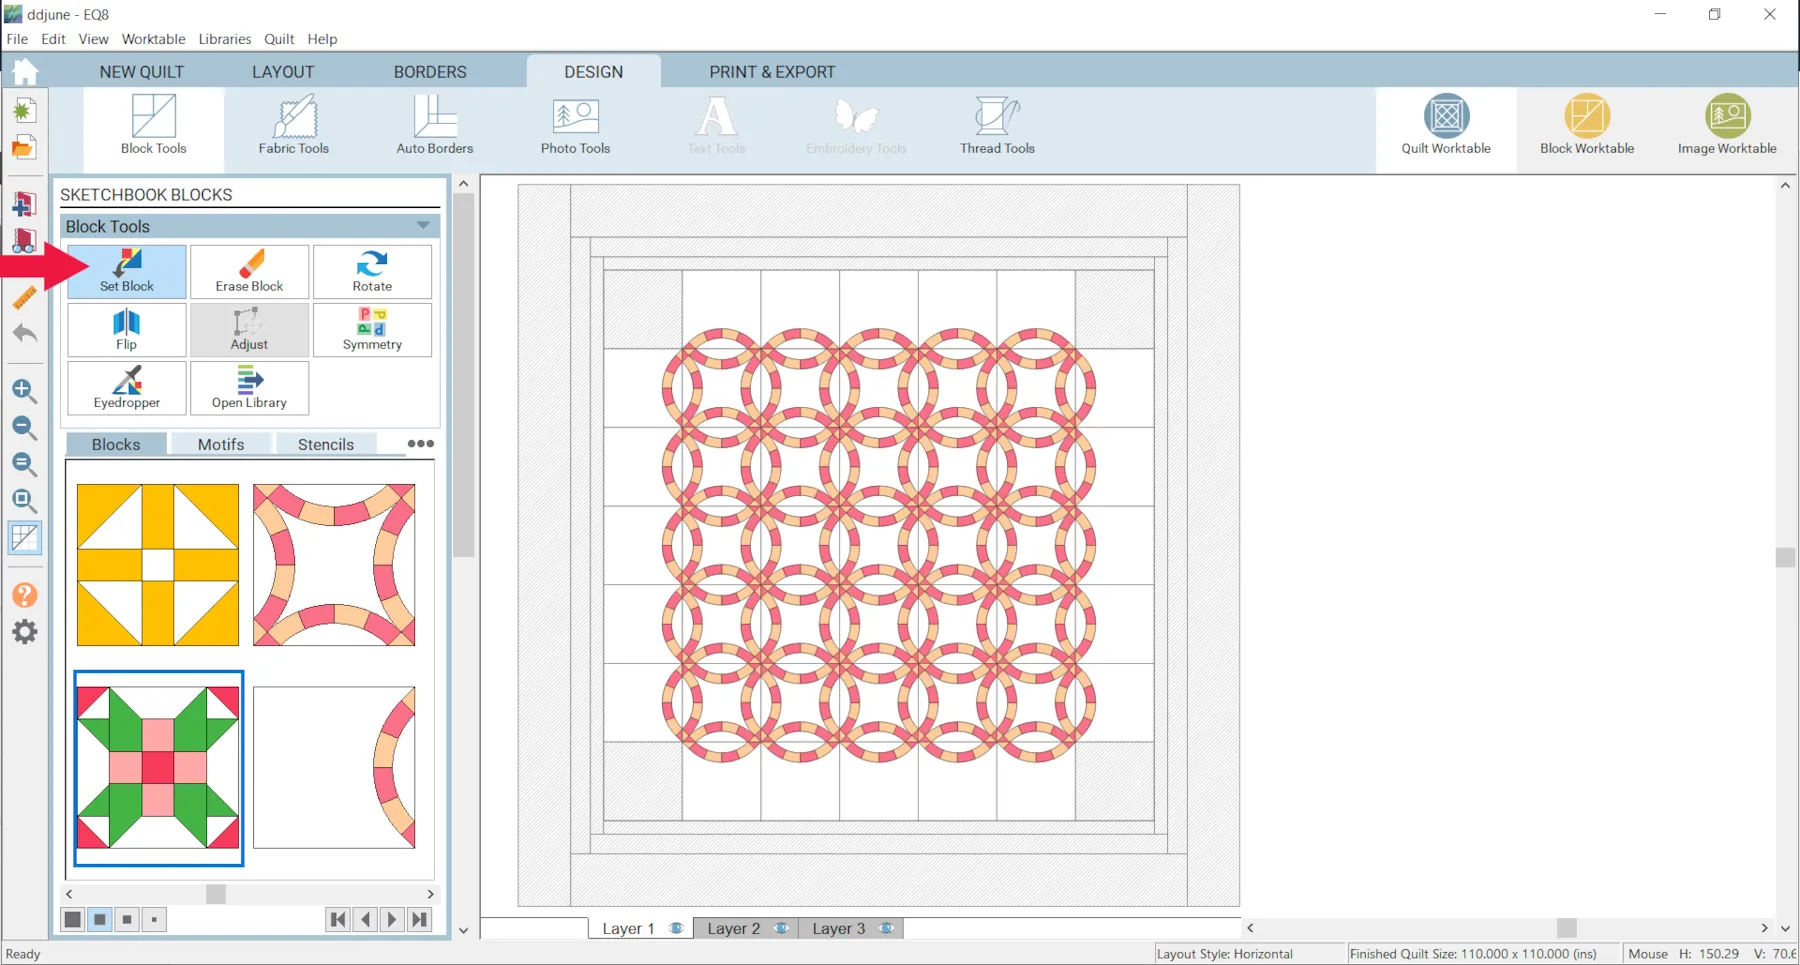
- Click the Set Block tool and place the blocks as shown.
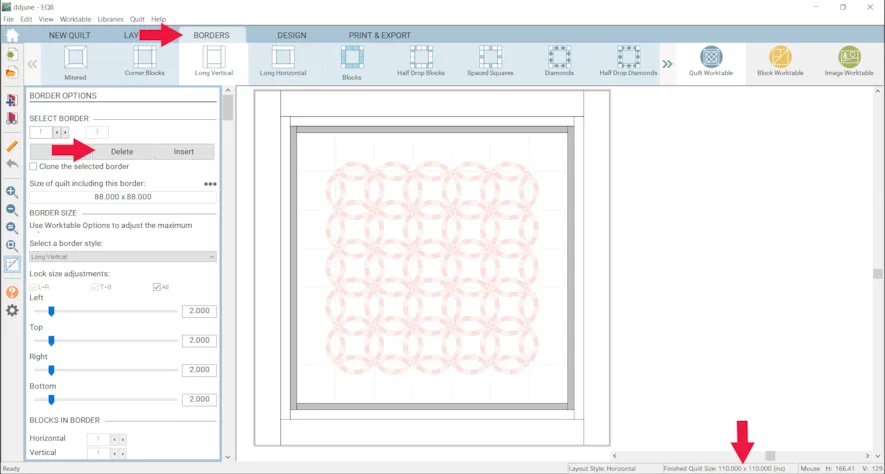
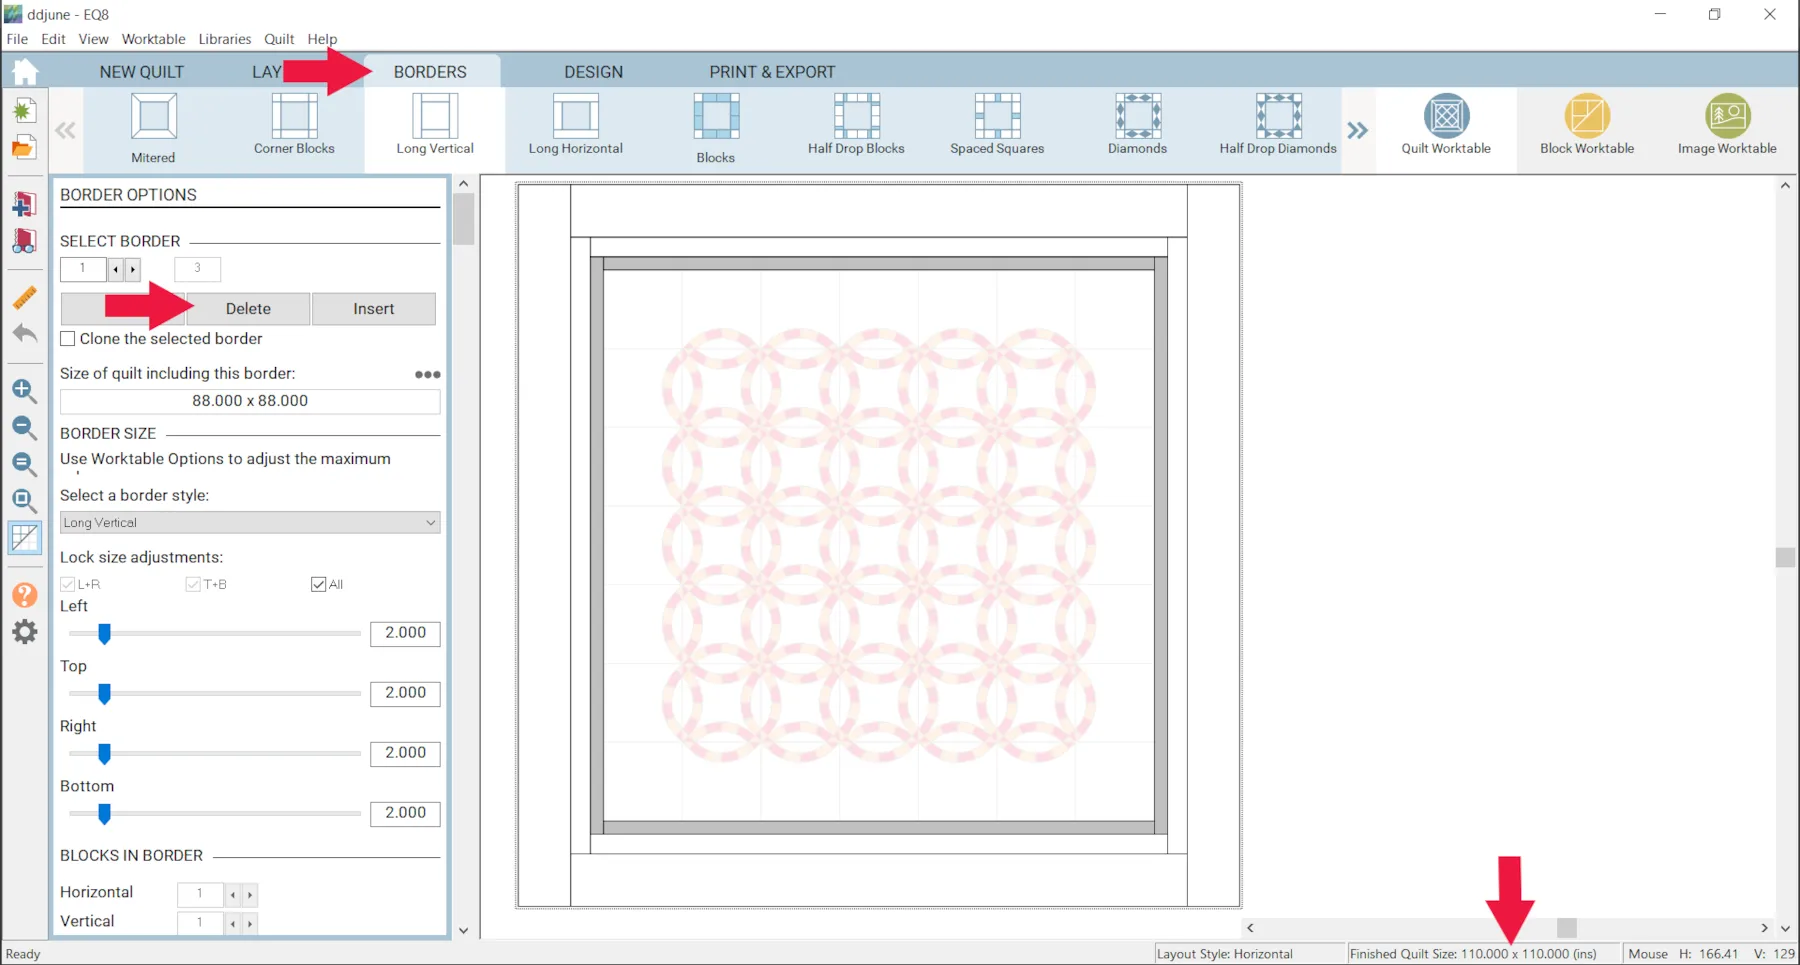
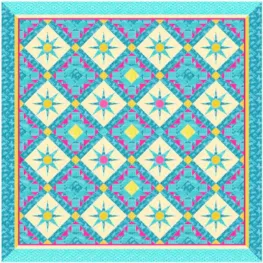
Now lets change the borders on this quilt. Even though it is from the Layout Library it is still editable. - Click the Borders tab.Notice in the lower right corner there is the Finished Size of the Quilt: 110 x 110. We will keep the quilt the same size.
- Click the Delete button twice to delete the first and second border.
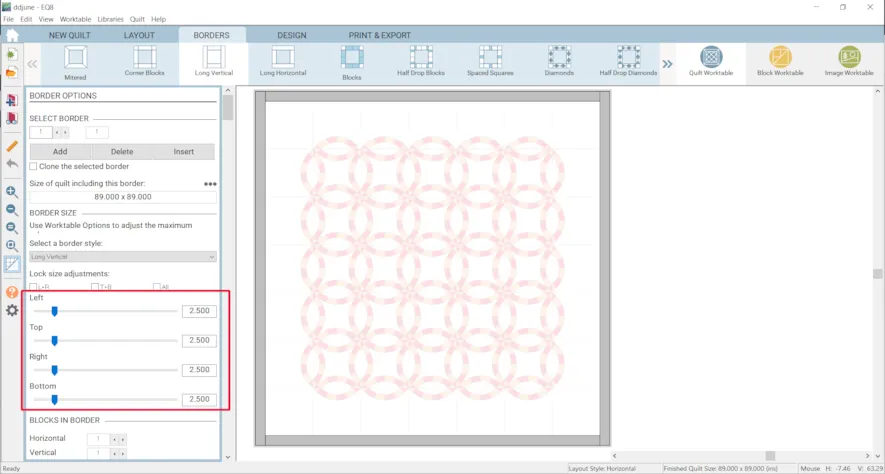
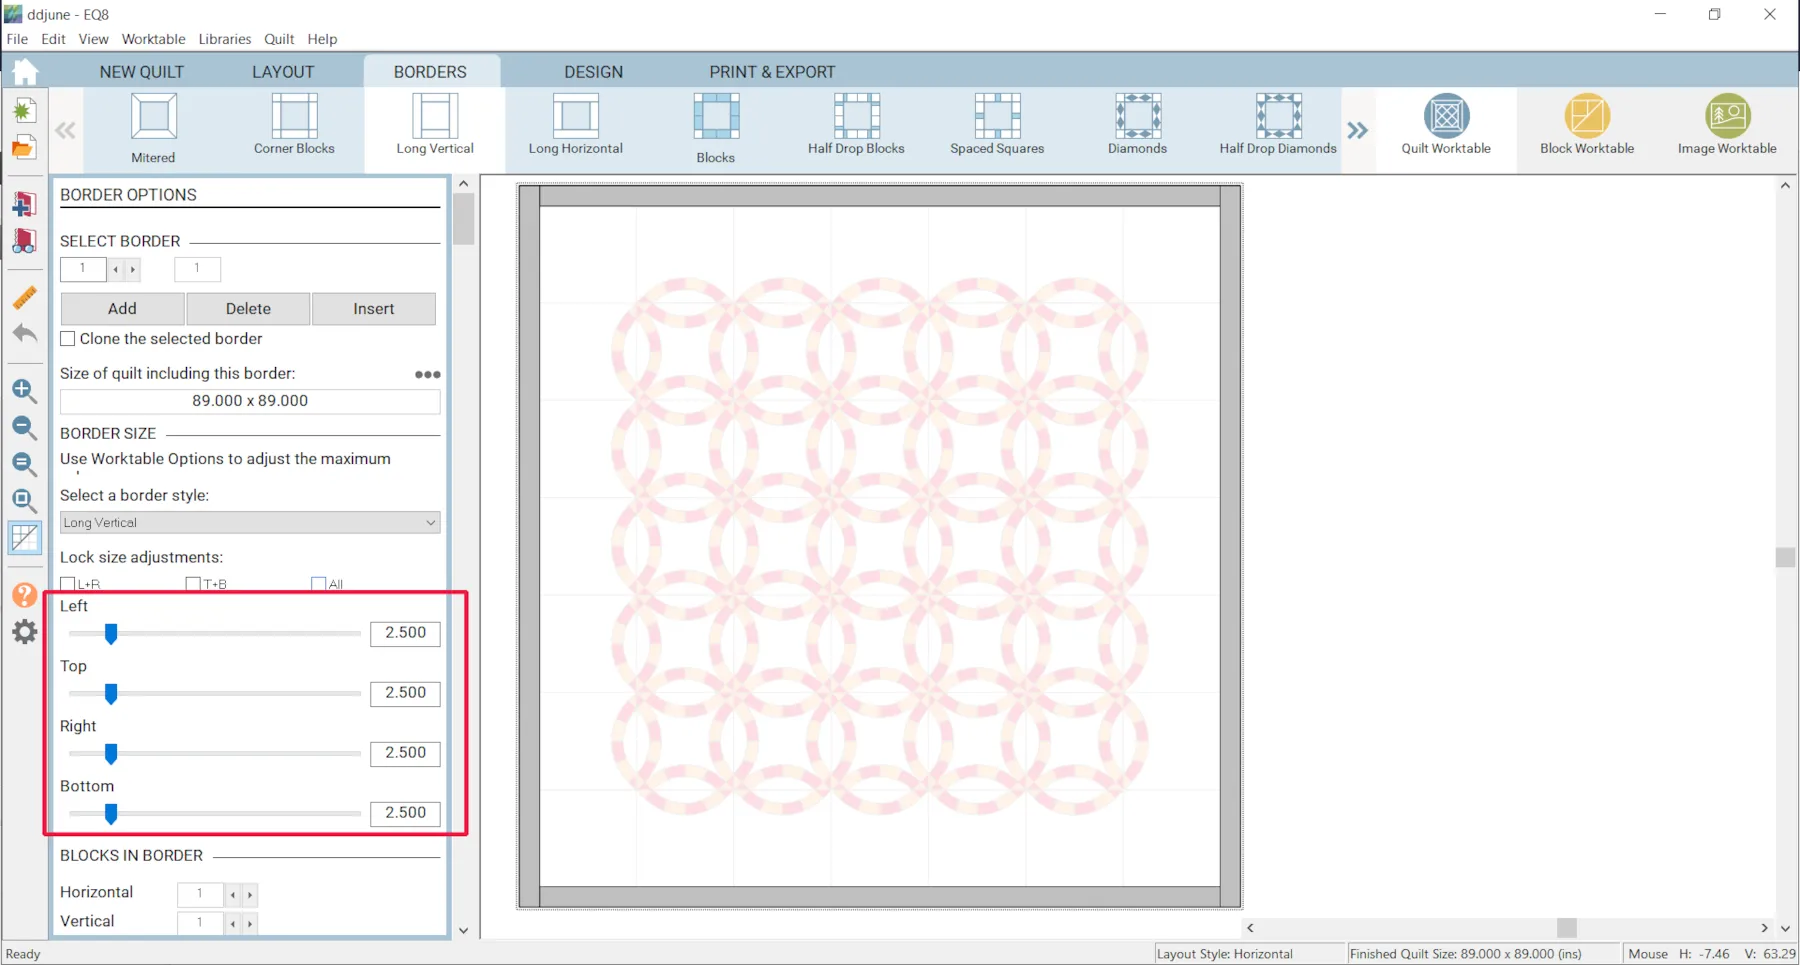
- Make the remaining border 2.5″ on all sides. That makes the quilt 89″ x 89″.
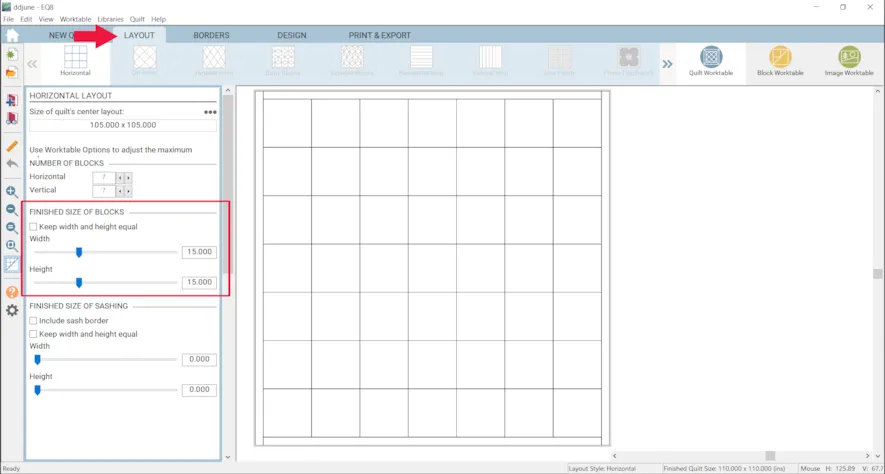
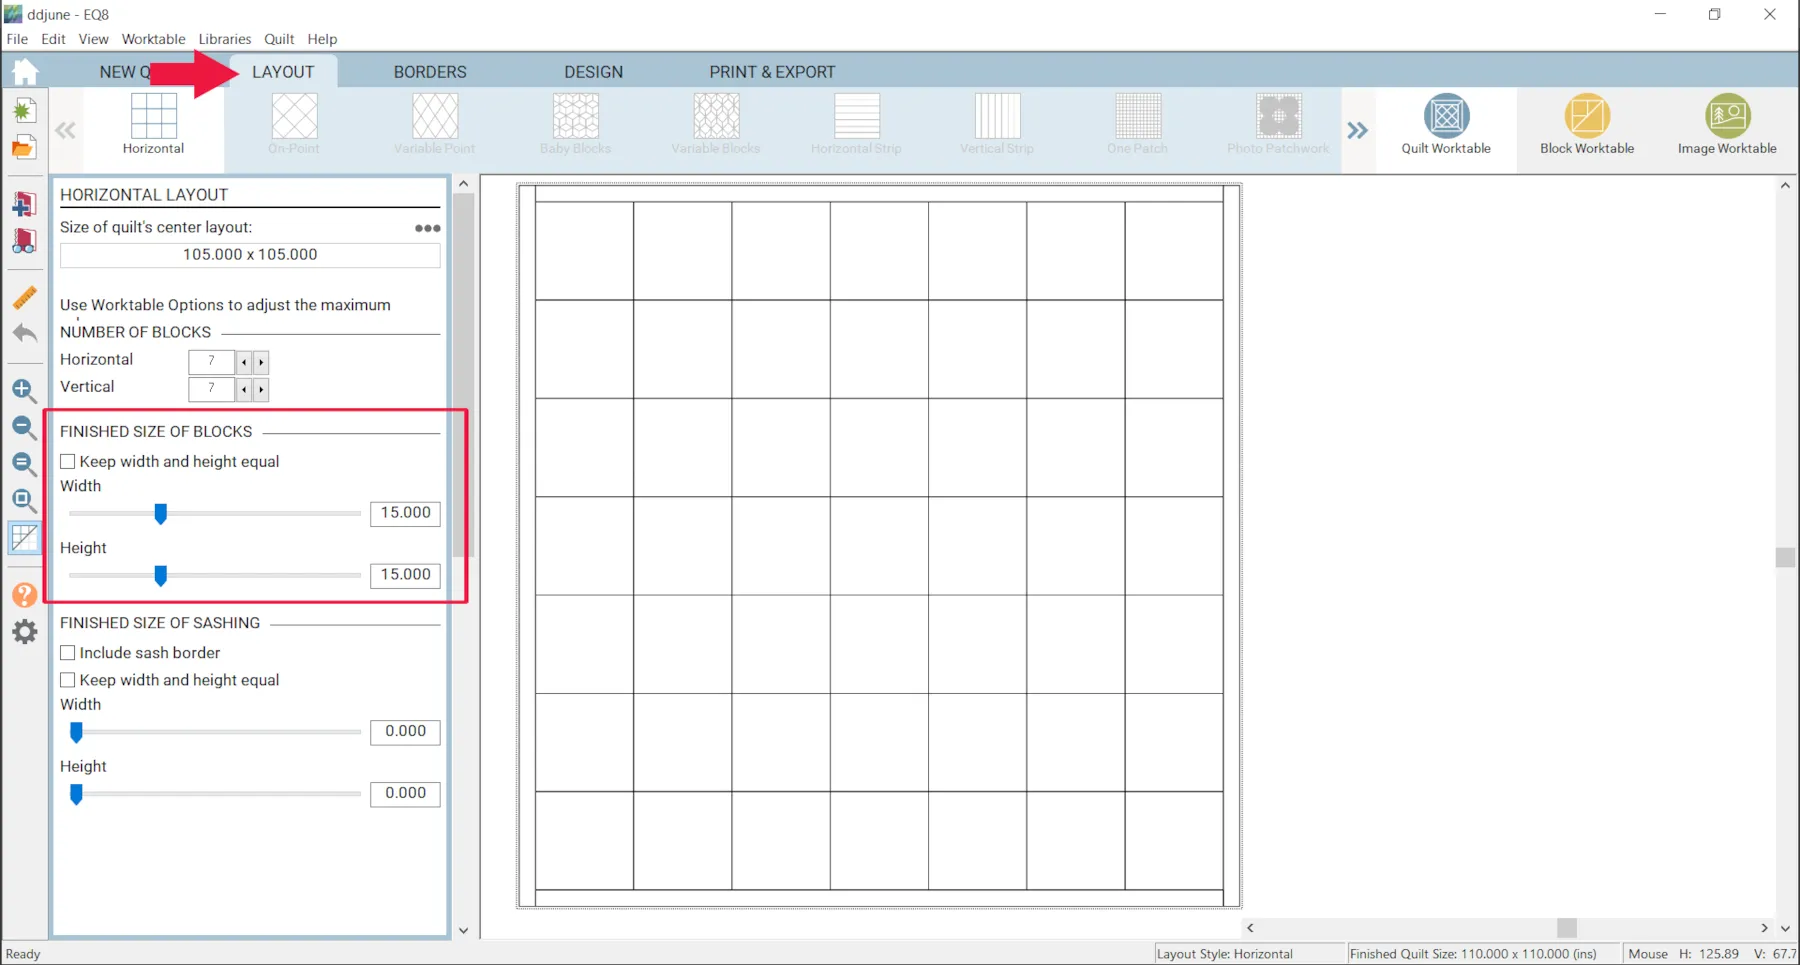
- Click the LAYOUT tab
- Change the block size to 15″ x 15″. Now the quilt is 110″ x 110″ again.
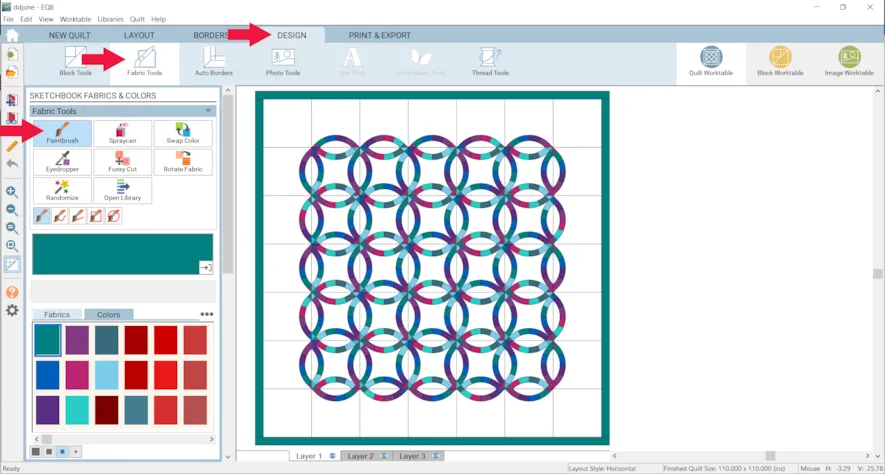
- Click the DESIGN tab > Fabric Tools > Paintbrush and recolor the quilt the way you’d like.
- Click Add to Project Sketchbook
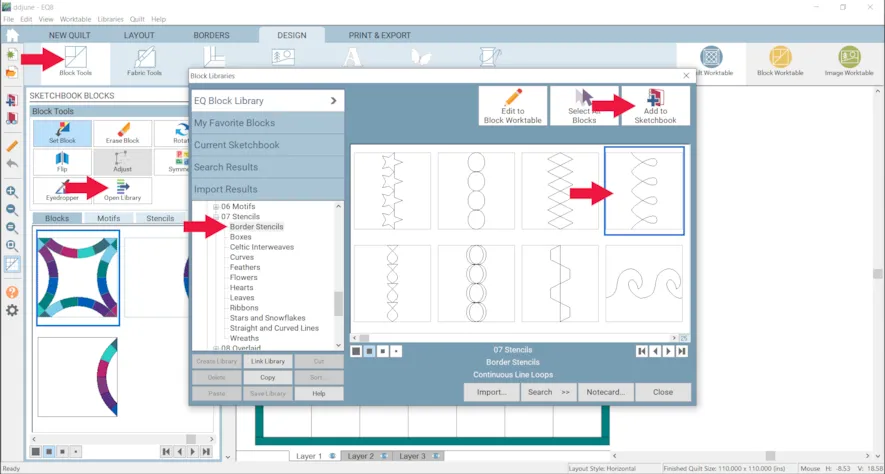
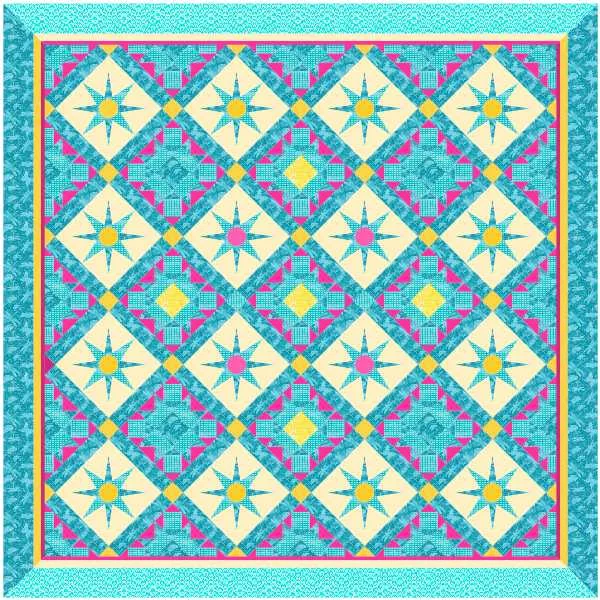
- Click Block Tools
- Click Open Library
- Under 07 Stencils click Border Stencils
- Find Continuous Line Loop and click Add to Sketchbook.
- Click Hearts to see some heart stencils. Add a few to the sketchbook.
- Click Close
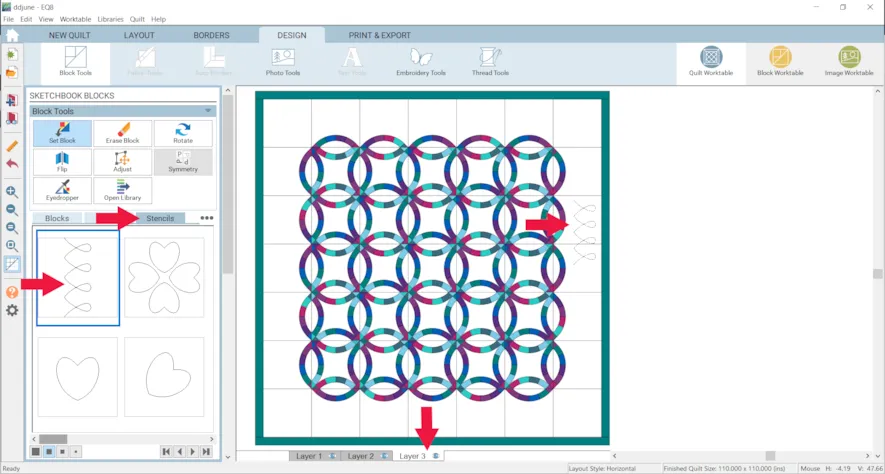
- Click the Layer 3 tab at the bottom of the screen
- Click the Stencils tab
- Click and drag a stencil onto the quilt. Size and location doesn’t matter right now.
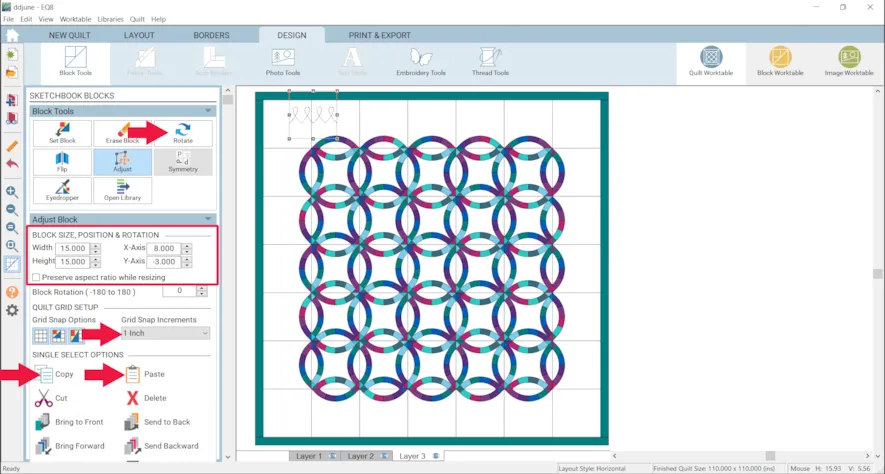
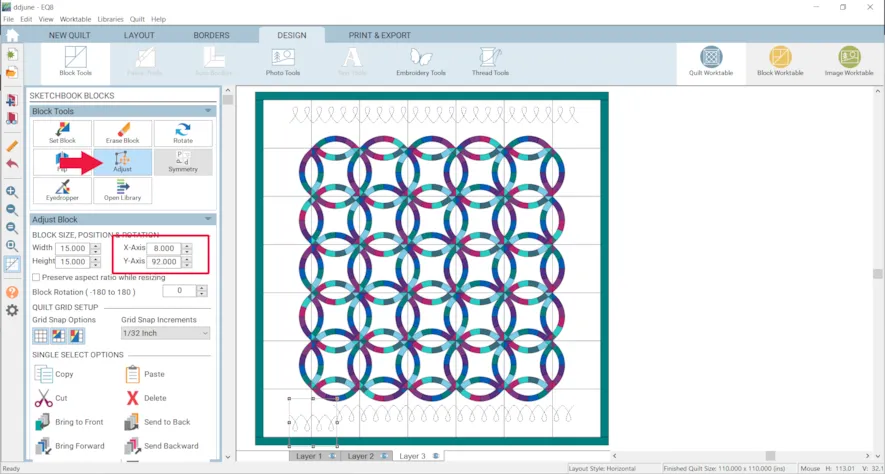
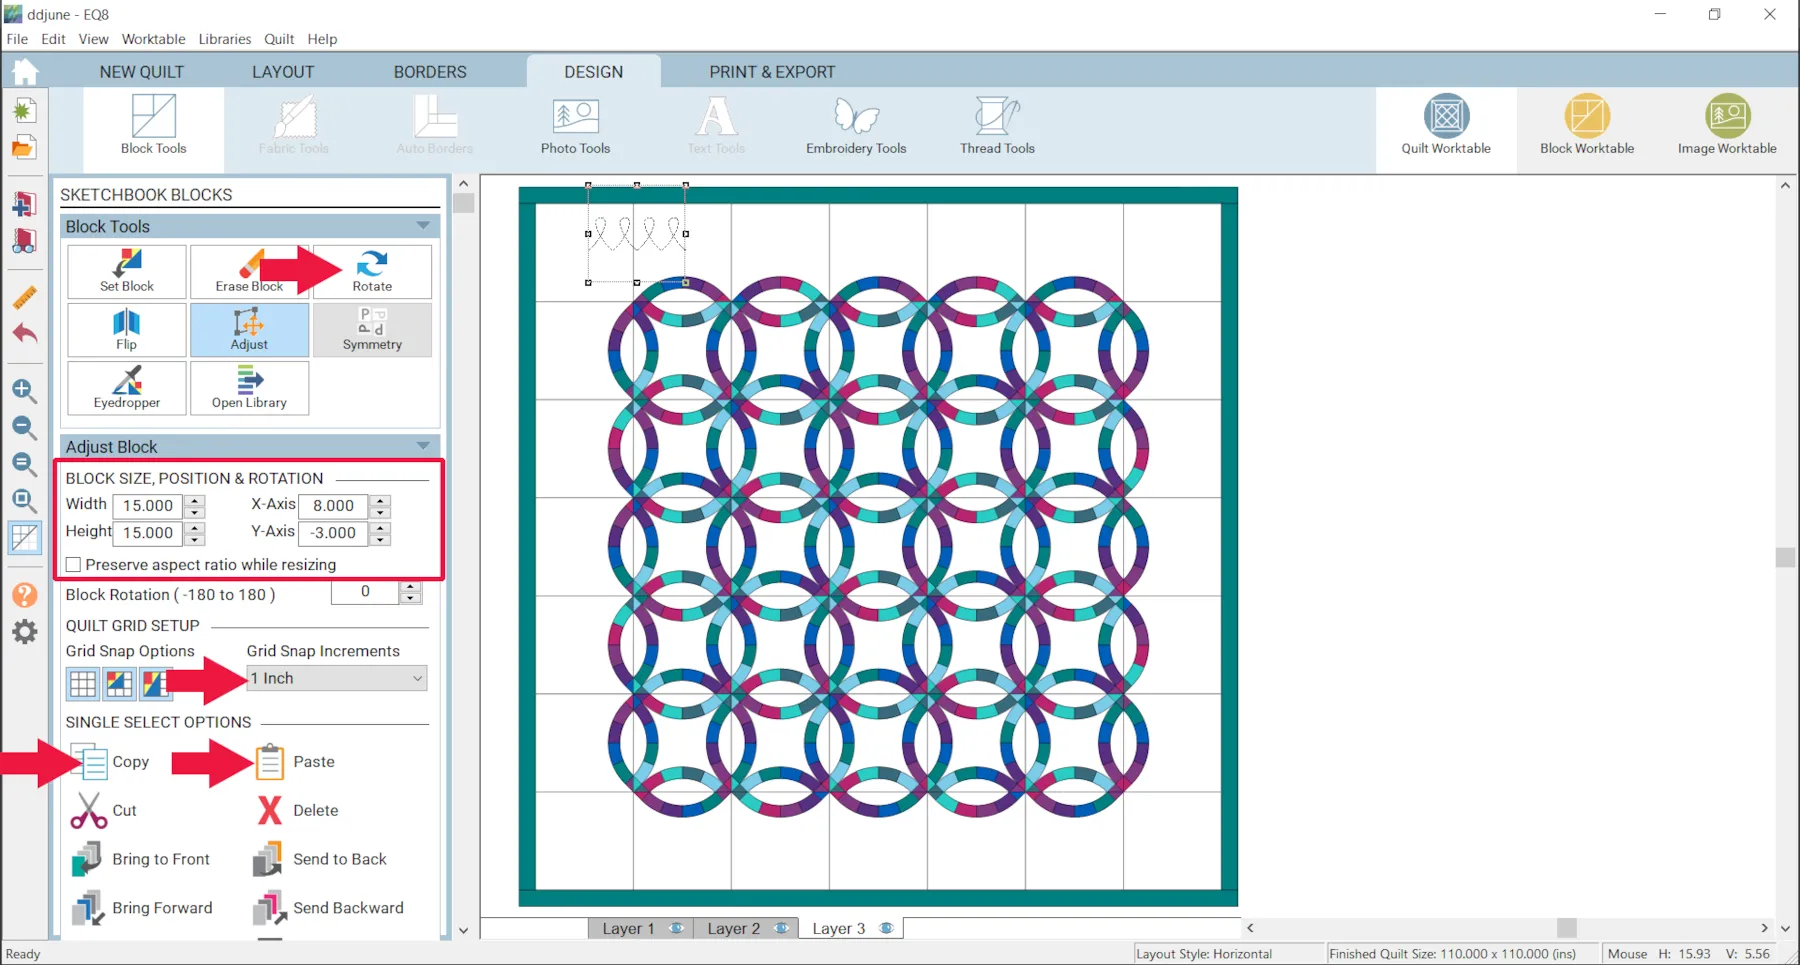
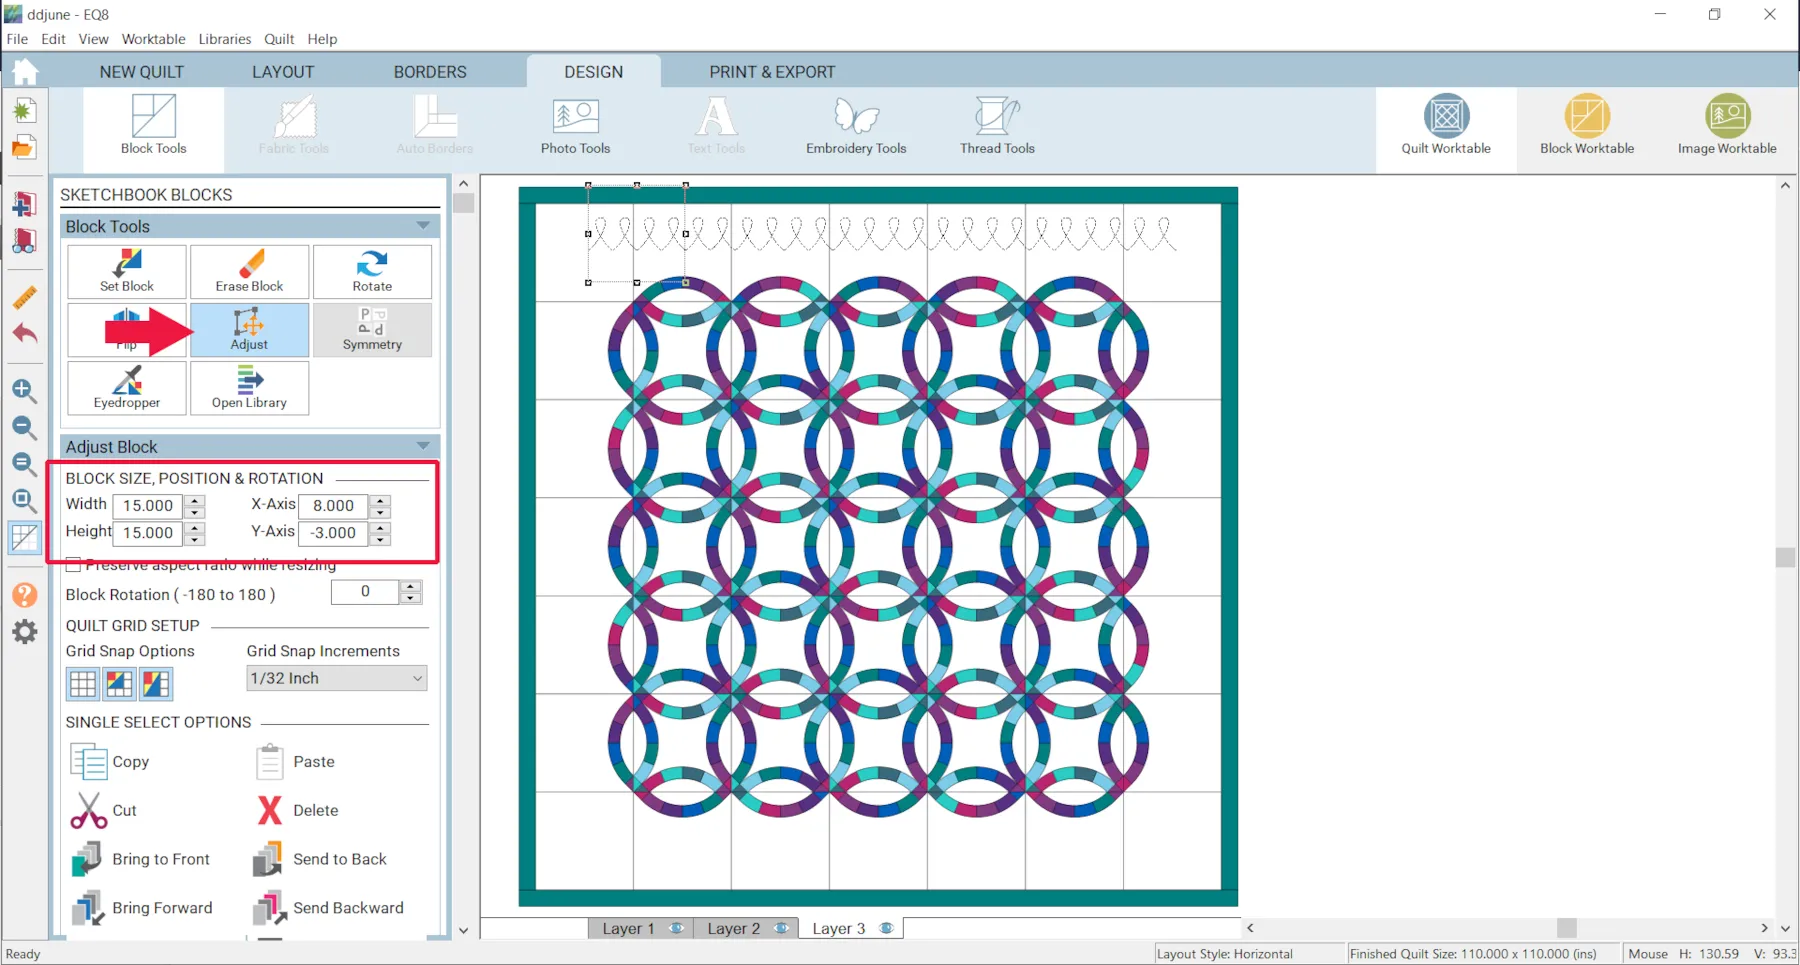
- Click the Adjust tool.
- Make the block 15″ x 15″.
- Make the Y-axis: -3 and the X-axis: 8
- Make the Grid Snap Increments: 1 Inch
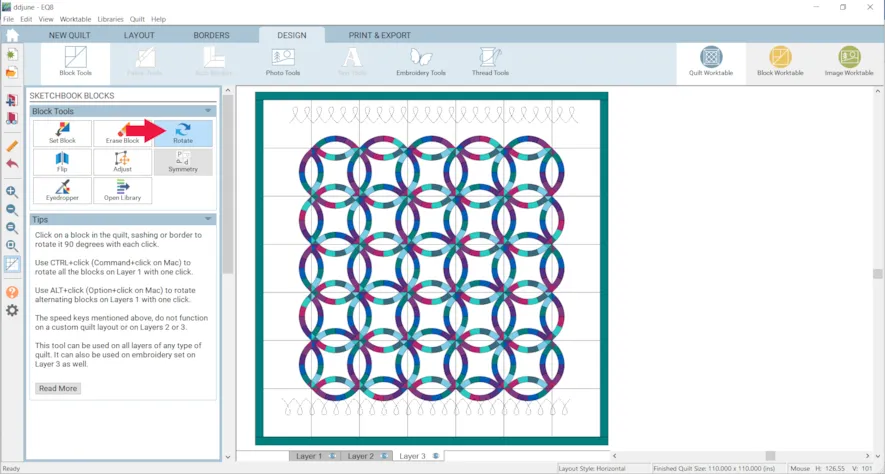
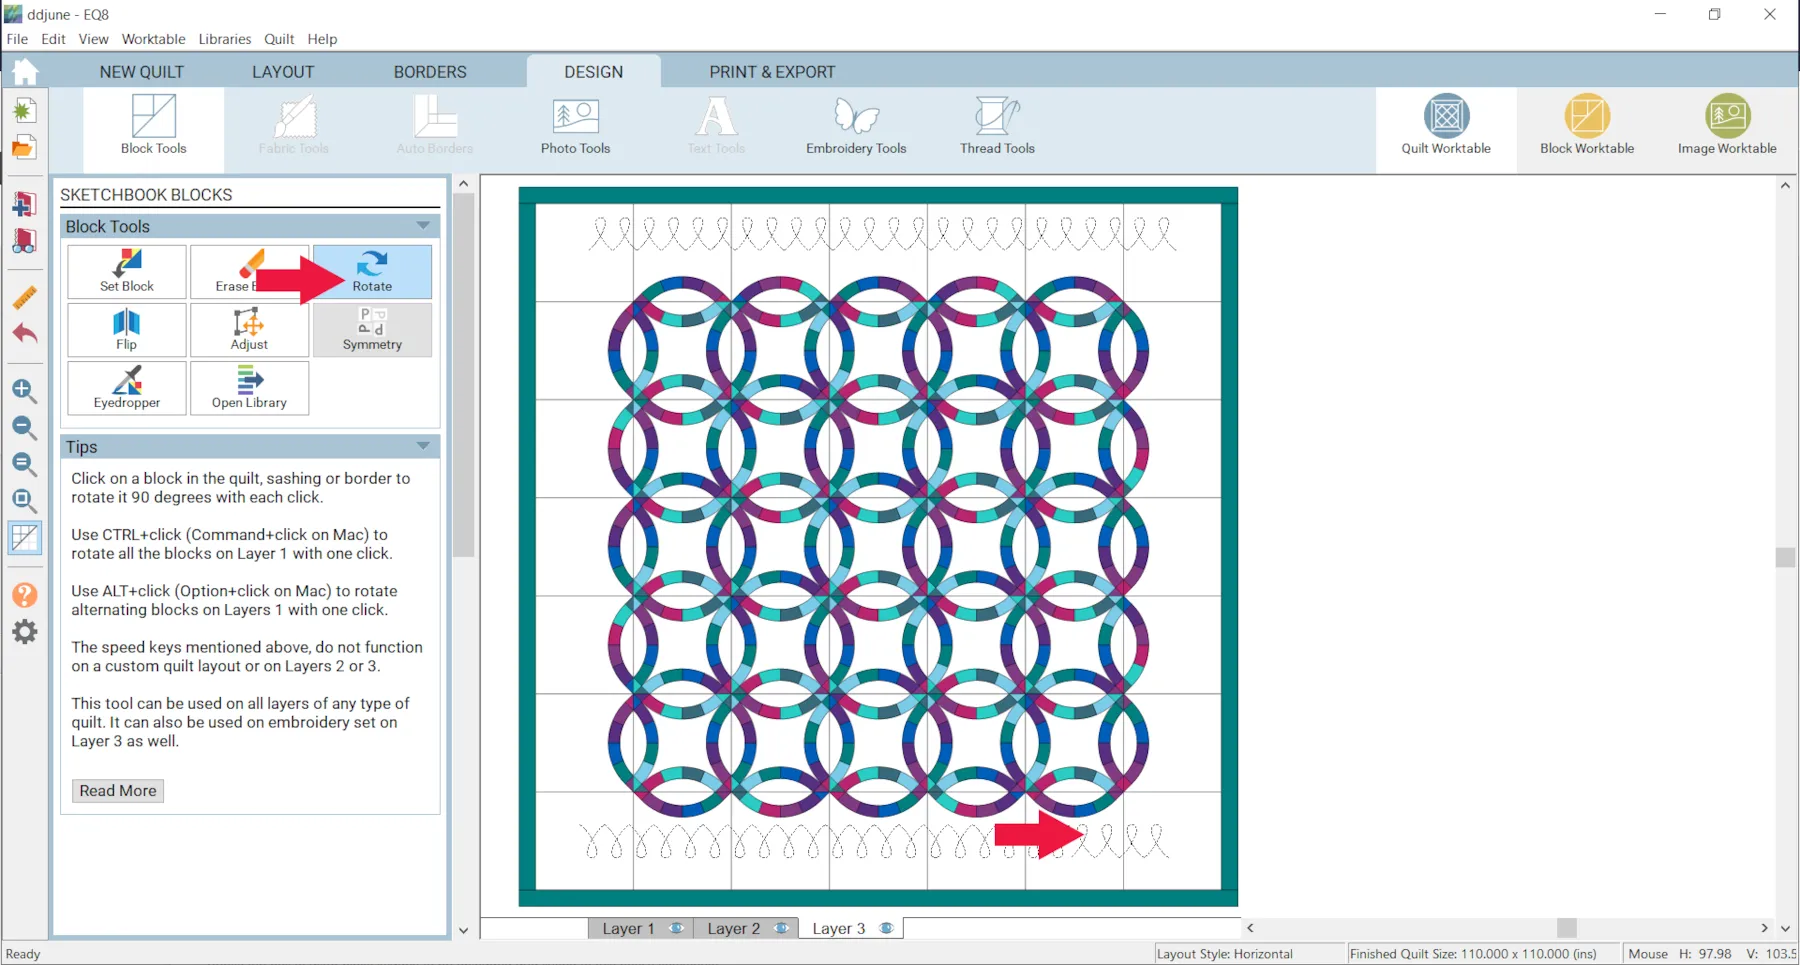
- Click the Rotate tool and Rotate the stencil as shown.
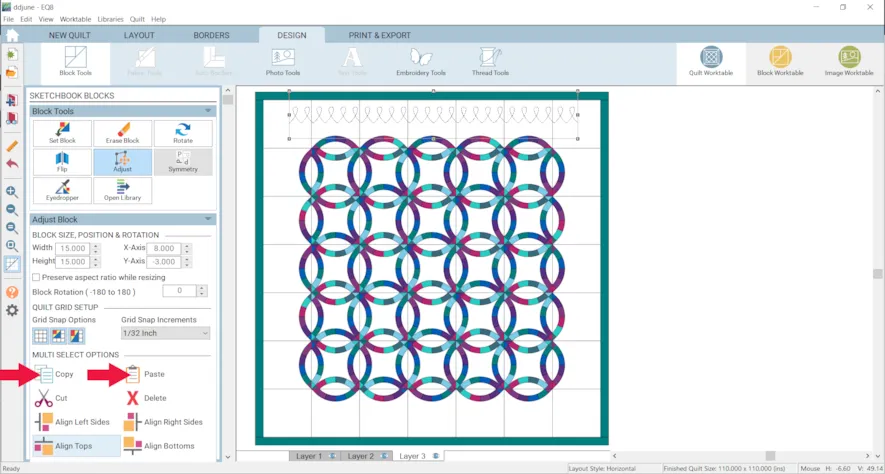
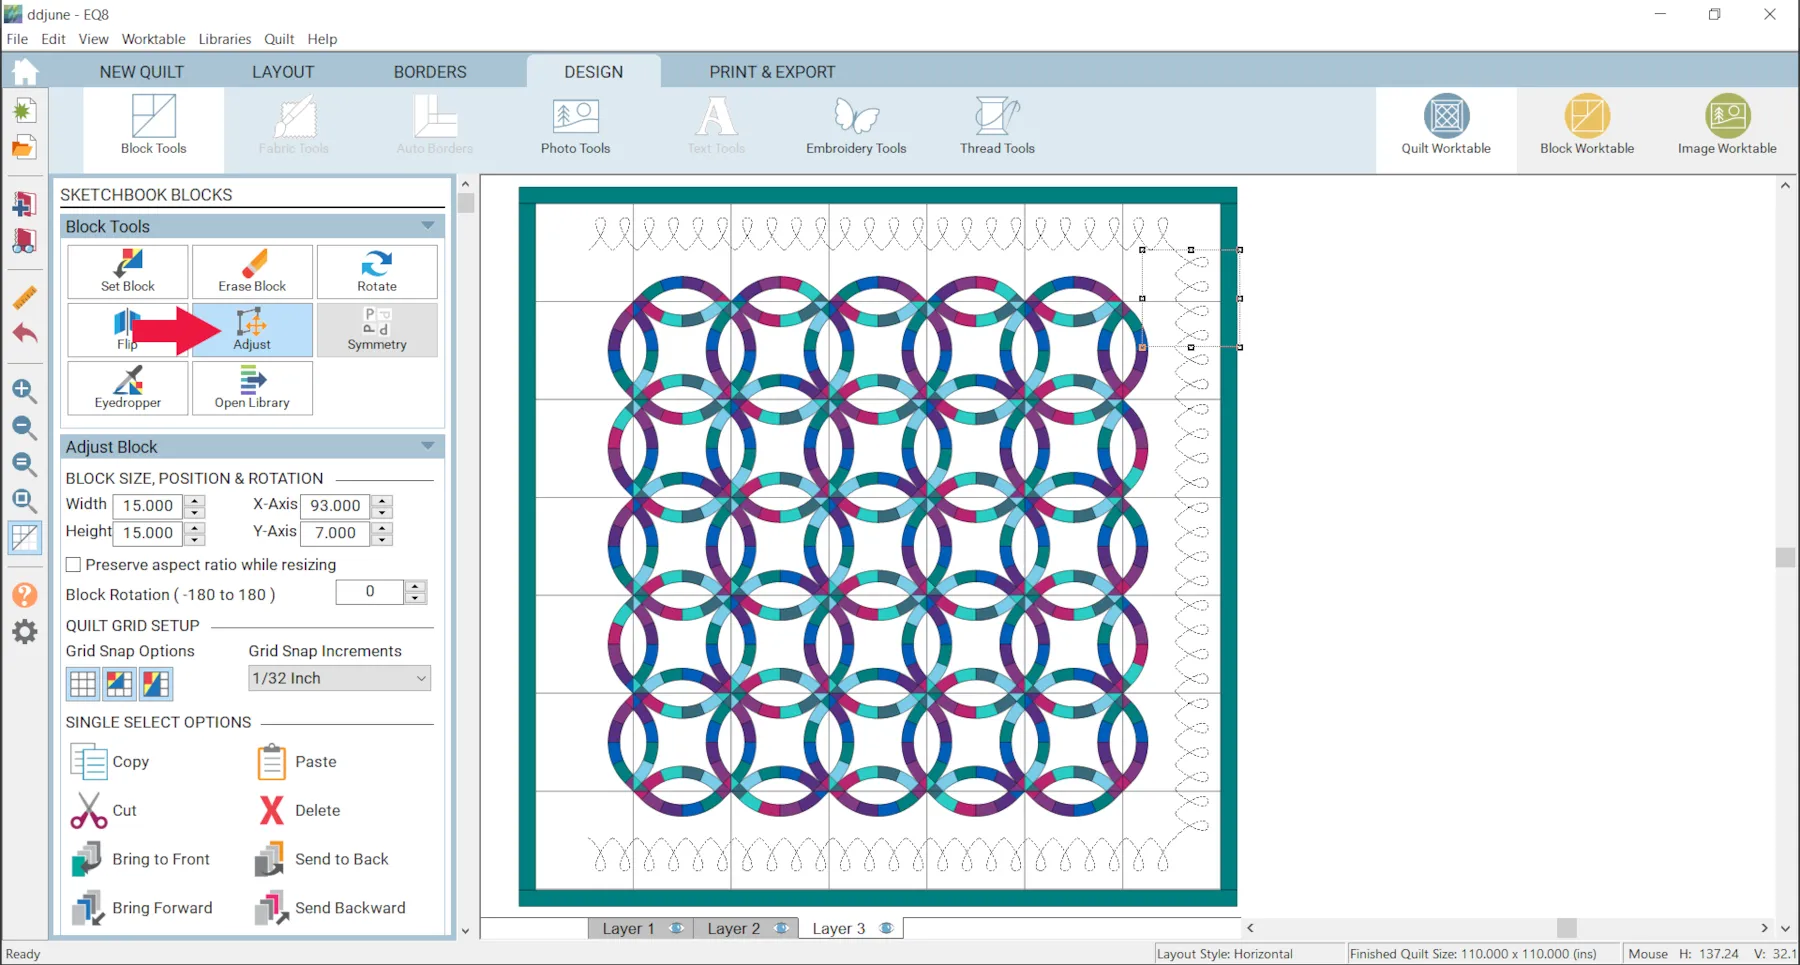
- Click the Adjust tool and click on a stencil.
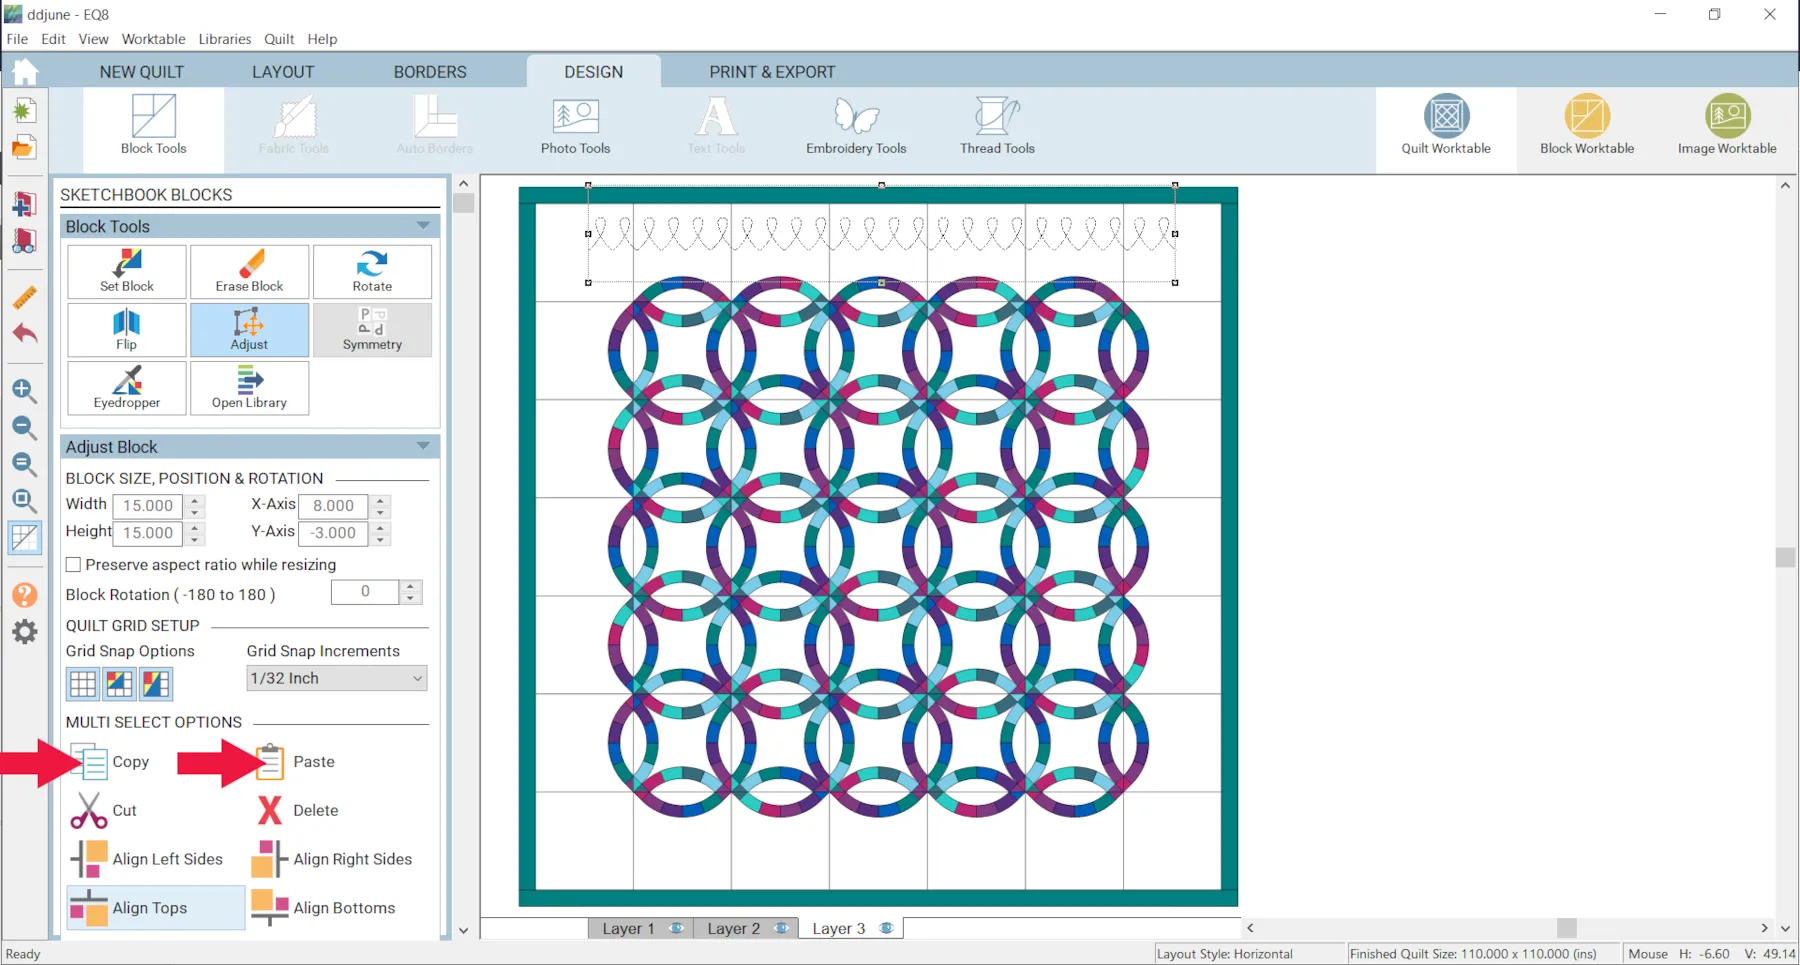
- Click Copy and Paste
- Drag the new stencil into location. Because it is snapping to the nearest inch, it should snap right into place.
- Repeat steps 58-59 until you have 6 blocks across the top.
- Hold down the Shift key on your keyboard and click the stencils to select them all.
- Click Copy and Paste
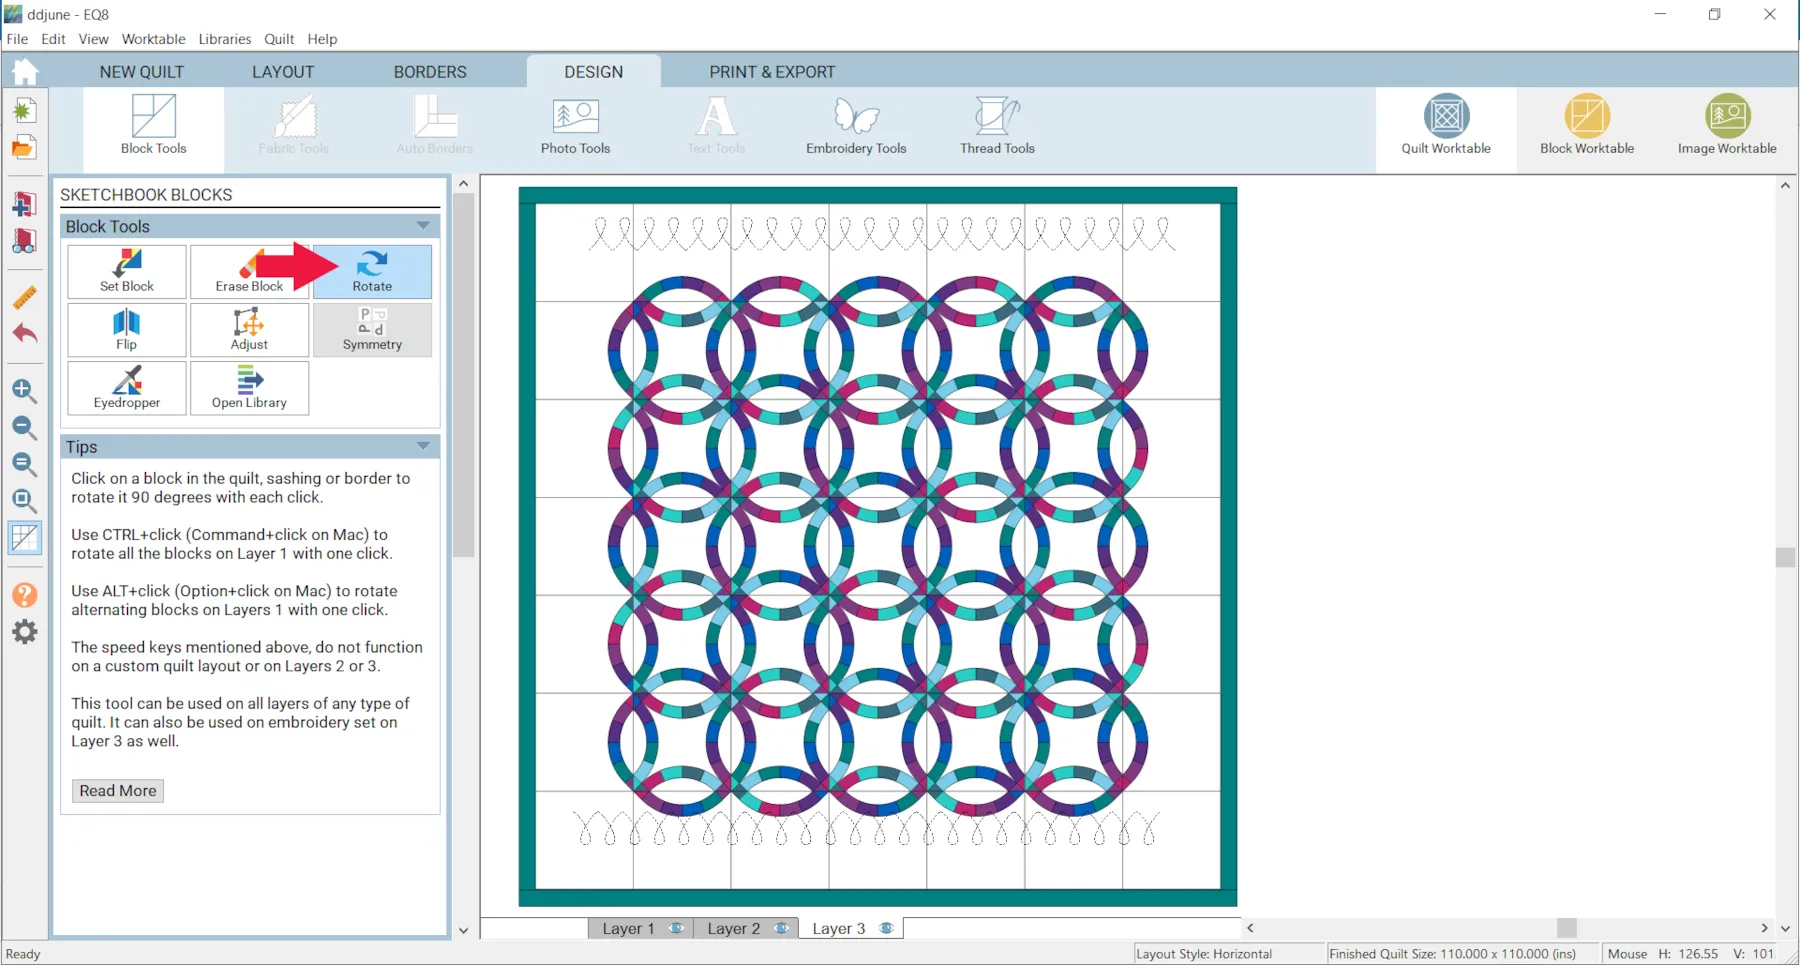
- Drag the bottom border to approximately the right location.
- Click the Rotate tool for each stencil in the border so that is positioned correctly.
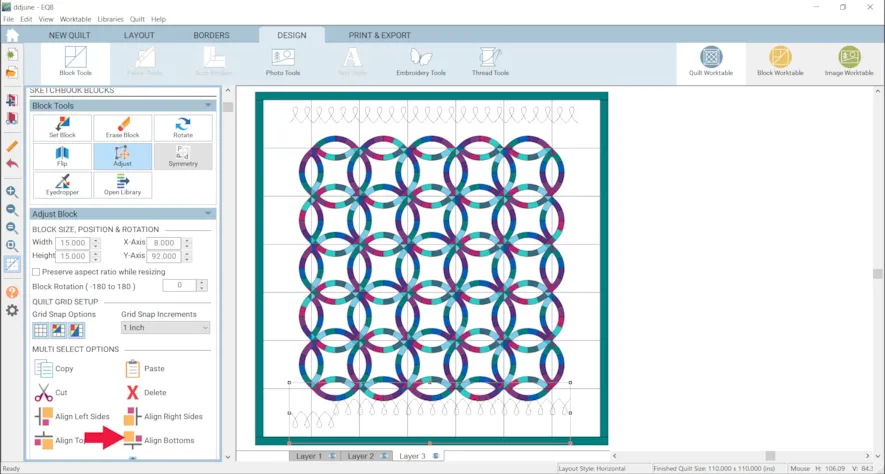
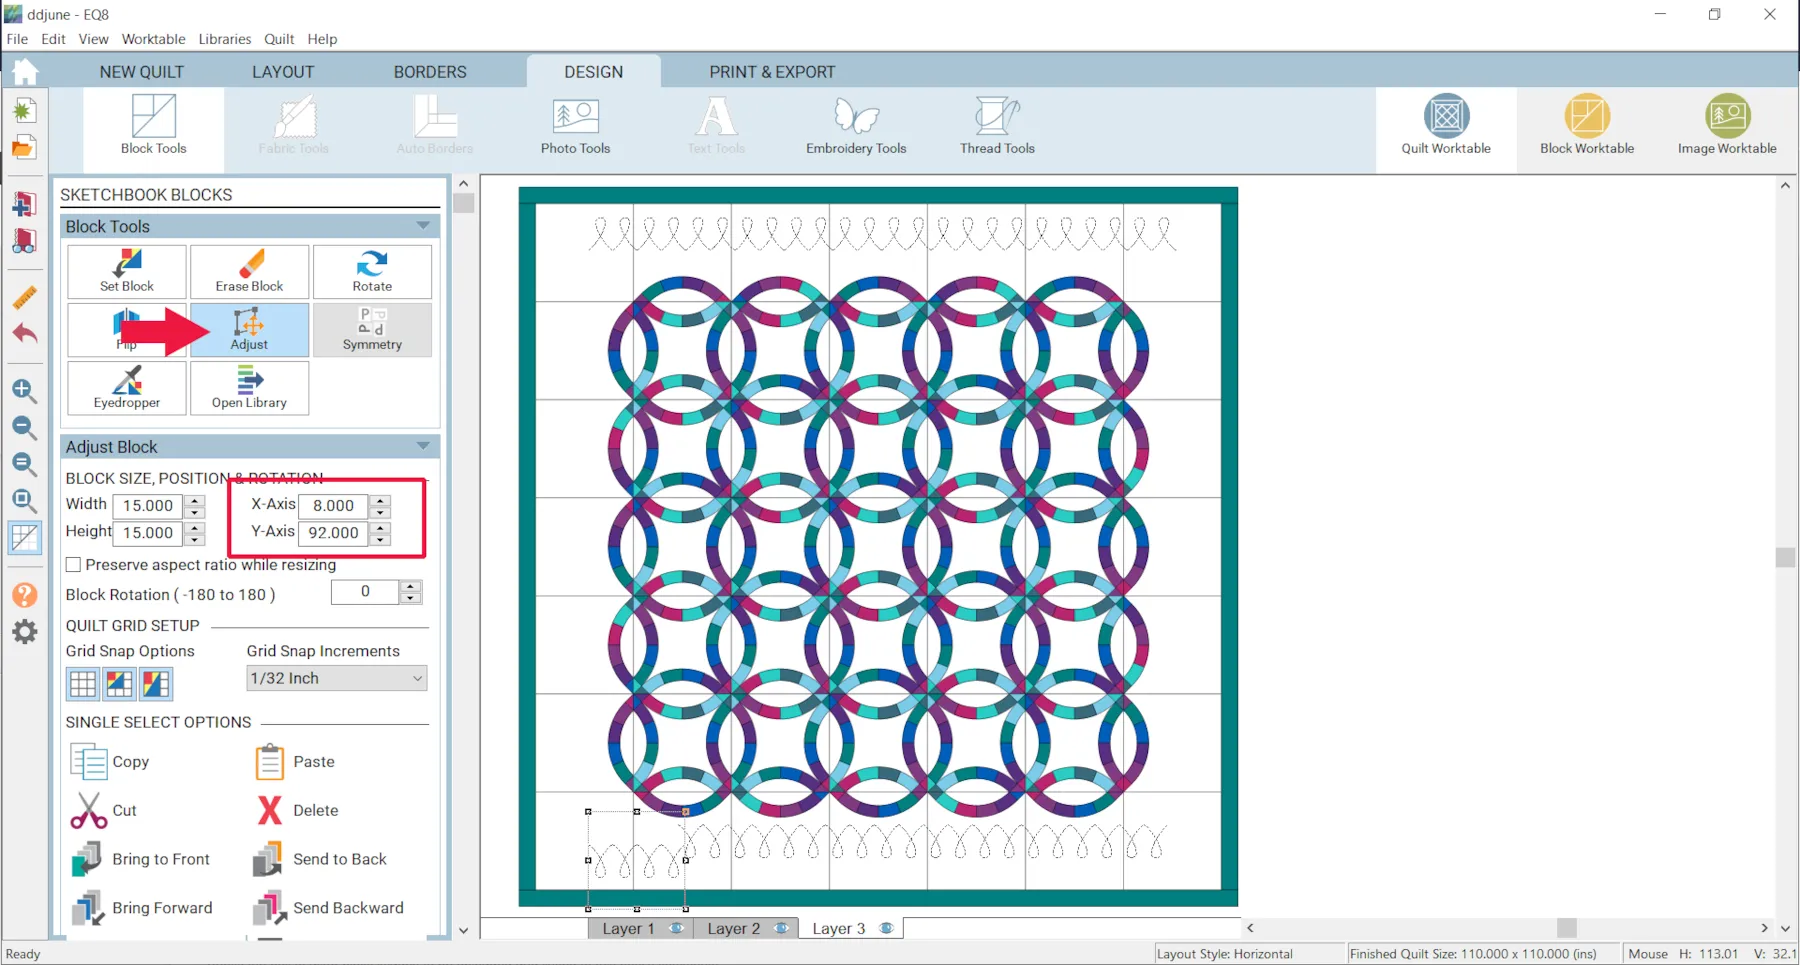
- Click the Adjust tool
- Click on the first block
- Make the X-Axis: 8 and the Y-Axis 92
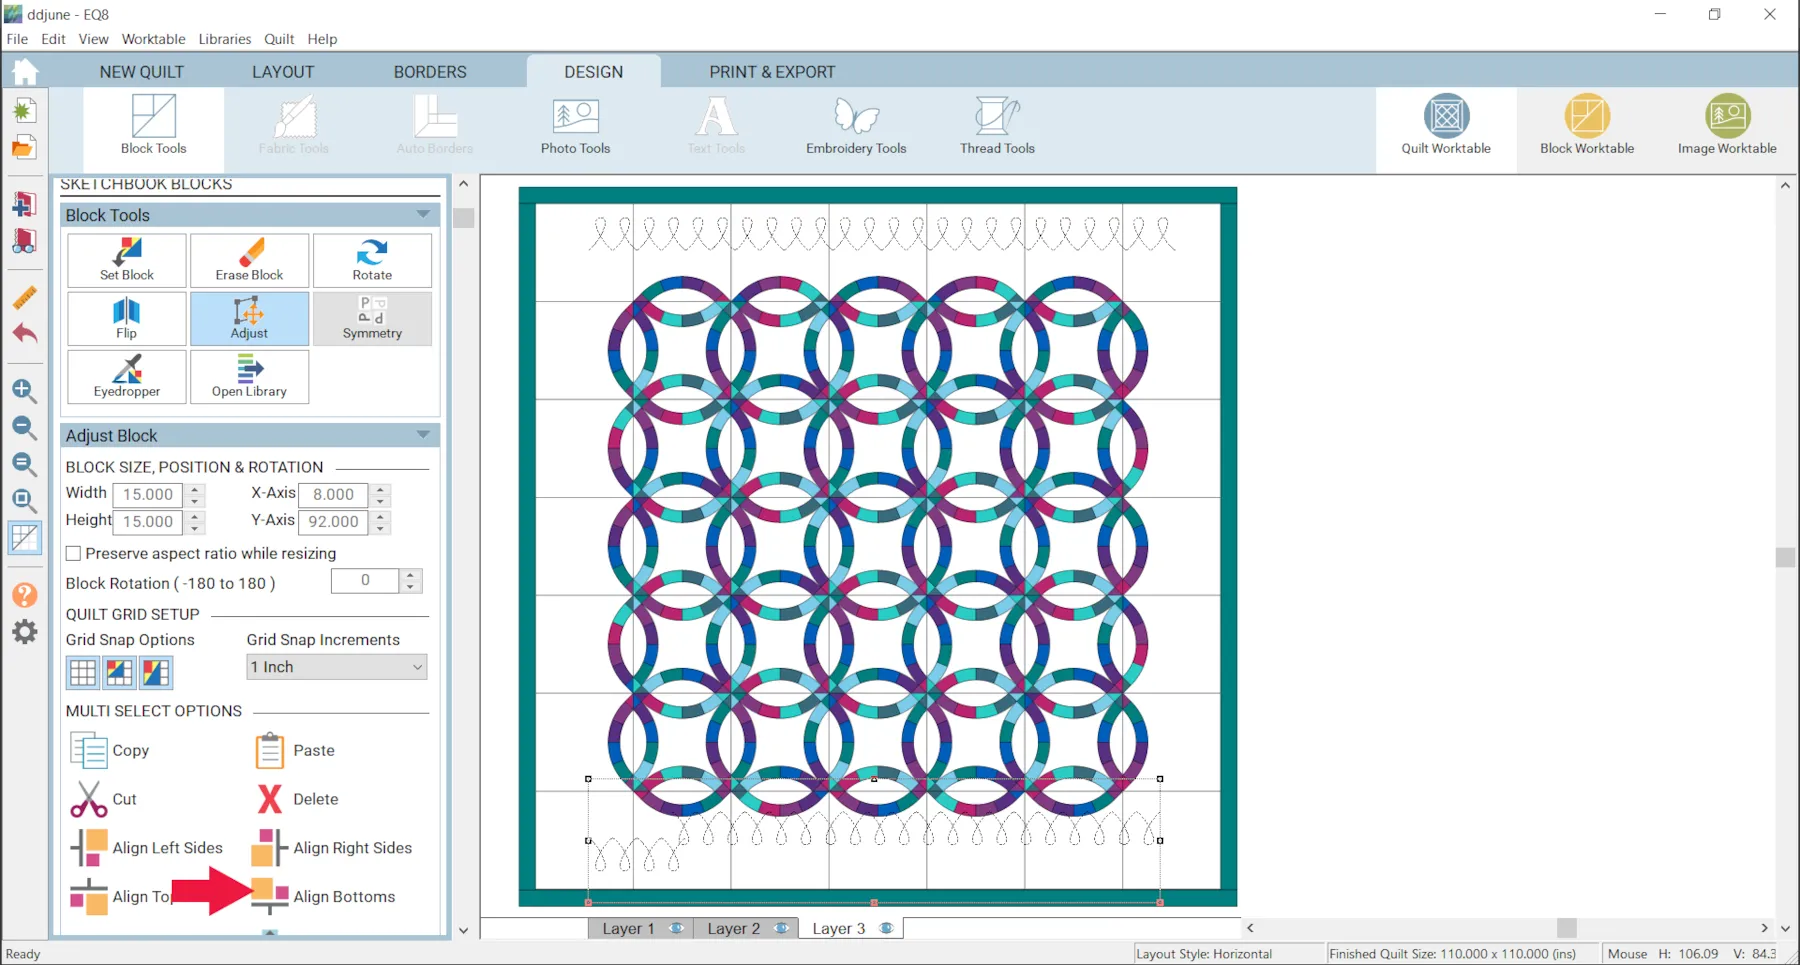
- With the first block still selected, hold down the Shift key on your keyboard and click the other stencils in the row to select them.
- Click the Align Bottoms button.
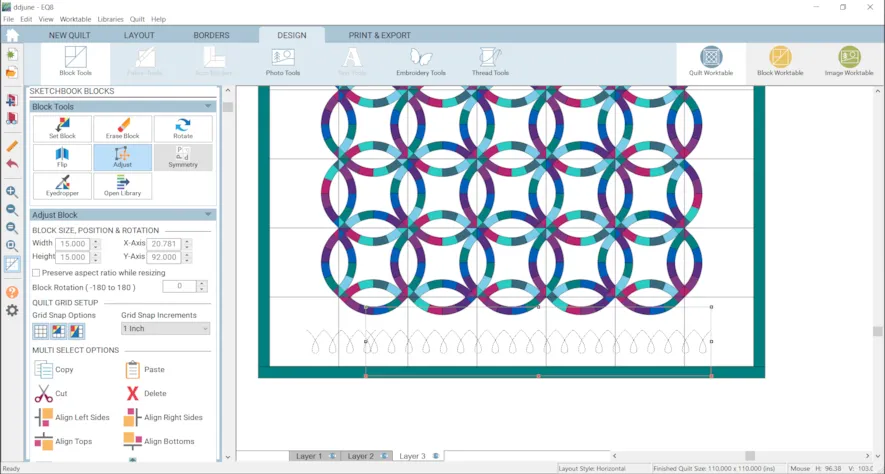
- You may need to move the second block over to the right or left. Click on it and drag it into place. You may want to zoom in to make sure it is lined up correctly. You can also use the right and left arrow keys on your keyboard.
Another way to do it is to enter the X-Axis numbers.
2nd stencil : 23
3rd stencil : 38
4th stencil: 53
5th stencil: 68
6th stencil: 83
- Click on one stencil in the bottom row.
- Click Copy and Paste.
- Click the Rotate tool and click the stencil three times.
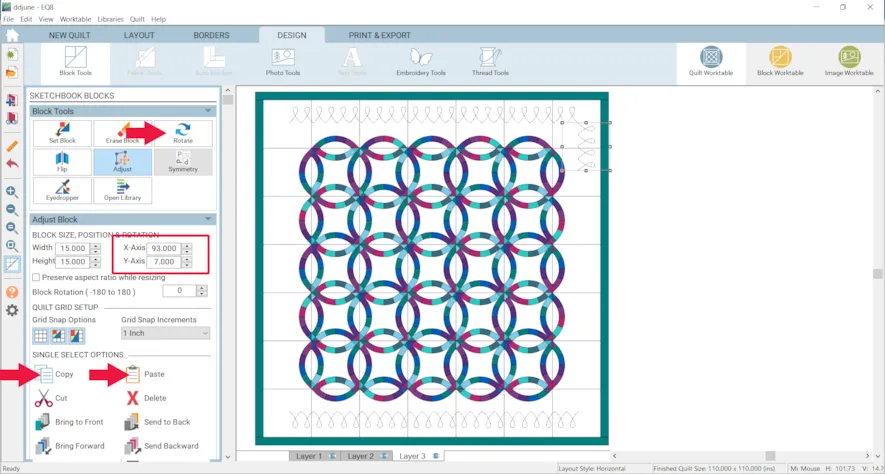
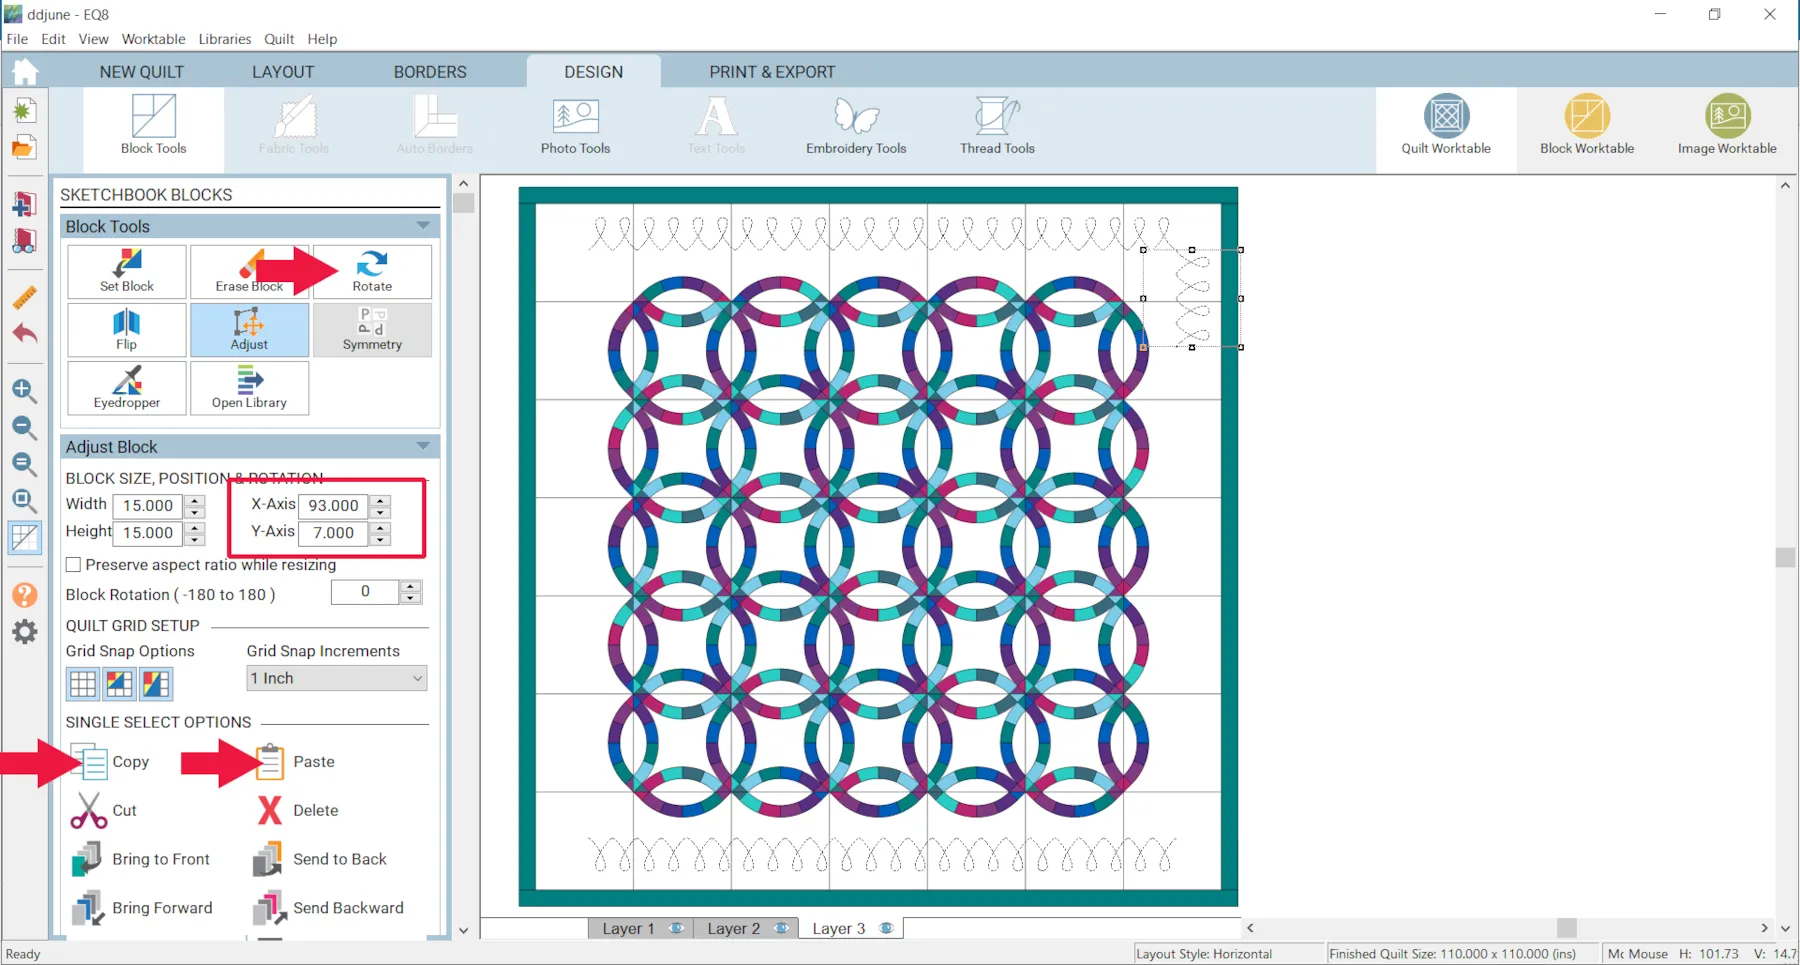
- Click the Adjust tool
- Make the X-Axis: 93 and the Y-Axis: 7
- Use Copy and Paste to fill out the rest of the row. They should snap into place. Again you can zoom in and/or use your arrow keys on your keyboard.
Or you can enter the X-Axis and Y-Axis numbers.
2nd block
X-Axis: 93
Y-Axis: 22
3rd block
X-Axis: 93
Y-Axis: 37
4th block
X-Axis: 93
Y-Axis: 52
5th block
X-Axis: 93
Y-Axis: 67
6th block
X-Axis: 93
Y-Axis: 82
- Click on one stencil in the right row.
- Click Copy and Paste.
- Click the Rotate tool and click the stencil twice.
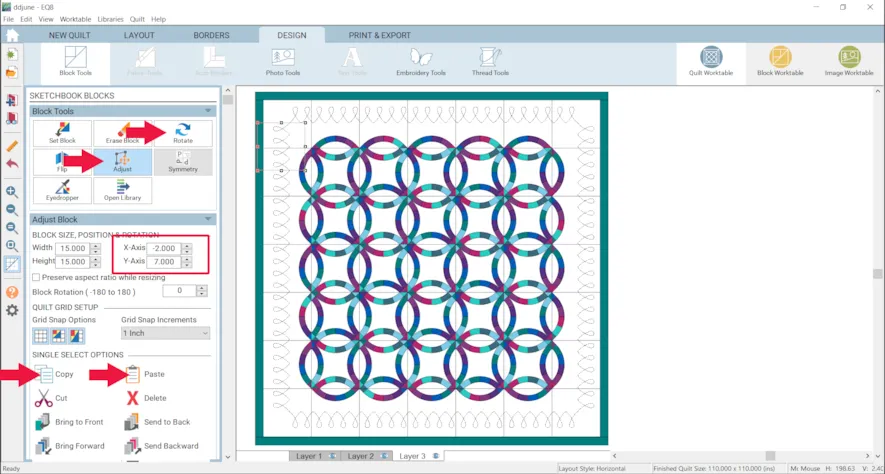
- Click the Adjust tool
- Make the X-Axis: -2 and the Y-Axis: 7
- Use Copy and Paste to fill out the rest of the row. They should snap into place. Again you can zoom in and/or use your arrow keys on your keyboard.
Or you can enter the X-Axis and Y-axis numbers.
2nd block
X-Axis: -2
Y-Axis: 22
3rd block
X-Axis: -2
Y-Axis: 37
4th block
X-Axis: -2
Y-Axis: 52
5th block
X-Axis: -2
Y-Axis: 67
6th block
X-Axis: -2
Y-Axis: 82
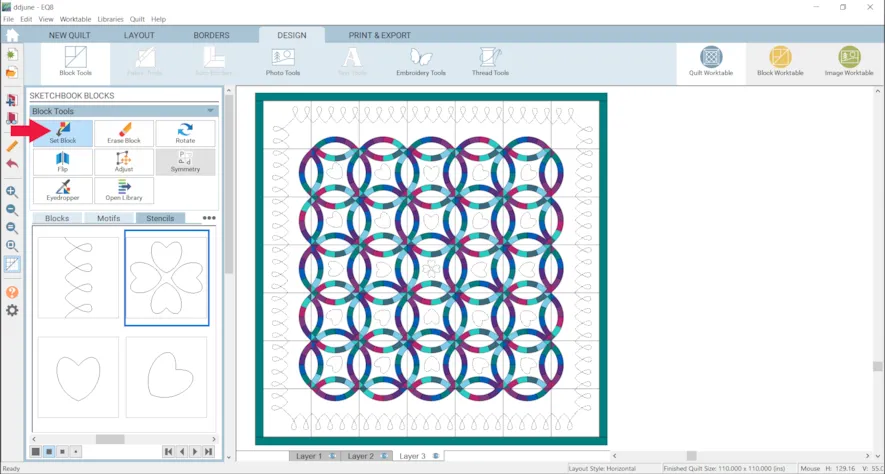
- Click the Set Block tool
- Place the heart stencils any way you like.
Here is more information about placing stencils and even more tips.
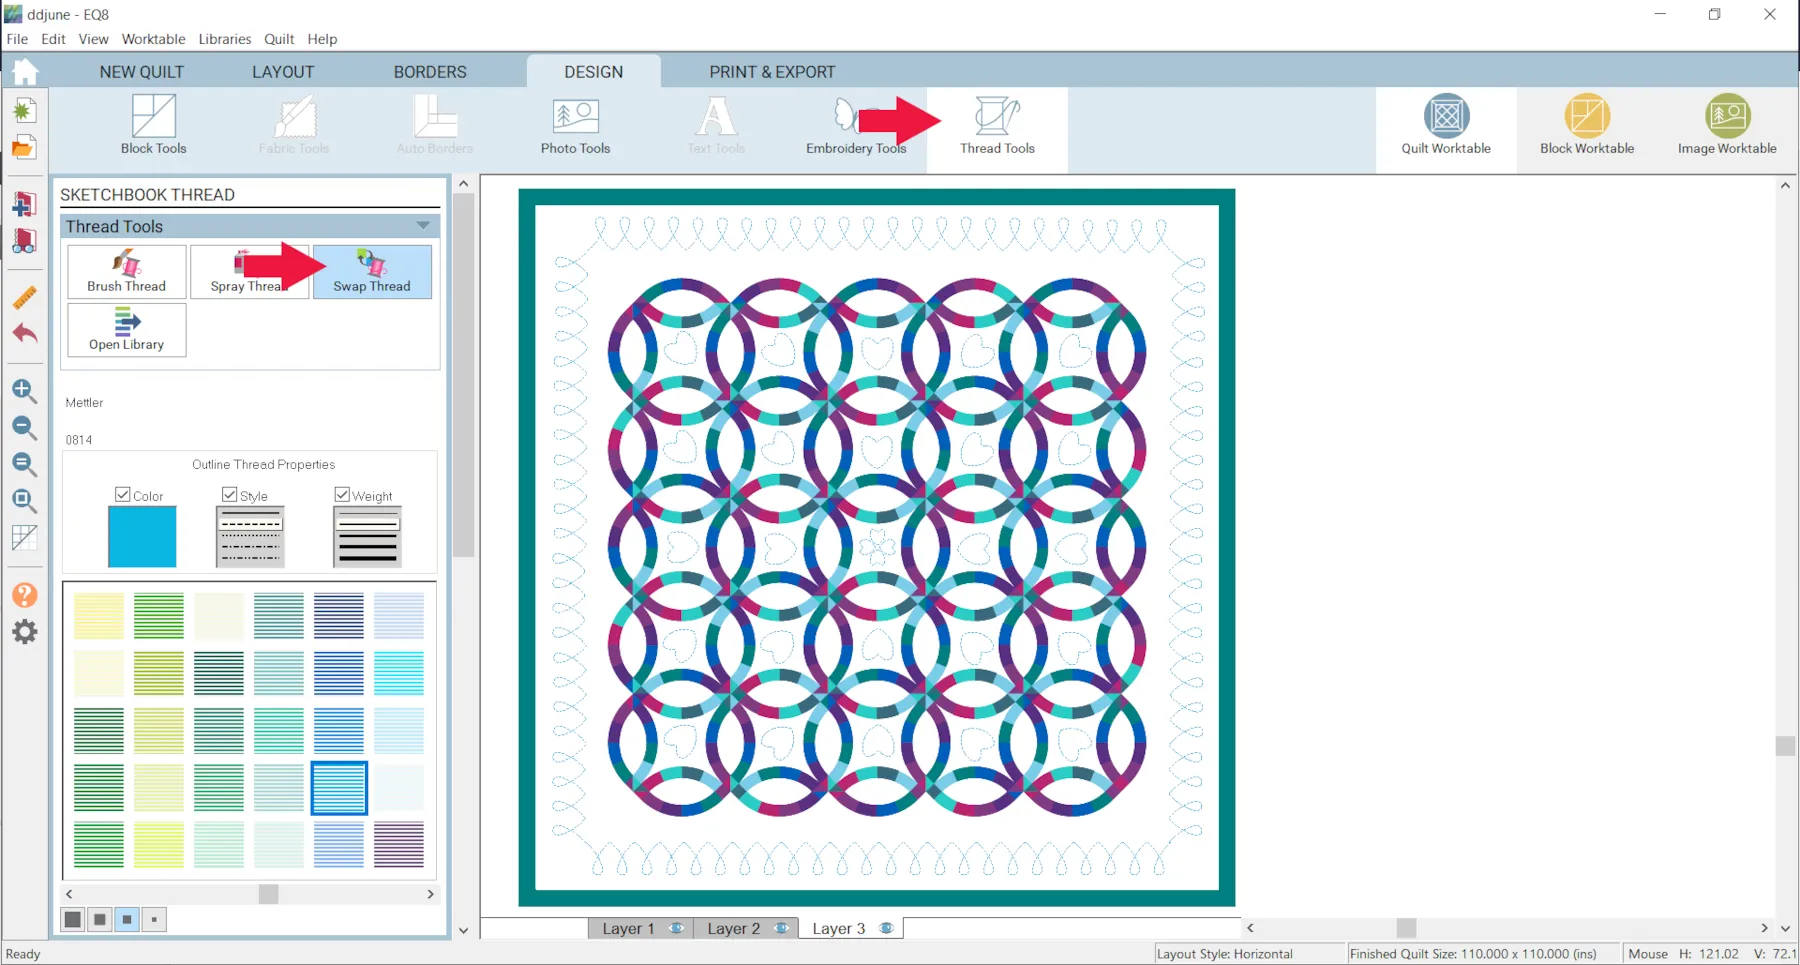
- Click the Thread Tools
- Click Swap Thread and recolor the stencils. (Or use Spray Thread or Brush Thread.)

- Add to Project Sketchbook
If you want to post images of your blocks, here is how to export the images.
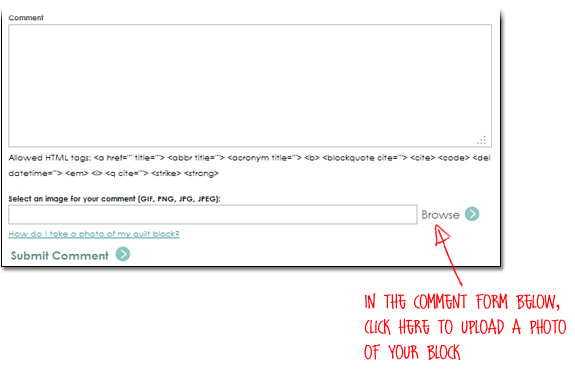
To post your image click to comment on this post. Fill in your info and then click Browse.Go to: Documents\My EQ8\ImagesI can’t wait to see what you’ve done! I hope you enjoyed the lesson!If you have questions about the lesson feel free to post them below. If you have questions about something else EQ related, please contact techsupport@electricquilt.com. If you have suggestions for new Design & Discover lessons feel free to comment below or email Heidi@electricquilt.com


