It’s time for Block 2 in the BlockBase+ Sew Along! I loved seeing everyone’s sewn blocks in the link up on Friday. If you haven’t added your first block to the link up yet, you can do so at any time in the Block 1 Link Up post.
Don’t have the BlockBase+ software yet? It’s not too late to join in! Find the BlockBase+ software here >
In this post, we’ll practice navigating through the categories and subcategories again to find the block. Then we’ll take a look at the Display settings and go through the steps of printing the templates for our next block. Let’s get started!
- Double-click the BlockBase+ icon to open the software.

- If you see the Getting Started window, click the Close button. (If you’d like to turn off the tour, check the box next to “Don’t show again” and then click Close.)

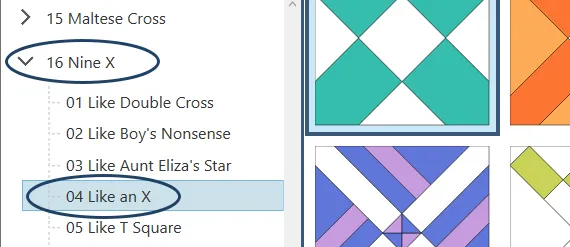
- In the Navigation Panel on the left, click on 16 Nine X, then click on 04 Like an X.
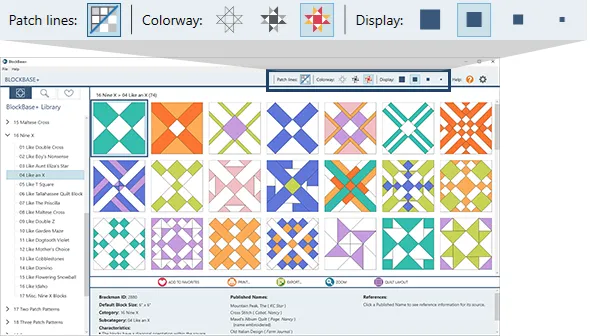
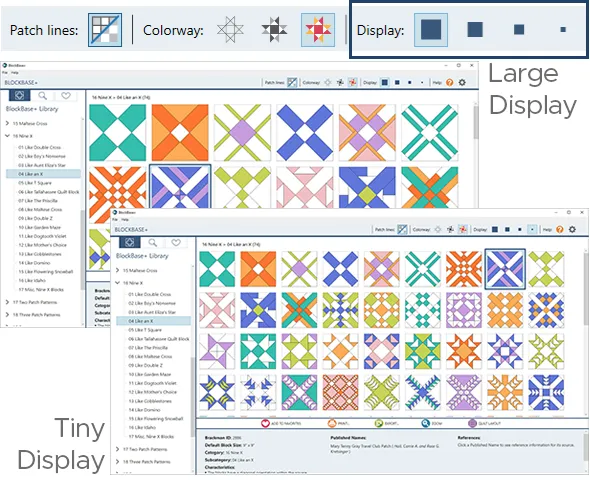
- Let’s take a moment to play with some of the Display settings available. The Display toolbar is above the Block Viewer.
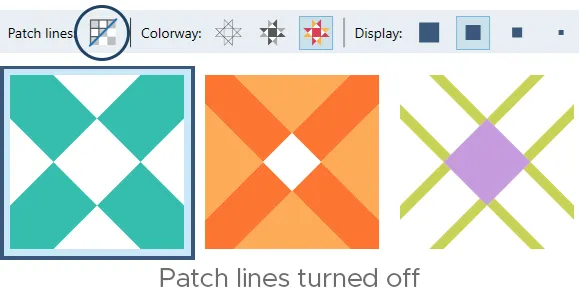
- Click on the Patch lines button to view the blocks without the lines around the patches. To turn the patch lines back on, click the button again.
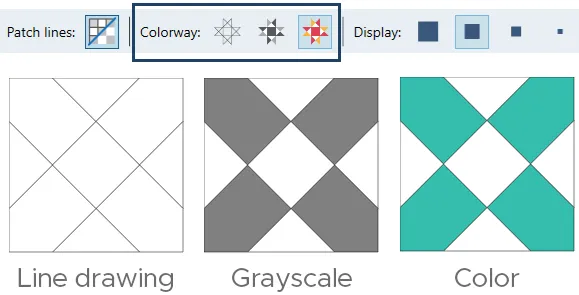
- The Colorway buttons allow you to view the blocks as Line Drawings, Grayscale, or in Color. Click on each Colorway button to see the different displays.
- The Display buttons change how large or small the blocks display in the viewer. The number of blocks shown in the viewer will depend upon the size of your screen too.
- Now that we’ve played with the display settings, let’s get to our block! This time we’ll be sewing block 2898, which looks like this:
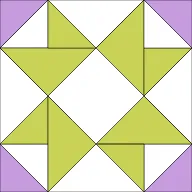
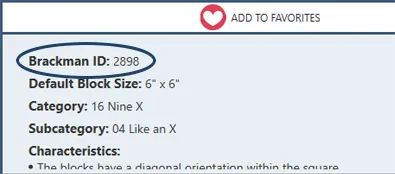
- Click on block 2898 to select it. Remember that you can look for the Brackman ID number in the Notecard Panel. And if you don’t see this block in the viewer, use the vertical scrollbar to the right of blocks to see more blocks.
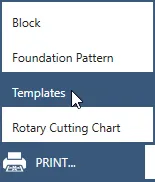
- In the Block toolbar, click the Print button. Then choose Templates from the menu.
- In the Print Templates window, you can select the settings for your printout. I’ll be using the Default block size. If you want to change the size, click Custom block size and type a new size. (If you’re getting really creative and don’t want to make a square block, click the Lock button to the right of the size boxes to unlock them and type a different size in each box.)
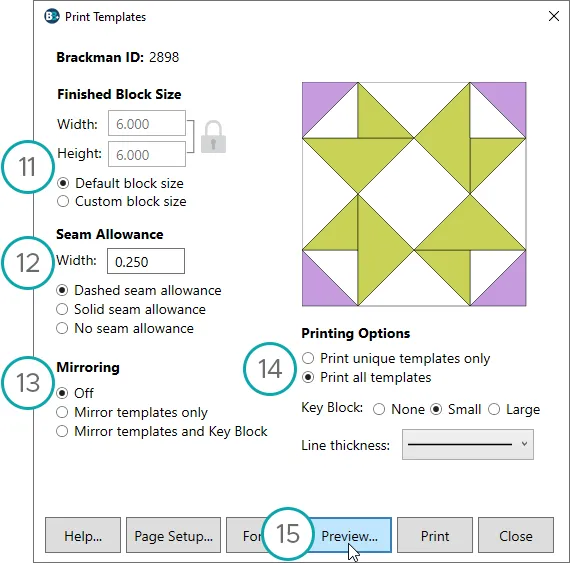
Note: The Finished Block Size is the size of the block after all the seams have been sewn (including the seams on all four sides of the block). BB+ adds the seam allowance for you in the printout. - The Seam Allowance is set to the standard quarter-inch (0.25″) that most quilters use. You can type in a new width if you’d like to change the seam allowance. You also have the option to set the seam allowance to a dashed line or a solid line. Or you can turn off the seam allowance altogether.
- Mirroring is OFF by default. For this particular block, all of the patches are symmetrical, so mirroring really isn’t a factor. If you were making a block with applique pieces and planned to trace the templates onto fusible web, you would want to mirror the templates.
- Under Printing Options, select Print all templates.
- Click the Preview button.
- This is the Print Preview screen. Because we selected Print all templates in step 14, you’ll see a separate template for each patch in the block. I’m using the default 6″ size and my templates take up four pages. If you changed your block size to something bigger, you may see LOTS of pages in the preview.
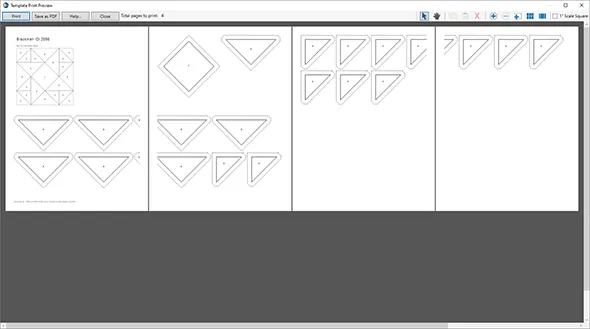
- Typically, you wouldn’t want to print (or cut out!) a different template for all those matching patches. Let’s make a change in the Print Templates window to save some paper. Click the Close button to close the Print Preview.
- In the Print Templates window, under Printing Options, select Print unique templates only.
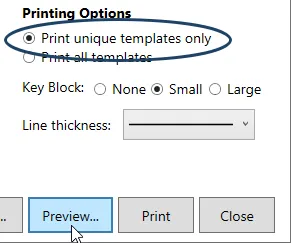
- Click Preview.
- You’ll now see fewer pages in the Print Preview screen. And we can move templates to save even more paper. First, check the box next to 1″ Scale Square in the toolbar. This adds a 1″ square to your printout. After printing, measure this square to ensure that your printer is outputting the printouts at the correct size.
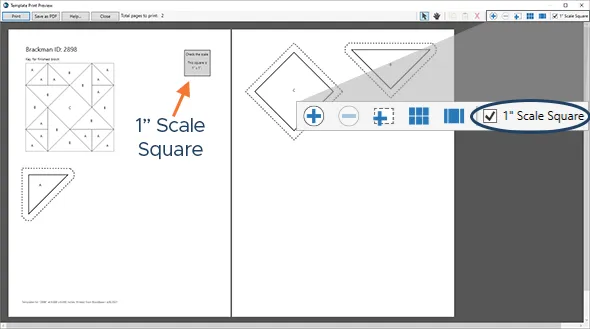
- You can move, rotate, and delete templates in the Print Preview. Click on a a patch and you’ll see the lines turn red and a handle in the middle of the patch. Drag the patch to re-position on the page or move to another page.
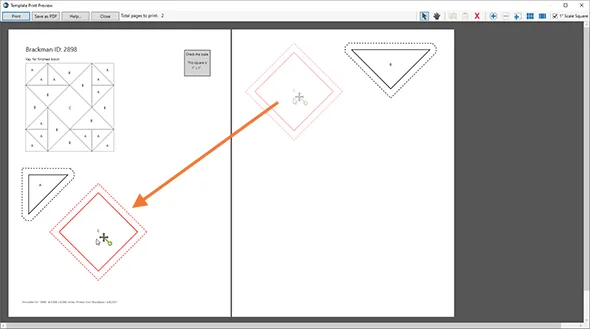
- You can also rotate a patch by clicking and dragging the green circle on the handle. Watching the video for this lesson at the end of this post will help make the rotation process more clear. There’s also a great video on the support site about the Interactive Print Preview Options.
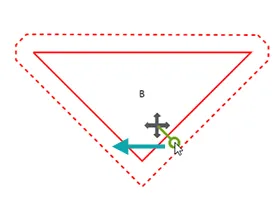
- Take a few minutes to play with rearranging and rotating the templates on the pages. If you want to start over at any time (and place the patches back in their default locations) close the Print Preview, then click Preview again in the Print Templates window.
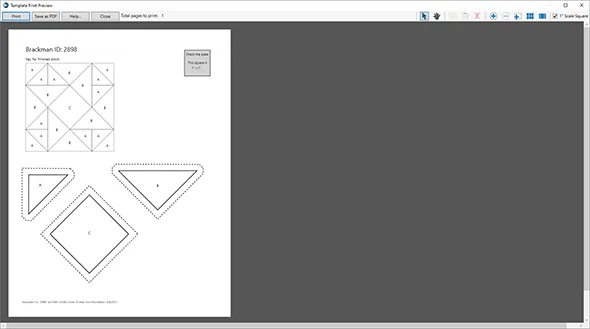
- When you have the templates arranged the way you’d like, you can click Print to print the templates for the block. If you don’t want to print right now, click the Close button.
- After printing or closing, click the Close button in the Print Templates window.

- Remember that we’re adding all of our Sew Along blocks to the Favorites view. With block 2898 still selected in the block viewer, click Add to Favorites in the Block toolbar.

- At the top of the Navigation panel, click the Favorites button.
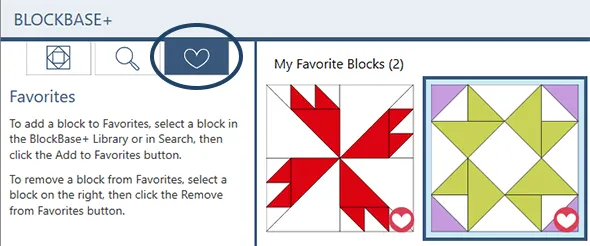
- Now you’ll see our first two Sew Along blocks in the Favorites view. If you want to come back later and print a different type of printout for this block, you can quickly find it here in the Favorites.
- If you’re done working in BlockBase+, you can close the program by clicking the X at the top or clicking File > Quit BlockBase+.
Notes Before You Start Sewing:
- You can make the block any size you like.
- You can be creative in your coloring of the block (i.e. make the star points light and the background dark, or make each corner triangle a different color, etc.). Just keep the seams/patches in the same orientation as the BB+ block.
- I showed you how to print the templates for the block. But I realize that most quilters would prefer to use the rotary cutting chart for these easy-to-cut patches. The purpose of this lesson was to show you how to use the Templates printout options. If you’d prefer to piece the block using a different technique (rotary cutting chart or foundations), feel free to print those patterns instead. For help with other types of printouts, visit our support site.
- There will be a new post here on the blog on Friday, April 23 where you can post a photo of your sewn block.
Comments
Let’s get to know each other in the comments! I loved reading everyone’s introduction comments on Block 1. I hope you all enjoy getting to know each other this way too! For this post, let’s all leave a comment about our favorite quilting notion or tool. I’ll start–
Is it a bit biased to say that EQ8 is my favorite quilting tool? ![]() If we’re talking about my favorite non-software quilting tool, I would say that my little wooden seam roller is my fav. It’s great for paper piecing!
If we’re talking about my favorite non-software quilting tool, I would say that my little wooden seam roller is my fav. It’s great for paper piecing!
Block 2 Video
The steps in the video are the same as the steps listed above. So you can follow the written steps above, or watch the video lesson for Block 2.




04-12-2021
8:09 am
Oh Boy ready to go
04-12-2021
8:35 am
Oy that’s hard. I’m sure everyone uses Jack the Ripper a lot, even though he wouldn’t be the favorite. I’m leaning towards the stiletto – so handy to keep those seams and points in order.
04-12-2021
9:58 am
My three favorite tools/notions are—Acorn seam align glue, my 36” x 4” ruler, and my Clover fabric folding pen. Also, my GO cutter (and the way too many dies I own) get top ranking.
04-12-2021
10:01 am
Question: Can we import the BlockBase+ blocks into EQ8 and test color combinations within the software?
04-12-2021
11:45 am
I’ve linked the two programs and it went really smoothly. Playing in EQ8 with these blocks is so much fun!
04-12-2021
12:06 pm
Yes, definitely! If your EQ8 software is up-to-date, BB+ should link automatically to your EQ8 Block Library. You can find more info on the support site: https://support.electricquilt.com/articles/using-blockbase-with-eq-software/
04-12-2021
12:53 pm
to Joy Baggett, please explain … Acorn seam align glue and Clover fabric folding pen. These are new to me. Thanks Lynda
04-12-2021
9:10 pm
Yes, you can link BB+ to your EQ8. I’ve done it. It’s fabulous.
04-12-2021
11:24 am
Hi Joy, from another Joy. Yes, from their site: “The BlockBase+ blocks can be linked to the EQ8 Block Library so that you can use the blocks in EQ8 to design quilts.” Look for their article “Linking BlockBase+ to EQ8″ in Electric Quilt’s support . electricquilt . com
Happy Quilting!
Joy
04-12-2021
11:32 am
I love all the tools. Right now, I would say my favorites are my Quilters Select rulers. The lines are so thin and clear, and they don’t slip.
04-12-2021
11:48 am
QSI rulers and Deb Heatherly strippy stars rulers
04-12-2021
11:48 am
Quilt in a Day Flying geese rulers are my favorite ruler. Wonder clips are terrific when working on a project with many thicknesses. Favorite marking pen is the Frixion by Pilot.
04-12-2021
12:16 pm
I really love my non-slick ruler and their rotary cutter (QuilterSelect)
04-12-2021
12:17 pm
I think my favorite would be my stiletto. It really helps keeping those seams straight – especially at the ends!
04-12-2021
12:59 pm
I am such a gadget & tool junkie, but I am a complete sucker for good scissors… even if they are specialized… and good hand sewing needles.
04-12-2021
1:21 pm
This is a hard question. My copout response would bew that my favorite tool is the one I am currently using. If I had tp choose I guess I would say my wool pressing mat. I hate to press, but know it is a necessary evil if I want to be precise in my piecing. My wool mat makes pressing much easier.
04-12-2021
9:31 pm
I totally agree – the wool pressing mats are fabulous for getting a nice press without getting ‘dents’ in the fabric from seam allowances. I love mine, and have a smaller one with an olliso small iron set up close to my sewing machine for when I’m doing a lot of patchwork.
04-12-2021
1:30 pm
My favorite tool is the rotary cutter – without that I doubt I would have taken up quilting.
04-12-2021
1:55 pm
It is hard to name a favorite. But as my hand joints are becoming more arthritic, the bent end twizzers that came with my serger is my most used tool as it allows me to pick up matched block pieces and move them together under the needle and foot without disturbing the edge match of the fabric + using the tweezers as a stiletto to hold the edges at the beginning and end of the stitching. The next most used is the product Flatter, a spray fabric relaxer that works like magic for getting wrinkles out of fabric and truly flattening out seams and blocks.
04-12-2021
2:11 pm
To Lynda: The Acorn seam align glue makes it easy to line up seams (hence the name). You put a drop of glue within the seam allowance where you want to match up seams, align the two pieces, and iron for about 20 seconds. Then you can check to see if the alignment is perfect before you sew. If not, the two pieces will pull apart and you can repeat the process. The “glue” washes out. The glue keeps me in a happy place, because I don’t have to rip out mismatched seams.
The Clover fabric folding pen was introduced to me by my favorite quilt shop owner in Las Cruces. You mix water and the “magic liquid” together in the pen, then run the pen down each seam in a block and iron dry. The seams are really really flat. I use it with my wool pressing mat.
04-12-2021
2:15 pm
Does Block base work on EQ7.i don’t have the EQ8!
04-12-2021
2:29 pm
BlockBase+ is a stand-alone software, so you don’t have to have any other software to use it to print patterns. This sew along only uses the stand-alone BB+ software.
BlockBase+ will not link to EQ7. If you’d like to use the BB+ blocks in a quilt design, you’ll need EQ8.
04-12-2021
3:33 pm
I love all these ideas about ‘new to me notions’, especially the Acorn seam align glue. My favorite rulers are my Quilters Select rulers. I agree with Jean. They are the ONLY ONES that truly don’t slip. And I love my brass seam ripper. I don’t know that it works any better than any other seam ripper, but it gives me a sense of ripping grandeur.
04-12-2021
3:51 pm
This may sound a bit crazy, but right now my favorite quilting tool is Terial Magic.
It makes my fabric soooo stiff it could probably stand upright! It helps greatly control fraying of edges and keeps bias edges from stretching so easily and makes handling the fabric like handling a stiff paper. My cuts and piecing are much more accurate! It also makes it very easy to “finger press” as you sew; it’s like folding paper.
04-12-2021
4:03 pm
Jeanne, I just ordered this product for the first time. I’m glad to hear you have had success with it. I am hoping to use it to stabilize some rayon batiks I bought in Bali a few years ago. The colours were wonderful and somehow I convinced myself they were cottons, and the sales staff were happy to support that idea. Does the stabilizer come out in the wash?
04-12-2021
3:58 pm
My favourite tool is my old dining-room-table-on-stilts cutting and pressing table. Lots of room for laying out fabrics for pressing then just put my large cutting mat on top for cutting. The extra height means no more sore back. It works well for layering a good sized quilt as well.
04-12-2021
6:04 pm
Gosh, that sounds wonderful; wish my sewing space had room for such a practical and useful accessory!
04-12-2021
4:10 pm
It would be nice if Blockbase had an option to print the Key Block in color or Black and White if that is how you had selected to display your blocks.
04-13-2021
9:31 am
For rotary cutting and foundations, you can choose to print the key block in grayscale or color. Templates does not have this option. I believe it’s because the key block is larger for templates so you can see all the patch labels easier. Adding a second key block with the color/grayscale version would take up space that could be used for templates. But I’ll send a request for that option to the development team!
If you’d like to print a color or grayscale picture of the block for you reference, you could use the “Block” option from the Print menu: https://support.electricquilt.com/articles/blockbase-print-block/
04-12-2021
5:08 pm
I would have to say my mini iron is my fav item to use while I build a block. I have a mini press station-setup right beside me so I can do a Hard press as I sew along,
04-12-2021
6:24 pm
There are a few tools that I always have right by my side whether I am working on an applique project or a pieced quilt. If I had to pick one, it would be my Karen Kay Buckley scissors.
04-12-2021
6:48 pm
I love my purple thang! It is a miracle worker in so many quilting situations!! I’m sorry to say I’m behind on sewing my blocks due to a husband health issue! But, I will definitely work at catching up. I just love viewing everyone’s creativity in action!
04-12-2021
7:22 pm
I love my ballpoint stilletto and my little nippers for use right at my sewing machine. For trimming half square triangles and some others, I love the Block Lok rulers. For rotary cutting I use the Martelli cutter as it is so easy on my arthritis and can be used sitting down.
04-12-2021
7:58 pm
Jenny, Block one printed with information at the bottom, like program name and date printed. When I first printed block two, none of that printed for either the templates or rotary cutting instructions. Then I got it to print with the rotary cutting. What is the difference? Perhaps printing from print versus print while in preview? I am not sure what I did.
04-13-2021
9:33 am
Hmmm…. not sure about that. Did you change the margins on your printer settings? If the margins are set wider than the default, it can sometimes cut off the footer information at the bottom of the printout.
04-12-2021
10:26 pm
Love this blog. Having the best time learning my BB+ software by making the blocks. I cut and finished block #2. Would share pic but don’t know how. Will tell my secret of how fast I completed block 2. I used AccuQuilt 6” cube dies to cut the pieces.
04-13-2021
9:35 am
The Block 2 Link Up post where you can share a photo of your block will be posted on Friday, April 23.
04-13-2021
2:15 am
Believe it or not my favorite sewing notion isn’t even for sewing! It’s a soft bristled pet brush! We all know what it’s like to have threads and fabric “dust” everywhere while we sew. My pet brush cleans everything from my cutting mat to my ironing spaces and doesn’t leave anything behind. It also doesn’t damage either one. It’s more economical and environmentally friendly than a lint brush since you only need to buy one and don’t have to replace the sticky paper. You should see the looks I get when I take to a class! Until they find out “why” I have it.
04-13-2021
3:22 pm
Totally “dig” it, am going to get me one.
04-13-2021
7:09 am
my current favourite tool is the Add a Quarter ruler for paper piecing
04-13-2021
9:06 am
Bloc loc rulers for flying geese, triangle in a square, my Juki!
04-13-2021
11:59 am
So many favorite tools. Today my favorite tool is the “Purple Thing”. It helps me turn curves smooth on one end and the other end I use for quarter inch measuring.
04-13-2021
4:36 pm
I guess my most used notions are my 9 1/2″ ruler and rotary cutter! Then I guess I always have to have a seam ripper close (even though I don’t want to have to use it). But I wouldn’t quilt as much or as often without EQ8. And Blockbase is coming in as a favourite too – this sew along is a brilliant idea!! What a great way to learn as we create blocks!
04-14-2021
10:07 am
I use my EQ8 to resize quilt patterns ALL THE TIME. I have 2 big quilts I am piecing now that I will have to post when they are assembled and quilted. I use the violet craft seam roller, My add a quarter plus ruler and my bloc loc rulers. I also like the clearly perfect slotted trimmer.
04-15-2021
3:42 am
Where are the rotary cutting instructions? I don’t want to use templates for these easy blocks.
04-15-2021
8:24 am
You can print the rotary cutting chart by clicking Print > Rotary Cutting Chart. Here’s more info: https://support.electricquilt.com/articles/blockbase-print-rotary-cutting/
04-16-2021
4:51 pm
I think my laptop computer is my favorite quilting “tool” — it has made so much possible: finding fabric that may be an older design, ideas for quilts and quilting, learning through tutorials and blogs, connecting with quilters (especially during the last year!, knowing what fabric is coming out, getting inspired, reading the stories of quilters, printing out downloaded patterns, paper piecing papers, templates, and locating notions I never knew existed (Acorn seam align glue). And what would EQ8 and Block Base+ be without our companion computers?
04-17-2021
11:12 am
I enjoy using Karen Kay Buckley’s templates for applique. The template plastic is “ironable” and you can get just the plastic sheets to cut your own templates.
04-17-2021
5:02 pm
That’s very cool. I do English Paper Piecing and with templates you could do the fabric unique cutting templates with a 3/8″ seam easily. Then turn around and print all templates with no seam so you can have your paper piecing papers. Sweet!
04-20-2021
6:52 pm
It’s hard to pick just one, but I think my favorite “tool” is the Ultimate Fabric Mister by Riley Blake Designs. It puts out a very fine mist evenly & without drips like some spray bottles I’ve used.
04-21-2021
1:23 am
I love my Clover curved blade scissors for cutting curves and circles. I just flip them right or left to match the direction of the curve. I also love printing templates on printable freezer paper. Looking forward to the next block!
04-22-2021
8:44 pm
This time I used the foundation piecing info to put my block together and it worked well for the most part. I still have issues with the direction of folds. I was in a quilt-a-long a couple years ago where the directions were marked on the downloadable instruction sheets, and that helped me immensely. Following the foundation diagram, I found I couldn’t tweak the direction later, because a few of the seams were sewn down. I obviously should have been folding in a different direction, so things did not come out as smoothly as I’d hoped. Is there any information on this site that can help with explaining directional folding fundamentals?
04-22-2021
8:48 pm
It just occurred to me that maybe I should be folding in the direction of the higher numeral? As if I WAS actually paper piecing while using the foundation layout as a guide.
04-23-2021
10:41 am
Yes, you should press towards the higher number. We don’t have any sewing instructions on our site (our support articles focus on using the software). If you google “how to foundation piece” you’ll find lots of great lessons and videos on the subject.
04-23-2021
9:14 am
Couldn’t figure out how to put this one together!?
04-23-2021
10:43 am
If you’re having trouble figuring out how to piece the block together, I’d suggest looking at the foundation pattern. Even if you don’t want to piece it that way, looking at how the block is sectioned for foundations will show you which patches you should sew together first.
04-23-2021
10:44 am
Found instructions by doing a search of how to make a Magic Cross quilt block!
04-23-2021
11:52 am
Hi all, I am new to EQ8 and just got BB+ as well so all your comments are helpful to me. I have been experimenting with blocks over the past couple weeks and just stumbled upon the sew along today and in looking at the blog, it appears there will be much “Joy” in doing this project! I see too other people named Joy here so guess I am in the right group!
05-09-2021
9:21 pm
Just started with BB+ Sew Along. The software is user-friendly and l am looking forward to sewing the first two blocks. My favorite tool would be something to help with exact 1/4″ seams. You might guess the next favorite tool is a Seam ripper.