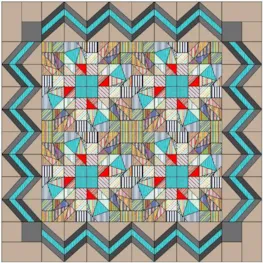
Welcome to Design and Sew 2 Lessons with Yvonne. This is lesson five (5) in this series and the last lesson of this series. We will be looking at blocks and changing the EQ8 program/project settings to edit existing block drawings. We will also continue working with unique layouts for quilts built into the program library. Color plays a significant role in how we view the quilts and we will discover how to change the color settings in the EQ8 program. Be sure to watch the video at the end of the blog first to get a feel for how the lesson will be laid out. A picture is worth a million words!
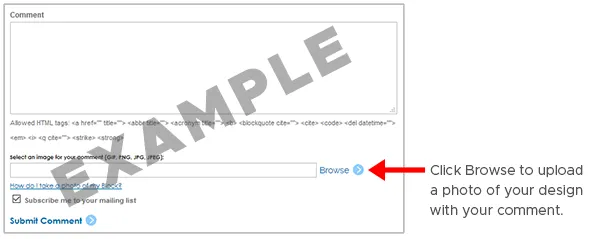
We want to see what you have created in this series of lessons so be sure to add your comments and images of your layouts to the blog in the comments box at the bottom. Refer back to lesson one to refresh your memory on how to add an image of your quilts to the comments section at the bottom of the blog page. The feedback you give me about the course helps to direct me to what you want for the next series of lessons.
NOTE: I am working with a PC and the notes I give you here along with the images are for PC. If you are using a Mac computer your commands are slightly different. When I say to use Control +Alt for the PC it is Command/Option for the Mac. Other slight differences can be found on the EQ website at the following links. My notes and the video associated with the notes are for the PC.
Exporting a Metafile of blocks is not available for Macs, only Windows: https://support.electricquilt.com/articles/export-a-metafile-of-block/
When Mac users updated to Catalina, some started getting lines across their print previews (no numbers, text, etc.), therefore, they need to change each of the 5 Font options (Header, Symbol, Footer, Data, Number) to Tahoma: https://support.electricquilt.com/articles/issues-with-eq8-printouts-on-macos-catalina/
Launch your EQ8 program  from your desktop. If you have changed the preference settings in the program since the last class, you need to go back and set the program to the default settings. This can be done by referring to lesson one (1) and following the steps there to reset the preferences.
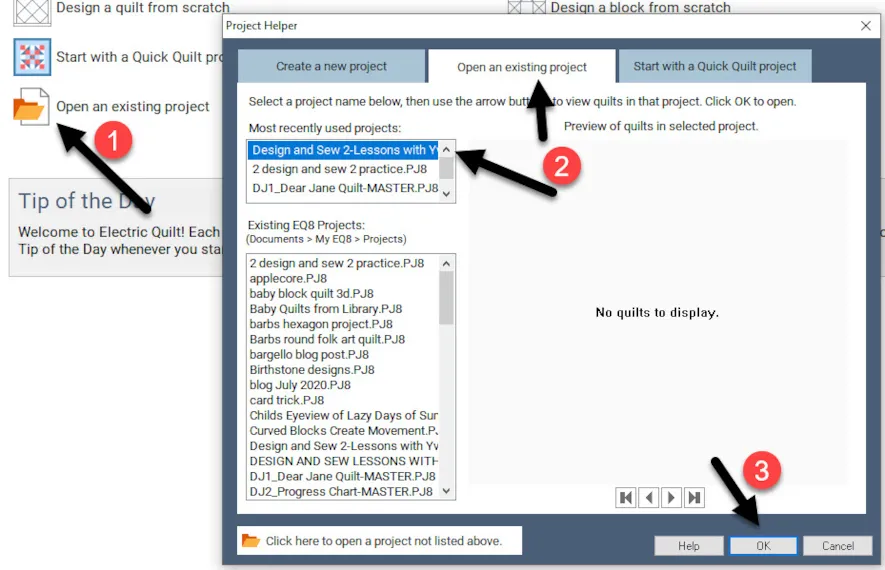
Once the program opens and you have the default preferences set on the opening page, click on the ‘open an existing project’ icon in the center of the screen and navigate to the Design and Sew 2-Lessons with Yvonne project and click on the OK at the bottom of the box to open the project we created in lesson one (1).
Make sure the project name is showing at the top of the screen.
Close the sketchbook.
EDITING BLOCKS WITH A DRAWING TOOL FROM THE EQ8 LIBRARY
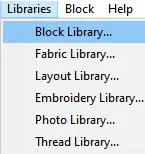
1. Click on LIBRARY>Block Library at the top of the screen.
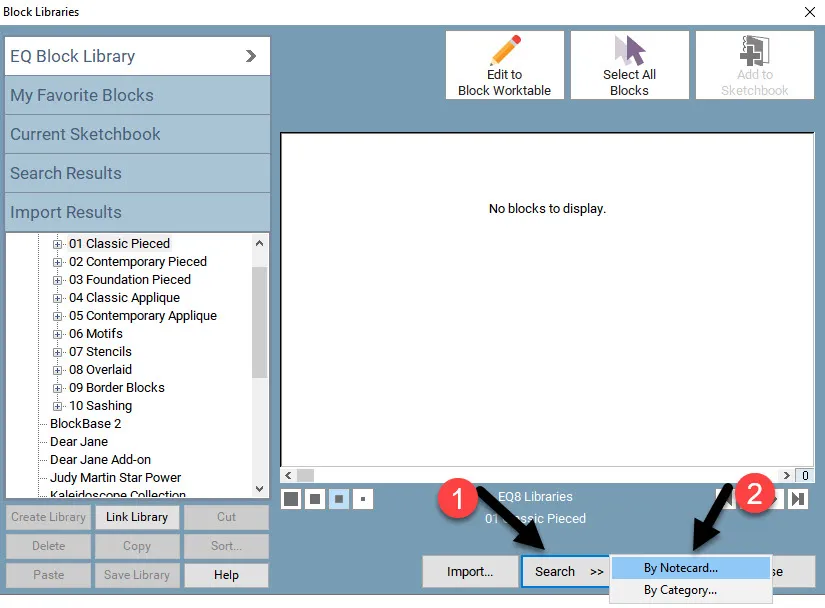
2. In the block library box, click on search>by notecard at the bottom of the box.
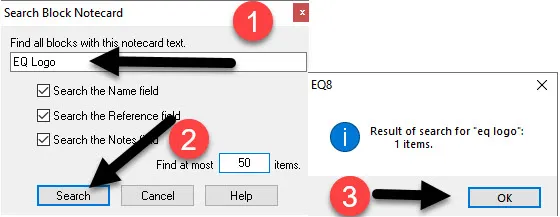
3. On the notecard type in ‘EQ Logo’. The search results will show one only. Click OK at the bottom of the box.
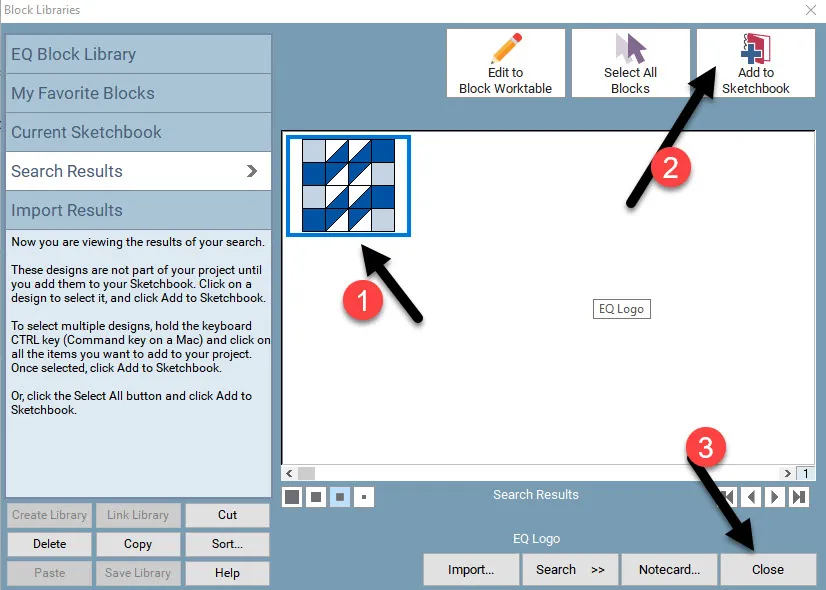
4. The block now appears in the block library box. Click on the block to select it and then click on add to sketchbook at the top of the box. Close the box when done.
5. Click on the view sketchbook icon![]() on the far left side of the screen.
on the far left side of the screen.
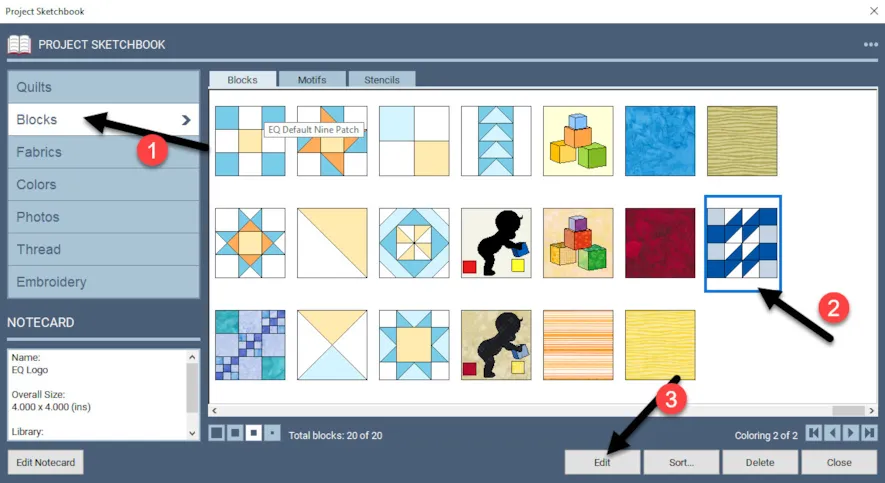
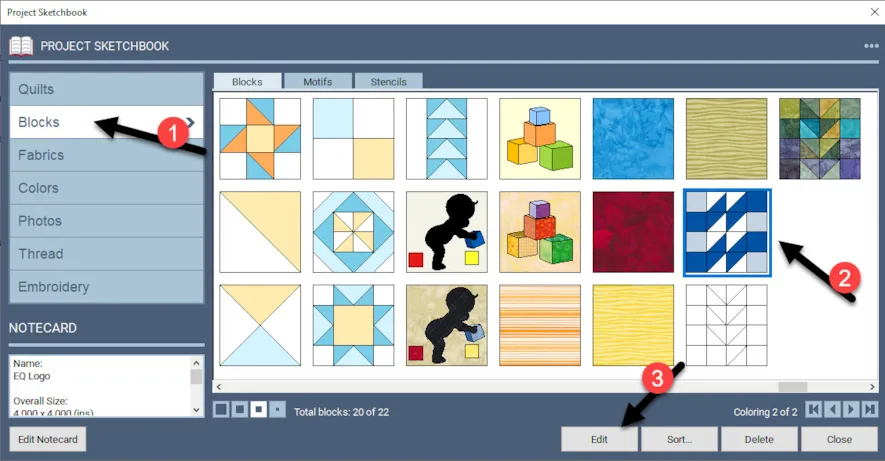
When the sketchbook opens, click on the blocks heading on the left side of the box and then scroll to the end to see the EQ Logo. Click on it to select it. It will have a blue box around it when you select it. Click on the word edit at the bottom of the box to place the design on the worktable.
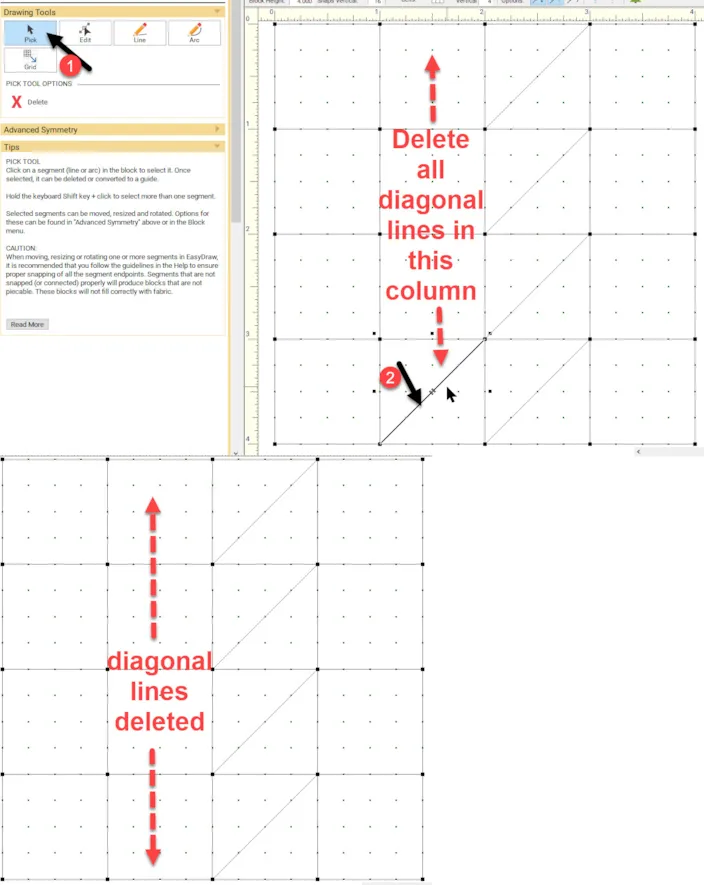
6. Click on the pick tool ![]() to select it. In the second column of the block design, click on the diagonal like to select it then click on the delete key on your keyboard to delete all the lines in the second column.
to select it. In the second column of the block design, click on the diagonal like to select it then click on the delete key on your keyboard to delete all the lines in the second column.
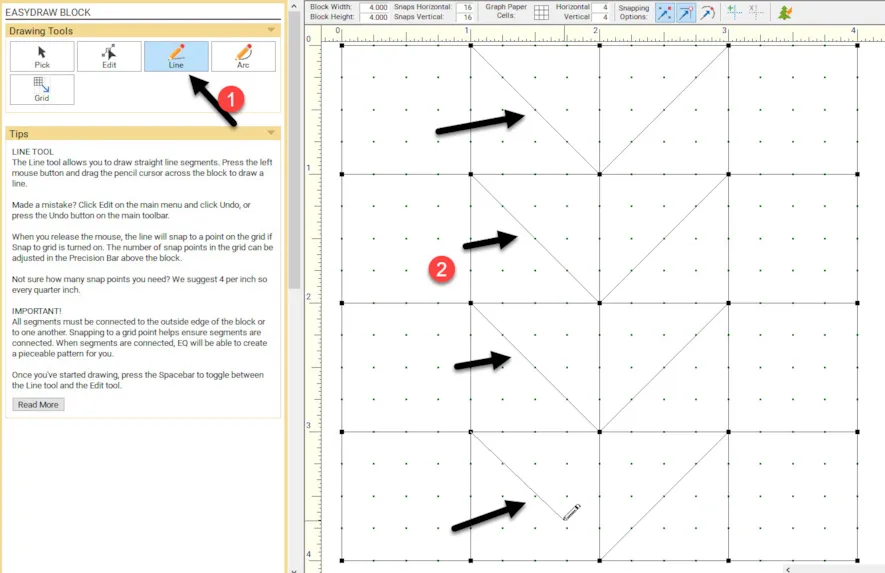
7. Click on the line drawing tool to select it. Click/hold/drag/release a line from the upper left corner of the block to the lower right corner of the blocks in the second column to edit the EQ Logo block.
Add to sketchbook ![]() when completed the drawing.
when completed the drawing.
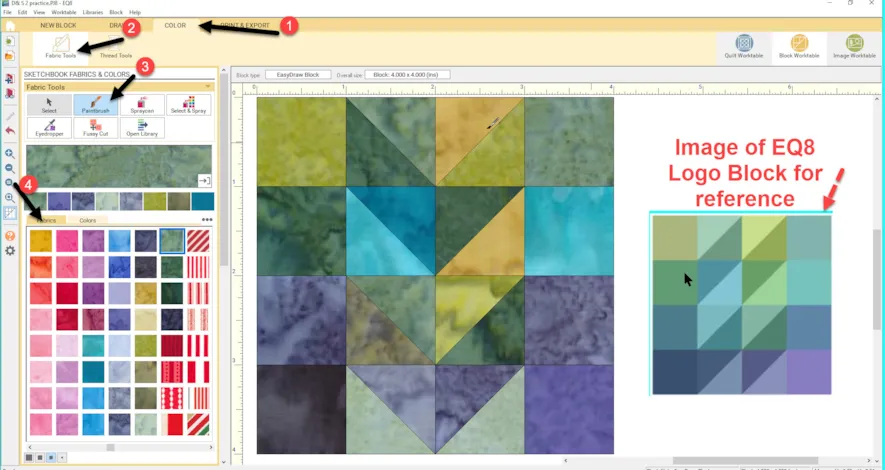
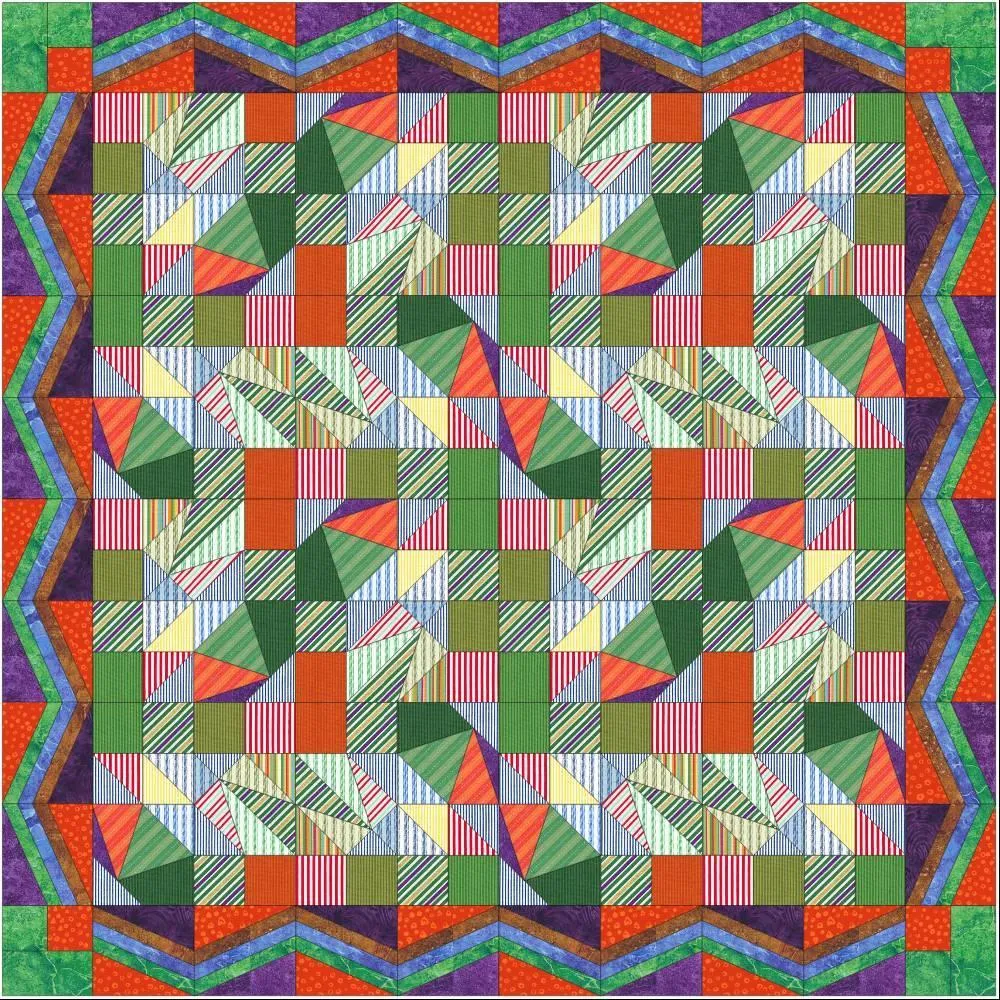
8. Click on the color tab at the top of the screen. Select the paintbrush tool ![]() and color the design in the new EQ8 Logo colors. Refer to the image of the EQ8 logo block that I have inserted for reference for you here. NOTE: Your colors do not need to be the same as the logo. You can use any print fabric in your sketchbook to color the design.
and color the design in the new EQ8 Logo colors. Refer to the image of the EQ8 logo block that I have inserted for reference for you here. NOTE: Your colors do not need to be the same as the logo. You can use any print fabric in your sketchbook to color the design.
Add to sketchbook ![]() when completed coloring.
when completed coloring.
9. Click on the quilt worktable icon ![]() at the top of the screen. The horizontal quilt is the default layout. If you have a different layout on your screen click on NEW QUILT>Horizontal to get the default layout.
at the top of the screen. The horizontal quilt is the default layout. If you have a different layout on your screen click on NEW QUILT>Horizontal to get the default layout.
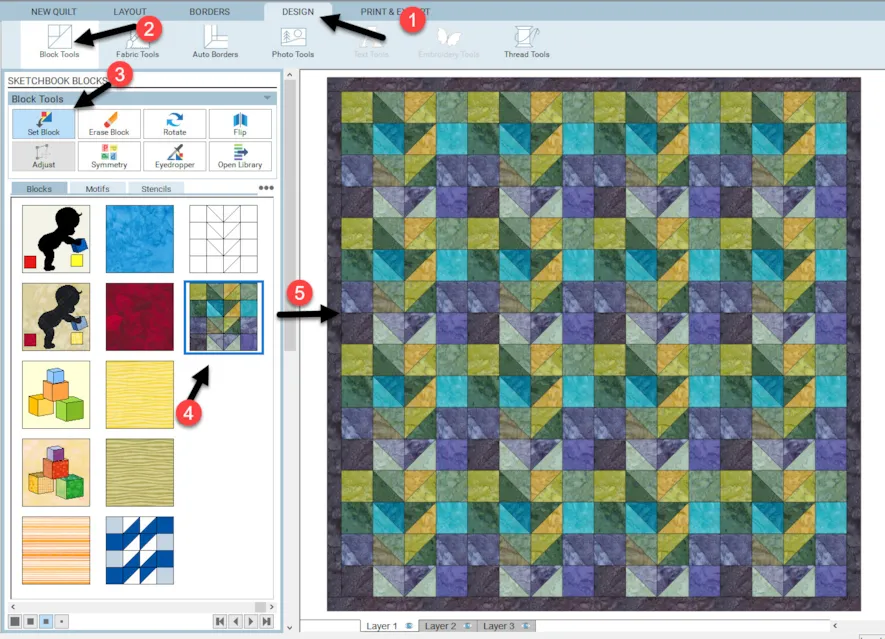
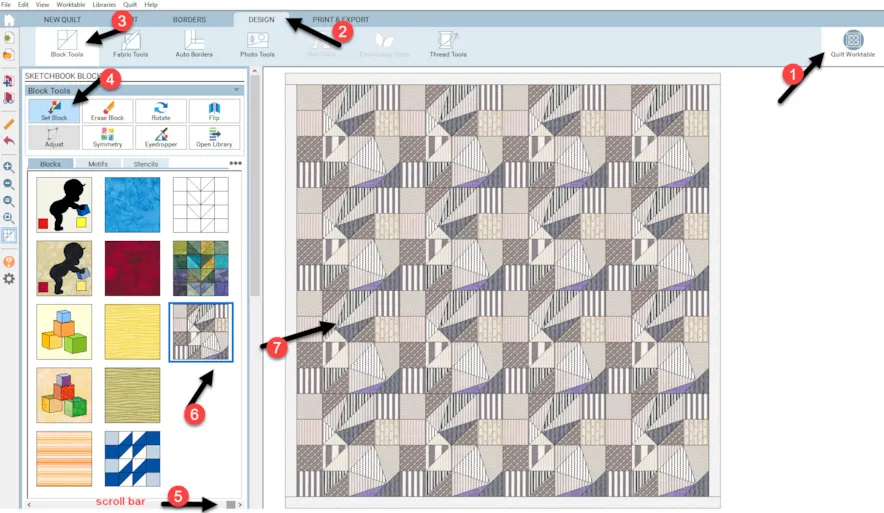
10. Click on the Design tab at the top of the screen and select the block tools. Click on the set block icon ![]() and scroll to the end of the blocks to find the new block color of the modified EQ Logo. Click on the block to select it and then move the cursor over to the worktable and while holding down the control key (CTRL) on the keyboard, click once to fill all the block areas.
and scroll to the end of the blocks to find the new block color of the modified EQ Logo. Click on the block to select it and then move the cursor over to the worktable and while holding down the control key (CTRL) on the keyboard, click once to fill all the block areas.
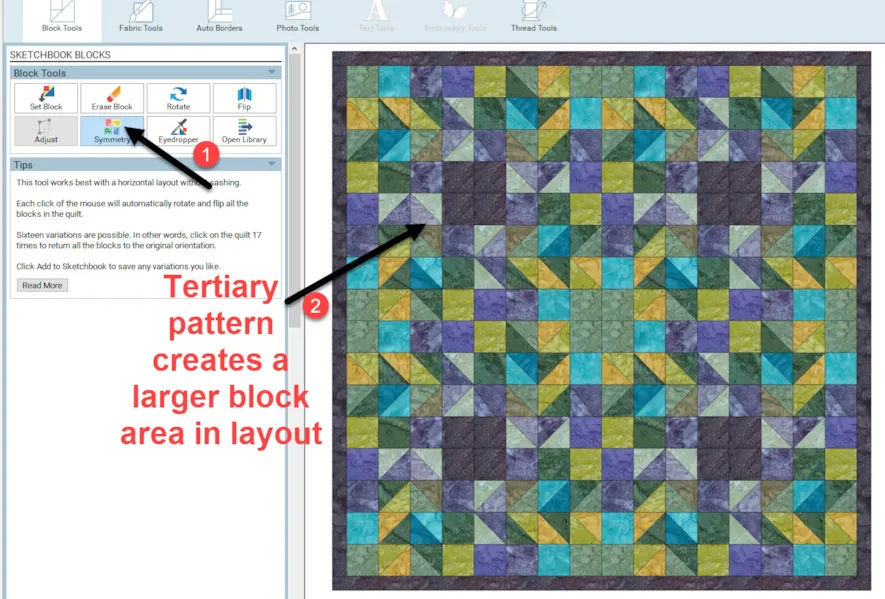
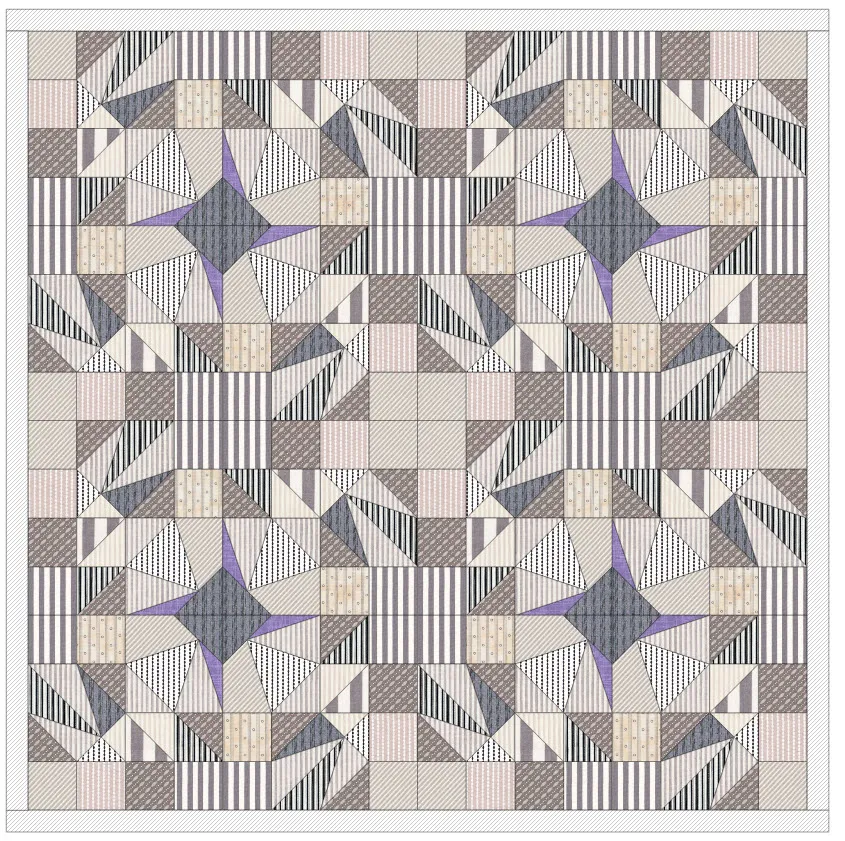
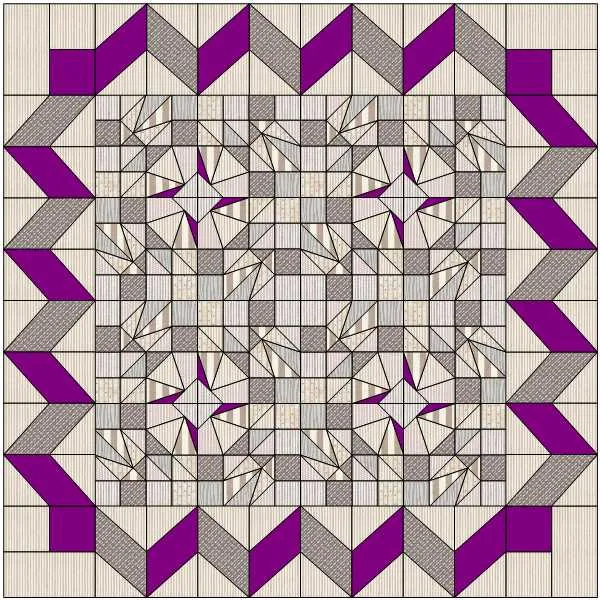
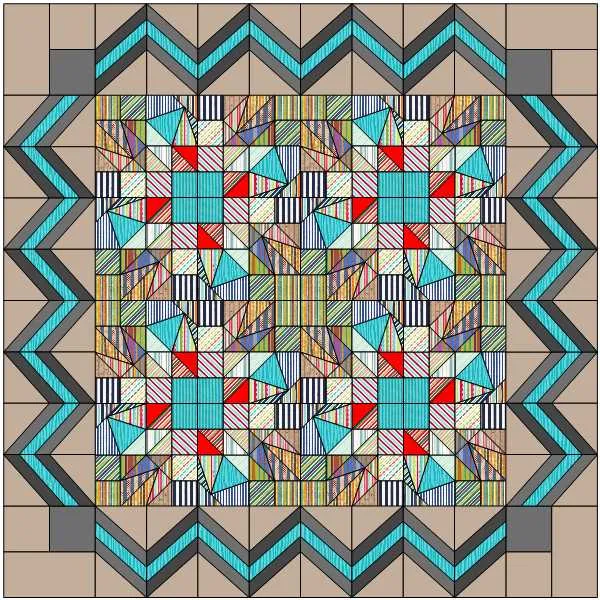
11. Click on the symmetry tool icon ![]() to select it. Move the cursor over to the worktable and click up to 16 times to see different layouts with the same block. Save the ones you like by adding them to the sketchbook. Keep one of the layouts that have a tertiary pattern of a larger block area on the worktable.
to select it. Move the cursor over to the worktable and click up to 16 times to see different layouts with the same block. Save the ones you like by adding them to the sketchbook. Keep one of the layouts that have a tertiary pattern of a larger block area on the worktable.
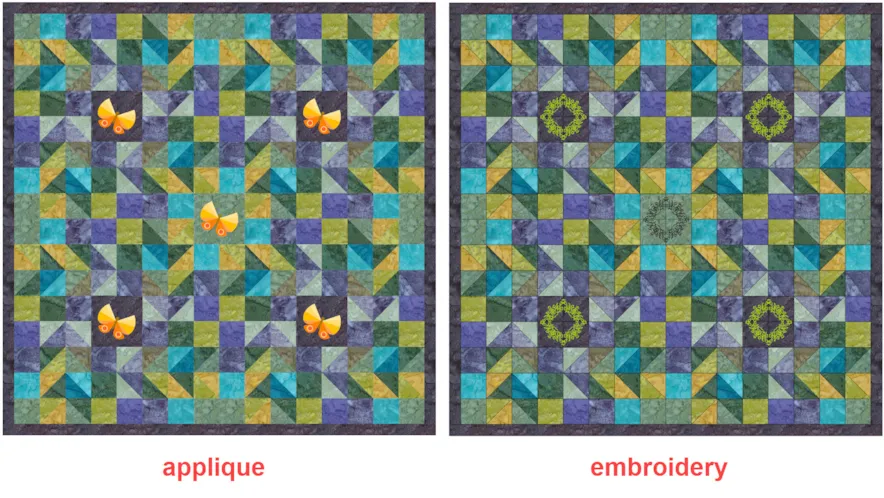
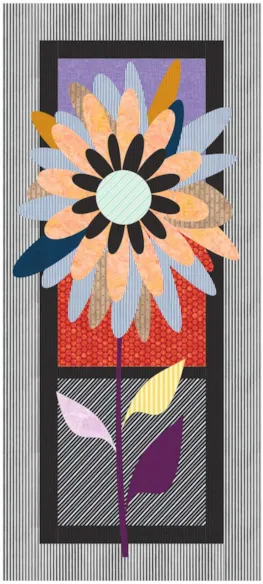
Tertiary patterns are an excellent place to add applique elements or machine embroidery patterns when quilting the quilt layout. Below is an example of embroidery and applique added to the tertiary pattern area of a quilt. Embroidery in quilting will be addressed in another Design and Sew series of classes.
NOTE: The same EQ Logo block has been used over the years with changes in the color placement to help define which version of the program it is attached to. The current EQ8 logo is the most colorful to date. Use the logo to create your palette colors and layouts for the block.
EDITING BLOCKS BY CHANGING THE SNAP FUNCTIONS IN EQ8
1. Click on the view sketchbook icon![]() on the left side of the screen. In the sketchbook under the blocks tab, scroll to the end to locate the EQ Logo block and click on it to select it. Click on ‘edit’ at the bottom of the box. It will open on the block worktable.
on the left side of the screen. In the sketchbook under the blocks tab, scroll to the end to locate the EQ Logo block and click on it to select it. Click on ‘edit’ at the bottom of the box. It will open on the block worktable.
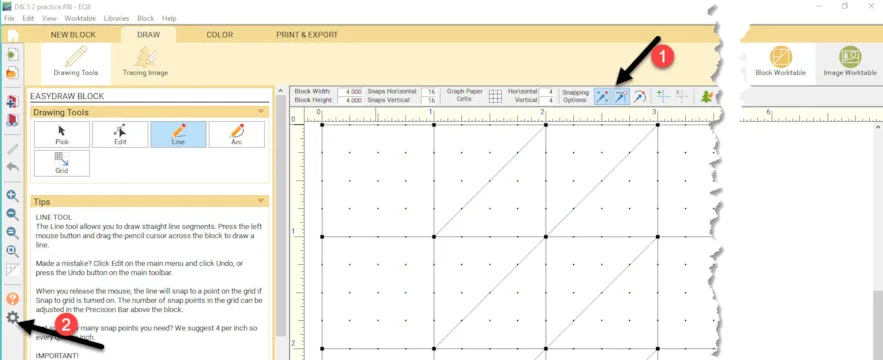
2. The snap functions are turned on at the top of the block worktable. Add one more snap function by clicking on the gear icon ![]() on the left side of the screen.
on the left side of the screen.
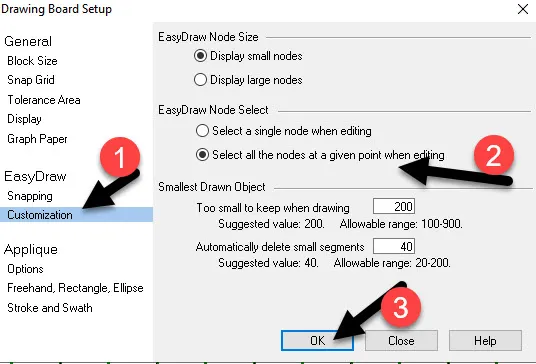
3. In the drawing board set up, under the EasyDraw heading>customization, click on the radio dial in front of ‘select all the nodes at a given point’. Click on the OK at the bottom of the box.
The new setting will make all nodes that intersect be able to be edited to move the entire intersection of lines in one click.
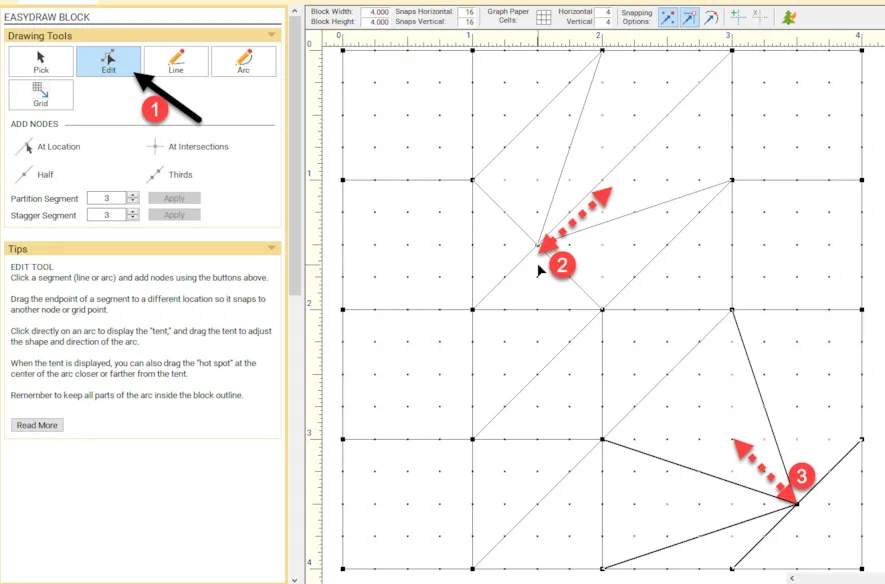
4. Click on the edit tool ![]() to select it. Move the cursor over to the worktable and select a point and click/hold/drag/ release it to create an asymmetrical block design.
to select it. Move the cursor over to the worktable and select a point and click/hold/drag/ release it to create an asymmetrical block design.
Add the new design to the sketchbook.![]()
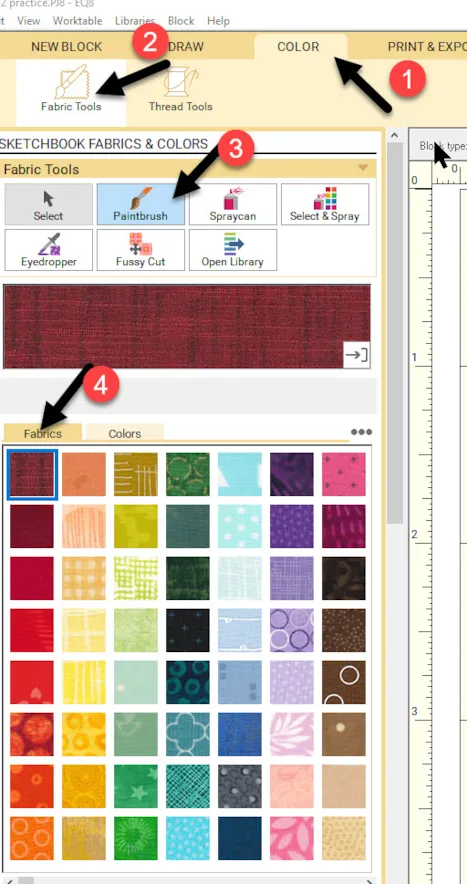
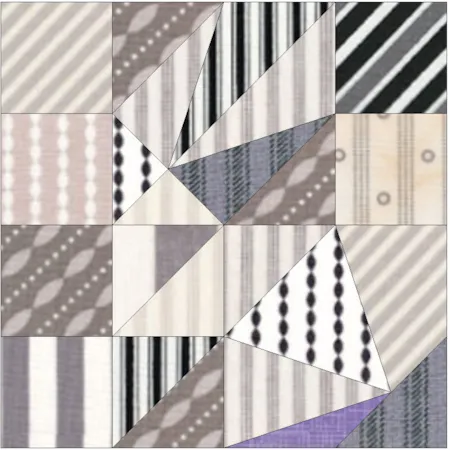
5. Click on the Color tab and color the design with fabrics of your choice using the paintbrush tool. ![]() One small pop of color on the outer edge of the block design can make a difference when using the symmetry tool in the layout.
One small pop of color on the outer edge of the block design can make a difference when using the symmetry tool in the layout.
6. Click on the quilt worktable. Click on NEW QUILT>Horizontal at the top of the screen.
7. Click on the Design tab and then select the Block Tools. Click on the set block ![]() and scroll to the end of the blocks to find the block we just added to the sketchbook. Click on the block to select it and then move the cursor over to the worktable and while holding down the control key on the keyboard, click once to add the block to fill the center area of the quilt.
and scroll to the end of the blocks to find the block we just added to the sketchbook. Click on the block to select it and then move the cursor over to the worktable and while holding down the control key on the keyboard, click once to add the block to fill the center area of the quilt.
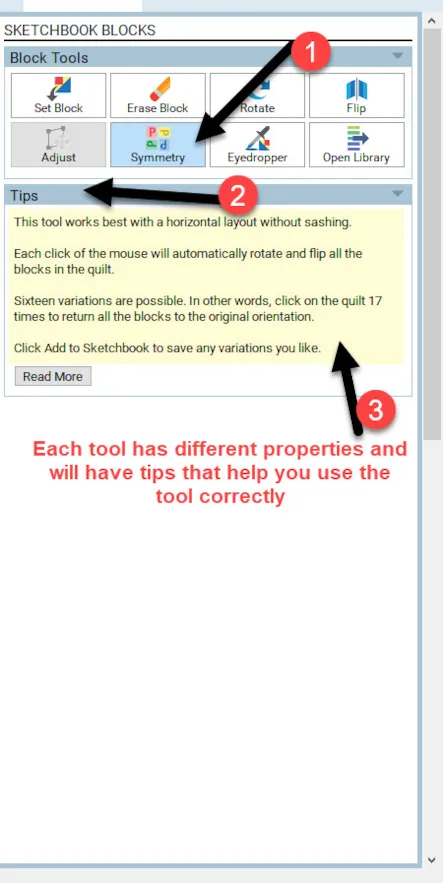
8. Click on the symmetry tool![]() in the properties box to select it. Notice how there are tips listed for each tool you select on each worktable that guides you in how to use the tools. Some tools are not available on all worktables. If you are having difficulty with a tool, look at the tips, and make sure you are trying to use it correctly.
in the properties box to select it. Notice how there are tips listed for each tool you select on each worktable that guides you in how to use the tools. Some tools are not available on all worktables. If you are having difficulty with a tool, look at the tips, and make sure you are trying to use it correctly.
9. Move the cursor over to the worktable and click up to 16 times to get a different layout for your quilt. Add any layouts that you like to the sketchbook.
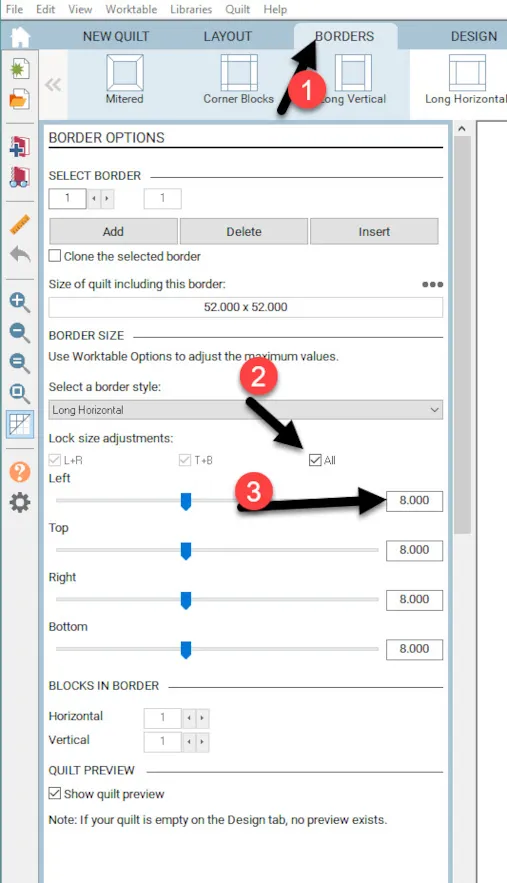
10. Click on the borders tab a the top of the screen. In the options box, set the borders to be 8 inches on all sides.
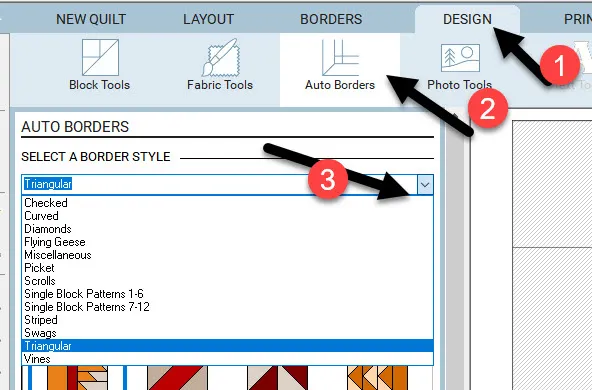
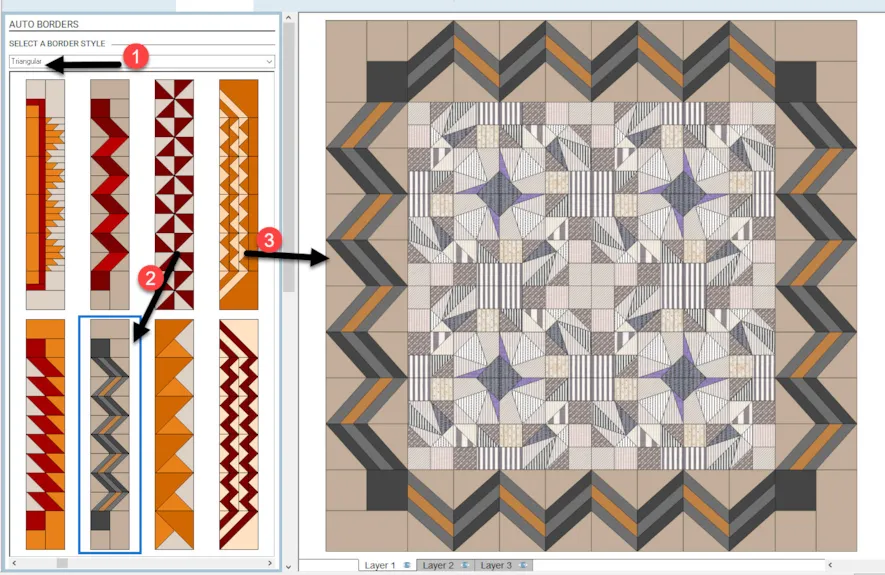
11. Click on the Design tab at the top of the screen. Select the auto borders option. This is a selection of borders all-ready-made in the EQ8 program for us to apply quickly. The colors are not correct but the border designs are easy to see. Choose the border of your choice from the drop-down menu that you feel will look best with your layout design.
12. Select an auto border design by clicking on it and then move the cursor over to the worktable and click once in the border area to apply the border design to all sides of the quilt layout.
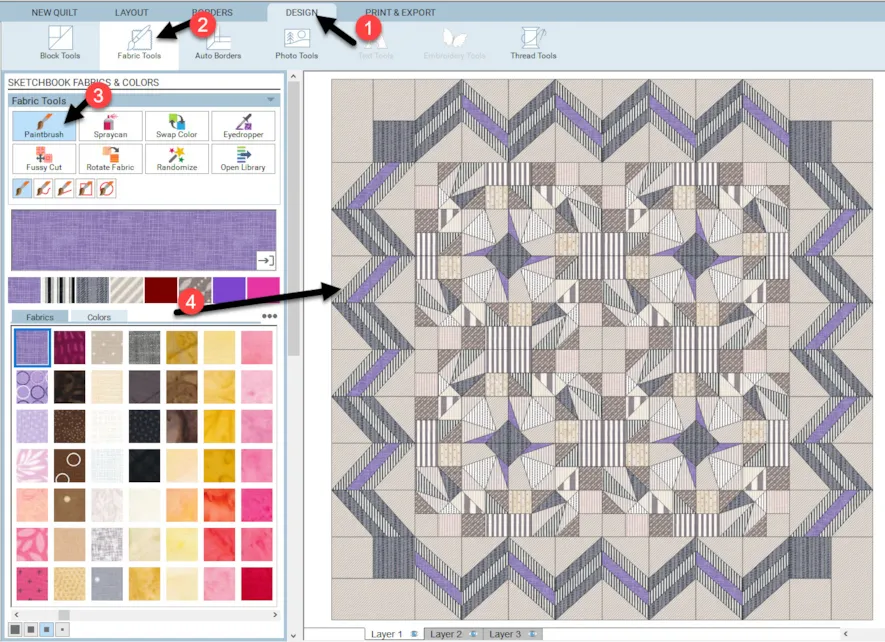
13. Under the Design tab at the top of the screen click on the fabric tools and select the paintbrush ![]() to apply fabrics to match your blocks in the center of the quilt. Be sure to hold down the control key while applying the fabrics to color all similar areas of the border with one click of the mouse.
to apply fabrics to match your blocks in the center of the quilt. Be sure to hold down the control key while applying the fabrics to color all similar areas of the border with one click of the mouse.
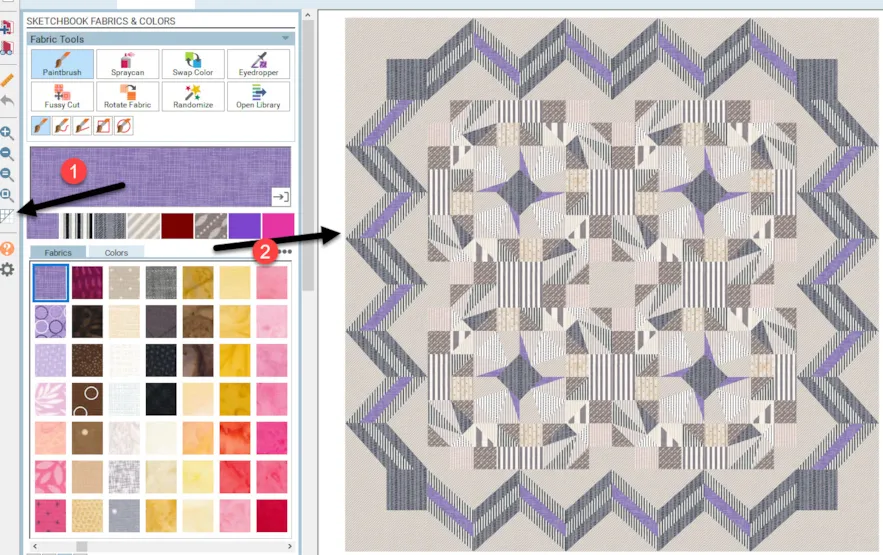
14. Click on the ‘hide/show block lines’ tool ![]() on the left side of the screen to view how the quilt will look in fabric rather than showing drawing lines. Click on the tool a second time to turn the lines back on.
on the left side of the screen to view how the quilt will look in fabric rather than showing drawing lines. Click on the tool a second time to turn the lines back on.
CREATING YOUR SPECIFIC COLOR PALETTE
We can easily create our color palette in EQ8. Sometimes we want only grayscale (works well for pattern writing) or sometimes we want a specific range of colors that match the fabrics we have on hand. By creating your custom palette, you can see how your design will look when completed.
1. Click on the quilt worktable icon on the upper right side of the screen. Click on the NEW Quilt icon and then select the open library from the ribbon.
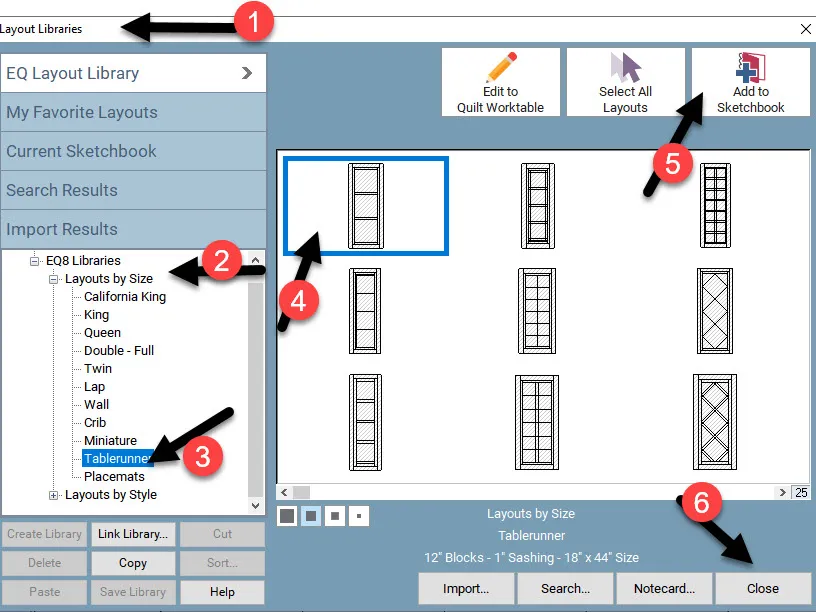
2. In the Library box, click on LAYOUTS BY SIZE>Tablerunner>and click on the first table runner shown. Once you have selected it, click on the add to sketchbook at the top right corner of the box. Click on ‘close’ at the bottom of the box to close it.
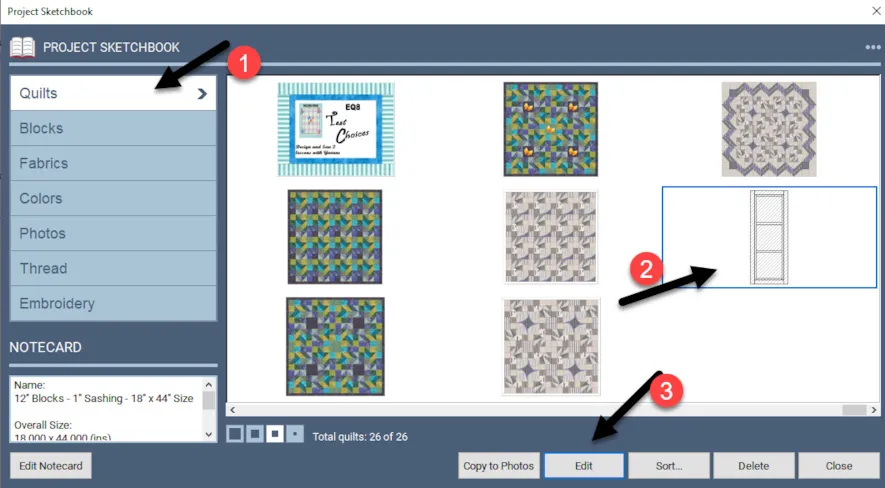
3. Click on the view sketchbook icon ![]() on the far left side of the screen to open the sketchbook. In the sketchbook, under the quilts heading, scroll to the end to find the table runner we just added tot he sketchbook. Click on the table runner to select it and then click on ‘edit’ at the bottom of the box to place it on the quilt worktable.
on the far left side of the screen to open the sketchbook. In the sketchbook, under the quilts heading, scroll to the end to find the table runner we just added tot he sketchbook. Click on the table runner to select it and then click on ‘edit’ at the bottom of the box to place it on the quilt worktable.
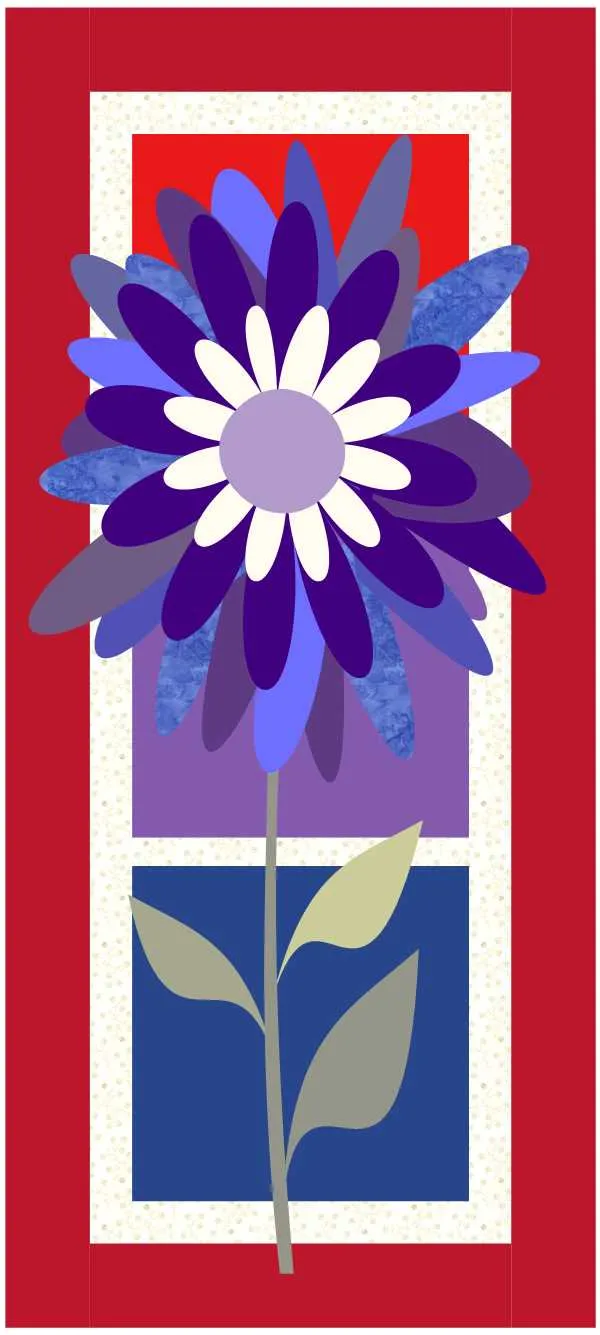
4. Leave the layout, sashing, and borders as they are. Click on the Design tab at the top of the screen. On the lower right corner of the screen, you will see the finished size of the quilt is 18 x 44 inches. You may not use this as a table runner. You may choose to use this as a design for a skinny wall space that needs a wall hanging instead of a table runner.
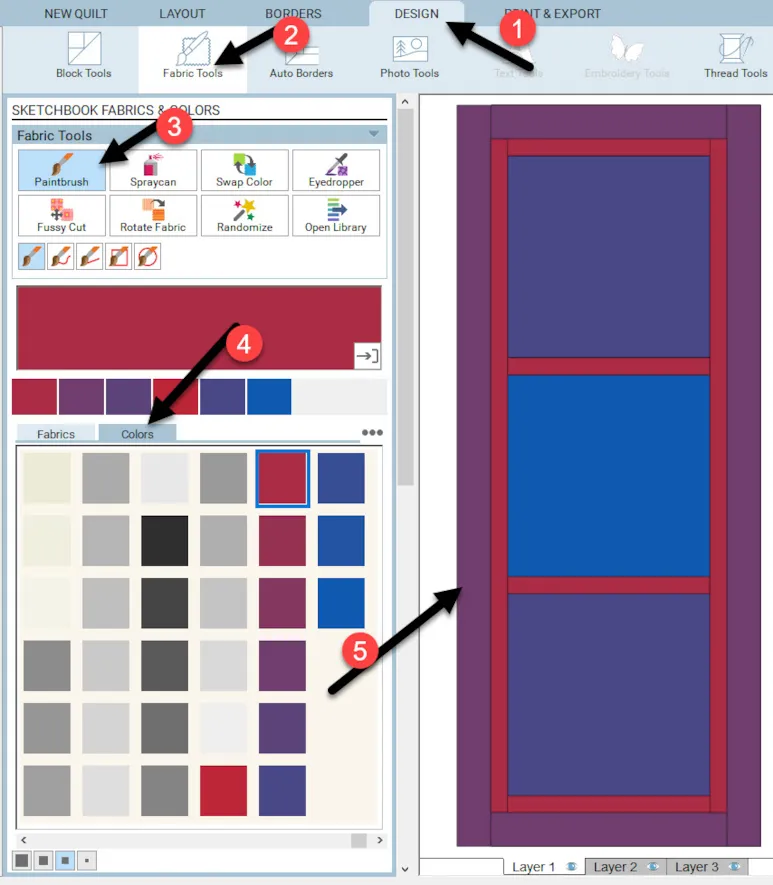
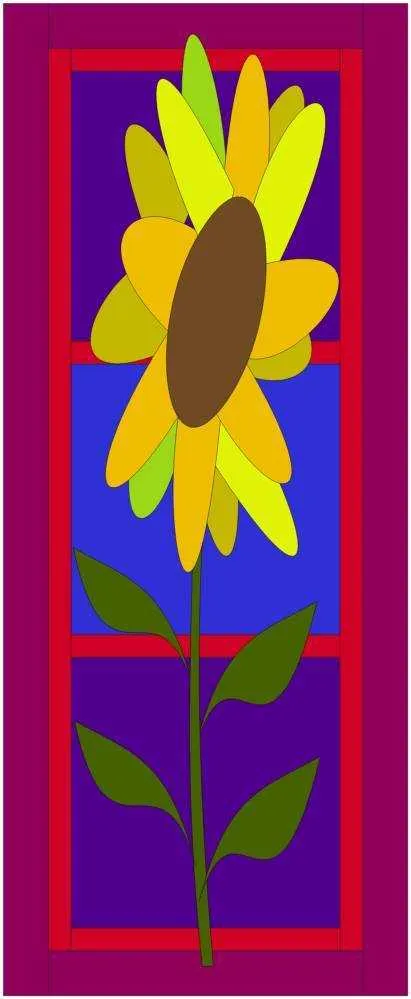
Thinking of my stash of fabrics, I do have a lot of red and blue fabrics. Purple is often used as an accent in my color schemes. I can create my color palette to work within EQ8 that has a range of these colors to work with when designing my wall hanging.
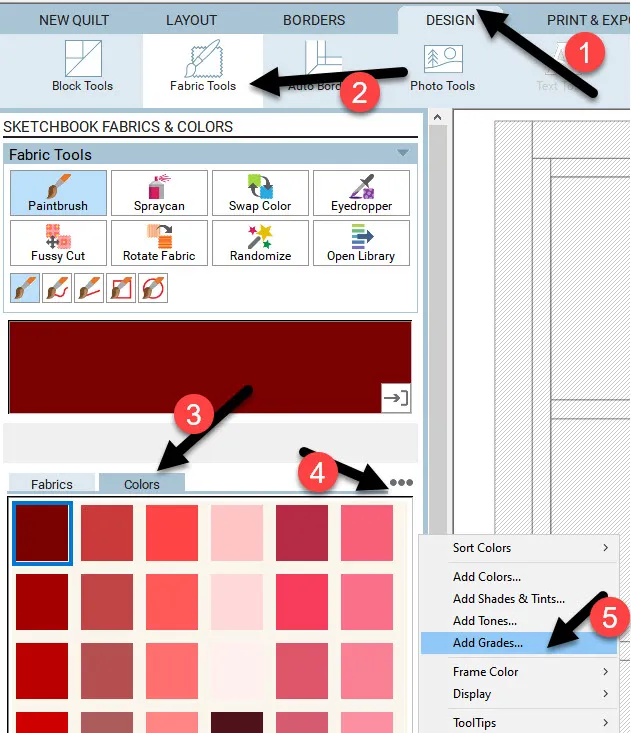
5. Under the Design tab, choose the fabric tools icon on the ribbon at the top of the screen. Click on the paintbrush tool
 ![]() and select the Colors Tab in the center of the sketchbook fabrics and colors box. Click on the three little dots and then select the ‘add grades’ from the menu.
and select the Colors Tab in the center of the sketchbook fabrics and colors box. Click on the three little dots and then select the ‘add grades’ from the menu.
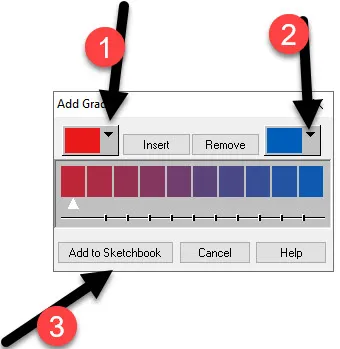
6. In the add grades box, click on the down arrow to see all the colors in the palette. I will select a red color to start with then I will select the second drop-down menu and select a blue color. The program will automatically give me the blending colors of purple between those two selected main colors. When you are satisfied with the selection, click on the ‘add to sketchbook’ at the bottom of the box.
These new graded colors will be added to the end of the color selections when using the paintbrush tool.
7. Scroll to the end of the colors palette and select the colors you wish to use to color your table runner/wall hanging. Color each of the elements by clicking on a color and then clicking on the design on the worktable.
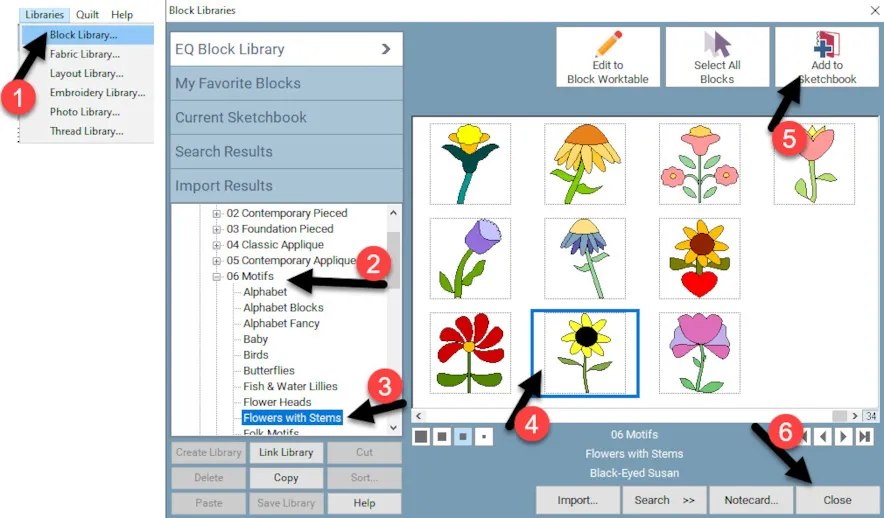
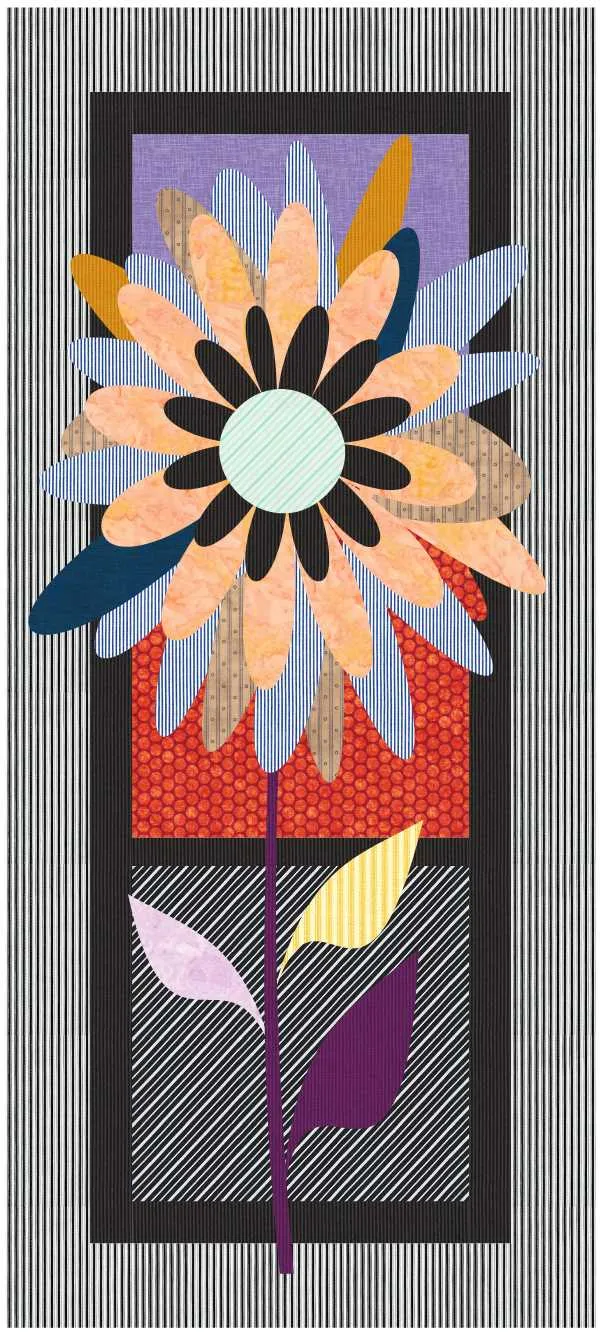
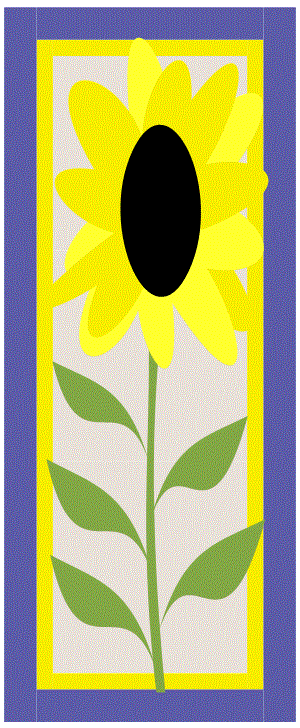
8. Click on LIBRARIES>Block Library>06 Motifs>Flowers with Stems. In the box, scroll to the end to find the
‘Black-Eyed Susan’ and click on it to select it. Once selected, add to the sketchbook and then close the library box.
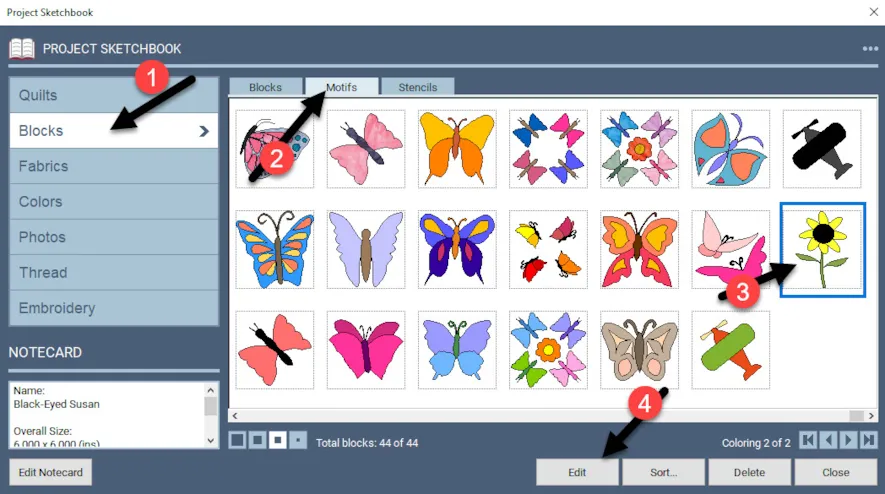
9. Click on the view sketchbook icon![]() to open our sketchbook. In the project sketchbook, click on the blocks heading at the left and select the motifs tab at the top. Scroll to the end to see the new flower we just added. Click on the flower to select it, then click on ‘edit’ at the bottom of the box.
to open our sketchbook. In the project sketchbook, click on the blocks heading at the left and select the motifs tab at the top. Scroll to the end to see the new flower we just added. Click on the flower to select it, then click on ‘edit’ at the bottom of the box.
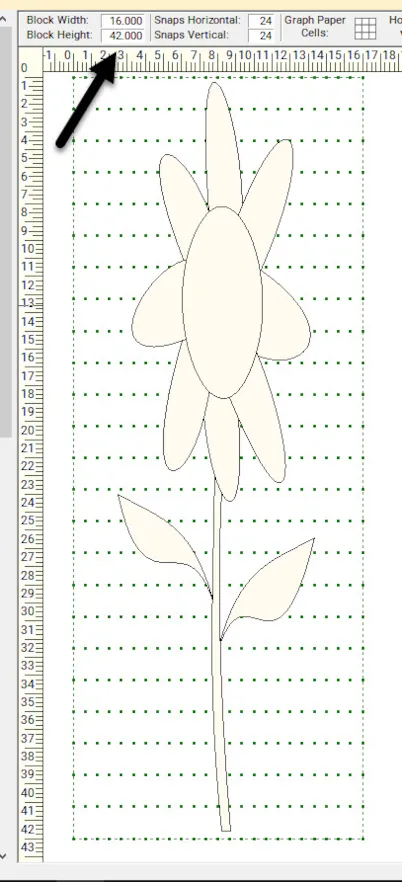
10. Once the design is on the block worktable set the new size of the block to be 16 x 42. This is 2 inches smaller than the overall quilt layout including the borders. The size of the flower will change in proportion to the size of the new block dimensions.
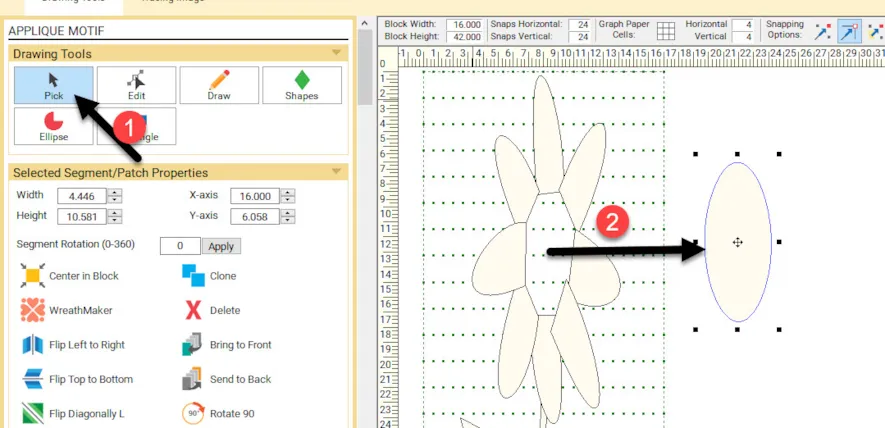
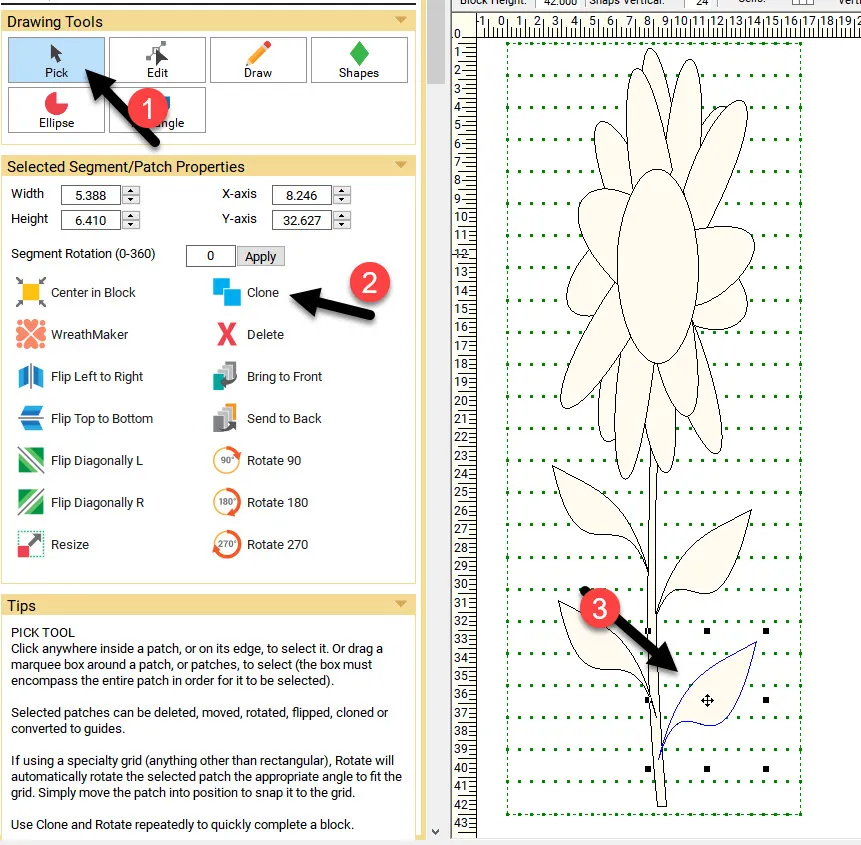
11. Click on the center of the flower head with the pick tool ![]() to select it. Click/hold/drag/release the center of the flower off to the side of the worktable to get it out of the way for the moment.
to select it. Click/hold/drag/release the center of the flower off to the side of the worktable to get it out of the way for the moment.
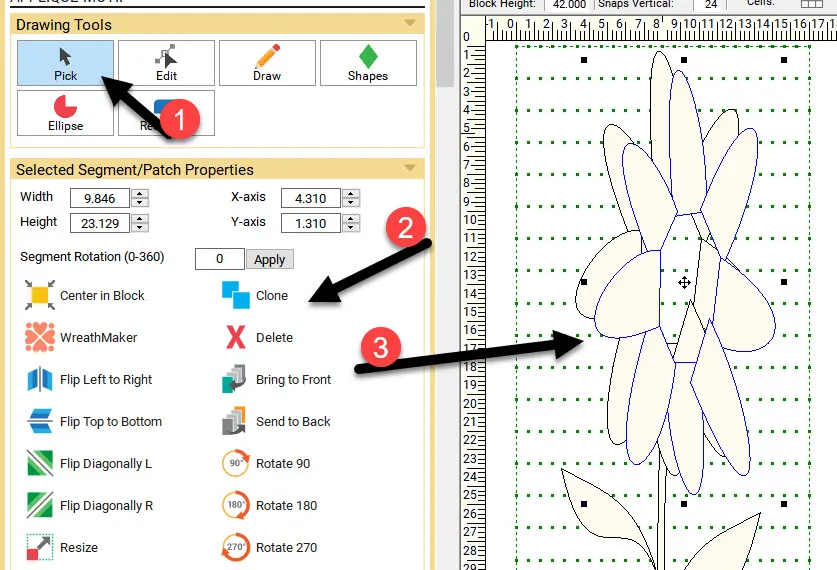
12. Using the pick tool, click/hold/drag release a selection box around the head of the flower petals making sure you have all the petals selected. Once it is selected, click on the word ‘clone’ at the left side of the screen. A second copy will appear slightly lower and to the right of the original petal layout.
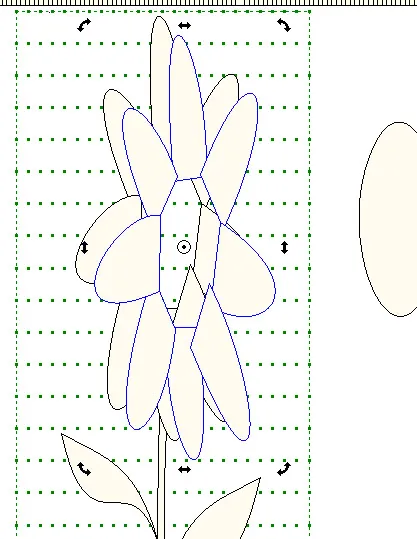
13. While the cloned image is still selected, move the cursor over the center crosshairs, and while holding down the control key (CTRL) on the keyboard, click once to get rotation handles.
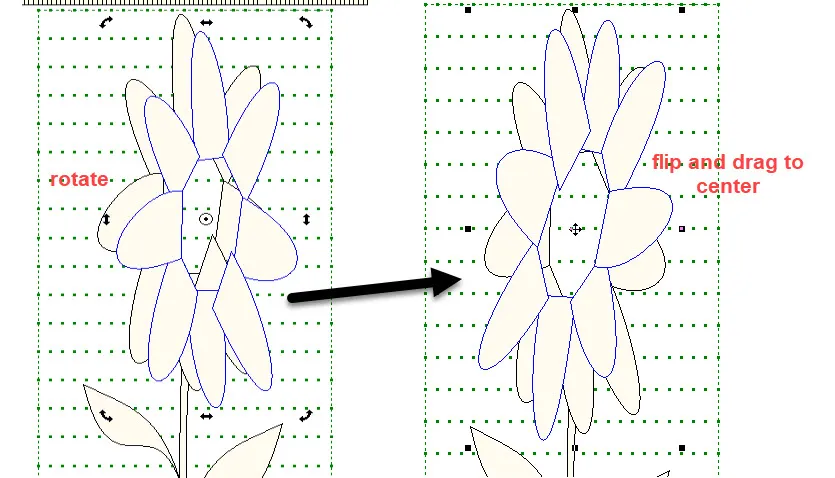
14. Click on one of the corner rotation handles and hold/drag it so the flower head is slightly rotated. This will give a fuller look to the flower head by increasing the number of petals. Once it is slightly rotated, click on the Flip Top to Bottom Tool ![]() and then Flip Left to Right Tool
and then Flip Left to Right Tool ![]() to change the position of the petals. Click and drag the image so it overlaps the original design.
to change the position of the petals. Click and drag the image so it overlaps the original design.
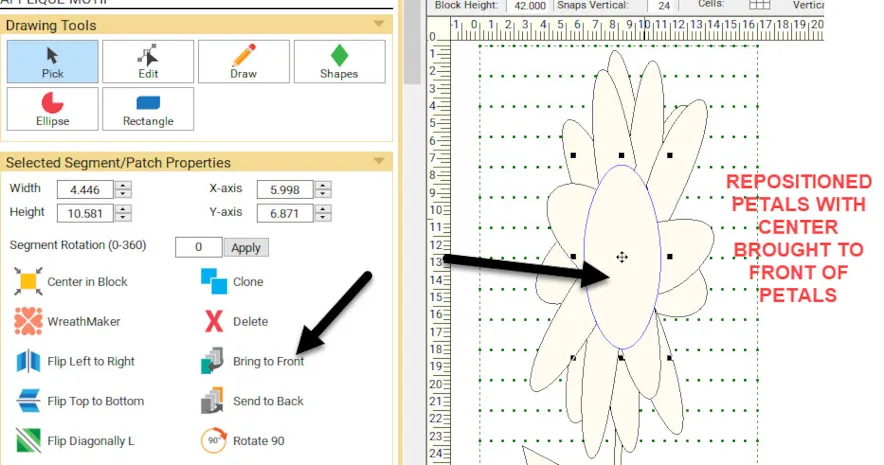
15. Click on the flower center that is off to the side and drag it to the center of the petals. Once you drag it to the center of the petals, click on the ‘bring to front’ icon.![]()
16. Click on each of the leaf petals with the pick tool ![]() and then ‘clone’ to make two more leaf petals and move them down the stem.
and then ‘clone’ to make two more leaf petals and move them down the stem.
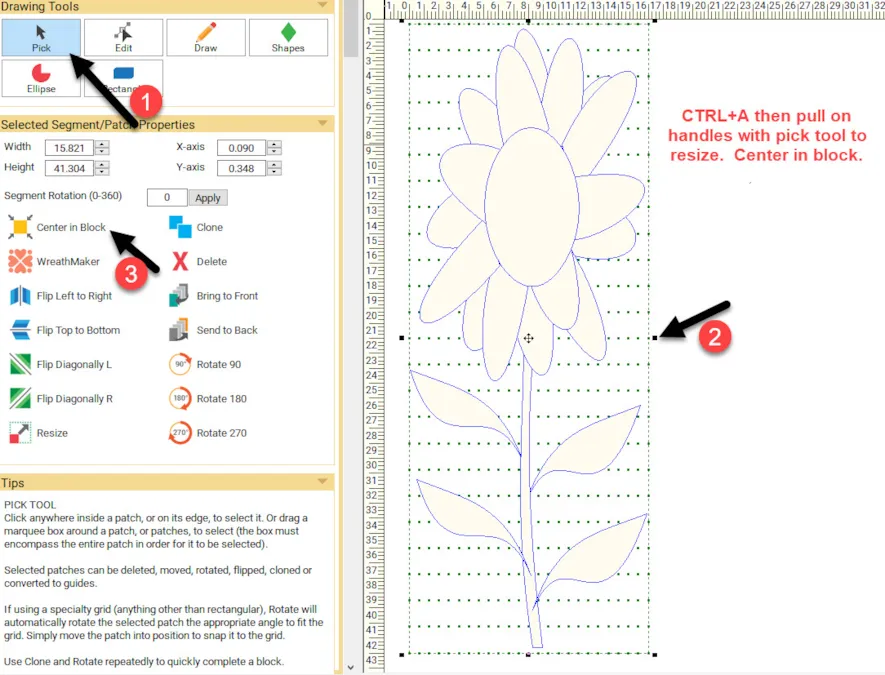
17. Click on Control (CTRL) + A to select the entire design. Click/hold/drag/release on the handles to increase the size of the design so it fills the block area. Be careful to not have any of the applique shapes extending beyond the edge of the block. Click on the center in the block icon![]() when finished resizing.
when finished resizing.
Add the block to the sketchbook![]()
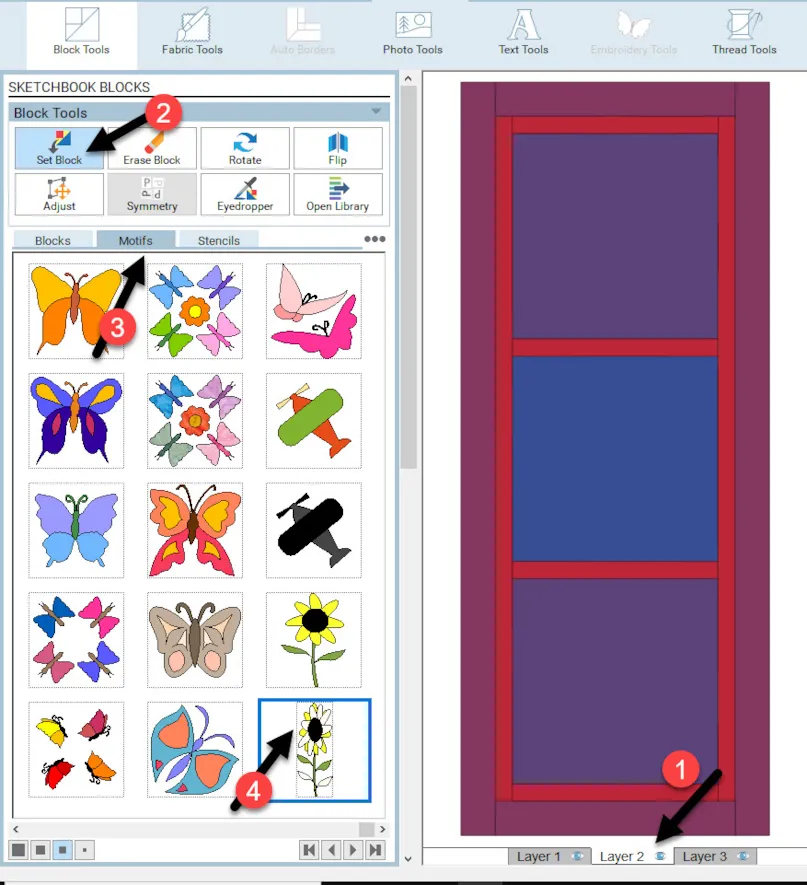
18. Click on the quilt worktable icon ![]() on the upper right side of the screen. You should still have your table runner/wall hanging design on the worktable. Click on layer 2 of the quilt at the bottom of the screen. Applique is applied to layer two of the quilt layout.
on the upper right side of the screen. You should still have your table runner/wall hanging design on the worktable. Click on layer 2 of the quilt at the bottom of the screen. Applique is applied to layer two of the quilt layout.
Using the set block tools, click on the motifs tab and scroll to the end to locate the flower we just made.
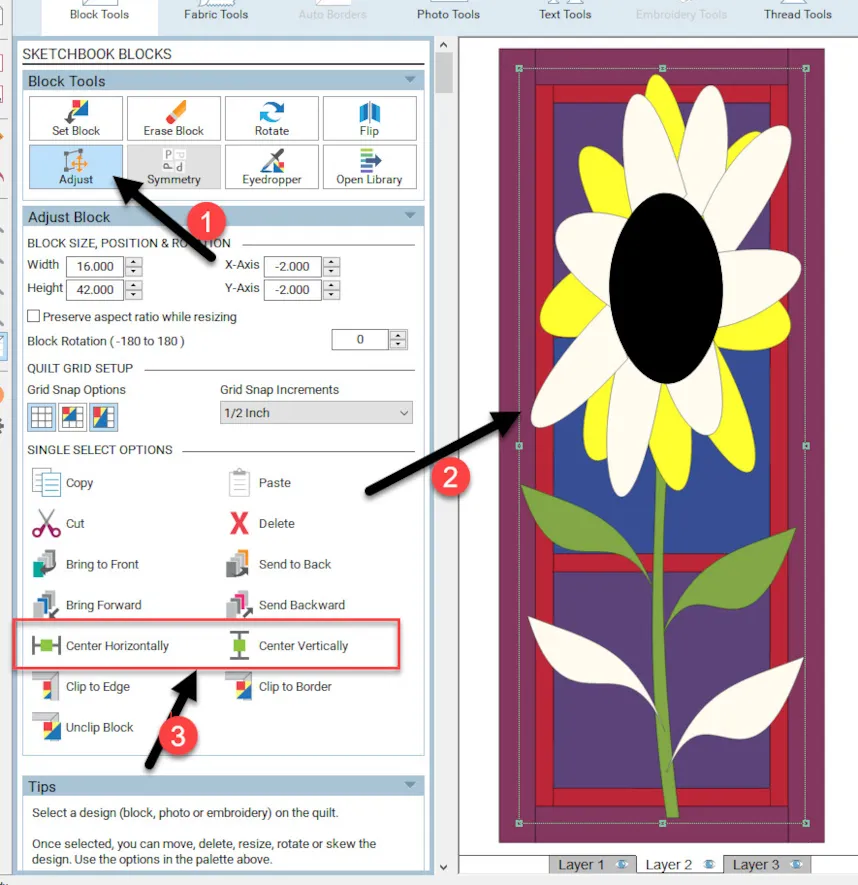
19. Select the motif and drag it onto the worktable. It will come in at the size we made it on the block worktable. Click on the adjust tool ![]() and then click on the design to select it. Once it is selected, click on the center horizontally and center vertically to place it in the center of the quilt layout.
and then click on the design to select it. Once it is selected, click on the center horizontally and center vertically to place it in the center of the quilt layout.
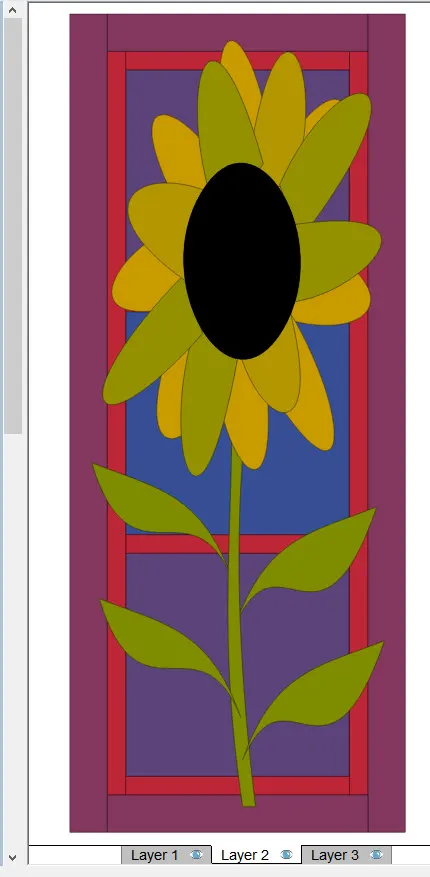
20. Click on the fabric tools icon on the ribbon t the top of the screen. Using solid colors, create another color gradation for your flower as we did for the background. Refer to step 5 and 6 to refresh your memory on creating grades of color.
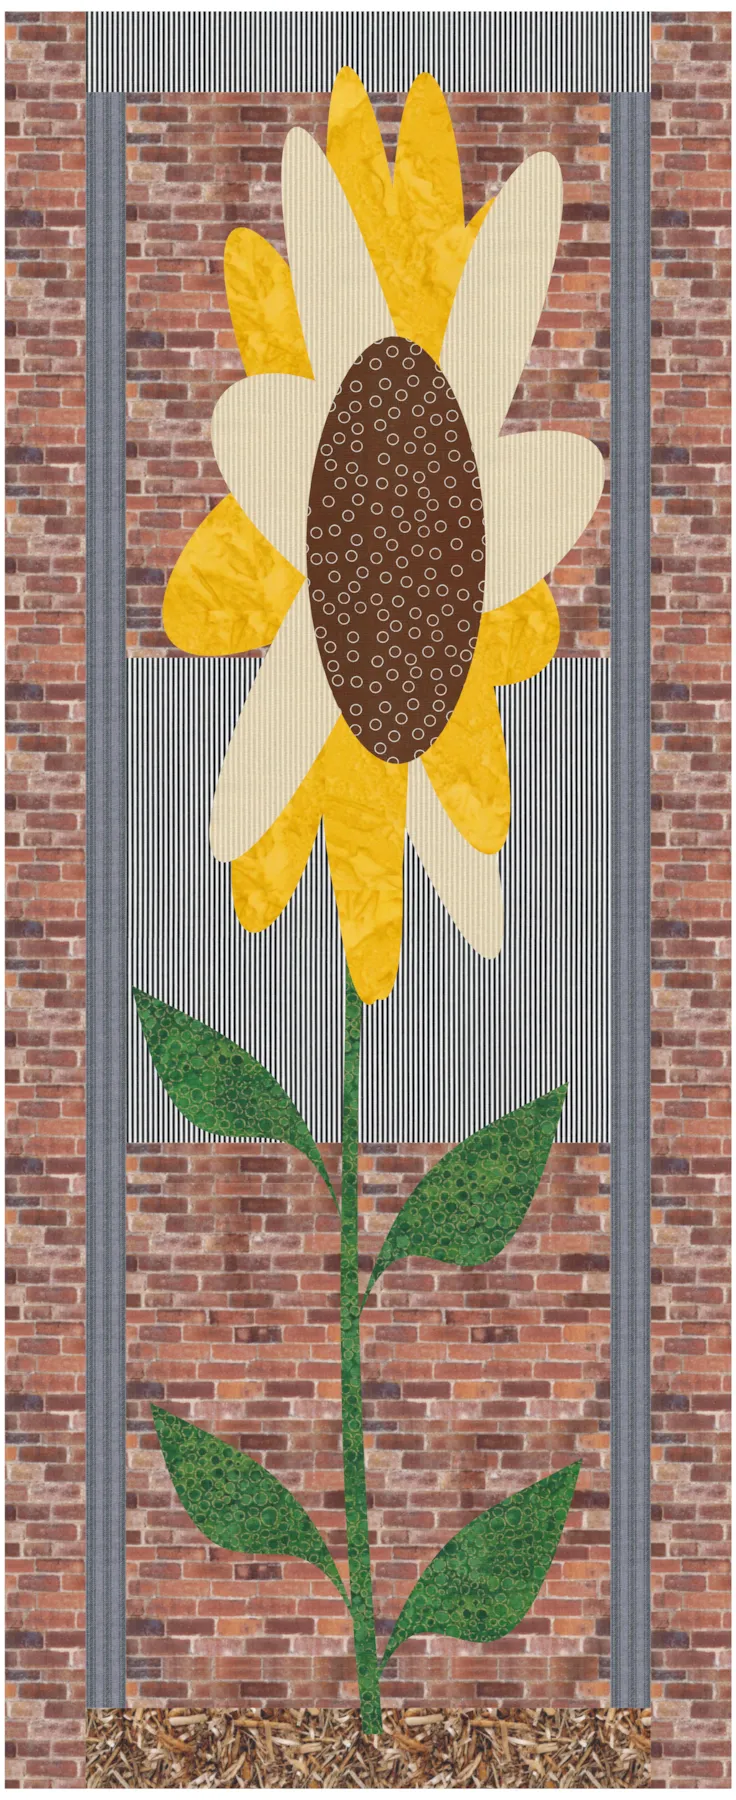
NOTE: I would spend a lot more time making sure each petal was rotated exactly how I wanted it if I were writing a pattern for someone else. If I am creating this for myself, I know that the design is just a visual that I can follow or change slightly as I create and lay into position my applique elements. At the last minute, you can always change colors or reshape an applique element more to your liking before creating your quilt.
The purpose of this lesson is to show you how you can easily change layouts and blocks by editing what is already in the library. You do not have to draw all your designs by yourself. Use what is in the program and change it to make it your own.
Once you have completed your designs, choose one that you are happy with from the sketchbook and save it as an image to upload to the comment section of the blog page. Refer back to lesson one if you have forgotten how to make your quilt layout an image to send to the comment section below. We all want to see how creative you have been.
WATCH THE VIDEO BELOW
Want to download the video to watch later? Click an option below:
