I love to design my quilts with EQ8, it saves me so much time and let’s me really be creative before cutting into that fabric. I am finding more and more folks are using the Accuquilt GO! Cutting system of dies to cut out their quilts. Some love the accuracy, others like the speed of cutting out a quilt and many quilters with physical limitations find that die cutting their fabric solves some of their cutting issues and get them back to doing what they love.
What you may not know is that the GO! Qube set of dies is based on the most popular type of quilt block, the FOUR PATCH! based upon a simple 4 x 4 grid. Electric Quilt is full of blocks that use the 4 x 4 grid and that makes them perfect for adapting to be cut out with your GO Qube dies. You can design a quilt, try on fabrics and play with borders using the power of EQ8, then cut it out with your matching size dies.
In this lesson we will create a 4 patch block, design a quilt and review some tips to cut it out using the Accuquilt GO! die cutting system.
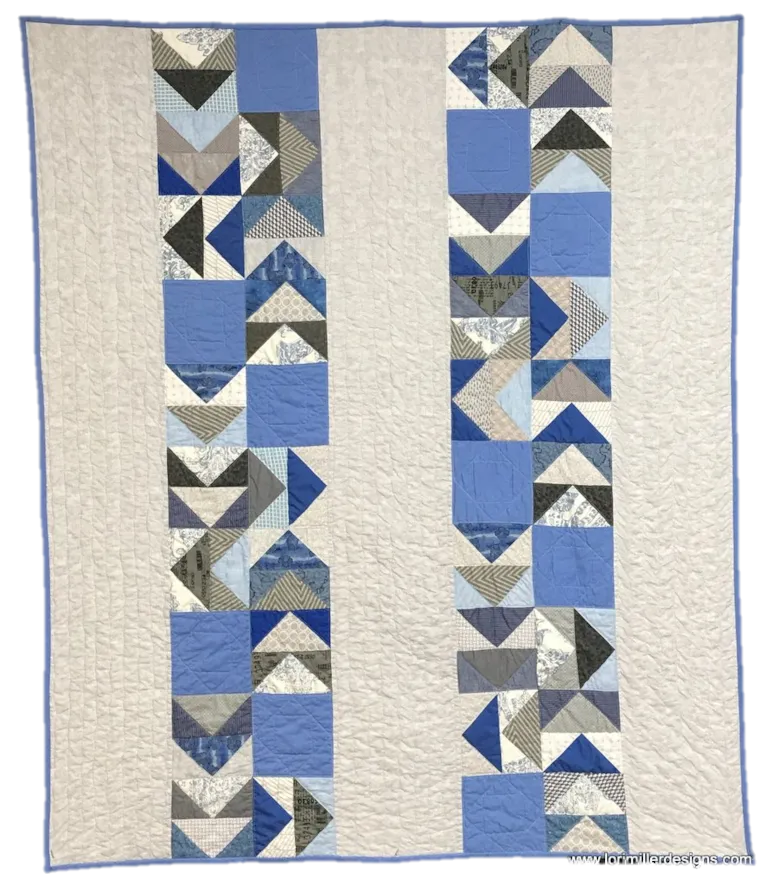
Goose Trot Quilt
Skillset: Beginner/ Advanced Beginner Size: 51″ x 60″ Skill Builders:
- Working with Vertical Strip layout
- Designing a Four Patch block
On to the DESIGN…
- Open EQ8.
- Let’s name the Project. The project name appears at the top left of the EQ8 Window. Right now the project says Untitled – EQ8.
- On the left side toolbar, click the New project button.

- On the Create a new project tab, type in the project name field Goose Trot.
- Click OK. The box will close. Notice the project name Untitled has been replaced with Goose Trot.
- Lets start with designing the Four Patch block. I am going to design with a 12″ block since I will be using my 12″ GO! Qube cutting dies. (Hint: Design for the size of dies you have and make adjustments accordingly for size.)
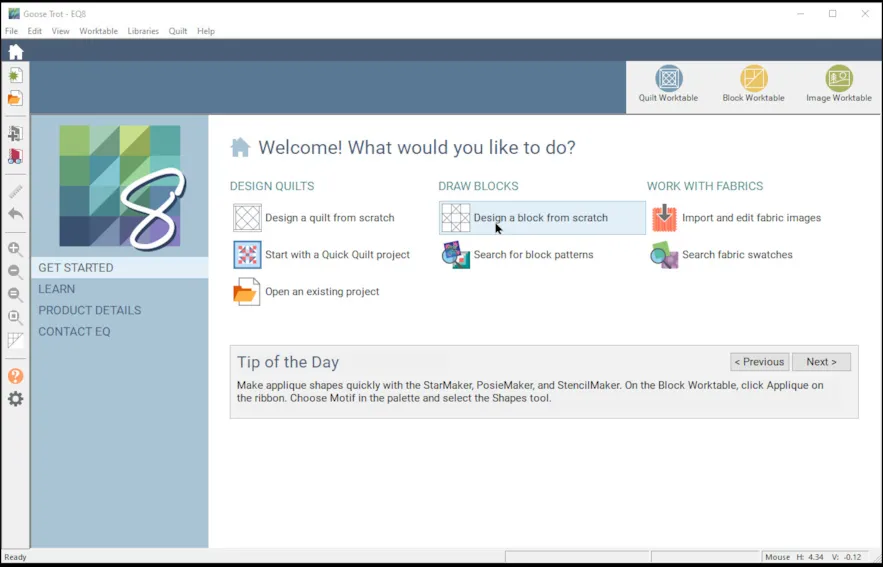
- From the Home Page, under DRAW BLOCKS, select Draw a block from scratch.
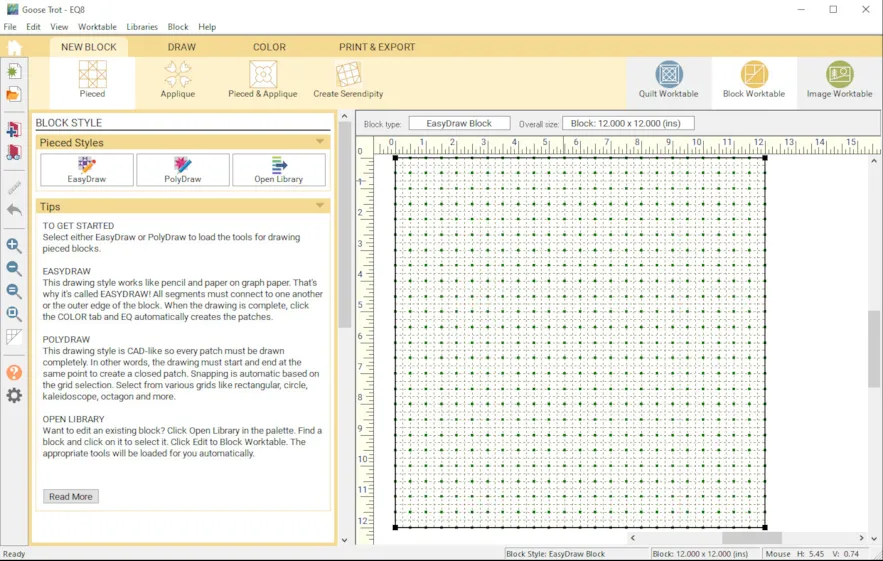
- New Block, Easy Draw
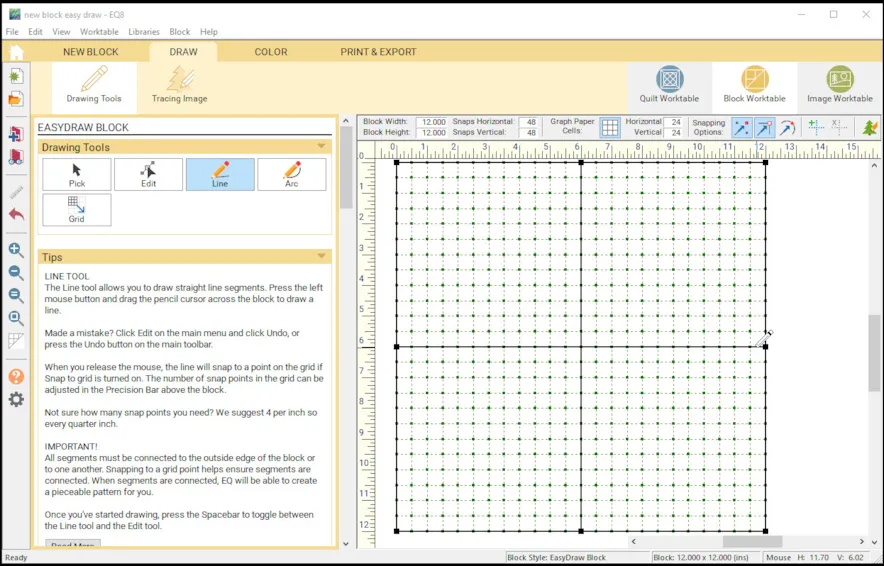
- In the precision bar, make sure the Block Width and Block Height are 12′”, snaps horizontal and vertical are 48, and graph paper cells horizontal and vertical are 24.
- Using the line tool, Click and drag two lines to form an equal basic four patch block using the 6″ marks as a guide. Hint: Click hold and drag the line tool and lift up when you get to the end of the line.
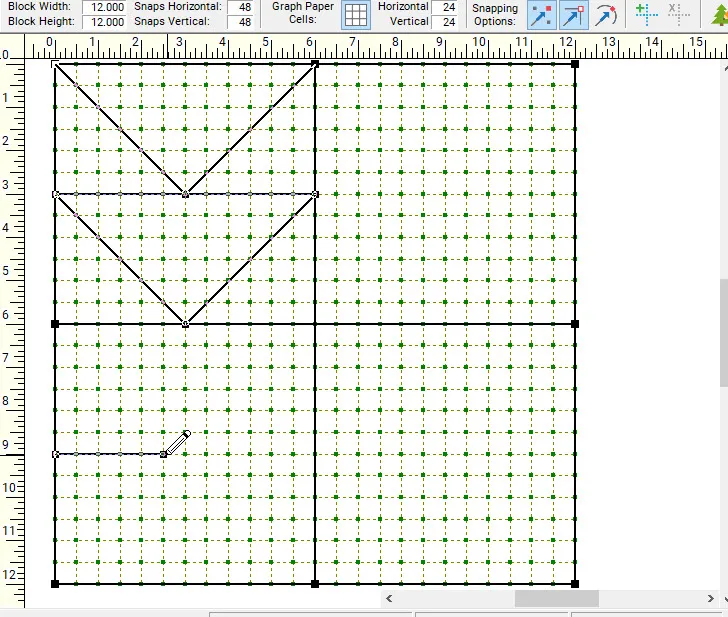
- On the left size of the four patch, draw four flying geese pointed down. Click hold and drag the line tool and lift up when you get to the end of the line. The center of the V shape will be at the 3″ mark.

- Finish drawing the block by adding two flying geese pointed to the right in the bottom right corner. Use the 9″ mark as a guide for the V shape.
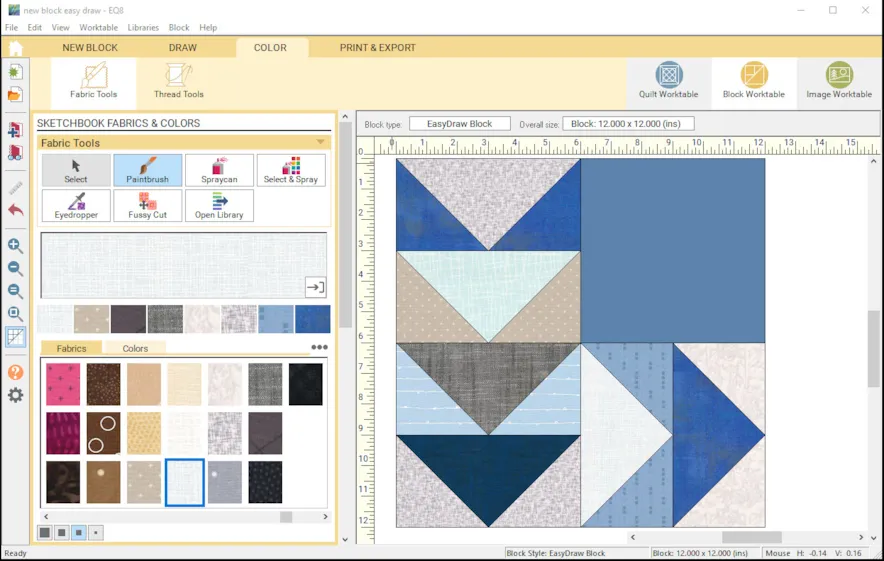
- Move to the Color tab and color or choose fabrics for your block. I used blues and greys to color my block. You choose what you like. Add to Sketchbook.
Let’s arrange this quilt block in a quilt!
- Go Home.
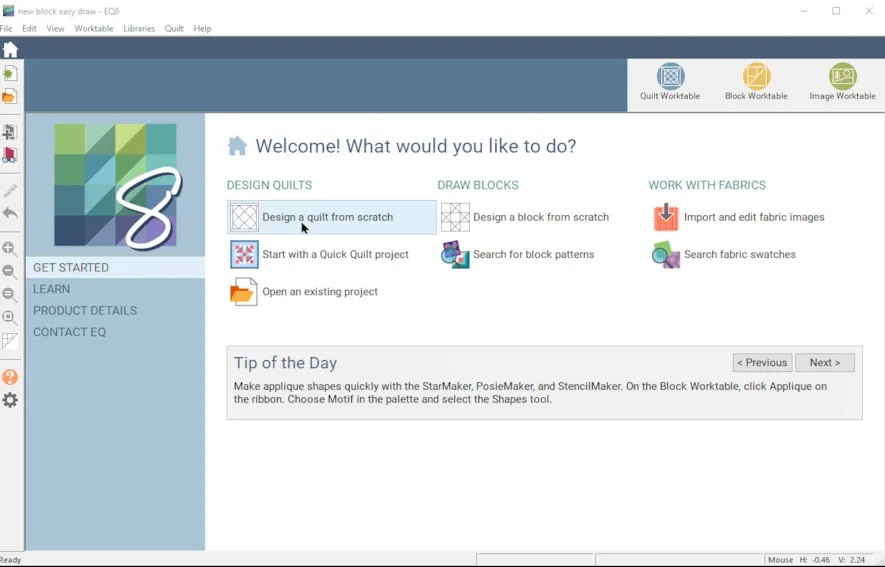
- Select Design a Quilt from scratch
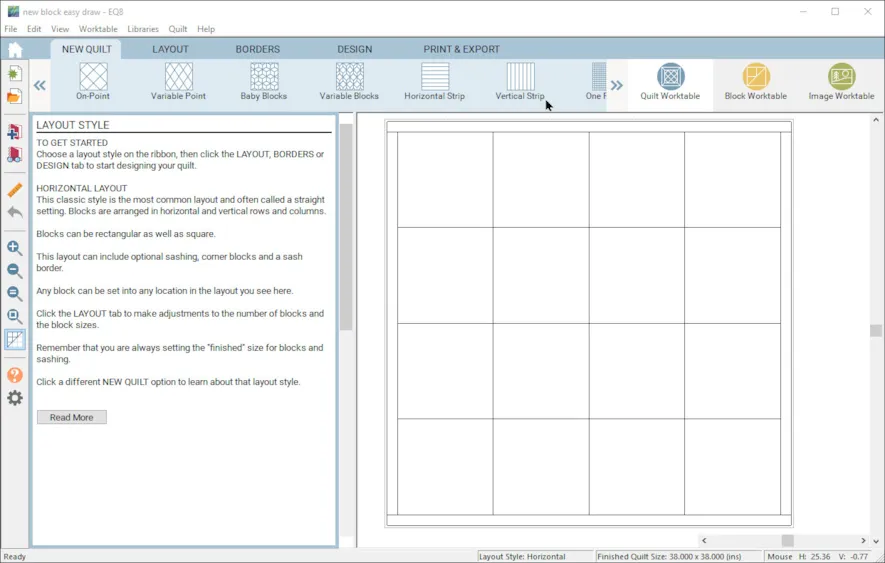
- Select New Quilt, Vertical Strip
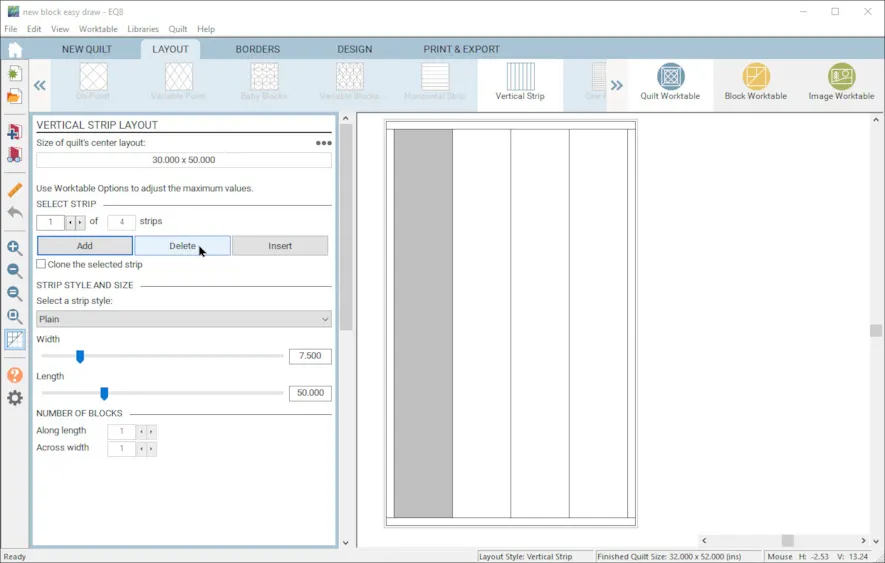
- Select and delete three strips until you only have one left.
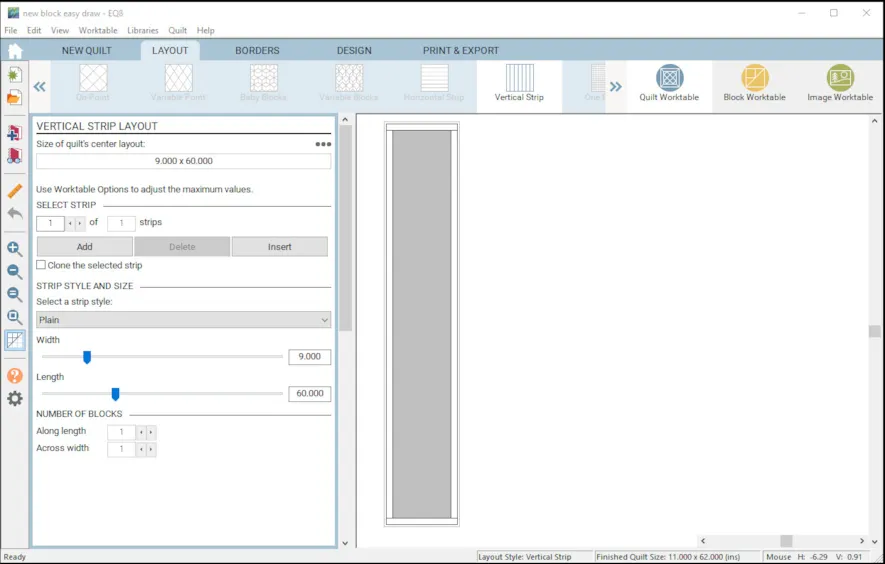
- Leave the strip style Plain. Change the width to 9″ and the Length to 60″.
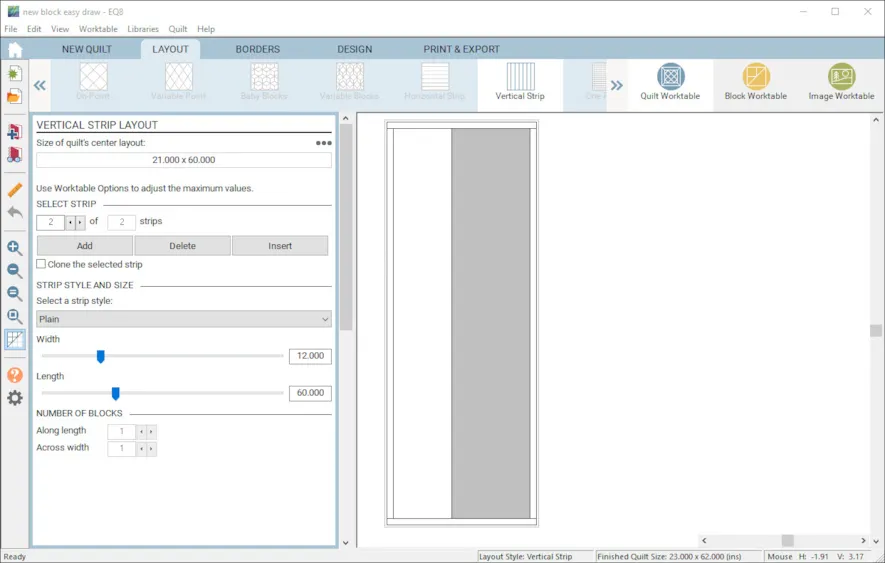
- Add another strip. Change the style to Pieced Block. Change the width to 12″ and leave the length at 60″.
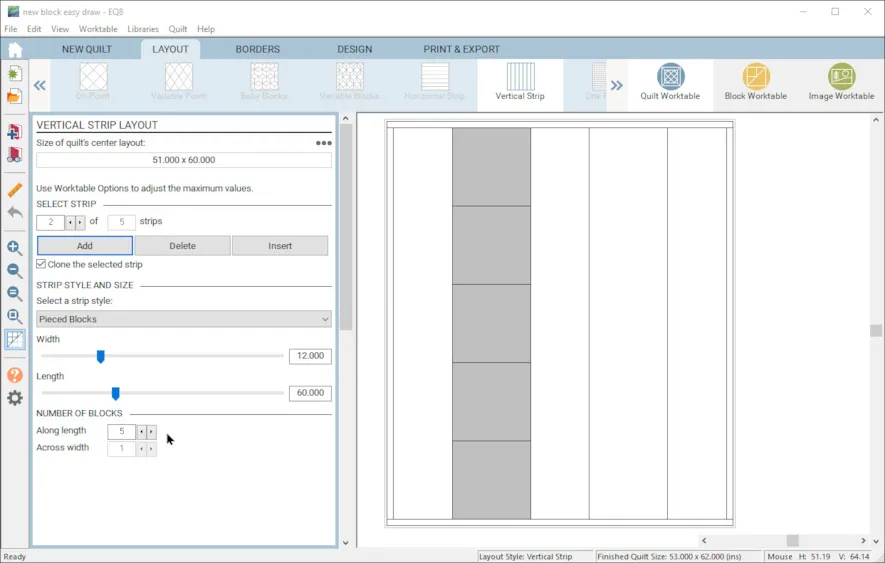
- Check the clone box. Select strip 1, Add strip. Select strip 2, add strip. Select strip 1, add strip. you should have alternating sized strips. On the two 12′ strips, set the number of blocks along length to 5.
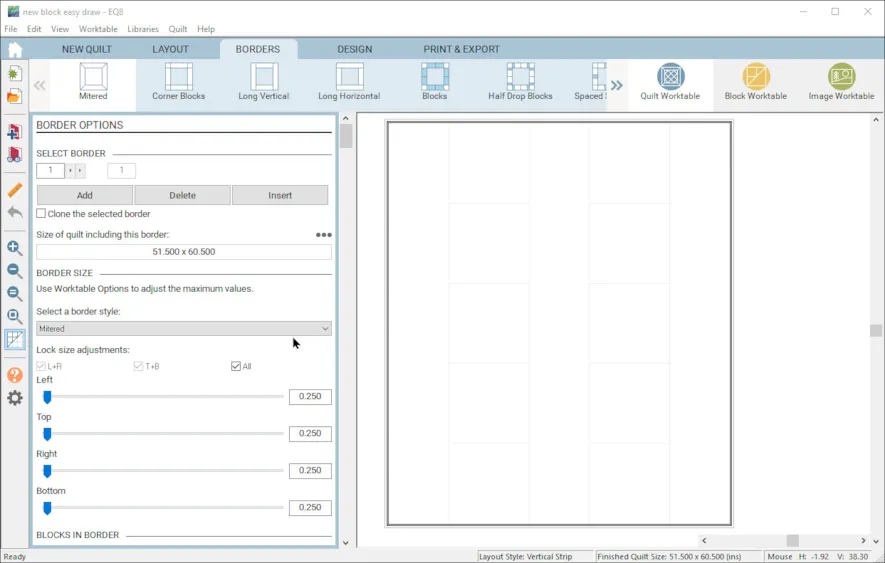
- Go to the Borders tab. Change the border to mitered and 0.25′ wide.
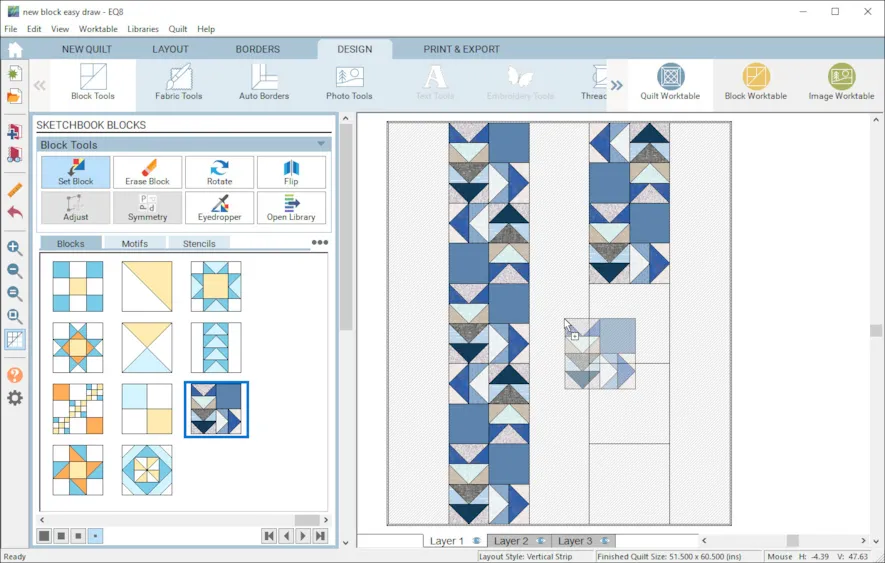
- Go to the Design tab > Block Tools > Set Block. Choose your Goose Trot block and place it in the strips with pieced blocks. Use the Rotate tool twice on every other block to add interest.
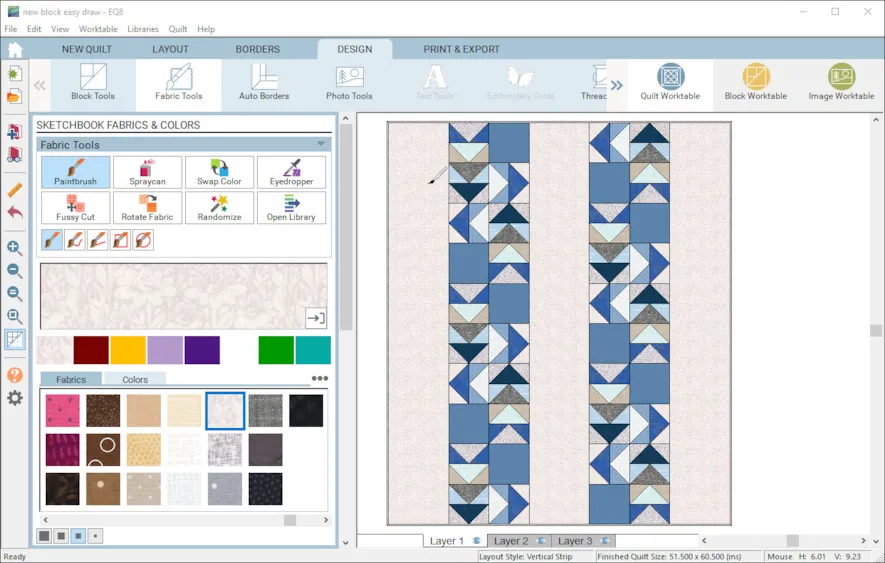
- Select Fabric Tools. Color the plain strips and border. Add to Sketchbook.
Now you have a four patch quilt designed with EQ8.
Cutting Tips
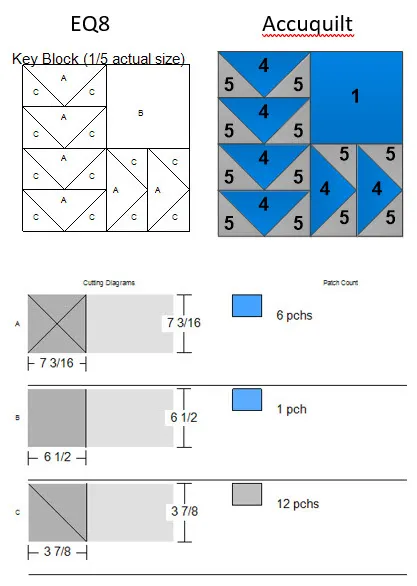
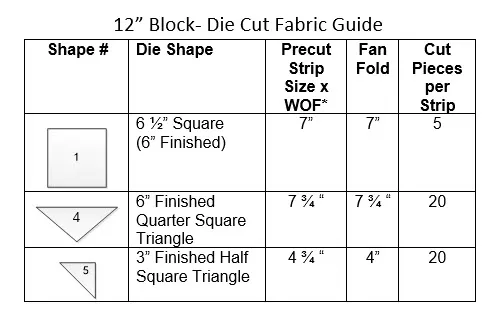
I will share some tips to cut out your quilt. Electric Quilt was designed using traditional methods of cutting blocks long before fabric cutting dies were introduced. Dies like the Accuquilt GO! Qube require additional fabric for fan folding and the irregular die shapes. You can use the Rotary cutting charts to determine how many patches you will need for each of your block and determine the traditional size of the cut patch. Accuquilt provides a cutting chart reference on their website that will help you translate from Electric Quilt’s traditional method to the Accuquilt method so that you have the extra fabric you need.
I have gathered that information for you for this quilt below. Here is a picture of the EQ8 rotary cutting information for the block from the quilt. I have added a diagram showing what pieces by number you would need from your 12″ Accuquilt Go! Qube to cut for the block. Remember, you can use the EQ8 rotary chart to help you with the number of patches to cut for each block. Then use the Accuquilt information to determine what dies to use and how much fabric you need.
*WOF – Width of Fabric
I hope this design has inspired you to create more quilts based on the four patch that you can use with your Accuquilt GO! Cutter.
FREE Quilt Tutorial
Want to make this Goose Trot Quilt? A Free tutorial with sewing instructions is available on my Lori Miler Design’s Blog
Questions or Feedback
Lori J. Miller lives in Oxford, Michigan, where she designs, stitches and sews quilts and quilty things. She loves experimenting with fun colors and designs to make playful and clever products for the modern sewist. Lori continues to share her knowledge with others teaching quilting and EQ8 classes around the country. A self professed EQ8 superfan, you can follow her quilting adventures on her blog at lorimillerdesigns.com or on instagram @lorimillerdesigns






04-24-2020
12:12 pm
Thank you for the Accuquilt instructions I love my GO! and this really helps.
04-24-2020
5:12 pm
Thanks for the class as I’m pretty rusty on EQ but I noticed how much easier to draw using EQ8 than EQ7. no sticky lines. I’d like learn how to design variable size on a quilt for example 8×8 with 4×4 or any other sizes or shapes.
04-25-2020
10:47 am
Amy, To have those different sizes you will want to try designing with custom quilt. There is a lot of good information on the EQ website and community, as well as the design books that could point you in the right direction.
04-25-2020
8:25 am
Even though the Qube is designed for a 4-patch block to make the size listed, I find that it is quite easy to use my 8″ Qube to make a nine patch that is 12 inches square. I have used this “trick” for several quilts and it works wonderfully. Adding the companion sets to the Qube really increases this ability.
04-25-2020
10:49 am
Gene,
Great information, I do the same thing and even create other grid styles with the versatile dies. I am playing with the angles companion set now. I like the bigger blocks as they stitch up fast too.
04-25-2020
1:50 pm
Since I have EQ8 and many of the dies, strip dies and the 8″ and 12″ Mix and Match Block Cubes with companions pieces this really helps using the two systems together. Any further instructions on the use of these two products together would be greatly appreciated.
04-28-2020
10:14 am
Really look forward to more lessons that take advantage of Accuquilt dies, especially the companion sets. Thanks for this lesson.
05-01-2020
10:25 am
Thank you for this post! I watched a Accuquilt webinar sponsored by my local quilt shop yesterday, and using with EQ8 was a prime consideration for me.
03-17-2021
12:34 pm
Hi Lori,
I found you through EQ8 software page. I see this lesson on creating a pattern in relation with the AccuQuilt system. I am totally new to this software (ha, haven’t purchased, YET) and creating patterns. I have designed a pattern from using an AccuQuilt die and am wondering if you have any class or information on the legalities of creating this pattern and putting it out there. I am reviewing your blog and the lesson about creating with the AccuQuilt go system now. Can you offer any insight or direct me to this information. I am loving your blog and information you provide!
Thank You, Kristin Jackson
03-17-2021
7:56 pm
Kristen, Thank you so much. My lessons focus on using the EQ8 Quilt design software and offering practice exercises when using the software. We don’t cover pattern classes or other information on creating or designing a physical pattern in any of the scope here. There are lots of resources on the internet regarding those matters but it is a complex subject. I encourage you to search for information on designing quilt patterns in general to find what you are looking for. I do think EQ8 is a great addition as one of the tools to do that. Thanks, Lori
04-09-2021
2:33 pm
Hello! Thank you for all your great work with EQ. I am new and cannot figure out why the flying geese body (which is usually a rectangle) says to cut it 7 3/16 square? Can you direct me to where I can find an explanation for this? Thanks so much! Theresa
04-09-2021
3:45 pm
If you look on the diagram, you will see that you take that size square and then cut across on the diagonals to create quarter square triangles. This method keeps the long side straight of grain and not on the bias. The extra length takes into account the points when you rotary cut, if you use Accuquilt, they cut off those dog ear points. I hope that made sense. Lori
01-10-2024
9:55 pm
Looking forward to using Accuquilt with EQ8