One color embroidery designs are traditionally called Red Work. These designs were done in the past stitching pictures by hand using red threads. Today, we often refer to machine embroidery one color designs as Red Work and then change them to different colors at the machine (blue work, green work, black work). The trick when designing a single color design for the embroidery machine is to have the elements all connect to each other and draw them so they sew at the machine as a continuous stitch design. Try not to have jumps, starts and stops, and elements that are not connected. You can add interest to the designs by changing from running stitches, bean stitches, zigzag stitches, and a small amount of fill stitch areas.
Open your EQStitch program.
![]()
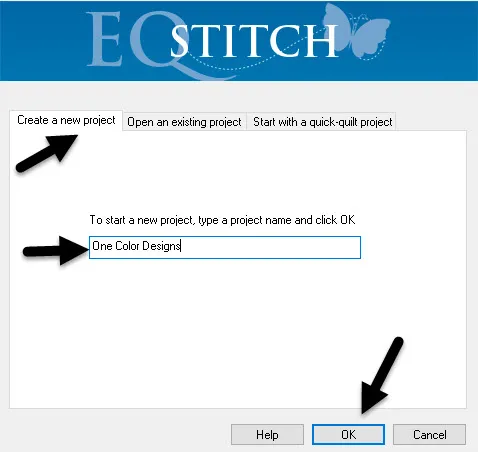
Name a new project called One Color Designs.
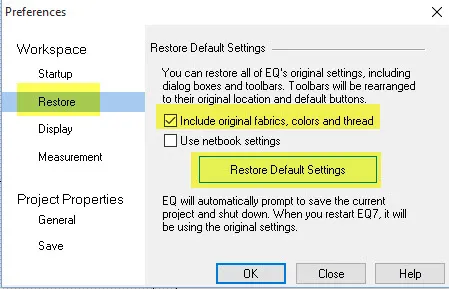
Set the preferences back to the default settings.
Click on the ‘work on stitching’ worktable![]() .
.
Click on the ‘patch fill icon’![]() on the property bar at the top of the screen and turn off the patch setting.
on the property bar at the top of the screen and turn off the patch setting.
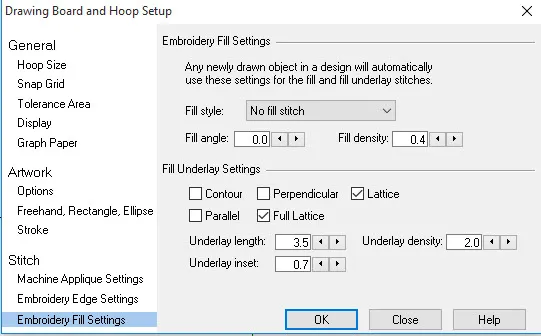
Click on the the ‘drawing board options’ icon ![]() on the properties bar at the top of the screen.
on the properties bar at the top of the screen.
Set the ‘embroidery edge stitches’ to a bean stitch.
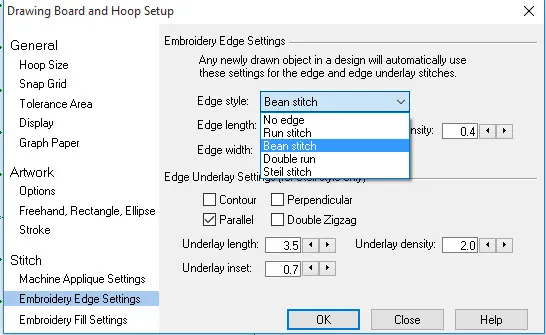
Set the ‘embroidery fill stitches’ to a no fill option.
Remember–You can always change the stitch settings on the stitch tab at the bottom of the screen later.
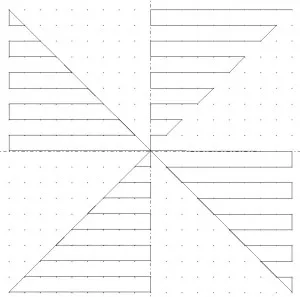
Click on the ‘line drawing tool’ ![]() and create a line drawing with a continuous line drawing from point to point on the worktable working your way around so the line becomes a continuous line.
and create a line drawing with a continuous line drawing from point to point on the worktable working your way around so the line becomes a continuous line.
Click on the stitch tab at the bottom of the screen and color the design with the ‘set thread’ tool![]() .
.
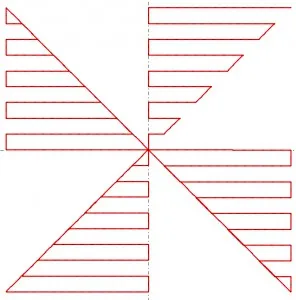
Click back on the artwork tab at the bottom of the screen and draw an outline stitch going around the outer edge of the shape in a continuous line drawing.
Click on the stitch tab at the bottom of the screen and click on the ‘embroidery edge stitch’ tool ![]() on the toolbar.
on the toolbar.
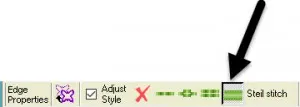
At the top of the screen, click on the steil stitch (same as a zig zag stitch) on the properties bar.
Move the cursor over to the edge outline you just drew and click once to apply the new edge.
Click on the ‘set thread’ tool and color the edge stitches.

Click on the ‘simulate sewing’ icon ![]() on the toolbar.
on the toolbar.
Click on the ‘play forward’ icon ![]() on the properties bar at the top of the screen and see if you were successful in having the design stitch as a continuous one color embroidery design.
on the properties bar at the top of the screen and see if you were successful in having the design stitch as a continuous one color embroidery design.
Designing with a continuous line is called ‘pathing’. Free hand drawing the path can be complicated and is not the same as drawing an enclosed shape and moving the start point. Pathing is a much more intricate way of creating a continuous sew design.


