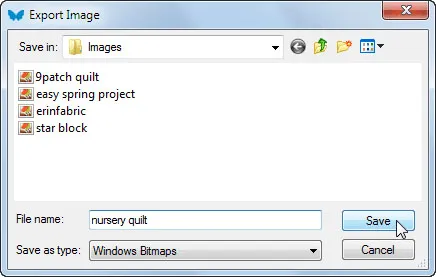
 Export Image
Use Export Image if you want to generate high quality images of your blocks and quilts to create professional images for you to use or, that can be used by publishing houses and commercial printers.
Click FILE > Export Image, or click on the Export Image ![]() tool on the Project toolbar. An Export Image dialog box will appear for you to name the file and select a format.
tool on the Project toolbar. An Export Image dialog box will appear for you to name the file and select a format.
Navigate to the folder you want to save your image in.
In File name, type a name for your image.
In Save as type, click the drop-down menu to choose the type of file you’d like to save your image as: bmp, jpg, gif, tiff, or png.
Once you’ve selected a filename and format, another dialog will appear for you to make more selections determined by the format you’ve selected.
BITMAP, GIF and PNG Dialog
All of the dialogs require that you set the size for the image.
Note: If you are exporting a quilt from the quilt worktable, the dialog will display a checkbox for Keep aspect ratio. When this box is checked, only one entry needs to be adjusted, either Width or Height. The other entry will adjust automatically. If you are exporting from the Block worktable, this checkbox does not appear.
Resolution options are 75, 150, 300 and 600 dots per inch. If you are creating images for web sites, 75 dpi is the ideal selection. For most other printing, 150 dpi will be adequate. If you are generating images for publication in magazines or other commercial ventures, then one of the higher resolutions would be best.
It’s important to remember that resolution selections strongly affect the size of the file that gets generated. For example, a bitmap file of a 4 by 4 inch quilt at 75 dpi will generate a file of much less than 1 megabyte. That same quilt at 600 dpi generates a file that is 16.5 megabytes!
You can choose to outline the patches and blocks of the quilt separately using the checkbox options.
JPEG Dialog
If the JPEG file format is chosen, one additional setting is available under Options.
JPEG quality: This setting affects the size of file that gets created. It causes a trade off between compressed file size against the quality of the saved image: the higher the quality setting, the larger the JPEG file, and the closer the output image will be to the original.
Low values will produce fuzzy images. High values will produce sharp images.
Suggest value: 50
Allowable values: 0-100.
TIFF Dialog
If the TIFF file format is chosen, two additional setting are available under Options.
Compression: Choose between None and LZW. This setting affects the size of file that gets created. LZW is a compression scheme that will create a smaller file size.
Depth: Choose between 24 bit or 32 bit.
24-bit is often referred to as Truecolor. It uses 8 bits to represent red, 8 bits to represent blue, and 8 bits to represent green or 256 levels of each of these three colors. Combined this equals over 16 million colors. This approaches the level at which the human eye can distinguish colors for most photographic images.
32-bit color actually refers to 24-bit color (Truecolor) with an additional 8 bits as empty padding. The reason for using empty space is that all but the newest modern computers process data internally in units of 32 bits; as such, using this amount for each pixel can allow optimizations. In other words, this option won’t make the image look different, but it may run more smoothly on your computer.
Exploding Blocks
If you’d like to explode your blocks check out our lesson on Exploding Blocks & Quilts for Patterns.
• If you’d like a reminder of this and other tools in EQ7, check out the ![]() Display Dynamic Help tool.
Display Dynamic Help tool.
• To print this: Click the title (Tool Tip Tuesday! - The Export Image Tool) and then print as normal.


09-21-2015
11:05 am
Following the directions to print this (it will be very helpful), I could not find the Tool Tip Tuesday option.
09-22-2015
9:19 am
Hi Judith,
If you click here https://doyoueq.com/blog/?p=17206, or where it says “Click the title (Tool Tip Tuesday! – The Export Image Tool)” in the post, or the title of the post (at the top, in blue) you will see just The Export Image Tool post so your printer will just print that post. Otherwise some printers may try to print the whole blog. Does that answer your question?
Thanks,
Heidi
09-22-2015
6:32 am
These tips are fabulous. I love learning in small increments!
09-22-2015
9:19 am
Thanks Bunny!