Are you ready to jump in? I am! This is Block 1 of the Jump Start Sew Along. Today we’re going to set up a basic quilt and print the pattern for our first block.
Let’s get started!
(Want an easy-to-print version of this lesson? Click here to download the Block 1 Lesson PDF file.)
- Open EQ7.
- On the Create a new project tab in the Project Helper window, type “Jump Start Sew Along”. Click OK. We’ll work in this same project for the entire sew along.
- Click the Work on Quilt tool
 . This is the Quilt Worktable. Take a moment to look around your screen. See the diagram below for the important stuff to know.
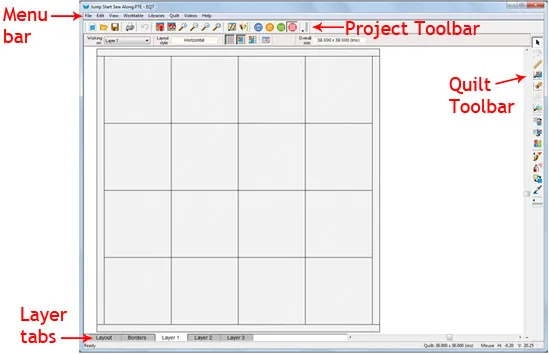
We’ll set up a basic quilt layout. But don’t worry–you don’t have to make this quilt. We’ll talk more about quilt layouts later in the sew along. - On the top menu bar, click QUILT > New Quilt > Horizontal.
- Click the Layout tab at the bottom of the screen.

- Input these settings:
Number of blocks, Horizontal and Vertical: 2
Finished size of blocks:
Check Keep width and height equal
Drag slider to 9.00
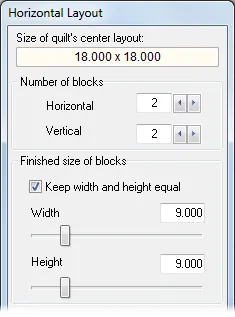
About Block Size: You don’t have to make the blocks 9”. This is EQ7 afterall—you can print the patterns any size you like! But to make your life easier, I’ll give you this advice:
All of the sew along blocks are based on a nine patch grid. Pick a block size that’s a multiple of 3 (3”, 6”, 9”, 12”, etc.) so that you’re working with easy-to-measure numbers. - Click the Layer 1 tab. We’ve got a nice, simple quilt waiting for blocks. Let’s go get some blocks from the Block Library.

- On the top menu bar, click LIBRARIES > Block Library.

- Under 01 Classic Pieced, scroll down and click Nine Patch.
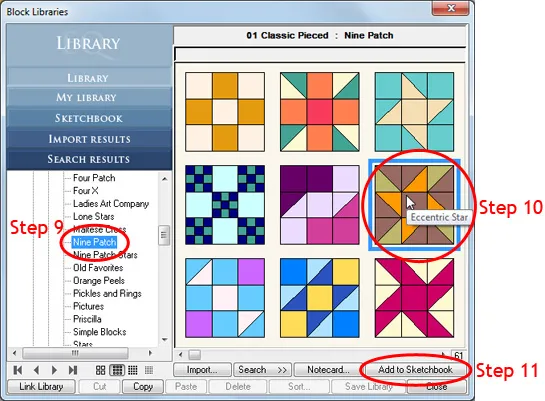
- If you hover your mouse over a block, the name will appear. Find the block named Eccentric Star. Click on it to select it. It will have a blue outline around it.
- Click Add to Sketchbook. It will disappear, indicating it has been added to the Sketchbook.
- Scroll further to the right until you find the block named Rolling Stone. Click on it and then click Add to Sketchbook.

Rolling Stone - Scroll some more until you find Greek Cross. Click on it, click Add to Sketchbook.

Greek Cross - On the left, click the style called Nine Patch Stars.
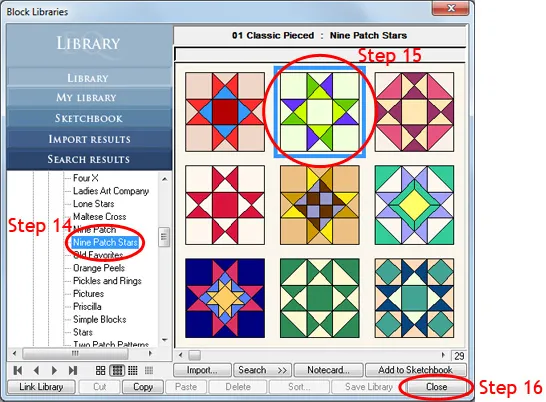
- Find the Twin Star block and Add to Sketchbook.
- Click Close.
- Now we’re back at the Quilt Worktable. Click the Set Block tool
 on the right. The Blocks palette will appear and you’ll see the four blocks we copied from the library.
 - Click on the Greek Cross block in the palette. It will have a light blue line around it, letting you know it’s the selected block.
- Move your cursor over to the top-left block space in the quilt and click to place the block there.
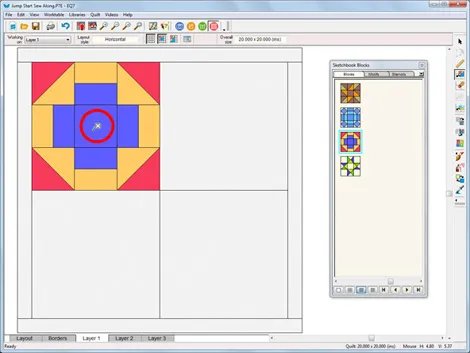
- Click Add to Sketchbook
 to save our in-progress quilt.Now we’re going to print the pattern for this block. In this lesson I’m going to show you how to print the Rotary Cutting chart. If you’d prefer to piece the block a different way (using Templates or the Foundation Pattern), feel free to use those print styles instead.
 - On the right toolbar, click the Select tool
 .
. - Click on the block in the quilt to select it (it will have a green outline).
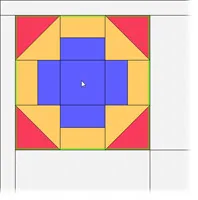
- Click the Print button
 on the top menu bar, and choose Rotary Cutting from the drop-down menu.
 - The block size that we set in Step 6 (9 inches) will automatically be selected in the Print dialog. If you’d like to make the block a different size, click the circle next to Custom block size and type the new size in the Width and Height boxes above.
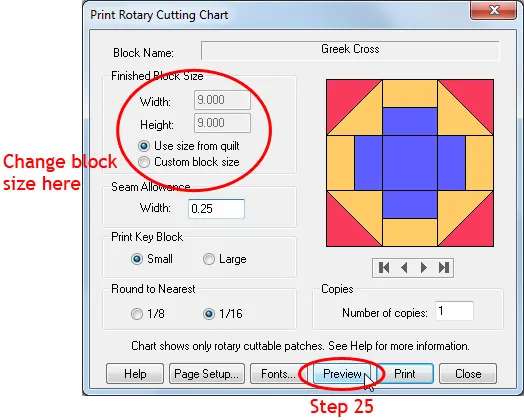
- Click the Preview button. A preview of the rotary cutting chart will appear on screen.
- Let’s take a closer look at how to read the rotary cutting chart. Here’s the chart for Patch A:

This means:
Cut a strip of fabric 3-7/8” wide.
Cut 3-7/8” squares from the strip.
Cut each square diagonally to make two triangles.
You will need 4 red triangles and 4 yellow triangles to make one block. - Click the Print button at the top of the screen to print the chart, or click Close if you do not want to print at this time (then click Close again to return to the Quilt Worktable).
- Click the Save button
 and then FILE > Exit to close EQ7.
We’ve made it through our first block! Now hit the sewing machine and we’ll meet back here on Friday, May 16th to share our blocks.
Note: We didn’t use any of the coloring tools this time, but feel free to get creative in how you use fabrics when you sew the block. Don’t feel like you have to keep the lights, mediums, and darks in the same patches as the block shows. Part of the fun of a sew along is to see how each sewist interprets the same block differently.
We’ll dive into the Fabric Library in the next sew along lesson!
Want to see this lesson in action? Watch the video below!


05-05-2014
10:40 am
What a great block to start up. I can’t wait to get started.
05-05-2014
12:25 pm
This is a great place to start. Just purchased EQ7 a couple of weeks ago and this is just what I need to help me get started.
05-05-2014
2:33 pm
One Step 17, the Set Block tool is grayed out and now I’m stuck — don’t know what to do next. Please help!
05-05-2014
2:41 pm
Hi Cynthia,
Did you click on the Layer 1 tab in step 7? The only time the Set Block tool is greyed out is when you are on the Layout or Borders tabs (because you can’t set blocks on those layers).
Jenny @ EQ
05-05-2014
4:08 pm
Have had EQ 7 since Christmas & have learned so much already! Looking forward to these lessons. Today taught me step 22. Thanks
05-05-2014
6:09 pm
My “horizontal layout” option won’t pop up? What am I missing???
05-06-2014
8:57 am
Hi Pat,
Are you using a Mac? If so, contact technical support and they’ll help you get updated. You can email techsupport@electricquilt.com or call 419-352-1134 9-5 EST.
Jenny @ EQ
05-05-2014
8:14 pm
This is so wonderful, I have been waiting for something like this to come along. Thanks!!
05-06-2014
12:12 am
Great instructions, easy to follow. Have had EQ7 for ages but been struggling. This is my kind of learning. Thanks.
05-06-2014
12:45 am
I too have been struggling! This will help to actually create something in the end I hope!
05-06-2014
1:54 am
I love that you are doing a virtual tutorial for EQ7 I have had it for a while and want to learn so this is just perfect. I have 12 samplers from a store BOM that I have been doing and want to do a different layout then they have and have to design my own with a oriental panel in the middle.
So thanks I will not be making the quilt as in sewing it but will follow along to do a virtual quilt with you.
05-06-2014
9:02 am
Hi Deb,
If you want to design a quilt for already-sewn blocks, you may want to check out this post:
https://doyoueq.com/blog/2012/12/quilting-resolutions/
It gives you instructions for importing photos of your sewn blocks so you can design a quilt layout around them. Saves you the work of finding the block designs in the library, or drawing them yourself.
Jenny @ EQ
05-06-2014
6:26 am
Thank you for the easy to follow instructions.
05-06-2014
7:37 am
Love this! Thanks for doing! EQ7 rocks!
05-10-2014
12:16 pm
Wonderful video Thank you. Already looking forward for the next lesson!
05-10-2014
10:27 pm
Are we just doing individual blocks in this or are we actually going to make something. I ask because I am wondering if I need to buy the fabric. I am loving the instruction so far.
05-12-2014
9:13 am
We will be sewing four blocks in this sew along. At the end of the sew along I’ll share some quilt layout ideas, but it’s up to you how you’d like to use the four blocks we create. Or you can just follow along with the software part of the sew along and not actually sew the blocks. It’s up to you!
On Friday, May 16th everyone will have the chance to share a photo of their first sewn block.
Jenny @ EQ
05-10-2014
11:46 pm
I notice that you have the blocks colored, but when I open my block library, I only see the uncolored blocks. Did I change a setting somewhere?
05-12-2014
9:16 am
In the Block Library, use the coloring arrows to change the display of the blocks. The coloring arrows are at the lower left of the Block Library window, right above the Link Library button. There are three display options for the blocks: line drawing, grayscale, and colored.
Jenny @ EQ
05-14-2014
8:17 am
I have my block finished and will be gone May 16th-26th. Can I send you a picture before the 16th. I’ve had EQ7 for a while and am looking forward to learning how to use it …
05-15-2014
10:58 pm
I Love my EQ7! I have had it for about a year and have designed more blocks and quilts than I could ever sew in a lifetime. I love that I can design personality into a block and/or quilt that fits the person I am gifting. This is my first Sew Along and is great fun. I’ve made 2 blocks in this first pattern. It will be fun to discover what different colorways others are using in the Sew Along and how the quilts will turn out. Thanks Jenny!
05-16-2014
6:16 am
I enjoyed the first session, thank you
06-02-2014
12:56 pm
Hi,
I am attempting to make a wedding quilt for my daughter. I have made rosebuds and roses myself out of fabrics that are the colors of her bouquet and her bridesmaids bouquets. I have hand-sewn these flowers onto a background fabric that is the color of the bridesmaids dresses – these are the blocks. How do I print out a photo of her and her husband onto a fabric sheet to use in the quilt – I want to put it in the middle of the quilt.