Welcome to the Block 2 post for the EQ7 Summer Drawing Series! We’ll start each month with a drawing lesson that focuses on one of the drawing styles available on the Block Worktable. Then, at the end of the month, we’ll have a link up post where everyone can show off a photo of their sewn block. That’s right, we’re not just drawing in this series, we’re SEWING too!
Block 2 is drawn on the PatchDraw Block Worktable. The PatchDraw Block Worktable has both Pieced and Appliqué tabs at the bottom of the screen. We’ll only use the Pieced tab for this lesson. We’ll tackle that Appliqué tab next month!
PatchDraw is aptly named because you construct the block by drawing closed patches (unlike EasyDraw where you drew straight or curved lines and the software created the patches for you). The best part of Pieced PatchDraw is the specialized click-and-snap grids. They make drawing rather tricky blocks (like LeMoyne Stars, New York Beauties, and Compasses) easy-peasy!
Here are the basic “rules” for Pieced PatchDraw:
- All patches must be closed shapes. If you do not close a patch correctly, the unfinished patch will disappear from the worktable when you switch to another tab or save to the Sketchbook.
- To be a finished design, the entire block must be filled with patches, otherwise you’ll leave an empty hole in your block.
- Do not overlap patches. Remember these are pieced blocks, therefore the patches must fit adjacent to each other as they would when you’re sewing the patches together.
Let’s get started with our block!
(Want an easy-to-print version of this lesson? Click here to download the Block 2 Lesson PDF file.)
- Open EQ7.
- Click the Open an existing project tab in the Project Helper window and open your sew along project file, which we named EQ7 Summer Drawing Sew Along in the first lesson. Most likely, your project will be listed under Most recently used projects (unless you’ve designed lots of projects since our last lesson!). Click on the project file name to select it, then click OK. The Sketchbook will appear, click Close to put it away.
- Click the Work on Block tool
 . You are now looking at the Block Worktable.
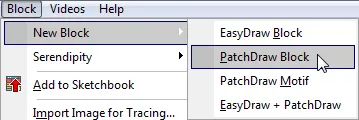
 - Click Block > New Block > PatchDraw Block.
- Make sure your Precision Bar is visible by clicking VIEW and then looking for the checkmark next to Precision Bar. If there isn’t, click to put a checkmark there.
Note: If you accidentally click on the worktable, you will have a “sticky” blue line attached to your cursor. Just click the ESC key on your keyboard to release the line from your cursor. - Now we’ll set up the Precision Bar. Input the following settings:
Block Width and Height: 12
Grid: Octagon
Dimension 1 and Dimension 2: 8 (these are your snap points)
Graph Paper Cells: OFF

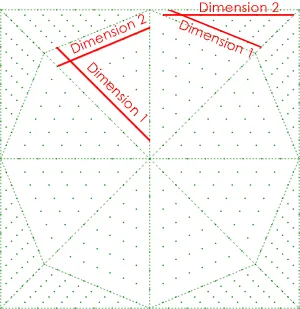 About those Dimensions…
The Pieced layer of PatchDraw has automatic snapping based on the grid you are working on. With the PolyDraw tools, you’ll notice that with each click your line will snap to the closest grid point or arc.
Snap dots are in two different dimensions within each of the different polygon shapes. For the Octagon grid, the two dimensions in each of the different shapes are illustrated by the red lines.
For more information about the special grids, go to HELP > Contents. On the left, click Drawing Blocks > Pieced Blocks Using PatchDraw > About the PatchDraw Pieced Grids. - Click and hold on the Polydraw tool on the left toolbar to make the flyout appear and choose the PolyLine tool.

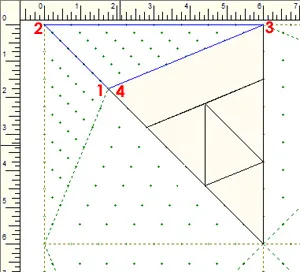
The drawing method in Pieced PatchDraw is different from that of EasyDraw. In Pieced PatchDraw you click on the points where you want nodes to appear (they will automatically snap to the nearest grid point). Do not hold down your mouse button between clicks. To finish a patch, double-click at the same point where you started. - Click at the center point of the block (#1). You’ll now see a blue line connected to your cursor. Move your cursor up vertically three grid points (#2) and click again. Move to #3 and click, then move to #4 and double-click to finish the triangle.
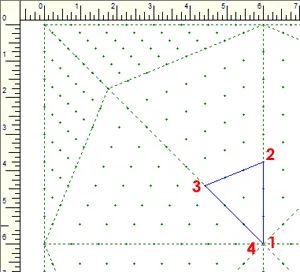
The triangle will change to a solid cream color, indicating it is closed.
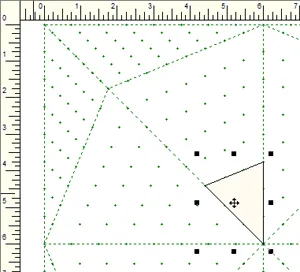
- Using the illustration below as a guide, draw another triangle above the first:
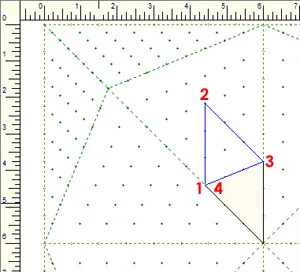
- Fill in the rest of the “wedge” by drawing the shapes illustrated below:
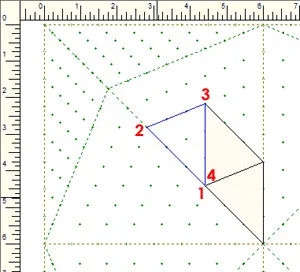
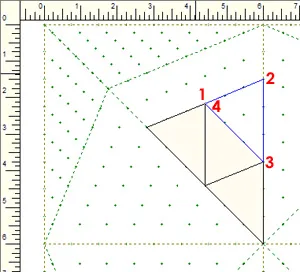
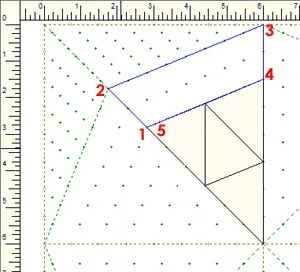
Believe it or not, all of the actual drawing is done! We’ll copy the shapes we’ve just drawn to fill in the rest of the block. - Click EDIT > Select All (or CTRL+A on your keyboard). All of the patches will be selected with a black crosshair in the middle.
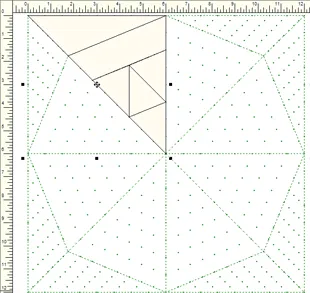
- On the Precision Bar, click the Clone selected segments tool
 . Another set of patches will appear on your screen and will be selected with a black crosshair in the middle. Make sure you do not click anywhere else on the worktable—we want these patches to stay selected.
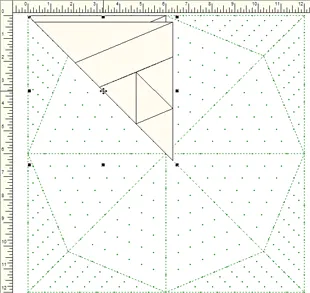
- Click the Flip left and right tool
 on the Precision Bar.
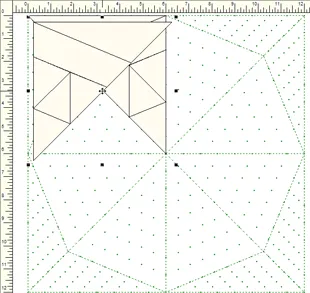
- Position your cursor over the crosshair and click, hold, and drag the new patches next to the original set. We now have a quarter of the block filled in.
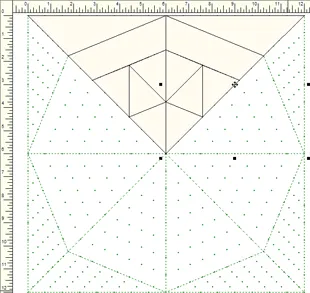
- Click EDIT > Select All (or CTRL+A) to select all the patches on the worktable again.
- Click the Clone selected segments tool
 . Remember we want to keep this new set of patches selected, so don’t click anywhere else on the worktable.
 - On the Precision Bar, click the Rotate selected segments tool
 two times.
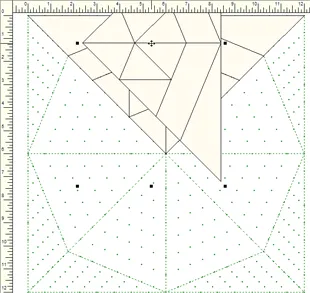
The Rotate button works differently for each of the Pieced PatchDraw grids. When using the Octagon grid, each click of the Rotate button will rotate the selected patch by 45 degrees. - Position your cursor over the black crosshair and drag the selected patches into place.
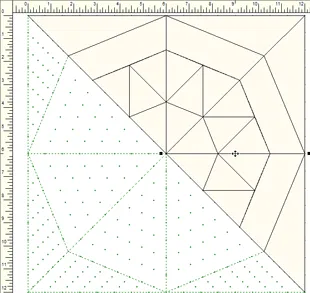
- Click EDIT > Select All (or CTRL+A) to select all the patches on the worktable again.
- Click the Clone selected segments tool
 .
. - Click the Rotate selected segments tool
 four times.
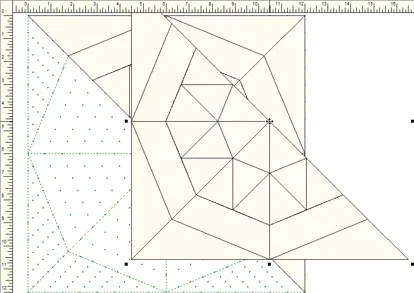
- Position your cursor over the black crosshair and drag the selected patches into place.
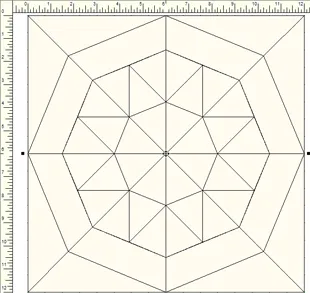
- The block is complete! Click Add to Sketchbook
 .
. - Click the Color tab at the bottom of the screen.

- Use the Paintbrush tool
 to color your block. You can use fabrics or solid colors. Color the block however you like—get creative!
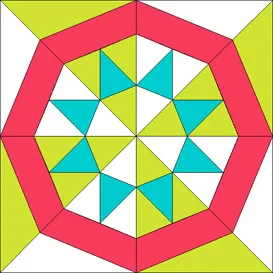
- Click Add to Sketchbook
 .
. - Click View Sketchbook
 . Click the Blocks section on the left and click the last block to select it.
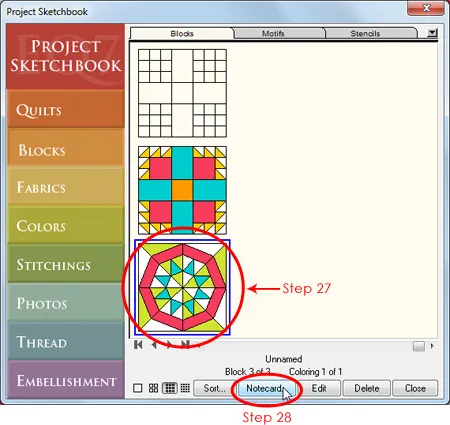
- Click the Notecard button. Your cursor should be blinking on the first line of the notecard next to Name. Type “EQ7 Summer Drawing: Block 2”. If you’d like to add more info to the Notecard, click beneath the word Notes to move your cursor there and type.
Adding information to a block’s notecard helps to keep us organized, especially if you keep lots of in-progress drawings in your Sketchbook. The name that you type on the notecard will appear on your pattern printouts too!
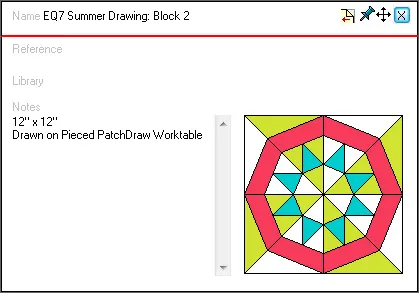
- Click the X in the top right corner of the notecard to close it. Then click Close to close the Sketchbook.
- Now we need to print our pattern so that we can get to the best part of the design process—sewing! Click the Print button
 .
. - The menu appears with the available printing options for this block. You can choose to print whichever pattern style you prefer to piece this block. For more information on printing, refer to Chapter 10 of the EQ7 User Manual. For this lesson, we’re going to take a closer look at Foundation Patterns, so click on that option.
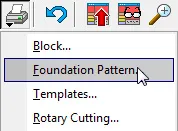
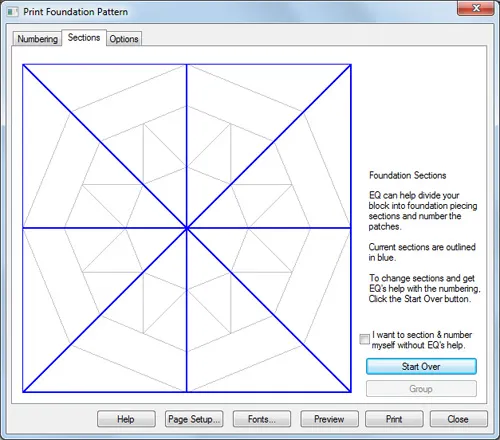
- The Print dialog box appears, with the Sections tab selected. The blue lines around the patches indicate the sections.
The sectioning for this block looks good. However, if you’d like to change the way the block is sectioned, click the Start Over button. Click the patches you’d like grouped together and click Group. Continue in this manner until you’re done.
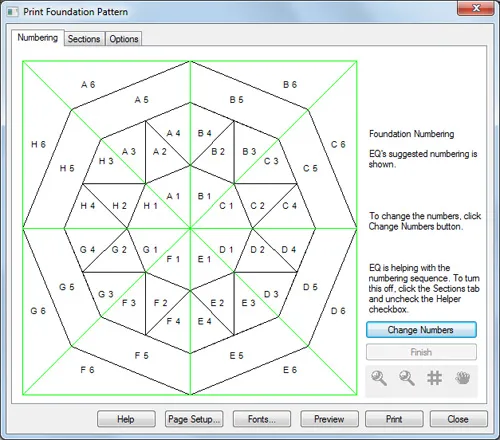
- Click the Numbering tab. This also looks good for our block, but if you’d like to change it click the Change Numbers button and click on the patches in the order you’d like them numbered.
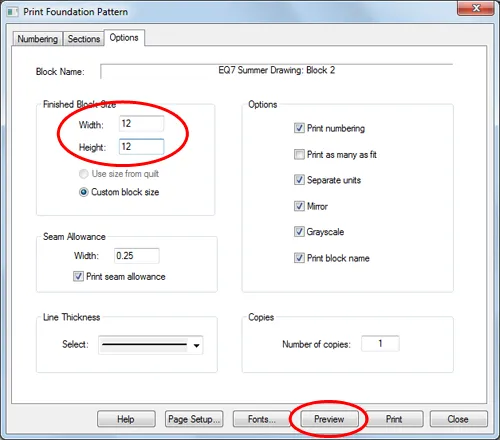
- Click the Options tab. Put checkmarks next to whichever options you’d like in the Options section on the right. Leave “Print as many as fit” unchecked if you’d like to be able to move foundation sections on the Print Preview (see step 35).
Remember that in EQ7 you are working in finished sizes (the final size of your block after all the seams have been sewn). EQ7 adds the seam allowance for you when you print the patterns.
For this sew along we’ll be drawing all the blocks at 12” and that’s the size I’ll be sewing my blocks too. But you can choose to print and sew your blocks at any size. Type in the finished size for the width and height. Click the Preview button.
- On the Print Preview, you may find that some of the foundation sections are spread across two pages. We can fix that—click the Move button.
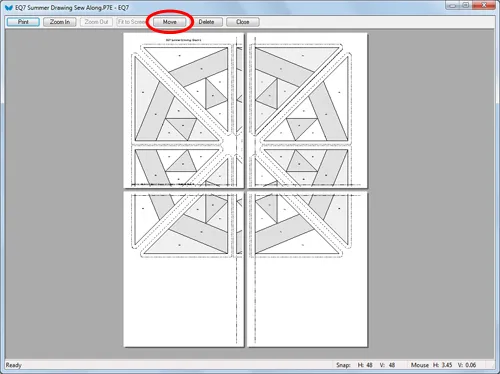
- Click on a section and drag it to a new location. If you’re making a 12” block like me, two sections will fit on each page nicely.
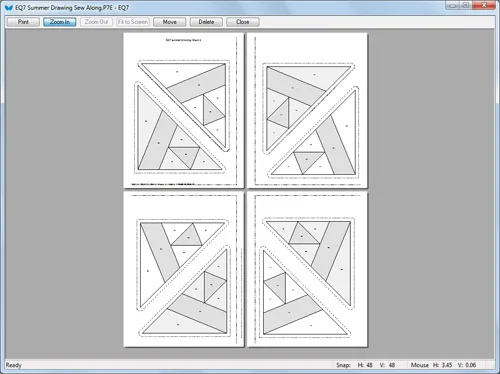
- You can click Print to print the Foundation Pattern, or Close to return to the Print dialog box (click Close again in the dialog box to return to the Block Worktable).
- After you’ve printed your patterns, click Save
 to ensure all your work is saved. Now close EQ7 and start sewing!
Come back on June 30 to post a photo of your sewn block!
Want to see this lesson in action? Watch the video below!
Would you like a little extra Pieced PatchDraw homework? Try out the other PatchDraw lessons available in EQ7 by clicking HELP on the main menu bar and choosing EQ Lessons (PDFs).
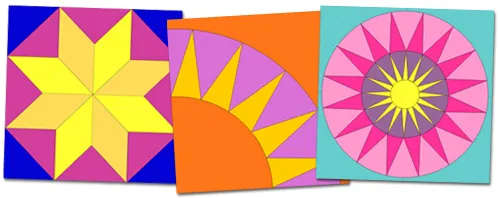
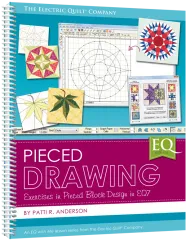
And if you’d like even more drawing practice, check out Patti Anderson’s book EQ with Me: Pieced Drawing! You’ll be a block drawing expert in no time!




06-01-2013
9:48 am
How would you sew this block? Would this be like paper piecing?
06-01-2013
10:39 am
That’s how I would piece this block (which is why I showed the foundation pattern printing option in the lesson).
06-01-2013
10:14 am
Love the newest block, can’t wait to get going. Love paper piecing. I hope you will continue these classes forever.
06-01-2013
10:23 am
I knew there had to be an easier way! I’m off to try it…
06-01-2013
10:39 am
I have just started doing lesson on pieced patchdraw from Patti R Anderson’s book and I was so glad to see this lesson. I am very excited, can’t wait to start it.
06-01-2013
1:25 pm
I seem to have missed the first lesson is there a way to download the instructions?
Thanks
Judy
06-02-2013
9:06 am
Hi Judy,
You can find all the EQ7 Summer Drawing posts from the main menu (under Behind the Mouse). Hover your mouse over Sew Alongs and then click EQ7 Summer Drawing from the drop-down menu.
Here’s the direct link to the block 1 lesson:
https://doyoueq.com/blog/2013/05/eq7-summer-drawing-block-1-easydraw-2/
06-01-2013
3:23 pm
Ok, what am I doing wrong? I have EQ Stitch installed over the EQ7 update. I don’t have any dots showing on my screen to count and draw to, so am trying to eyebalI sections. I get the blue drawing line but it never turns off What to do?
06-01-2013
3:30 pm
Video solved problem of line. But how do I see dots?
06-01-2013
4:47 pm
Hi Shirley, Scroll back thru the blog until you find the May 1 lesson with the first block. At the bottom of the lesson is a video. I think it shows about the dots in there. I hope that helps.
06-01-2013
5:01 pm
Ok. I just watched the video again. It didn’t show what answered your question.I must have seen it in another video. I did check the HELP button in EQ. In the search box type DOT and list topics. Then choose GRID OPTIONS and display. It shows how to change the size and color of the dots. I hope that helps.
06-01-2013
5:00 pm
Hi Shirley,
I was having trouble seeing the dots too, but after looking very closely, they were there, but so faint that they look more like specks than dots on my monitor. Could that be what’s happening for you, too? Just a thought.
06-01-2013
5:13 pm
The Foundation Patterns feature is dim when I click on the Print icon and will not allow me to use this feature. Did I miss a setting somewhere along the way?
06-01-2013
8:08 pm
See if you selected the block itself you want to print. If you are viewing the quilt and no block is selected the options to print the block are not highlighted. Thats what I see when I look at my quilt when not selecting a block.
Also in HELP type GRAYSCALE in the search box and read SPECIAL GRAYSCALE for coloring help. I had this issue last week and found out how to fix it when EQ staff wrote me back. Thats when I didnt see the grayscale coloring on something else I was doing.
Hope this helped.
06-02-2013
9:42 am
Hi Linda,
Have you downloaded the EQ7 Update yet? This is a free update to EQ7 available here:
http://electricquilt.com/download/eq7-update/
The update made changes to the foundation printing options on the Pieced PatchDraw worktable.
Jenny @ EQ
06-02-2013
1:31 pm
Thanks, Jenny! I knew that I had to be missing something–just didn’t realize that it was an update. Thanks so much–I downloaded and installed the update, and it solved the problem immediately. Now that I have my pattern printed, I need to decide what fabrics to use in making my block. Your Summer Drawing Series is proving to be extremely helpful.
06-01-2013
6:38 pm
Hi, Jodie: Thanks for the information about changing the size and colors of the dots. I tried it, and it worked beautifully! Now I can see the dots without having to squint and get up close to the laptop screen–let alone what it did for the accuracy of the block pattern! Thanks again!
06-01-2013
8:01 pm
Glad I could help you. Usually I am asking questions!
06-01-2013
11:08 pm
Is there a place that I can go to see how Paper piecing is done. I have never done this type of piecing before and I am a little nervous to try without seeing it done.
06-02-2013
9:59 am
Hi Alison,
Try doing a Google search for “how to foundation piece”. There are lots of great tutorials and videos out there. There are also several different techniques for foundation piecing, so you can find one that works best for you.
The way I foundation piece is pretty similar to the technique shown in this video:
http://video.fonsandporter.com/videos/0057_paper-foundation-piecing/
Foundation piecing is my favorite piecing method, but if you’d prefer to put this block together differently feel free!
06-02-2013
3:22 pm
http://www.caroldoak.com/store.php
Carol Doak Teaches You To Paper Piece DVD is an excellent DVD I review every time I am starting a paper piece project.
06-02-2013
7:08 am
There was a mini lesson with variations for block #1. Is there also a mini lesson for block #2? And where can I find it?:-)
06-02-2013
10:03 am
Hi Sandra,
You can find all the EQ7 Summer Drawing posts from the main menu (under Behind the Mouse). Hover your mouse over Sew Alongs and then click EQ7 Summer Drawing from the drop-down menu.
The mini lessons will be a “surprise” that show up in the middle of the month.
06-02-2013
9:41 am
What a great tutorial. I’m so loving the EQ7 summer drawing series. Thank you!
SewCalGal
www.sewcalgal.blogspot.com
06-03-2013
2:43 am
Jenny,
I am having a problem downloading the video. I keep getting this message when I go to play it “Windows Media Player cannot play the file. The Player might not support the file type or might not support the codec that was used to compress the file.” is anyone else having this problem? love the EQ7 Summer Drawing Blocks so far. Thanks for sharing.
Anne
06-03-2013
10:12 am
Anne,
All of our videos are hosted online at youtube.com. Here is a direct link to the video for this lesson:
http://www.youtube.com/watch?v=XMblqcr725o
Matthew
06-03-2013
3:18 pm
This is the clearest EQ lesson I have done and Thank You. I can’t say that I didn’t have to go back and do over a couple of things: I tend to skip ahead and then make mistakes. However, I a so very pleased with what you helped me create. I have not been sewing my blocks (I drew all 4 last month) but I may try to if I can get caught up on current projects. Thanks again.
06-04-2013
1:42 pm
Is there a way to print the lesson out as a PDF, as some of my pages have the header covering up the top line of text. Smiles, Bert
06-04-2013
3:40 pm
Hi Bert,
Yes there is a link just before step 1 to view the lesson as a PDF. I hope this helps!
Sara
06-04-2013
5:52 pm
I tried to print out the Block 2. It printed out without the numbers or the quarter inch seam allowances. I know I checked all the boxes on the options page. I tried printing it twice and the same thing happened. Did I miss a step?
06-05-2013
9:53 am
Hi Brenda,
Do you know if you’ve installed the EQ7 Update yet? It’s a free update on our website (http://electricquilt.com/download/eq7-update/). This update fixes some issues with printing Pieced PatchDraw blocks from the Block worktable.
Sara @ EQ
06-05-2013
12:45 am
Quilt in a Day has a very good DVD called Kaleidoscope Quilt that I am finding helpful for putting the wedges together.
06-07-2013
8:21 pm
Jen I get up to step 10 and then everything goes to hell in a hand bag! Once I hit Edit then Select All only not all of my patches are selected. it looks as if only the very first triangle is selected but in the diagram I printed, it shows the first three triangles are selected. I cannot seem to get pass this point and I need help. I enjoy my EQ7 very much but this sure is a challenge. Can you help me?
06-10-2013
9:30 am
Hi Sally,
Using EDIT>Select All does select all of the patches on the worktable, sometimes it’s just hard to tell that they’re all selected. There will be little black squares around all the selected patches and a black crosshair in the middle. Try clicking EDIT>Select All again and then doing the next step (Clone selected segments) and you’ll see that all the patches were selected and duplicated.
06-08-2013
9:26 am
I cannot find the “clone selected segment” icon. It is not on my toolbar. Can you help me to find it. Thanks, Jeana
06-10-2013
9:32 am
Hi Jeana,
The Clone Selected Segments tool is on the Precision Bar, right above the worktable. It’s the 5th tool from the right.
06-13-2013
7:44 pm
I haven’t done paper piecing in years! and then only once. Had to refresh my memory on how to do this. It took awhile but I finally finished the piece. That was a tough one!
06-21-2013
12:50 pm
Great lesson. Can’t wait to sew the block. Thank you, thank you, thank you. I am FINALLY enjoying my EQ7.
06-30-2013
5:09 pm
Here are my two blocks for June. I decided to change the colors I am using so that they may become a part of a quilt. Enjoyed the lessons, thank you
07-01-2013
1:48 pm
I am trying to color the star points in the first block as in the picture but I am unable to do so. Everything else is colored.
07-01-2013
2:48 pm
Hi Marilyn,
Could you send your project file to Tech Support (techsupport@electricquilt.com)? That’s the easiest way for us to see what’s going on with your block.
Just attach the PJ7 file to an email message the way you normally would. By default, PJ7 files are stored here:
Documents > My EQ7 > PJ7
You can also find instructions for emailing a project on page 28 of the User Manual.
07-01-2014
9:28 am
How do I rotate specific groups before printing? Sometimes if you can just turn 1 section you can fit more groups on a page.
07-02-2014
10:34 am
You cannot rotate in the foundation pattern print preview. Depending on the pattern, sometimes the foundation sections will fit better if you change the page orientation from portrait to landscape. In the print dialog box, click the Page Setup button. Under Orientation, choose Landscape, and then click OK.