Welcome to the Block 1 post for the EQ7 Summer Drawing Series! We’ll start each month with a drawing lesson that focuses on one of the drawing styles available on the Block Worktable. Then, at the end of the month, we’ll have a link up post where everyone can show off a photo of their sewn block. That’s right, we’re not just drawing in this series, we’re SEWING too!
———————–
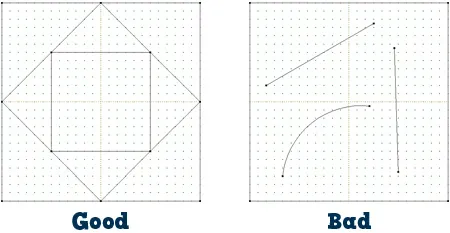
Block 1 is drawn on the EasyDraw Block Worktable. EasyDraw is the simplest way to draw a pieced block in EQ7. You can draw straight lines and curved arcs in EasyDraw. The one rule you have to follow when drawing in EasyDraw is to make sure that your lines and arcs touch one another OR the block outline.
If you’d like to read more information about the basics of EasyDraw, I highly recommend checking out the EQ Lesson titled EasyDraw Blocks: Lesson 2: Understanding the EasyDraw™ Basics. You can find the EQ Lessons by clicking HELP on the main menu bar of EQ7 and choosing EQ Lessons (PDFs).
———————–
Let’s get started with our block!
(Want an easy-to-print version of this lesson? Click here to download the Block 1 Lesson PDF file.)
- Open EQ7.
- On the Create a new project tab in the Project Helper window, type “EQ7 Summer Drawing Sew Along”. Click OK.
We’ll keep all of our sew along blocks in the same project file, so each month we’ll open this project before drawing a new block. - Click the Work on Block tool
 . You are now looking at the Block Worktable.
 - Click Block > New Block > EasyDraw Block.
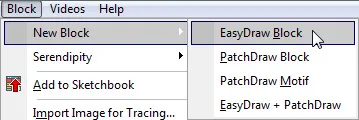
- Make sure your Precision Bar is visible by clicking VIEW and then looking for the checkmark next to Precision Bar. If there isn’t, click to put a checkmark there.
- Now we’ll set up the Precision Bar to make drawing easier. Input the following settings:
Block Width and Height: 12
Snaps Horizontal and Vertical: 48
Graph Paper Cells: ON
Graph Paper Horizontal and Vertical: 2
Snapping Options: Snap to Grid ON, Snap to Nodes ON, Snap to Drawing OFF
Proper snap settings are the key to drawing pieced blocks. These settings give us snap points every ¼”.
- Click the Line tool
 . When drawing in EasyDraw, click at the starting point of the line and hold down the mouse button as you drag your mouse to the end point of the line and then release the button.
 - Draw a vertical line at the 4.5” mark by placing your cursor at the top outline of the block at the 4.5” mark. Click, hold, and drag your cursor to the bottom of the block, keeping the line as straight as possible. Release the mouse and the line will snap into place.
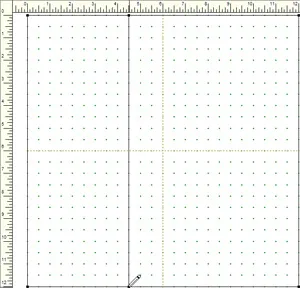
- In the same manner, draw a vertical line at the 7.5” mark.
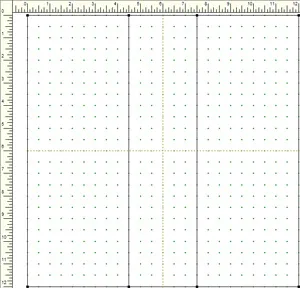
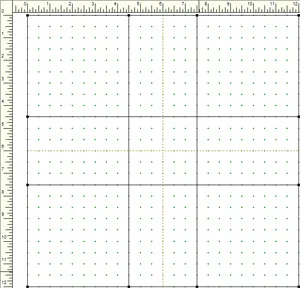
- Draw two horizontal lines at the 4.5” and 7.5” marks.
- Click the Grid tool
 .
. - Click the small red box on Grid tool to make the Grid Setup box appear. In the Grid Setup box, set the Columns and Rows to 3.

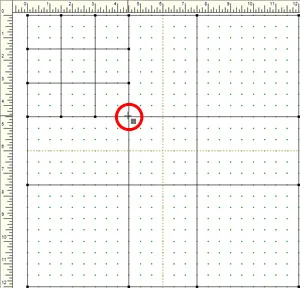
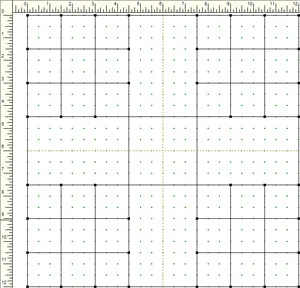
- We’re going to draw 3×3 grids in the four corners of the block. Starting at the top-left corner of the block, click, hold, and drag your cursor to the first intersection of the vertical and horizontal lines.
- Repeat for the other 3 corners.
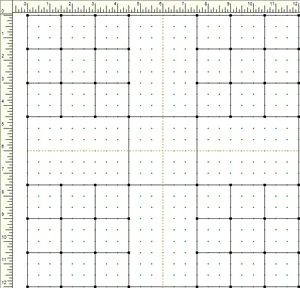
- Click Add to Sketchbook
 . Not only does this save our in-progress block, but it also creates nodes where all those grid lines cross. We’ll use these nodes for the next lines we draw. (If you don’t see these new nodes, click the Refresh tool
  to redraw your screen.)
- Click the Line tool
 .
. - We are going to create half-square triangles in the grid squares that touch the outline of the block. In the upper-left corner, draw diagonal lines as shown below:
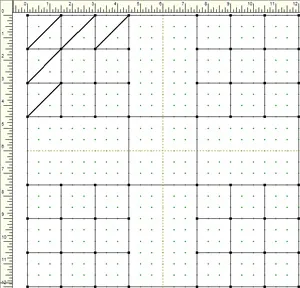
- Now draw these diagonal lines in the other three corners.
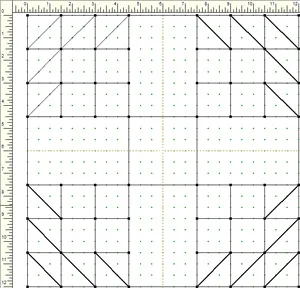
- Click the Pick tool
 . We’re now going to delete some lines to create larger squares in the four corners.
 - Click on one of the lines of the inner “four patch” in the top left corner of the block, to select it.
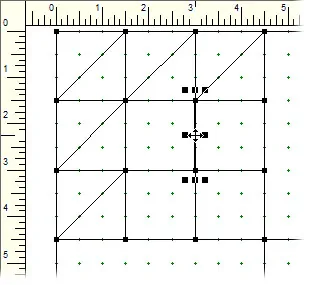
- Press the DELETE key on your keyboard and the line will disappear.
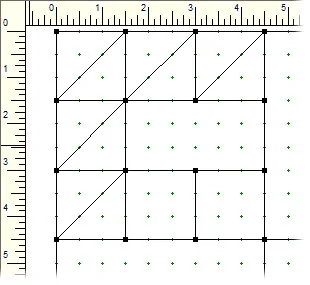
- Repeat for the other three lines.
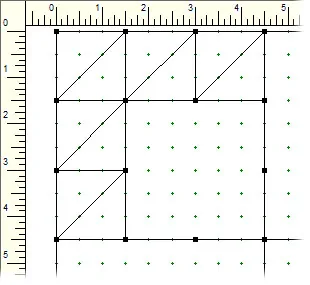
- Now delete those four lines in the other corners.
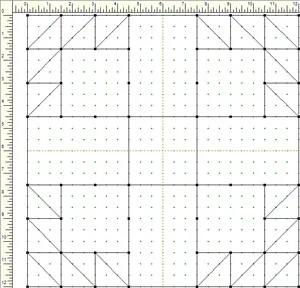
- The drawing is complete! Click Add to Sketchbook
 .
. - Click the Color tab at the bottom of the screen.

- Use the Paintbrush tool
 to color your block. You can use fabrics or solid colors. Color the block however you like—get creative!
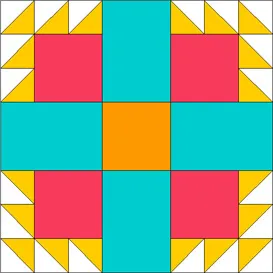
- Click Add to Sketchbook
 .
. - Click View Sketchbook
 . Click the Blocks section on the left and click the last, colored block to select it.
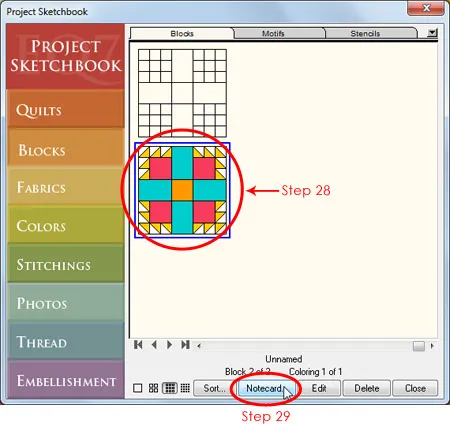
- Click the Notecard button. Your cursor should be blinking on the first line of the notecard next to Name. Type “EQ7 Summer Drawing: Block 1”. If you’d like to add more info to the Notecard, click beneath the word Notes to move your cursor there and type.
Adding information to a block’s notecard helps to keep us organized, especially if you keep lots of in-progress drawings in your Sketchbook. The name that you type on the notecard will appear on your pattern printouts too!
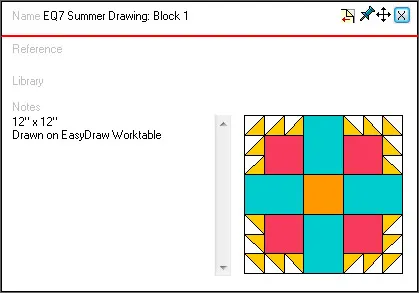
- Click the X in the top right corner of the notecard to close it. Then click Close to close the Sketchbook.
- Now we need to print our pattern so that we can get to the best part of the design process—sewing! Click the Print button
 .
. - The menu appears with the available printing options for this block. You can choose to print whichever pattern style you prefer to piece this block. For more information on printing, refer to Chapter 10 of the EQ7 User Manual. For this lesson, we’re going to take a closer look at Rotary Cutting, so click on that option.
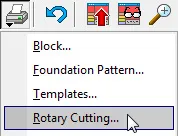
- The Print dialog box appears. Remember that in EQ7 you are working in finished sizes (the final size of your block after all the seams have been sewn). EQ7 adds the seam allowance for you when you print the patterns.
For this sew along we’ll be drawing all the blocks at 12” and that’s the size I’ll be sewing my blocks too. But you can choose to print and sew your blocks at any size. Type in the finished size for the width and height. Click the Preview button.
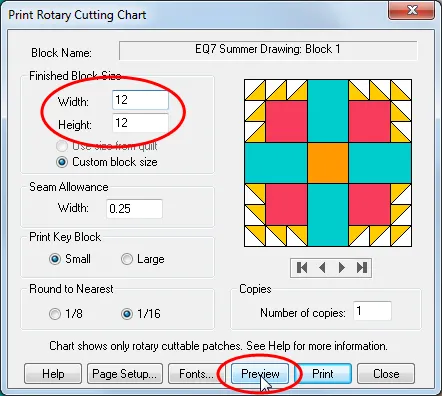
- Let’s take a closer look at the rotary cutting chart. Here’s the chart for Patch A:

This means:
Cut a strip 2-3/8” wide.
Cut 2-3/8” squares from the strip.
Cut the squares diagonally to make two triangles.
You’ll need 20 white triangles and 20 yellow triangles for this block. - You can click Print to print the Rotary Cutting Chart, or Close to return to the Print dialog box (click Close again in the dialog box to return to the Block Worktable).
- After you’ve printed your patterns, click Save
 to ensure all your work is saved. Now close EQ7 and start sewing!
Come back on May 31 to post a photo of your sewn block!
———————–
Want to see this lesson in action? Watch the video below!
———————–
Would you like a little extra EasyDraw homework? Try out the other EasyDraw lessons available in EQ7 by clicking HELP on the main menu bar and choosing EQ Lessons (PDFs).
And if you’d like even more drawing practice, check out Patti Anderson’s book EQ with Me: Pieced Drawing! You’ll be a block drawing expert in no time!




05-01-2013
3:40 pm
IF the lessons were in a PDF format, it would be so much easier to print them out. Is it possible to do this?
05-01-2013
3:41 pm
I just looked at the print preview and I see that it “should” print out without all of the things on the right side of the page. Sorry I didn’t check this out first.
05-01-2013
3:45 pm
Hi Wanda,
Did you see that you can save and print the PDF version of this lesson? Right before Step 1 it says “Want an easy-to-print version of this lesson? Click here to download the Block 1 Lesson PDF file.”
Jenny @ EQ
05-01-2013
4:05 pm
Thanks for a great lesson, I’ll be back at the end of the month with my block.
05-01-2013
4:14 pm
Looks good to me. I am having no problem keeping up so far! We’ll see as things go along, if I have a learning curve later.
Thanks,
Susan
05-01-2013
4:16 pm
Dear Jenny,
I want to confirm that the 2 3/8″ strip for the half sq triangles is the same size to be used to cut into 2 3/8″ squares, draw a line on the back of the lighter fabric, sew 1/4″ away from this line on both sides and then cut apart. This way you do not need to work with bias edges when the sqs are cut first and then sewn together. Is that correct?
05-01-2013
4:48 pm
Yes, Ruth, you are correct!
If you are making the block at 12″ (like I am in the lesson), those HST triangles are 1-1/2″. “Quilter’s math” tells us to add 7/8″ to the finished size of the HST to find the size to cut out the squares. 1-1/2″ + 7/8″ = 2-3/8″
05-01-2013
4:38 pm
I am new to EQ7 and EQstitch, this is very exciting! The u tube video was excellent! I can’t wait to follow along and stitch it out! I am out of town at the moment, watching this post on my iPad
05-01-2013
4:40 pm
Thank you for this opportunity to learn more. I really need this.
05-01-2013
4:49 pm
Can I save this lesson on my computer My EQ7 is still in the mail to me.
05-01-2013
4:57 pm
Gale-
You can save and print the PDF version of this lesson. Right before Step 1 it says “Want an easy-to-print version of this lesson? Click here to download the Block 1 Lesson PDF file.”
Also, once a lesson is posted it will remain on the blog so you can access them at any time. You’ll find all the EQ7 Summer Drawing posts from the main menu (under Behind the Mouse). Hover your mouse over Sew Alongs and then click EQ7 Summer Drawing from the drop-down menu.
05-01-2013
5:31 pm
I started with EQ5 many years ago. In lesson 1 I learned several new tricks that I was unaware of. Thanks for these lessons.
05-01-2013
8:45 pm
Thanks for the lesson. It has helped a lot. I’m looking forward to posting my sewn block at the the end of the month
05-02-2013
1:58 am
Thanks for the tutorial. I enjoyed working it and have my pattern all printed out. I’ve used Easy Draw a little, but learned some new things drawing this block. Can’t wait to get to the sewing.
05-02-2013
11:05 am
Loved this! Very easy to follow! Can’t wait to try this!
05-02-2013
11:08 am
Forgot to say how nice it was to have the video too! It makes a huge difference to me to actually see someone doing it the right way!
05-02-2013
11:40 am
Awesome!! I’ve taken a few EQ lessons, but this lesson has been SO much clearer and easier to follow than anything I’ve taken or stumbled upon by myself in the past. Thank you!
05-02-2013
12:08 pm
Jenny, The video lesson really helped me grasp what the printed lesson was telling me to do. I went thru it in 30 minutes or less. That was not hard at all.
Thank you!
05-02-2013
3:19 pm
How many blocks will there be in total? A girl likes to plan ahead rather than making orphan blocks
05-02-2013
9:02 pm
There will be four blocks in the drawing series. You can find the sew along schedule in this post:
https://doyoueq.com/blog/2013/04/announcing-the-eq7-summer-drawing-series-on-the-do-you-eq-blog/
Jenny @ EQ
05-02-2013
3:30 pm
WOW! This is really the first time I have drawn lines and actually had them remain in the sketchbook where I drew them. I had almost given up on EQ. Now I’m a believer again. Thank you!
05-02-2013
4:38 pm
I just finished drawing this block in EQ. Great instructions and lots of fun. Thanks for the great tutorial. I’ll be looking forward to the next one.
05-03-2013
8:07 am
Enjoyed the drawing of the block, however I did have problems with the deleting of the four patch lines, it wanted to take the whole line out. I did take the whole line out and redraw the parts that were taken away. Did anyone else have that problem?
05-03-2013
9:22 am
Hi Linda,
Sounds like you missed Step 15-Add to Sketchbook. After drawing the grids, adding to the Sketchbook creates nodes at the intersections of all those lines. Then you’ll be able to delete those “four-patch” lines without taking out the whole line.
05-03-2013
5:01 pm
I have just drawn block 1. Thank you! I am now understanding what I am actually doing. Looking forward to sewing out the block.
05-04-2013
6:37 am
I’ve been using EQ for years, but I learned pretty much by hunting around for what I wanted when I was desperate. I found ways to do things, but this lesson gave me shortcuts. Love the Precision Bar and the Refresh Tool — right there in front of me on the toolbar instead of clicking through the menu! This “old dog” is learning new tricks! Thank you!
05-04-2013
8:27 am
I am so excited about these lessons. I need all the help I can get to learn the EQ7 program. I went to UTube and watched the video and I was able to make the block with very little trouble. Thanks for the great lesson and the great instructions. I will be back on May 31!
05-04-2013
12:20 pm
Love the lessons, thank you.
05-05-2013
1:53 am
Thanks for the lessons now going to sew block.
05-07-2013
1:33 am
Good tutorial and great shortcut techniques. Got my block sewn and ready to post. Looking forward to the next one!
05-08-2013
9:42 am
thank you for these lessons, they are very useful to me.
It’s really great!
thank you again
Fran@oise
05-08-2013
9:53 am
Nice tutorial! Have a super day!
05-08-2013
10:25 am
Nice tutorial. So easy to follow and the block looks great now its sewn. Can’t wait for the next one! Well done.
05-08-2013
4:05 pm
Glad to see everyone’s working through the drawing lesson. I can’t wait to see all the sewn blocks at the end of the month!
Jenny @ EQ
05-11-2013
10:48 am
I’ve used EQ for a while now but never used the grid tool. Cool tool! Looking forward to the next lesson!
05-15-2013
6:26 pm
Sewed my block out last night and love it. I chose kind of different fabric than I normally would have and quite like the effect. Looking forward to the next review lesson.
05-22-2013
9:40 am
I managed to sew my block! I had a lot of fun. Do we post a picture somewhere?
Thanks
Cherine
05-22-2013
10:11 am
Wonderful Cherine!
On May 31 there will be a new post on the blog where you can post a photo of your sewn block. Can’t wait to see everyone’s blocks!
05-22-2013
9:55 am
Hope I can keep up. These lessons are great!
05-27-2013
9:57 am
How many blocks will there be? Will there be enough for a quilt? If so, is there any chance of seeing the completed quilt, so that I have an idea of what fabrics I will need, and somewhat of an idea of how much of each fabric I’ll need?
05-29-2013
9:39 am
Hi Eileen, ).
).
The series runs for 4 months with one block drawn/sewn for each month. The size you make the blocks is up to you, so 4 blocks could be enough for a wallhanging or tablerunner, depending on the size of your blocks.
I’m not going to show you the blocks in advance, because part of the fun is the surprise each month! When someone else asked about fabric yardage, here’s what I said:
When I do a fabric yardage estimate for my four 12″ blocks, I use about 10 different fabrics. My main “background” fabric calls for 5/8 yards and the rest call for 1/8 — 1/4 yard each.
I’m sorry I can’t be more specific, but I want to keep the creativity open! You don’t have to put the lights, mediums, and darks in the same patches I do in the lesson block. And when we get to the applique block, the way you choose to design your block will affect your yardage as well (that’s all the clues I’m giving away of that one!
05-31-2013
7:47 am
Good Morning,
Thank you for the lesson using the drawing board! I have learned a lot in one easy lesson! And, I have my blocks ready for posting, so hope the link up will be available all day I am off to our annual local “Quilts Unlimited” show this morning. Will check back late this afternoon.
05-31-2013
9:29 am
Hi Laura,
The link up post will always be open, so you can add your block photo at any time.
Here’s the link to the post: Block 1 Link Up
I look forward to seeing your block!
05-31-2013
4:52 pm
Liked the lesson. Like others I’ve been poking my way thru for years (I bought your very first release and every update since). The only issue I had was that the rotary cutter printout said I needed 20 blocks of each color for the half square triangles. Even though I could only see I’d need 10 of each, I followed the instructions. Hopefully a future block in the series will use the same size hst’s, because I have 20 extra sewn!
06-01-2013
2:54 pm
I’m running a little behind, I just did the first lesson in EQ7 and am going to work lesson 2 right now. Plan to make both blocks so I can post my pictures. The lesson was great and I learned something new with the grid and pick tools.
Thanks
06-02-2013
6:33 pm
All the blocks I’ve seen are beautiful.
I can’t figure how to upload my black.
Where do I go for instructions for this.
pauline
06-02-2013
9:18 pm
Hi Pauline,
Go to this post on the blog:
Block 1 Link Up
There are instructions in that post. It’s just like posting a comment, but you also add an image (the photo of your block) to your comment.
Jenny @ EQ
06-03-2013
3:17 pm
Exellent exercise. Now to find my fabric.
Thank you.
06-03-2013
4:38 pm
I agree with the others a PDF file would help so much better. I have had my program for years, took lessons and still feel I am at step 1. A pdf file for lessons would help so much more.
06-03-2013
4:56 pm
Hi Virginia,
There is a link to the lesson in PDF format just before step 1. There is also a video you can watch at the end of the lesson. I hope this helps!
Sara @ EQ
06-03-2013
9:28 pm
I have taken extensive courses 2 – 3 years ago. Unfortunately, I sustained a long illness and have forgotten so much of it! I found this first lesson a good way to jump back in! Thanks. Can’t wait to sew my block.