Twisting Daisies
by Andrea Bishop
Welcome to the club! If you have EQ software and the Kaleidoscope Collection add-on installed, you’ll be able to follow along.
This is the first of twelve Kaleidoscope lessons.
So let’s start!
Stripes are cool. You can start out with plain stripes, rotate and flip them around, color them differently, and even stagger their sizes to create neat effects:
But what happens when you put stripes in a Kaleidoscope?
Well, neat things happen then too.
Start the Project
 Open your EQ software.
- Start a new project and name it Twisting Daisies.
- Click WORKTABLE > Work on Quilt.
- Click QUILT > New Quilt > Horizontal.
- At the bottom-left corner of your screen, click the Layout tab.
- Change your layout to be 4×4 with 12″ blocks and no sashing.
- Skip the Borders tab for now.
- Click the Layer 1 tab.
Get the Blocks
- Click LIBRARIES > Block Library.
- Go to Kaleidoscope Collection > Star Corners > 01 Basics.
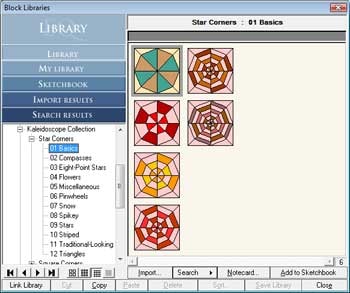
- Press CTRL+A on your keyboard and click Add to Sketchbook.
- Now go to Kaleidoscope Collection > Square Corners > 01 Basics.
- Press CTRL+A on your keyboard and click Add to Sketchbook.
- Click Close to put the library away.
Understanding the Corner Styles
- Click on the Set Block tool
 . The Sketchbook Blocks palette appears.
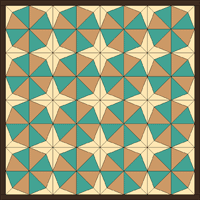
 - Click on the first green and tan “Plain Kaleidoscope 1” block in the palette.
- Hold down your keyboard CTRL key and click in the quilt. Look at the ivory/cream colored sections. These are “Star Corners”:
- Click the Add to Sketchbook
 button to save your quilt.
 - Click on the second green and tan “Plain Kaleidoscope 2” block in the palette.
- Hold down your keyboard CTRL key and click in the quilt. Look at the ivory/cream colored sections. These are “Square Corners”:

- Click the Add to Sketchbook
 button to save your quilt.
Playing with Stripes and Color
- Click on the Set Block tool
 .
. - In the Blocks palette, click on one of the non-plain blocks. You decide which one.
- Hold down the CTRL key on your keyboard and click in your quilt.
- Click the Paintbrush
 tool.
tool. - Color patches individually or hold down the CTRL key to color patches all at the same time. Keep going until the whole quilt is colored. Here are two of my examples:
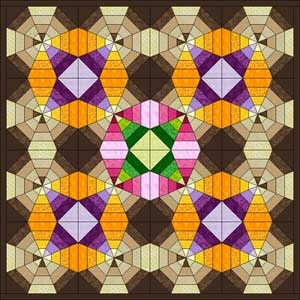
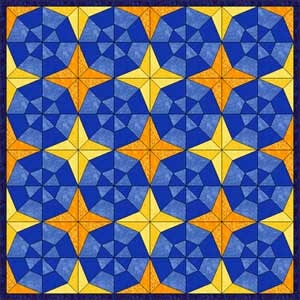
The first one plays with gradation. The second one plays with the star corners. - Click the Add to Sketchbook
 button to save your quilt coloring.
Moving on to Another Type of Stripe
- Click LIBRARIES > Block Library.
- Go to Kaleidoscope Collection > Square Corners > 10 Striped.
- Scroll to the end of the blocks in this style. We want the last two. Click on the second to last block (Daisy Trellis 2) to select it. Click Add to Sketchbook.
- Click on Rainbow’s End 1. Click Add to Sketchbook.
- Click Close to put the library away.
Set the Blocks in the Quilt
- Click on the Set Block tool
 .
. - In the Blocks palette, click on the Daisy Trellis 2 block.
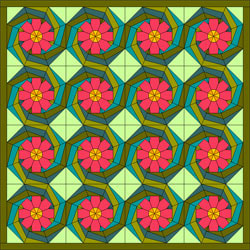
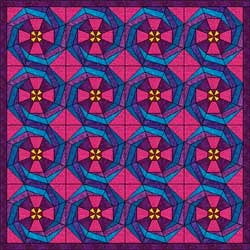
- Hold down the CTRL key on your keyboard and click in your quilt. Pretty cool eh? Do you see how the daisies twist into each other? This happens because we’re using the square version and the stripes are on an angle. If you get the star version, the twisting does not happen.
- Click the Add to Sketchbook
 button to save your quilt.
Make a New Block Which Does this Too
- Click the View Sketchbook
 button.
 - Click the Blocks section.
- Scroll to the end of the blocks and click on the Daisy Trellis 2 block to select it.
- Click Edit. You’ll be on the block worktable now.
- Click the Pick
 tool.
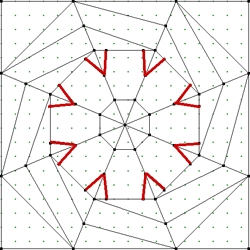
tool. - For each of the lines marked in red, do the following: a) click on the line, b) press your keyboard DELETE key.
- Click the Add to Sketchbook
 button to save this new block.
 - Click the Color tab at the bottom of the screen.
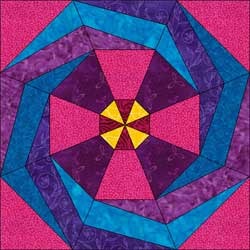
- Click on a color and click in a patch to color this block. Continue coloring and then click the Add to Sketchbook
 button to save the color with this block.
Set the New Block in the Quilt
- Go back to your quilt (WORKTABLE > Work on Quilt).
- Click on the Set Block tool
 .
. - In the Blocks palette, click on the new block.
- If you don’t see the color, use the colorway arrows
 so you see your coloring.
 - Hold down the CTRL key on your keyboard and click in your quilt. Pretty cool eh? You did that. Give yourself a pat on the back.
- Click the Add to Sketchbook
 button to save your quilt.
 - Optional Homework: Try to recolor the Rainbow’s End 2 block to make it twist. Then Add to Sketchbook for that quilt.
- Click FILE > Exit to close the program.
All done for this month. Check out the next lesson!
-Andrea : )


