Welcome to the club! If you have EQ software and the Kaleidoscope Collection add-on installed, you’ll be able to follow along.
This is the second of twelve Kaleidoscope lessons.
So let’s start this month’s lesson! We’re going to work in Custom Set with Snowflakes.
Start the Project
- Open your EQ software.
- Start a new project and name it Kaleidoscope Snowflakes.
Get the Layout
- Click LIBRARIES > Layout Library.
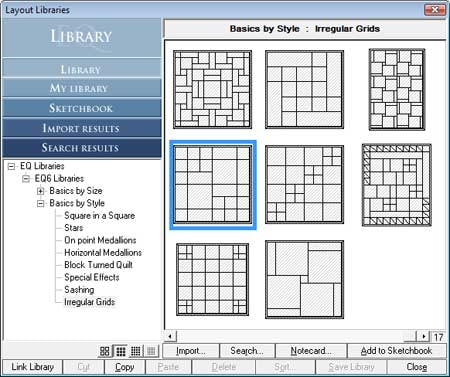
- Go into Basics by Style instead.
- Click on the style “Irregular Grids” to see the quilts.
- Find “Irregular Grids – 11“, click to select it and click Add to Sketchbook.
- Click Close to put the library away.
Get the Blocks
- Click LIBRARIES > Block Library.
- Go to Kaleidoscope Collection > Star Corners > 07 Snow.
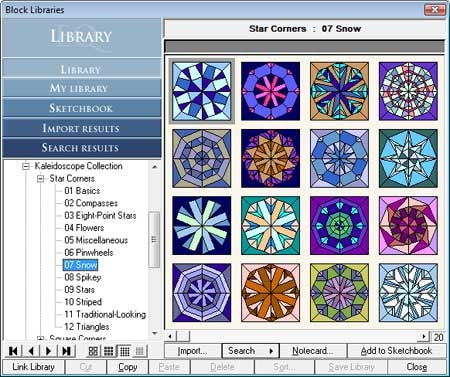
- Press CTRL+A on your keyboard and click Add to Sketchbook.
- Now go to Kaleidoscope Collection > Square Corners > 07 Snow.
- Press CTRL+A on your keyboard and click Add to Sketchbook.
- Click Close to put the library away.
Edit the Layout and Check your Settings
- Click the View Sketchbook
 button.
 - Click the Quilts section.
- Click Edit to take the library quilt to the worktable.
- Click QUILT > Options, and go to the “All Styles” section under Layout Options.
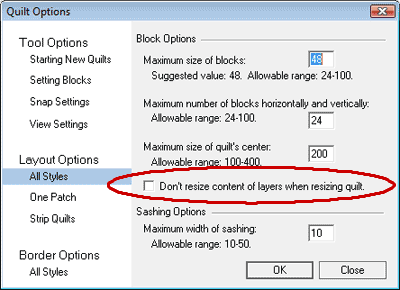
- Uncheck the thing that says “Don’t resize content of layers….”
- Click Snap Settings under Tool Options.
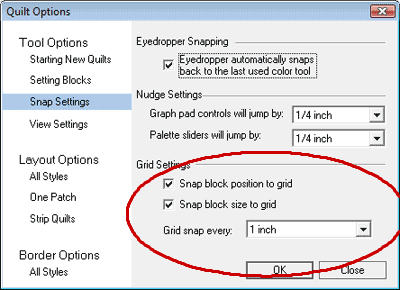
- Put a check in “snap block position…” and “snap block size…”
- Click the dropdown box arrow for Grid snap and change it to 1 inch.
- Click OK.
Change, Fix and Simplify the Layout
- Click the Layout tab at the bottom of your screen.
- The quilt from the library is currently 50×50. Let’s make it 60×60. So, double-click the number 50 and type 60 for both boxes.
- Click the Layer 1 tab.
- Click the Adjust
 tool.
tool. - Click on any block in the quilt to select it.
- We need the Graph Pad on. If you don’t see something like this at the top of your EQ window (below the Project toolbar):
- Click on the third block in the top row of the quilt.
- Press your keyboard DELETE key.
- Repeat steps 29 & 30 to delete the other blocks marked in red below.
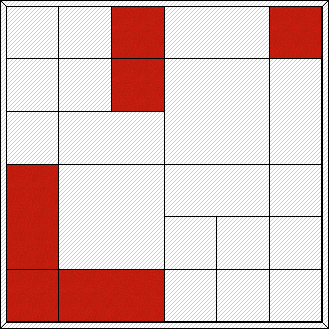
- Click on the first block in the top row of the quilt. (You may notice that some of these blocks are weird sizes like 9.91. The rest of these steps are to get them all nice and multiples of 10.)
- Put your cursor in the first box of the Graph Pad.
- Press the TAB key a bunch of times until you cursor returns to this same box… and watch the block size change. How cool is that? It updated to be 10×10 because of the snap settings we set.
- Repeat this process for other blocks marked in blue below. Click on the block, then put your cursor in the first box of the Graph Pad and press TAB repeatedly until your cursor returns to this same box. This will make the size and position update for the blocks you do this for.
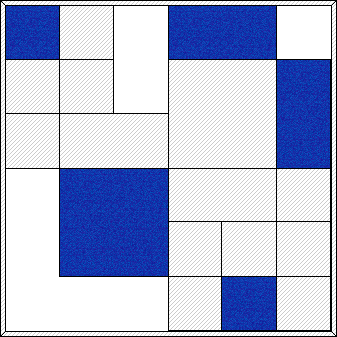
Why? I want to get one of each size and in various positions in the quilt so we can use the aligning and same size tools.
- Click on the block marked in blue with the Adjust
 tool. (This will be your anchor block.) Then hold down the SHIFT key on your keyboard and click on all the blocks marked in green. New buttons will appear at the end of the Graph pad.
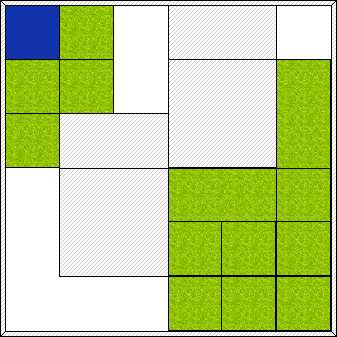
- Click the very last button on the Graph Pad… it’s the Same Size
 button. This ensures that all the blocks are square now and all 10×10… because that was the size of our anchor.
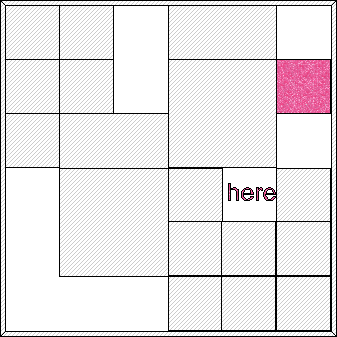
 - Click on the block marked in pink with the Adjust tool.
- Grab the block in its center and drag and drop it to where the image below says “here.”
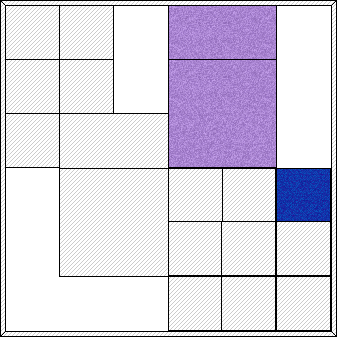
- Click on the block marked in blue below. It will be your new anchor block.
- Hold down your keyboard SHIFT key and click on the two blocks marked in purple.
- Click the Align Rights
 button on the Graph Pad.
- Click on the one of the blocks marked in yellow below.
- Hold down your keyboard SHIFT key and click on the other yellow block.

- Copy (EDIT > Copy or CTRL+C) and Paste (EDIT > Paste or CTRL+V) the pair.
- While the pasted pair are still selected drag and drop them to fill the hole at the top-middle of your quilt.
- Click on the bottom-left big block with the Adjust
 tool.
tool. - Instead of 20×20, double-click the size for width and type 30.
- Press your keyboard TAB key to go to the height and type 30.
- Double-click the first number in the Graph Pad, type 0, and press ENTER. This will make the horizontal position jump to the edge of the quilt layout. Yay! No more holes.
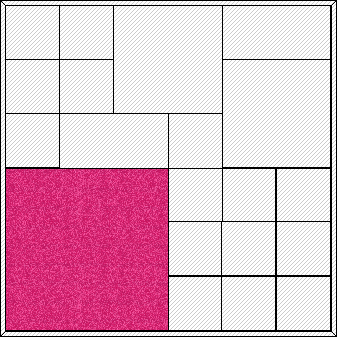
Now let’s just double-check the sizes and position of all the blocks in the quilt to be on the safe side. (We don’t want any 9.91′s left in there.) We’ll be using our trick with the TAB key.
- Still with the Adjust tool, do this step for every block in the quilt. The only numbers that you should see in the Graph Pad are 0, 10, 20, 30, 40, or 50. Click on the top-left block.If everything (horizontal position & vertical position, and width & height) is one of those numbers (0, 10, 20, 30, 40, or 50), go to the next block to the right.If the position or size is wrong, put your cursor in the first Graph Pad box and press TAB until all the numbers are either 0, 10, 20, 30, 40, or 50. Do this for all the blocks this row, then go to the next row. Make sure you check all the blocks in the quilt.
Set Blocks in the Quilt
- Click on the Set Block tool
 . The Sketchbook Blocks palette appears.
 - Click on any block in the palette and click on any space in the quilt.
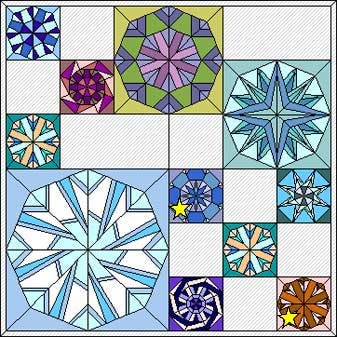
- Fill as many or as few block spaces with a mixture of the Star Corners and Square Corners Snowflakes.It doesn’t matter where they go or which ones you choose. Just make sure you put one in each of the two spots I marked below with a star and the space above those 2 star blocks is empty. I recommend doing complex ones in the bigger spaces and simpler blocks in the smaller squares. Here’s what mine looks like (minus the stars):
- Click the Add to Sketchbook
 button to save your quilt so far.
Gather Some Fabrics and Use them in your Quilt
- Click LIBRARIES > Fabric Library on the top menu bar.
Remember, this is a work in progress… not your finished quilt yet. Just get one dark, 3 medium, and one white fabric for now. Don’t go into “analysis-paralysis” trying to choose the perfect fabrics right from the start. You can tweak it later and get more fabrics once you see where the design is going.
- Go into any library styles and pick 4-5 snowy colors. (I used blues, cool-colored batiks, and snowy fabrics, and made sure I got a nice navy snowy fabric for my background.) For each fabric, click on the fabric to select it, then click the Add to Sketchbook button.
- Once you have added 4-5 snowy fabrics, click Close to put the library away.
- Click the Spraycan
 tool. The palette of fabrics will appear.
 - Scroll to the end of the fabrics to find the snowy fabrics you added. Click on the fabric you want to use for the background.
- Hold down your keyboard CTRL key and click on one of the remaining PLAIN BLOCKS in the quilt. All plain blocks will color at the same time.(Be careful not to make your background too dark at first. We’re going to do some more tweaking in a little bit, so being able to see the lines between the blocks would be helpful.)
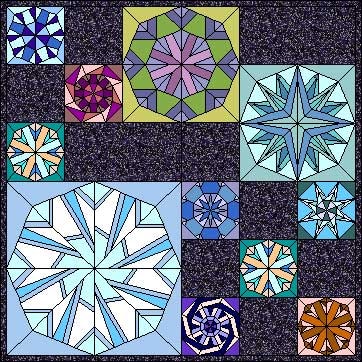
- Do step 61 for the border too. Your quilt should look something like this now:
- Release the CTRL key.
- Here’s when the snowflakes start to look like they are floating. And, if you used a good mixture of Star Corners and Square Corners, the snowflakes will look like they are tumbling. Using the same background fabric, click on the corner of each snowflake in the quilt. Some you may need to click on two corners if they are colored differently. My quilt looks like this now:

I don’t know about you… but that Nine-Patch grid effect in the bottom-right corner looks goofy and too structured. Snowflakes don’t fall that way. That, and near the two big upper snowflakes there seems to be a lot of wasted space. Let’s fix that.
- Click the Adjust
 tool again.
 - Click on the block I’ve marked in yellow.
- Change the height of the block to 5.00 in the Graph Pad.
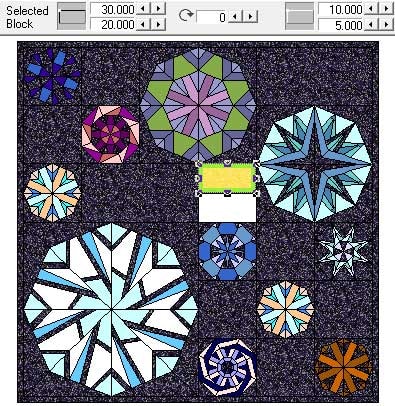
- Click now on the snowflake just below the one you adjusted the size for.
- Grab it, drag it up, and drop it just below the rectangle you made. (Because we have “snap block position to grid” checked, it should drop right at the correct inch spot.)
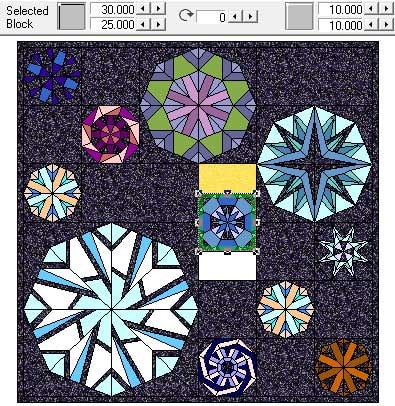
- Repeat this process (66-69) for the bottom-right snowflake and the square just above it.
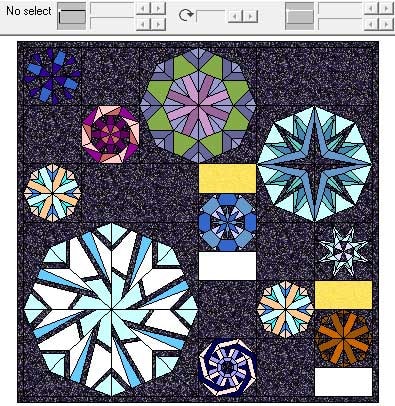
- Now click on one of the small rectangles to select it.
- Copy (EDIT > Copy or CTRL+C) and Paste (EDIT > Paste or CTRL+V) the rectangle.
- While the pasted rectangle is still selected drag and drop it to fill the hole below the first snowflake. If you drop it really close, it should snap to the inch mark where it needs to go.
- Paste (EDIT > Paste or CTRL+V) one more rectangle.
- While the pasted rectangle is still selected drag and drop it to fill the hole below the second snowflake. Same deal — If you drop it really close, it should snap to the inch mark where it needs to go.
- Click the Spraycan
 tool. Make sure your background fabric is still selected.
 - Color the background rectangles we just made.
- Click the Add to Sketchbook
 button to save your quilt so far.
 - Now, using a combination of the Spraycan tool to color at first, then the Paintbrush to bring out details, color the rest of the quilt in your 3 medium and one white fabric.
- Once you have your colors placed, use the Swap tool to see how the quilt would look when changing out one fabric for another.
- Click the Add to Sketchbook
 button to save your finished quilt.
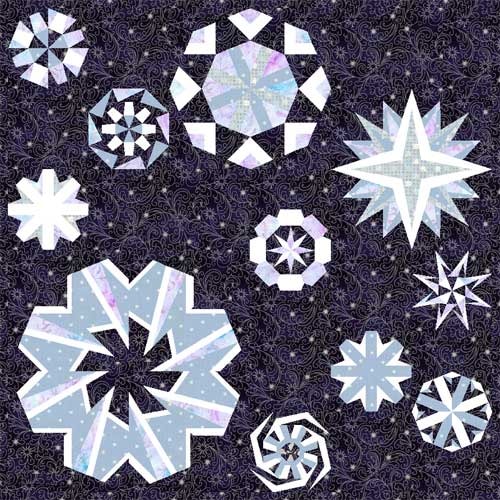
Want to see a finished quilt? This quilt was sent in by Margaret Gray of Salem, Utah.
OPTIONAL MYSTERY SIDE PROJECT – SEWING INVOLVED
MONTH 1 of Sewing Project
If you like this month’s snowflake lesson, then you will flip when you see the finished sewing project I have planned for you guys.
This is a mystery to me too. I’ve picked fabrics, but I still don’t know what fabrics I am going to use or how much I need. My quilt is going to be scrappy, but with a main background I think.
Pick some really fun fabrics, get your lights, mediums, darks and maybe even some black and white.
As far as busy multi-colored fabrics go, use them sparingly.
I’m going to use a fun fabric I found and pull colors from it. Then I will use values (darker and lighter versions) of the colors I pulled. Many will be directional prints that I can orient in the foundation pattern to create movement. I will find at most 3-4 wow, multi-colored prints that go with my inspiration fabric and probably a black background…. because I like the way colors pop on a dark background.
Your fabrics are entirely up to you. But the key here is NO PEEKING!
Once you’re done with the sewing for this month, I want you to place the block out of sight so it won’t influence the design decisions you make in the other months.
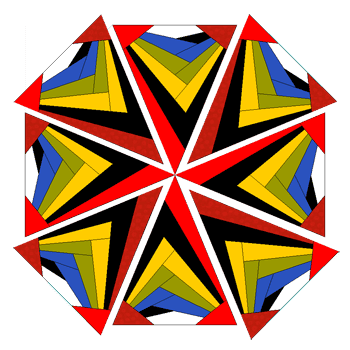
Pick your favorite STAR CORNER design in the whole entire Kaleidoscope Collection library.
Make it something fun and complex.
Add to Sketchbook.
Close the library.
View the Sketchbook > Blocks section.
Edit this block.
Choose FILE > Print > Foundation Pattern.
Go to the Sections tab.
Click the Start Over button.
Click on all the pieces of one wedge EXCEPT FOR THE STAR CORNER.
Click the Group button.
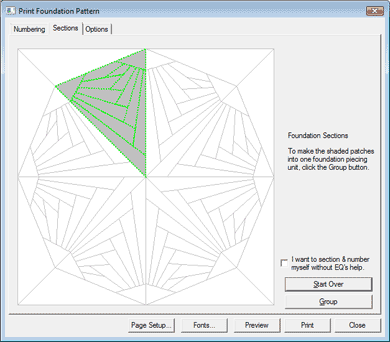
Click the star corner and click Group.
Go to the Options tab.
Make your block size 15.00 by 15.00.
Set the number of copies to 8.
Make sure the options are as follows:
Print numbering CHECKED.
Print as many as fit unchecked.
Separate units CHECKED.
Mirror – doesn’t matter here… up to you.
Grayscale – personal preference I like it CHECKED.
Print block name CHECKED.
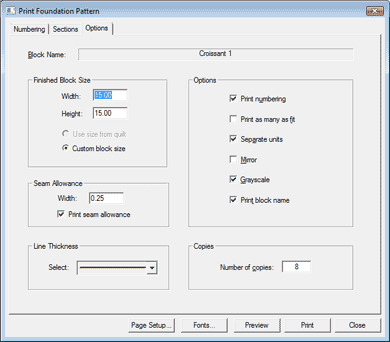
Click Preview.
Click the Delete button at the top of your screen.
Click on the corner you grouped and press your
keyboard DELETE key.
What remains is the wedge minus the corner.
Click the Move button at the top of your screen.
Drag the section to fit cleanly on one page with no tiling onto the next page.
Click Print at the top of your screen.
8 copies of this wedge will come out.
Feel free to go to the Color tab and test out some color placement to see how to make the fabrics you’ve chosen really pop in the block.
Foundation Piece all 8 wedges, but do not sew the wedges together.
Put all 8 loose wedges in a bag or a box and label it so you know what’s inside. Keep them somewhere you can find them again, but not so you can look at them again until roughly 7-8 months from now.
All done for this month. Let’s start the next lesson! It’s a 2-parter.
-Andrea : )

