by Andrea Bishop
Welcome to the club! If you have EQ software and the Kaleidoscope Collection add-on installed, you’ll be able to follow along.
This is the third of twelve Kaleidoscope lessons.
So let’s start this month’s lesson! It’s a 2-parter. We’re going to draw like crazy.
I want to make sure you all understand how foundation patterns work and why. This will help you immensely when you go to draw your own blocks… no matter if they are kaleidoscopes or not.
This lesson is going to be packed full of drawing tips, so don’t worry if some of the harder stuff doesn’t make sense at first. With a little practice on your own, you’ll see why I documented all the tips.
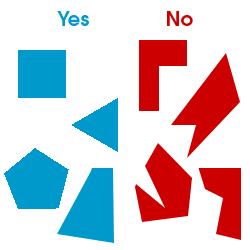
First, in foundation piecing convex is good, concave is bad. A section can go on forever as long as it stays convex. The moment you hit one of those “whoops” spots (like where a rectangle goes into an “L”), the pattern breaks off into a new section. (The rectangle is the end of section one and the bump in in the “L” is the beginning of section two.)
Examples
So, look at the animated images below and watch why these sections work. Each piece adds on to the next, staying convex the whole time.
| Example 1The first row fills out lengthwise then moves out into a kind of triangle/pentagon shape. After that the star points are added. Then the ending triangle is put on each end forming the complete Half-Square Triangle section. |
| Example 2This one is very similar to the previous one. The first row fills out lengthwise then has a plain stripe added to either side. After that the ending triangle is put on each end forming the complete Half-Square Triangle section. |
| Example 3Once again, the smallest piecing starts in the first row as it fills out lengthwise. Then triangles are added, keeping the convex shape until the ending triangle is put on each end forming the complete Half-Square Triangle section. |
When Drawing – it’s in Reverse
When you draw a foundation pattern, you’re actually subtracting pieces from the whole. So as long as the slices you make are along the entire edge and don’t make any concave bumps, you can keep slicing.
Start a New Project
- Open your EQ software.
- Start a new project and name it Foundation Fun.
Get Blocks from the Library

- We’re going to get 5 blocks from the library. They are pictured on the right for your reference. Click LIBRARIES > Block Library.
- Go to Kaleidoscope Collection > Star Corners > 01 Basics.
- Let’s get the first two blocks:
Click Add to Sketchbook two times. - Scroll down and go into Star Corners > 04 Flowers.
- Click to select Amethyst 1 and click Add to Sketchbook.
- Scroll down and go into Star Corners > 10 Striped.
- Click to select Gazebo 1 and click Add to Sketchbook.
- Scroll down and go into Star Corners > 12 Triangles.
- Click to select Daydream 1 and click Add to Sketchbook.
- Click Close to put the library away.
Edit Amethyst 1
- Click the View Sketchbook
 button.
 - Click the Blocks section.
- Click on the Amethyst 1 block to select it.
- Click Edit. You’ll be on the block worktable now.
Pause: Let’s make sure our worktable is set up correctly. (For now, we’re going to work with Snap to Grid on. Many times though, you may want to turn it off and just work off the nodes.)
- Turn on the Precision Bar if you haven’t already. (Click the VIEW menu. If Precision Bar doesn’t have a check next to it, click on those words to turn it on. If it does have a check, just click away from the list so you don’t turn it off.)
- Make your Precision Bar match mine (see picture below). My shorthand for this stuff will be the TAB order. So if you double-click on the Block Width, type in a new number, and press TAB, the numbers would be: 6, 6, 24, 24, 2, 2
Then, Graph Paper Cells ON, Snap to Grid ON, Snap to Node ON, and Snap to Drawing OFF.
- Click the Line
 tool.
tool. - You should see some nodes in the center now.

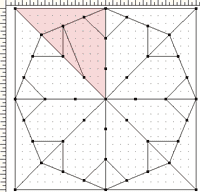
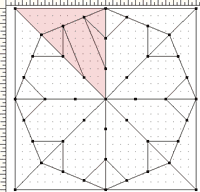
- Let’s watch foundation piecing in action… and see when it breaks out. We’re going to work inside this top-left wedge (pink one) and draw some lines from node to node. With the Line tool, draw a line as in the picture below:
- Click FILE > Print > Foundation Pattern. Click Preview (yours may look different if you have Mirror turned on – don’t worry). Look at the wedge and the way the sections are grouped. Yep, it’s still one triangle. Let’s keep going. Click Close once to close the preview and Close again to close the Foundation window.
- Still with the Line tool, draw a parallel line to match the one you just drew:
- Click FILE > Print > Foundation Pattern. Click Preview and look at the wedge this time. We’re still good. Let’s keep going. Click Close, then Close again.
- Draw a line across the bottom of the two lines you drew:
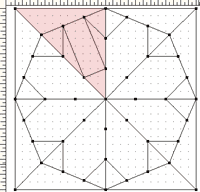
- Click FILE > Print > Foundation Pattern. Click Preview and look at the wedge. It’s still in one section. Let’s keep going. Click Close, then Close again.

- Draw a diagonal line inside the box you formed:
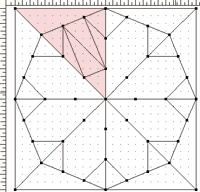
- Click FILE > Print > Foundation Pattern. Click Preview and look at the wedge. It’s still in one section. Let’s keep going. Click Close, then Close again.
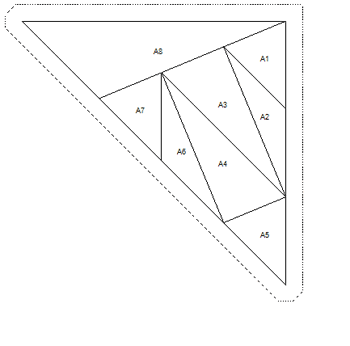
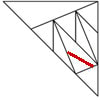
- Draw the opposite diagonal line inside the box you formed:
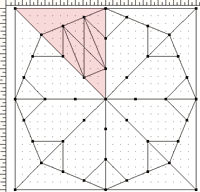
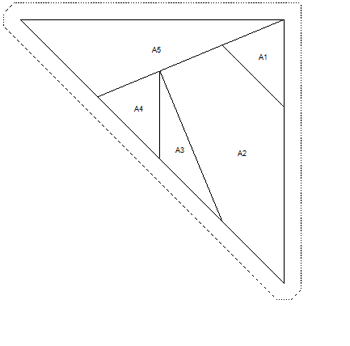
- Click FILE > Print > Foundation Pattern. Click Preview and look at the wedge. Whoops.Why did this break? Well, let’s follow it. Start at A1 in the image below. We can go to 2, 3, 4, 5, but adding H4 makes it concave.What about A1 through 5 and then add H3… nope, still concave. That’s why it broke out into more than one section.Since A and H can’t go together, they have to be separate sections.Why the J1, you ask? Add J plus H… that’s concave. What about J plus A… nope, that’s concave too. So J needs to be separate from H and A.
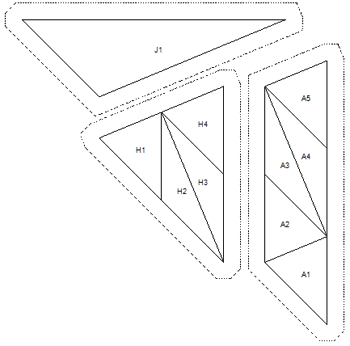
- Now, click Close, then Close again to return to the drawing. So, just remember “X’s” are bad…. don’t draw them.
- Here comes the part I really want you to understand. As you’re drawing… if you come across a section like that, sometimes you can move or delete lines and make it work again…. you’ll see in a moment. Click the Pick
 tool.
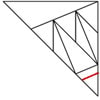
tool. - Delete the line marked in red in the image below, by clicking on the line to select it and then pressing your keyboard DELETE key.
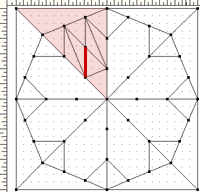
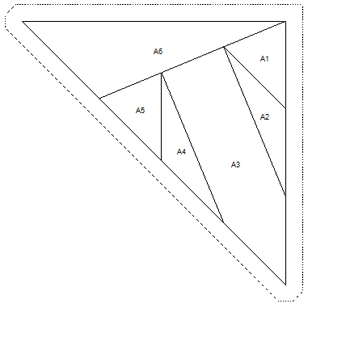
- Click FILE > Print > Foundation Pattern. Click Preview and look at the wedge. Well, how did that happen? The magic happens with A5. If A5 were any shorter, it wouldn’t work. That piece stretches the length of A3 and A4 together… thus avoiding a concave piece. All the rest of the pieces A6 through A9, stretch the full length of the sides adding on until you get the full section.
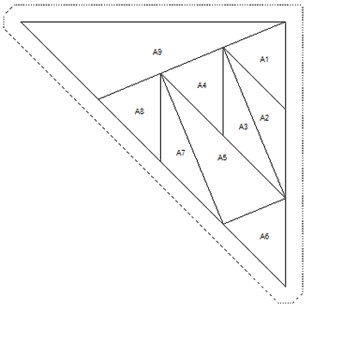
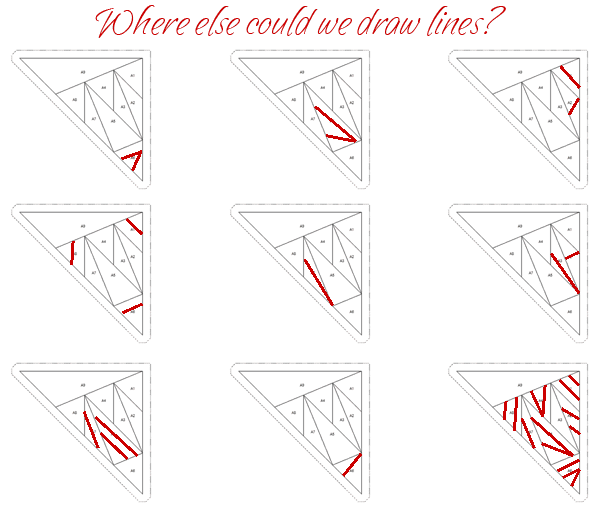
- Take a look at the image below. You don’t need to draw all these variations… just follow them to see why the section doesn’t break off into multiple ones. Hopefully, you’ll see some of these ways that more detail can be added. You can do:
Do you see how it works now?
Grab a colored pen or pencil (something not black) and try drawing your own lines on this worksheet:
Print out your own worksheet (PDF format)
Next month, I will show you the rules for duplicating wedges and show you how to copy and paste lines. View the next lesson now.
OPTIONAL MYSTERY SIDE PROJECT – SEWING INVOLVED
MONTH 2 of Sewing Project
If you like where this month’s drawing lesson is going, then you will flip when you see the finished sewing project I have planned.
Last month we picked a fun focus fabric,
3-4 multi-colored fabrics that go with the focus fabric,
colors pulled from the focus fabric,
values (lights, mediums, darks) of those colors,
and even some black and white.
Remember, throughout this whole process there is to be NO PEEKING with the previous work! Hide the block out of sight so it won’t influence the design decisions you make in the other months.
Last month we picked our favorite block and did 8 loose wedges.
This month I want you to do the same for your 2nd favorite:
Pick your 2nd favorite STAR CORNER design in the whole entire Kaleidoscope Collection library.
Make it something fun for you.
Add to Sketchbook.
Close the library.
View the Sketchbook > Blocks section.
Edit this block.
Choose FILE > Print > Foundation Pattern.
Go to the Sections tab.
Click the Start Over button.
Click on all the pieces of one wedge EXCEPT FOR THE STAR CORNER.
Click the Group button.
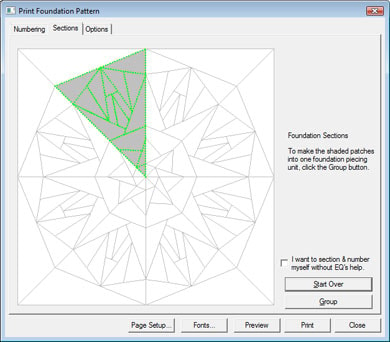
Click the star corner and click Group.
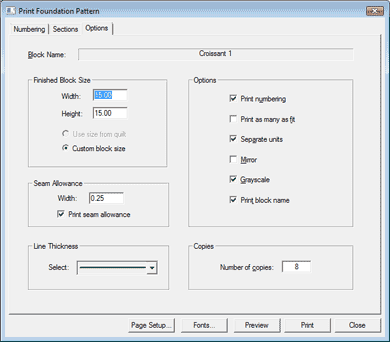
Go to the Options tab.
Make your block size 15.00 by 15.00.
Set the number of copies to 8.
Make sure the options are as follows:
Print numbering CHECKED.
Print as many as fit unchecked.
Separate units CHECKED.
Mirror – doesn’t matter here… up to you.
Grayscale – personal preference I like it CHECKED.
Print block name CHECKED.
Click Preview.
Click the Delete button at the top of your screen.
Click on the corner you grouped and press your
keyboard DELETE key.
What remains is the wedge minus the corner.
Click the Move button at the top of your screen.
Drag the section to fit cleanly on one page with no tiling onto the next page.
Click Print at the top of your screen.
8 copies of this wedge will come out.
Feel free to go to the Color tab and test out some color placement to see how to make the fabrics you’ve chosen really pop in the block.
Foundation Piece all 8 wedges, but do not sew the wedges together.
Put all 8 loose wedges in a bag or a box and label it so you know what’s inside. Keep them with Month 1 somewhere you can find them both again, but not so you can look at either of them again until roughly 6-7 months from now.


