Discover a trick allowing you to add text to your quilt block, and get a “picture” of it out of EQ6 or EQ7. Can do!
Get a Block to Use
Draw your block, or get a block from the Block Library. Add that block to the Sketchbook.
Beginners, to get a block from the Block Library: Click LIBRARIES > Block Library > keep clicking through categories and styles until you find a block you want to use for this lesson (any block will do) > click on the block to select it > click the Add to Sketchbook button.
Set the Block into a One-Block Quilt
- Click WORKTABLE > Work on Quilt.
- Click QUILT > New Quilt > Horizontal.
- Click the Layout tab (at the bottom).
- Make “Number of blocks” Horizontal and Vertical both be: 1.
Size does not matter here, so leave the size as is. - Click the Borders tab (at the bottom).
- Click the Delete button (at the top of the palette) to delete the border.
- Click the Layer 1 tab (at the bottom).
- Click the Set Block tool > click on your quilt to set your block into the quilt.
It will now look like one large quilt block, with no border around it. But since your block is set into a quilt, making it actually a QUILT, you can use the Quilt tools. This means you can “write” on your quilt!
Let’s make sure we have the Set Applique Text tool added to the toolbar.
- Right-click the right-hand toolbar (anywhere on the toolbar) > choose Add/Remove Buttons > click theSet Applique Text tool if it is not checked. (If the tool is already on your toolbar, click any empty spot on your toolbar to make the pop-up menu disappear.)
- Click Layer 2 (at the bottom).
- Click the Paintbrush tool > click the Colors tab > click on a solid color for your font. Choose a color that will show up well on your block.
- Click the Set Applique Text tool. It looks like a big T. (For full details about this tool, see page 98 – 99 in the EQ7 User Manual or page 172 – 173 in the EQ6 User Manual.)
- Choose a font in the drop down box. (This box will show all True Type fonts on your computer.) Also, change the font size to 1.00. You can change the font style and size later, after you type, if you wish.
- Point the mouse at your block, and, holding down your keyboard SHIFT key, drag the mouse on the block. A small text box will form. This box will enlarge as you type, but will be small before you begin typing.
- Type whatever you’d like. If you want a different font, color or size text somewhere else on your block, drag out a new text box.
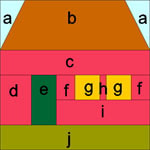
- You can only have one color, one font style, and one font size per text box. To choose a new font color, click the Paintbrush tool. Remember, since the font is set on Layer 2, font coloring must be done on Layer 2.

- If you’d like to color the block, click back on Layer 1 and color the block.
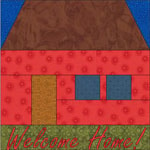
- Once your block is finished you can export it by using FILE > Export Select or FILE > Export Image. (See pages 255 and 256 in the EQ7 User Manual or pages 288 – 292 in the EQ6 User Manual.) Export Selection = You drag a select box around your block. You can then Copy to the Clipboard and then Paste the block into a document, for example, in Word.
Export Image = You create a file. Then in Word, you will use Insert > Picture > From File and navigate to find the file you created, and open it.
This trick for using the QUILT tools on what will look like one block is handy for displaying quilting or embroidery on the block as well. Plus, if you can “write” on your block it’s great for creating gift cards or tags.

