
It’s time for Block 4 in the BlockBase+ Sew Along! Thanks again to everyone who shared their blocks on Friday. If you haven’t added your block to the link up yet, you can do so at any time in the Block 3 Link Up post.
Don’t have the BlockBase+ software yet? It’s not too late to join in! Here on the blog, click Categories > Sew Alongs > BlockBase+ Sew Along 2021 to find all the posts and catch up. Find the BlockBase+ software here >
![]()
In this post, we’re going to use the Zoom feature in the Block Toolbar and take a look at the last of our four printing options. Let’s get started!
- Double-click the BlockBase+ icon to open the software.

- If you see the Getting Started window, click the Close button. (If you’d like to turn off the tour, check the box next to “Don’t show again” and then click Close.)
- In the Navigation Panel, click on the 05 Realistic category, then choose the 06 Flowers subcategory.
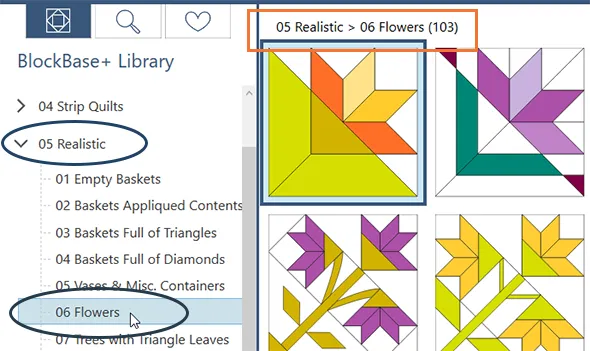


At the top of Block viewer, you’ll see the subcategory has 103 blocks. That’s a lot of blocks to scroll through to find the one we’re making for the sew along! So let’s use our search skills from the Block 3 lesson to find the block faster.
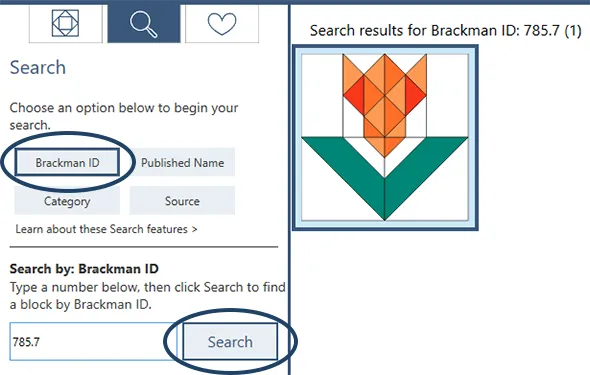
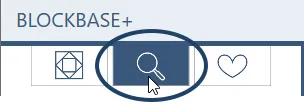
- Click the Search button at the top of the Navigation Panel.

- Click the Brackman ID button in the Search Panel.
- Type 785.7 in the box and click the Search button.

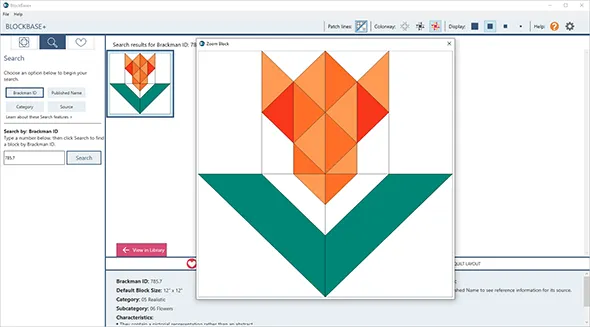
For this lesson, we’re going to continue working with this block while in the Search Results view. Remember that you can click the View in Library tab above the Block Toolbar if you’d like to see where this block appears in the Categories and Subcategories. Let’s get a closer look at this block by enlarging the block with the Zoom feature.
- On the Block Toolbar, click Zoom. You can also double-click on a block to see the Zoom view.

- A new window will appear with a large image of the block. For more complex blocks, this is a great way to get a better view of the seams and patches of the block.

Note: The size of the Zoom window depends on the size of your monitor. The Zoom window cannot be resized. - When you are done viewing the larger block, click the Close button at the top of the Zoom window to close it.
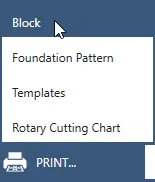
- Now we’re going to take a look at the fourth printing option available in BB+. In the Block Toolbar, click Print > Block.
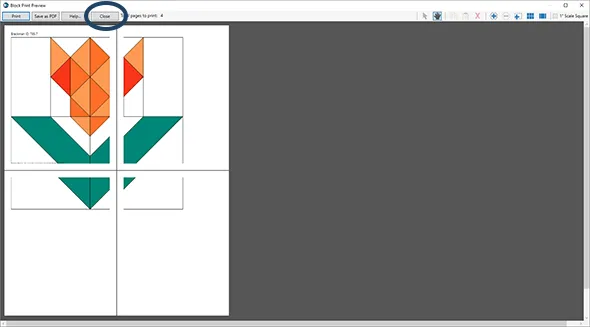
- This option prints an image of the block. Without changing any of the settings in the Print Block window, click the Preview button.

- This printout works great as a color placement guide. The default size for this flower block is 12″, so it expands across several pages. We don’t need to print it quite this large if we’re just using the printout as a color guide. Click the Close button to close the Print Preview window.

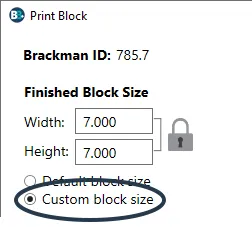
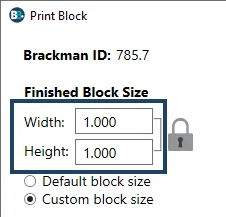
- In the Print Block window, select Custom block size and choose a new size that will fit the block on one page. For my printer, setting the Finished Block Size to 7.000 fits nicely on one page. Standard printer pages are 8.5″ wide but you have to remember that most printers have margins that will not allow the print to expand to the edges of the paper. You may need to preview a few different block sizes to see what works best with your printer.
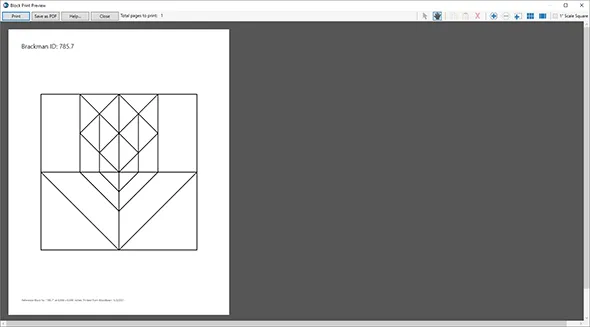
- Click the Preview button.
- In the Print Preview, you can see the how the smaller block size will print on the page. If you’d like to print, click the Print button. Otherwise, click the Close button and we’ll experiment with a couple of other options for Print Block.

- This next printout can be used for some fun, crafty projects! In the Print Block window, change the Finished Block Size to 1.000.

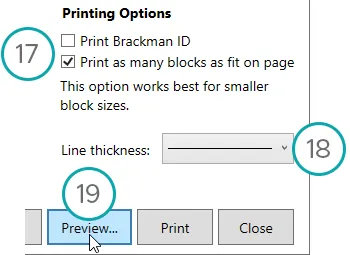
- On the right side of the window, under Printing Options, uncheck the box for Print Brackman ID and check the box for Print as many blocks as fit on page.

- Click the box for Line Thickness and choose the thinnest line.
- Click the Preview button.
- In the Print Preview, you’ll see you get a page of little blocks. If you print this on full-page label sheets, you can cut them out to make little quilt block stickers. Or print on regular paper or cardstock for other paper crafts, like cards or gift tags.

Note: 1″ blocks worked well for my printer and margins. You may need to experiment with the block size to see what works best for your printer and its default margin settings. - Click the Close button and we’ll adjust the settings for one more print option.
- In the Print Block window, change the Finished Block Size to 6.ooo.
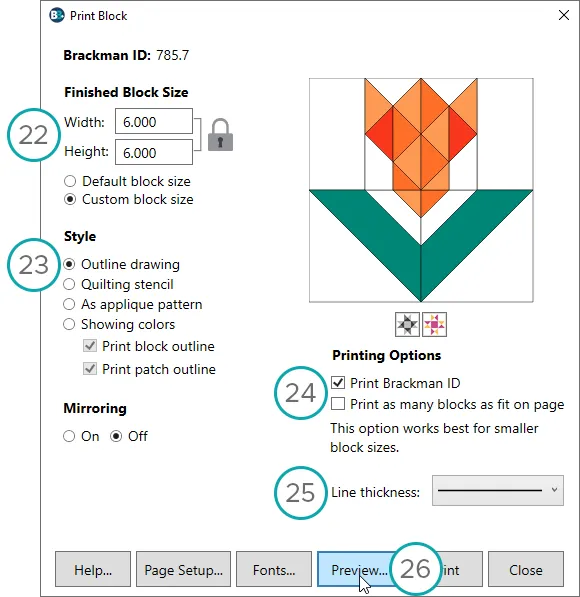
- Under Style, select Outline drawing.
- Under Printing Options, check the box for Print Brackman ID and uncheck the box for Print as many blocks as fit on page.
- Click the box for Line Thickness and choose the medium thickness.
- Click the Preview button.
- This option is great if you like to try out different colorings of your blocks using colored pencils. If you’d like to print this outline drawing of the block, click the Print button. If you don’t want to print right now, click the Close button.
- After printing or closing, click the Close button in the Print Block window. There are more options available for Print Block that we did not cover in this lesson, to learn more about those options, visit our Support site.
- Now we can add this block to the Favorites view. With block 785.7 still selected in the block viewer, click Add to Favorites in the Block toolbar.

- At the top of the Navigation panel, click the Favorites button.
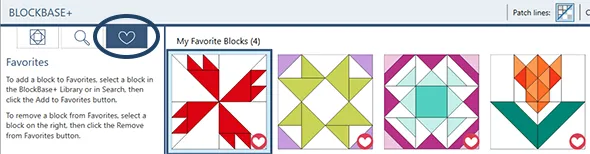
- Now you’ll see our four Sew Along blocks in the Favorites view. If you want to come back later and print a different type of printout for this block, you can quickly find it here in the Favorites. See my Notes about Printing Block 785.7 below.
- If you’re done working in BlockBase+, you can close the program by clicking the X at the top or clicking File > Quit BlockBase+.


Notes Before You Start Sewing:
- You can make the block any size you like. I’m making this block at the default 12″ size.
- You can be creative in your coloring of the block. Just keep the seams/patches in the same orientation as the BB+ block.
- I showed you how to print the block image for the block. You’ll need to choose another printout for your actual cutting/piecing of the block. See my Notes about Printing Block 785.7 below. For help with other types of printouts, visit our support site.
- There will be a new post here on the blog on Friday, May 21 where you can post a photo of your sewn block.
Notes about Printing Block 785.7:
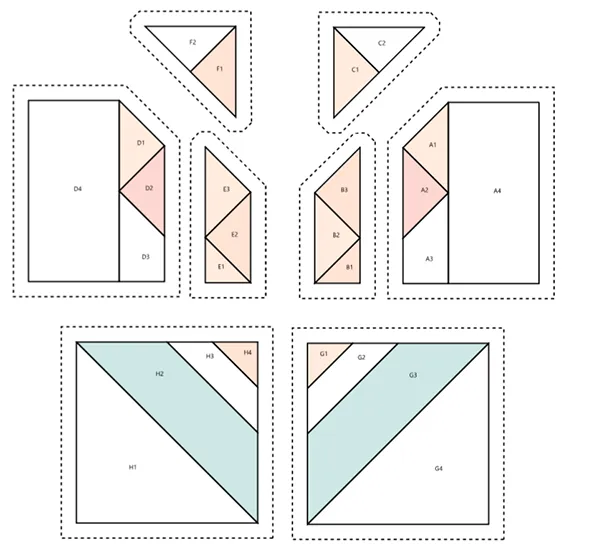
- Some patches in this block work well for a rotary cutting chart, while other patches may be easier to cut using the templates. You may find that you’d like to use a combination of printouts when piecing this block.

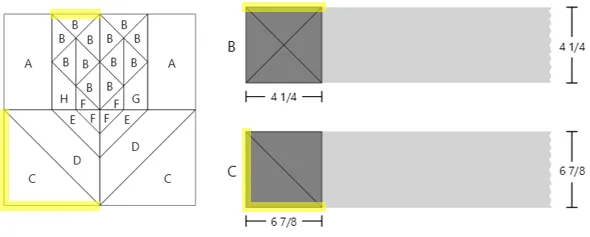
Rotary cutting chart for Block 785.7. Your cutting may be more accurate for patches D, E, G, and H if you use the Templates. - Why are some triangles cut as half-square triangles (HST) and some triangles cut as quarter-square triangles (QST)? BlockBase+ looks at the position of the triangle patch in the block and avoids placing bias edges on the outside edges of a block.

- I recommend previewing the foundation pattern for this block to see which patches should be pieced together first. You may be tempted to piece the four triangles at the top center together first, but this will result in a y-seam that you’ll have to deal with later. If you follow the sectioning of the foundation pattern (even if you don’t actually use the foundations), you’ll find the block easier to put together.


Comments
Let’s get to know each other in the comments! I love reading everyone’s comments (even if I can’t respond to every comment!). I hope you all enjoy getting to know each other this way too. I found this question from a fun Quilter’s “Would You Rather” game on Thistle Thicket Studio.
Would you rather have a magic fabric cutting fairy or a magic binding fairy??
I’ll start– That’s tough! If I had to choose just one, I think I’d rather have the fabric cutting fairy because I spend a lot more time cutting than I do binding.
Block 4 Video
The steps in the video are the same as the steps listed above. So you can follow the written steps above, or watch the video lesson for Block 4.


05-10-2021
10:06 am
Probably the cutting Fairy… I don’t mind cutting or binding. But, I have been distracted more when cutting than when binding. Maybe because cutting takes thinking and I can mindlessly sew binding. There are more partially cut quilts in my WIP pile than ones waiting for binding.
05-10-2021
11:16 am
I would definitely want a cutting fairy. Even though I have some great cutting tools, staying focused can be a real challenge. I love the binding process and the hand work. It also means I have finished a project!
05-10-2021
11:18 am
I actually like to do both, but if I had to choose, I’d pick the Cutting Fairy. I like to do the binding while I catch up on a show or movie.
05-10-2021
11:29 am
Definitely a cutting fairy. While I like to cut, she can be doing her thing while I sew, which is what I like to do the best! And I love to hand sew binding…very soothing by nature.
05-10-2021
11:33 am
Cutting Fairy for sure! I spend a lot more time on cutting than I do binding.
05-10-2021
11:55 am
I’ll take the cutting fairy even though I enjoy cutting. I can sit in front of the TV and mindlessly bind my quilts. Cutting takes concentration.
05-10-2021
12:34 pm
I DO NOT like binding! Its sooooo boring. So the binding fairy would be my choice!
05-10-2021
12:59 pm
You do a great job! This is fun.
05-10-2021
1:01 pm
Binding fairy! I hate binding. I ❤️ cutting.
05-10-2021
1:02 pm
Yes, a Cutting Fairy! One that could cut, sort, stack and lay the pieces out in the project box. Ahh, dreaming of the quilter’s sweet life…
05-10-2021
1:14 pm
Definitely binding!
05-10-2021
2:40 pm
Cutting Fairy as I use a lot of scraps so it is time consuming. My husband is a sports fan, so binding allows me to “watch” TV with him!
05-10-2021
2:48 pm
Binding fairy. I can sew the back of the binding down by machine but am never happy with it. So I am torn between hand sewing it and getting a product that I am unhappy with. I make many charity quilts but I like them to look nice. I think sometimes putting binding on by machine makes for a more sturdy binding. That was a long answer to a simple question.
05-10-2021
3:12 pm
I need the cutting fairy. I’d miss cutting, but my thumbs and side of my hand have developed a lot of pain from pushing down both the ruler and the rotary cutter.
05-10-2021
3:51 pm
Have you tried using a dumbbell weight to hold down the ruler? Someone told me that trick and it has helped relieve overuse of my hand.
05-10-2021
3:46 pm
The Binding Fairy – Most of my UFO projects involve binding .
05-10-2021
3:49 pm
Binding fairy, please! By the time I get to the binding, I’m ready to do something new.
05-10-2021
4:47 pm
Cutting fairy, I bought BlockBase software for the SVG files.
05-10-2021
5:03 pm
I do not like to hand sew if I can avoid it, but I absolutely LOVE cutting. I am not successful with sewing the binding on by machine, either, so I guess you can figure out which fairy I would choose.
05-10-2021
6:46 pm
I’d like a cutting fairy, please! Preferably one who knows how to squeeze as many patches as possible from small, odd-sized pieces of fabric!
Binding, for me, is kind of relaxing and enjoyable; and,once it’s done, TA-DA! Quilt Finished!
05-10-2021
6:52 pm
LOL! A Cutting Fairy would be dangerous. I do like to cut and that has led to quite a few UFOs — a cutting Fairy would make it too too easy to get excited about a pattern and just the right fabric and poof — it’s in a bin ready to sew! I’ll take the Binding Fairy — might be just the incentive I need to get to that stage especially for those large quilts!
05-10-2021
9:48 pm
Send me the Cutting Fairy, please!! I hate that part because I am just too excited to start sewing. I machine bind all my quilts and love doing that part because it means I am DONE and can start another project!! Let the Binding Fairy sprinkle her magic dust on someone else’s quilt. Thanks for this fun question!
05-10-2021
10:00 pm
Absolutely cutting fairy! Like many others here, I like finishing binding by hand and really enjoy hand sewing. Kind of meditative.
05-10-2021
10:50 pm
I don’t mind either, but probably I would take the binding fairy as I seem to just put away my quilts when I get them back from the LAQ, for a quiet time to do them. That never happens.
05-11-2021
3:10 pm
Oh to have an assistant! I would choose a cutting fairy but she would have to be in sync with me on directional & fussy cutting. I usually love to do the binding because it means the quilt is almost done!
05-11-2021
4:09 pm
Binding Fairy PLEASE!
05-12-2021
10:48 am
I don’t mind doing either thing but a cutting fairy would save me from the backache I tend to get after a long cutting day – my sewing table is just a bit too low to stand and cut at for more than an hour at a time. Binding I enjoy – especially with the accompaniment of a good audio book. If I could swop, I’d ask for an ironing fairy – to press all those seams!
05-12-2021
12:20 pm
Definitely the cutting fairy! If the cut’s not right, the quilt’s not right. Maybe he could bring the clean-up fairy too.
05-12-2021
12:26 pm
I would use the cutting fairy, I sometimes make mistakes when cutting I have yet to make any mistake with my binding, and I do enjoy the hand work.
05-12-2021
12:44 pm
I would love a cutting fairy. Oh-wait-I have one! When we want to give a baby quilt to a neighbor, my husband and I work on it together. He’s more accurate with cutting than I am, so he does a lot of the cutting and pressing, while I do the sewing. If we get bored, we trade off! It’s great to have a husband who quilts.
05-17-2021
7:14 pm
Definitely binding, my least favorite job in making a quilt. All the fun stuff is finished, and just this one boring task left…
By the way, how many blocks are we going to end up doing?
05-18-2021
2:11 pm
8 blocks will be posted for the sew along. You can read all the details here: https://doyoueq.com/blog/2021/03/blockbase-sew-along-starts-next-week/
05-18-2021
10:40 pm
Thanks Jenny, just trying to plan my quilt and decide what size blocks to make. Or maybe I should just keep making blocks until I run out of fabric.