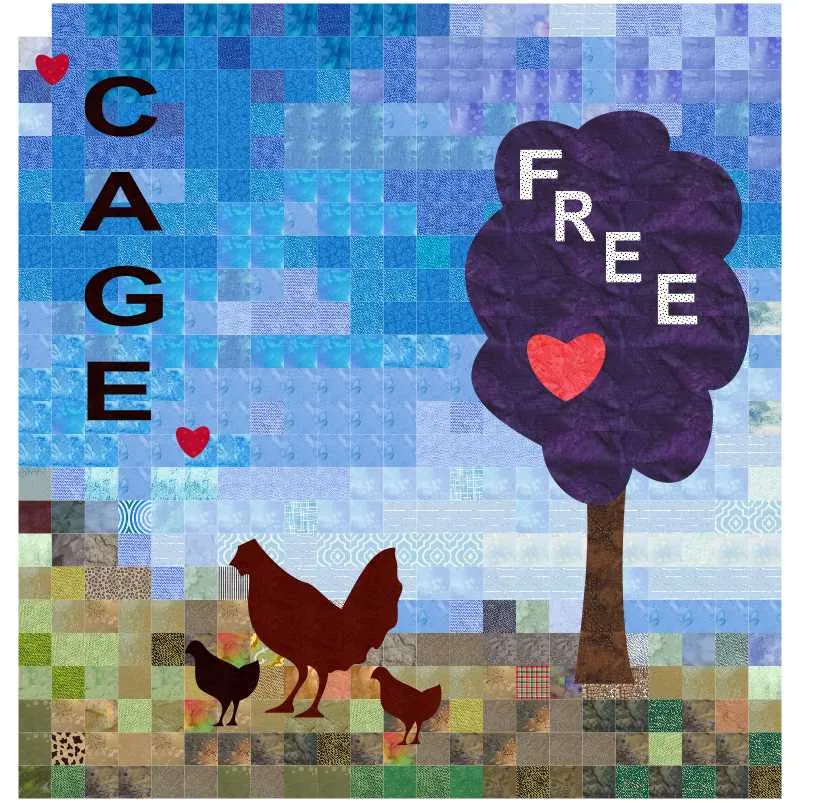
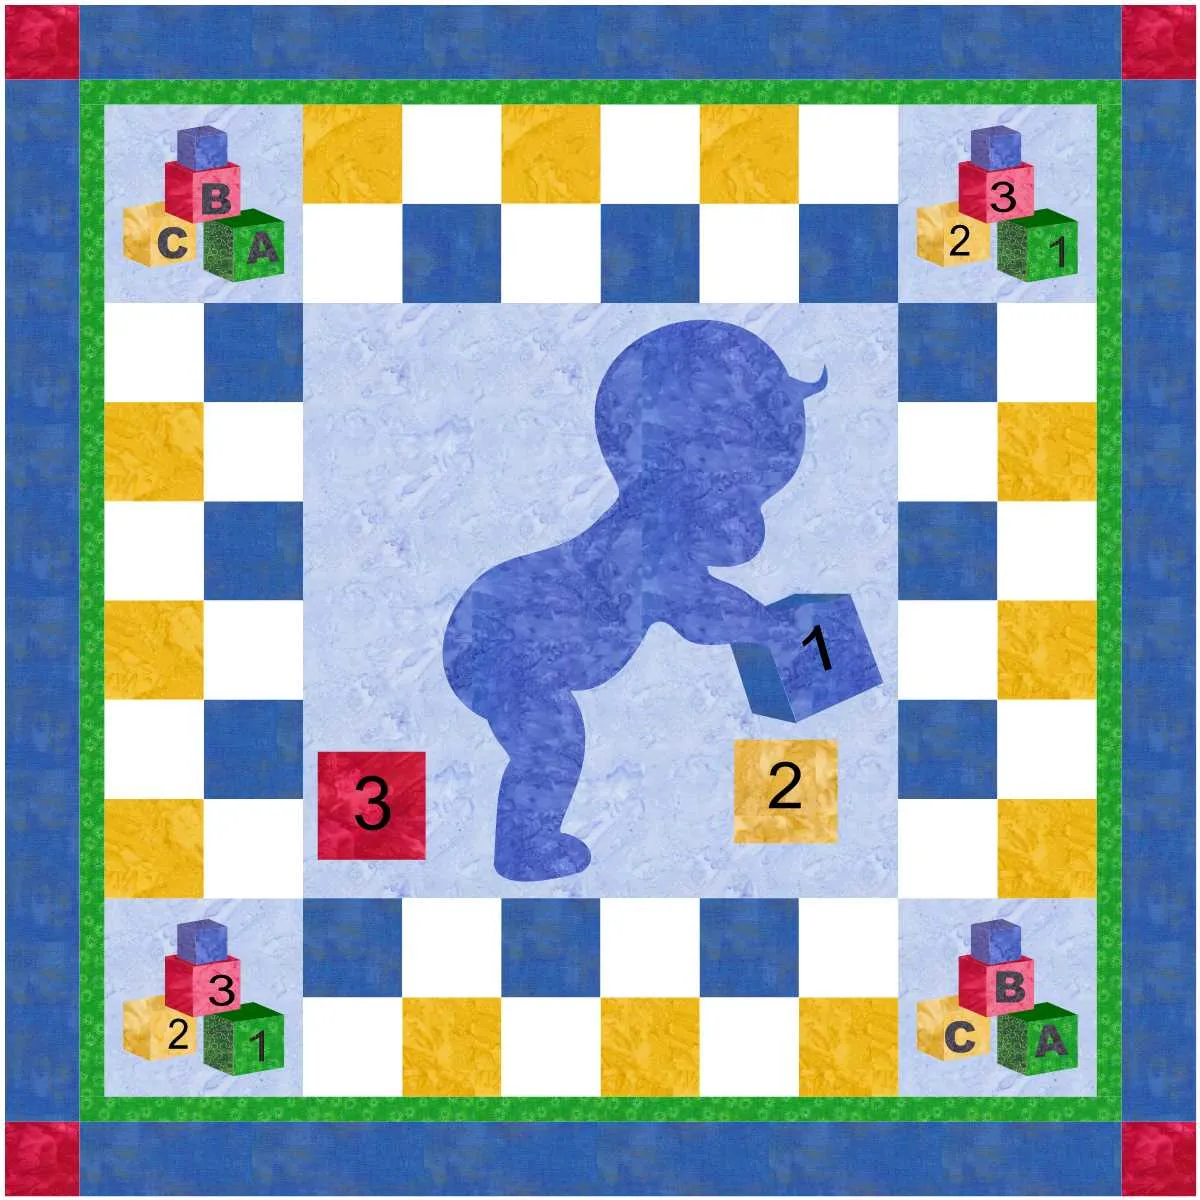
Welcome to Design and Sew 2 –Lessons with Yvonne. This is lesson four (4) in the series. In this lesson, we will highlight text and it’s applications in the EQ8 program. Text can be used in so many different ways to enhance our quilts. We will explore the use of text and how to make it a feature in your quilt designs. We will also look at different fabrics and layout options as unique backgrounds for our text elements.
The video for this lesson is at the bottom of the blog page. I suggest you watch the video to start with and then do the written lesson after. This way you will have a good idea as to how we are going to step through the lesson to create the quilt designs. A picture is worth a thousand words, and when creating different text styles in one layout it is easier to watch the video than trying to read about every single step involved. The video will help with this lesson.
We are highlighting different ways to use text in this lesson. Fonts that are built into your computer can be used for this lesson. Not all fonts are created equal and therefore may not work well for the applique text elements we need to create.
Launch your EQ8 program  from your desktop. If you have changed the preference settings in the program since the last class, you need to go back and set the program to the default settings. This can be done by referring to lesson one (1) and following the steps there to reset the preferences.
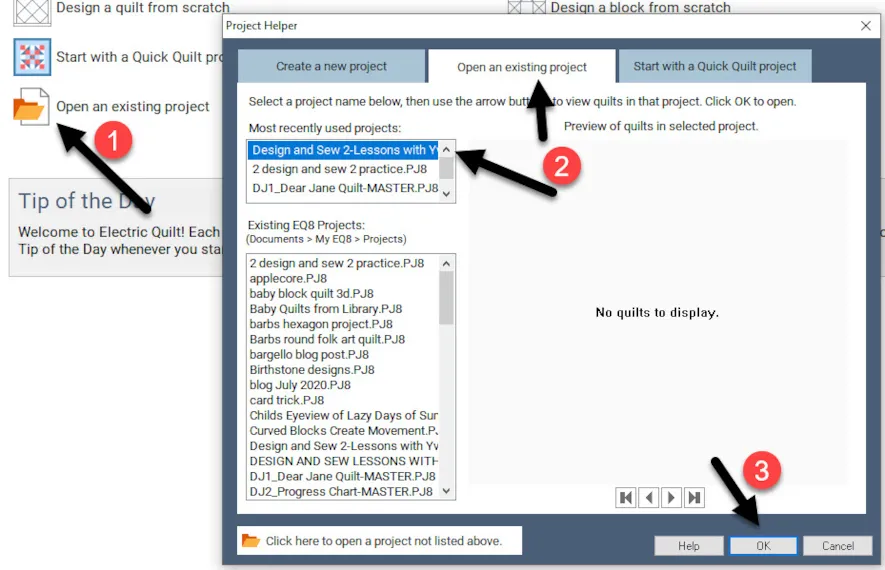
Once the program opens and you have the default preferences set on the opening page, click on the ‘open an existing project’ icon in the center of the screen and navigate to the Design and Sew 2-Lessons with Yvonne project and click on the OK at the bottom of the box to open the project we created in lesson one (1).
Make sure the project name is showing at the top of the screen.
Close the project sketchbook.
Click on the quilt worktable icon on the upper right side of the screen and then click on the photo patchwork icon on the menu bar at the top.
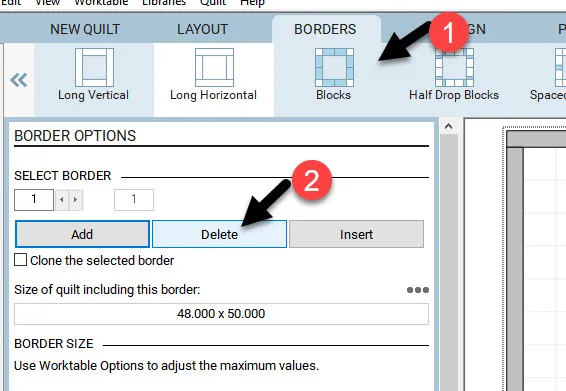
Click on the borders tab at the top of the screen and delete the border.
Click on the Design tab at the top of the screen to view the quilt worktable layout.
Notice on the bottom of the screen there is now four tabs instead of three. We will bring in a photo from the photo library and make it into a pixelated quilt layout.
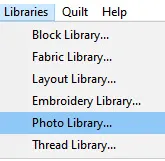
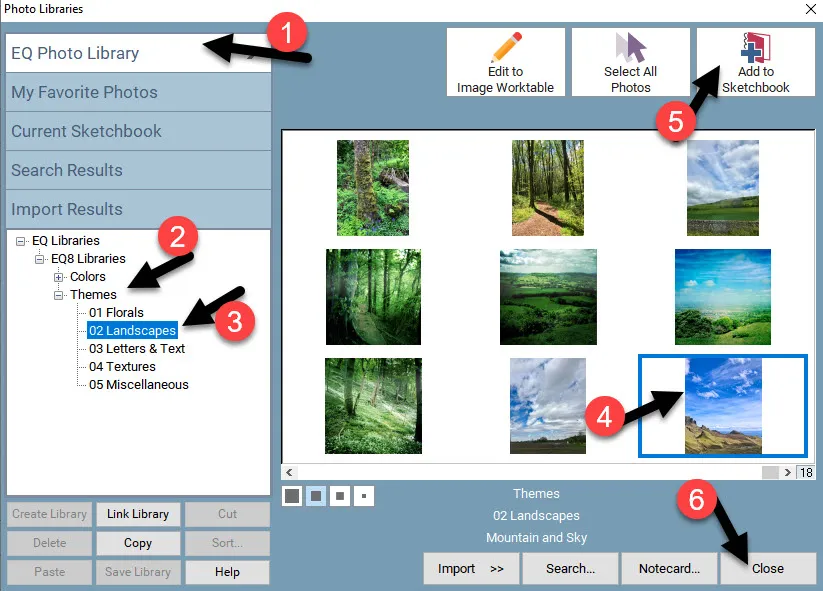
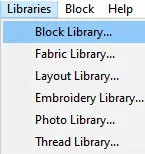
Click on LIBRARIES>Photo Library at the top of the screen.
In the photo library box, click on the + sign in front of the word ‘themes’ and then click on the 02 landscapes option. Scroll to the end of the photos and select the last picture of the mountains and sky. Once selected, click on the ‘add to sketchbook’ in the box and then close the box.
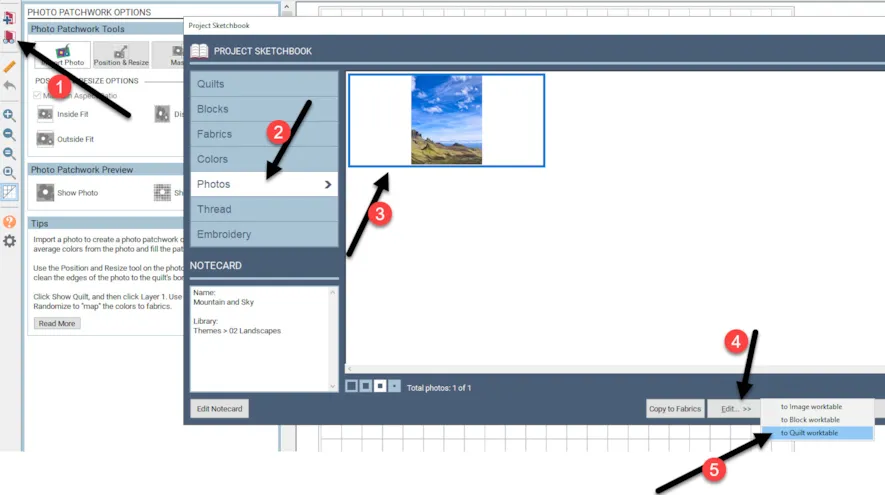
Click on the view sketchbook icon at the far left of the screen. In the sketchbook, under the photos heading, click on the image to select it and then click on edit>to quilt the worktable at the bottom of the box.
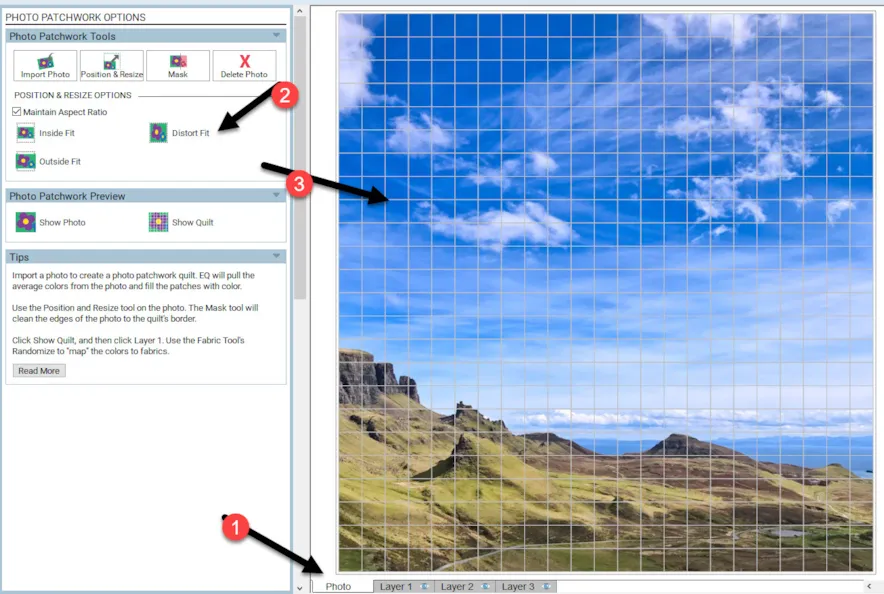
The image will enter the quilt worktable on the photo tab. It is not quite the correct size so click on the ‘distort fit’ icon in the properties box at the left to fit the photo to the layout size.
Add the design to the sketchbook. ![]()
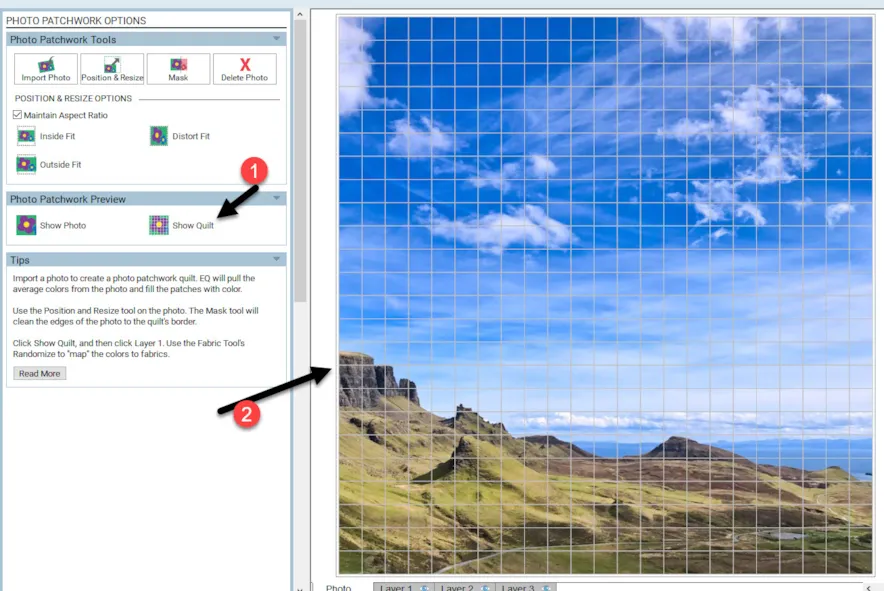
In the properties box, click on the ‘show quilt’ icon.![]()
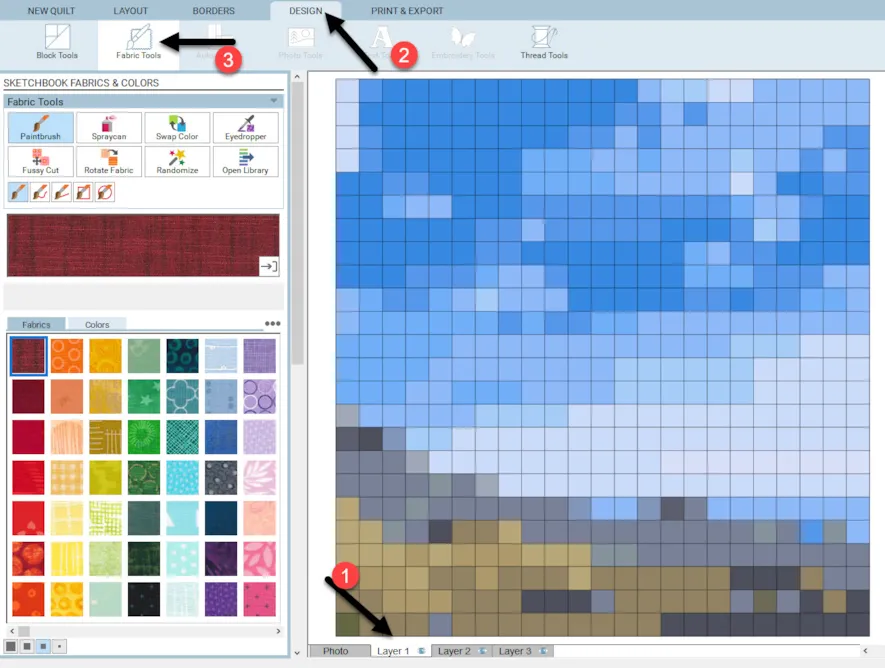
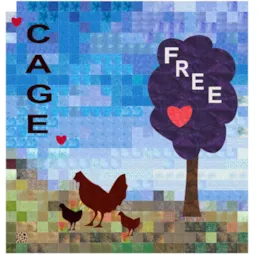
On the worktable, you can see how the photo will be chopped up into small squares to create a pixelated picture of the photo.
Click on layer one (1) at the bottom of the screen. Click on the Design tab at the top of the screen and select the fabric tools from the bar at the top of the screen.
Click on the randomize tool icon ![]() and select the ‘map to fabrics’ option. Move the cursor over to the layout area and click once to have the program automatically select fabrics from the fabrics sketchbook.
and select the ‘map to fabrics’ option. Move the cursor over to the layout area and click once to have the program automatically select fabrics from the fabrics sketchbook.
I want a softer look to my photo image as a background to applique. We need to add more fabric selections to our project sketchbook to create a softer look with fabrics.
Click on LIBRARIES>Fabric library at the top of the screen.
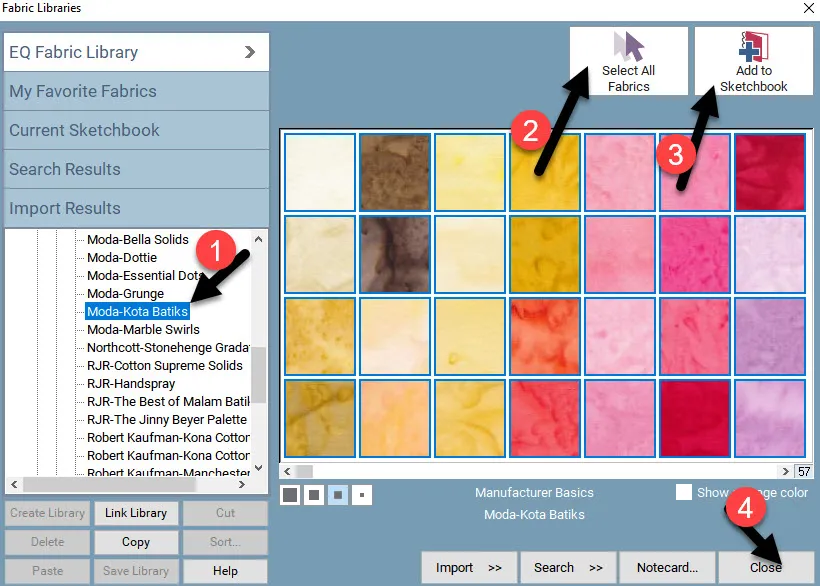
In the libraries box, click on the + sign in front of the ‘manufacturer basics’ option and scroll down to the ‘Moda-Kota Batiks’ collection. Click on the ‘select all’ at the top of the box and then click on the ‘add to sketchbook’ at the top of the box to add all the fabrics in this collection to our project sketchbook. The fabrics will temporarily disappear from the box. Click on the ‘close’ at the bottom of the box once you have added all the fabrics to the sketchbook.
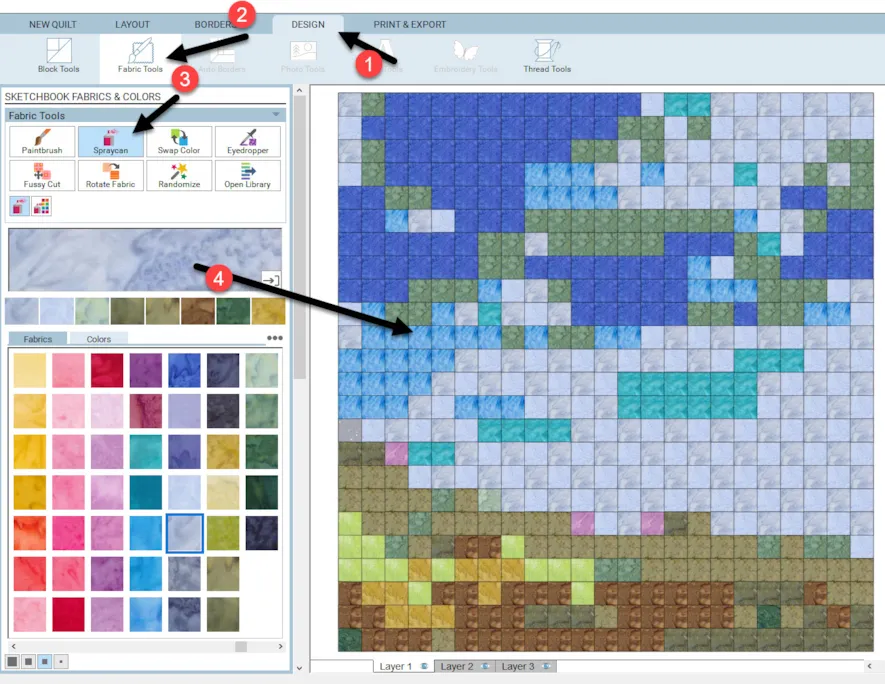
On the Design tab, fabric tools, click on the spray can icon ![]() to select it. Scroll to the end of the fabric palette to see the batik fabrics we added. Select a fabric color from the palette and while holding down the control key (CTRL) on the keyboard, click and fill the colors of the fabric photo with the softer colors of the batik fabrics.
to select it. Scroll to the end of the fabric palette to see the batik fabrics we added. Select a fabric color from the palette and while holding down the control key (CTRL) on the keyboard, click and fill the colors of the fabric photo with the softer colors of the batik fabrics.
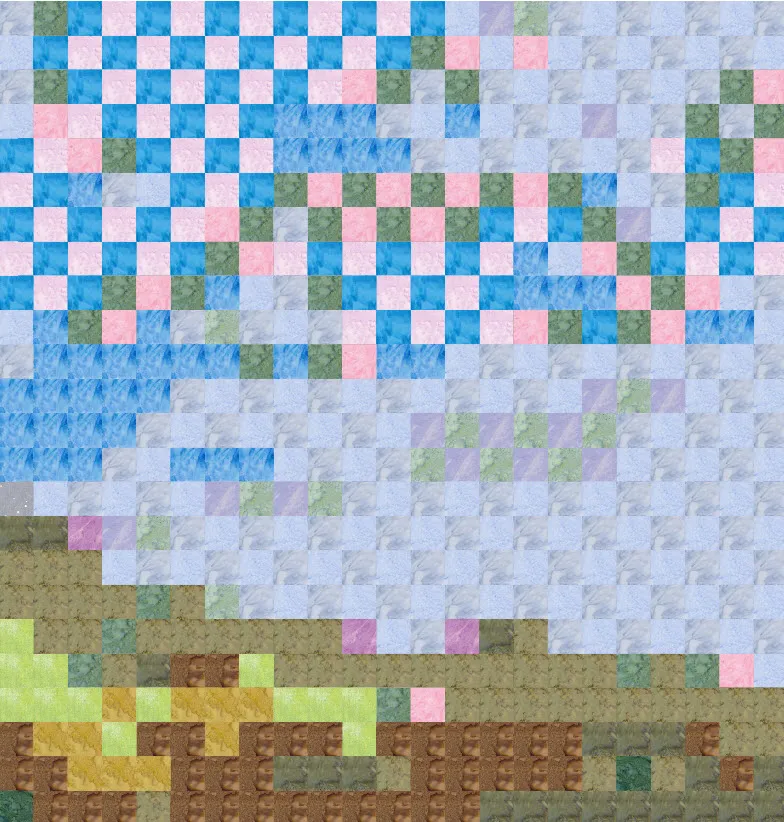
Click on the ‘hide/show quilt lines’ icon ![]() on the left side fo the screen. By turning off the drawing lines of the quilt you will be better able to see if the colors you selected blended well. You may choose to change some of the colors in the layout. Be sure to turn the lines back on when done.
on the left side fo the screen. By turning off the drawing lines of the quilt you will be better able to see if the colors you selected blended well. You may choose to change some of the colors in the layout. Be sure to turn the lines back on when done.
If you made changes, add the new design to the sketchbook.![]()
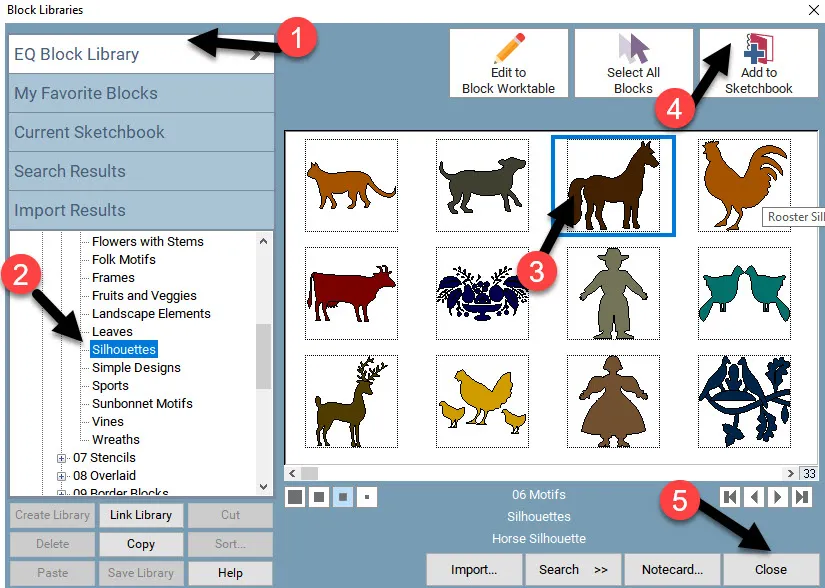
Click on LIBRARIES>Block library at the top of the screen.
On the left side of the box navigate to 06 Motifs and then navigate to the silhouettes category. Scroll through and select the horse image by clicking on it. Add it to the sketchbook and then close the box at the bottom.
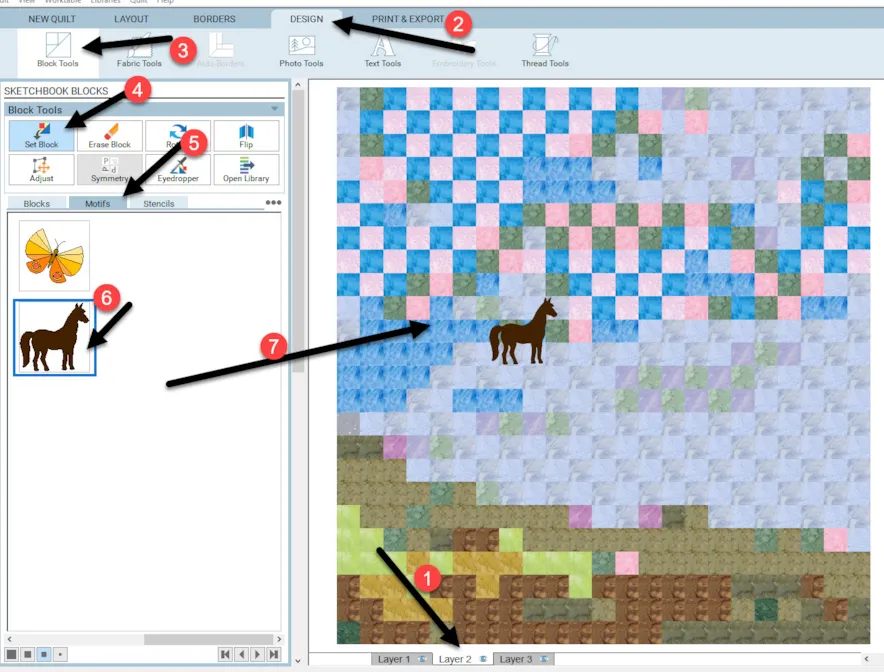
Motifs are applique designs and therefore need to be placed on Layer two of the quilt layout. Click on layer 2 at the bottom of the screen.
Click on the blocktools> Set block icon> and select the motifs tab in the sketchbook blocks box on the left side of the layout. Navigate to the horse image and click on it to select it. Click/hold/drag/release the horse on the quilt layout. The image is way too small for the background.
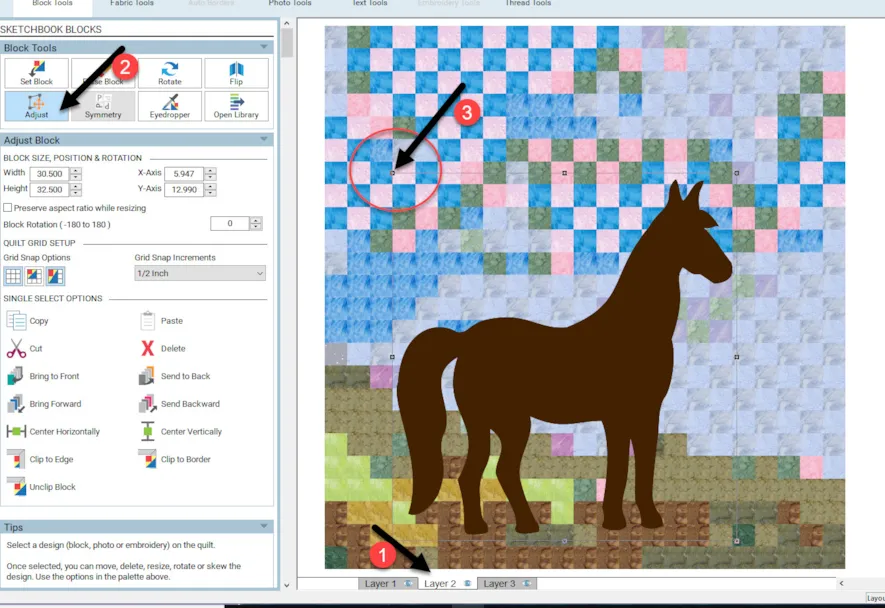
Click on the adjust tool icon ![]() to select it. Once selected, click on the horse image. Click and drag the corner selection handles to enlarge the horse. Click and drag the horse to a better position on the quilt layout.
to select it. Once selected, click on the horse image. Click and drag the corner selection handles to enlarge the horse. Click and drag the horse to a better position on the quilt layout.
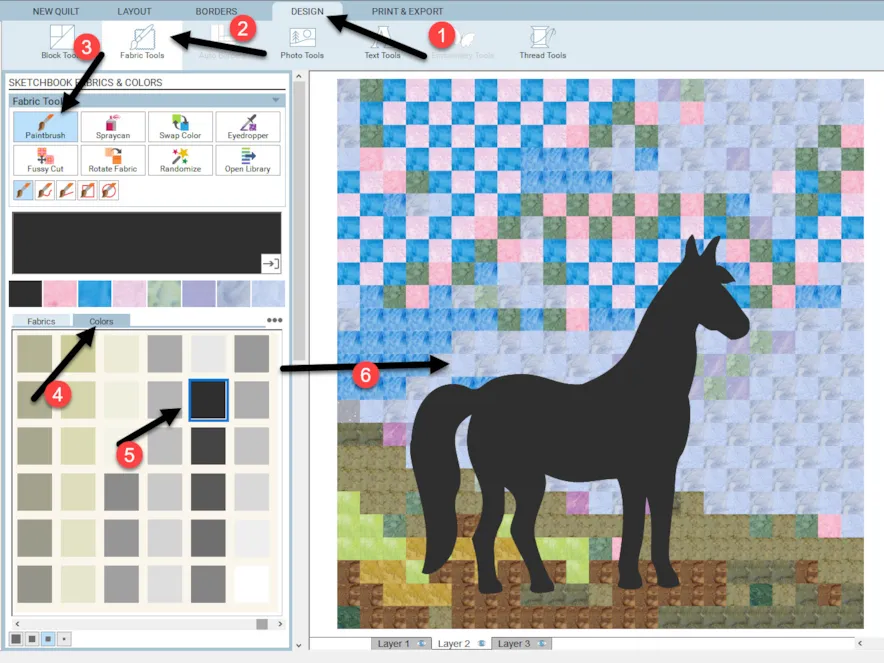
Click on the fabric tools icon and then click on the paintbrush tool icon.
 ![]() Click on the color tab and select the solid black color then click once on the horse to set the color.
Click on the color tab and select the solid black color then click once on the horse to set the color.
Text is added to layer two (2) of the quilt layout. Text is treated as being an applique element in EQ8.
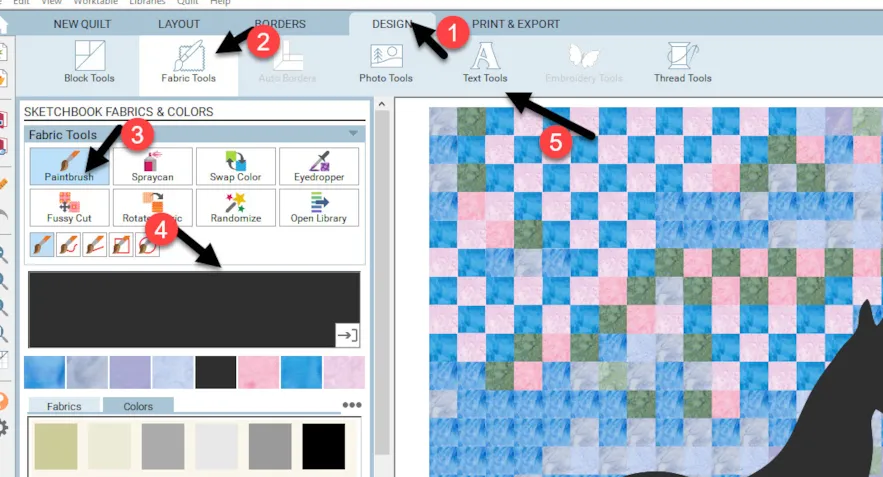
Make sure you are on layer 2 of the quilt layout. In the fabric tools, make sure you have the solid color black selected. This will help in placing the text onto the worktable. Click on the text tools icon ![]() at the top of the screen.
at the top of the screen.
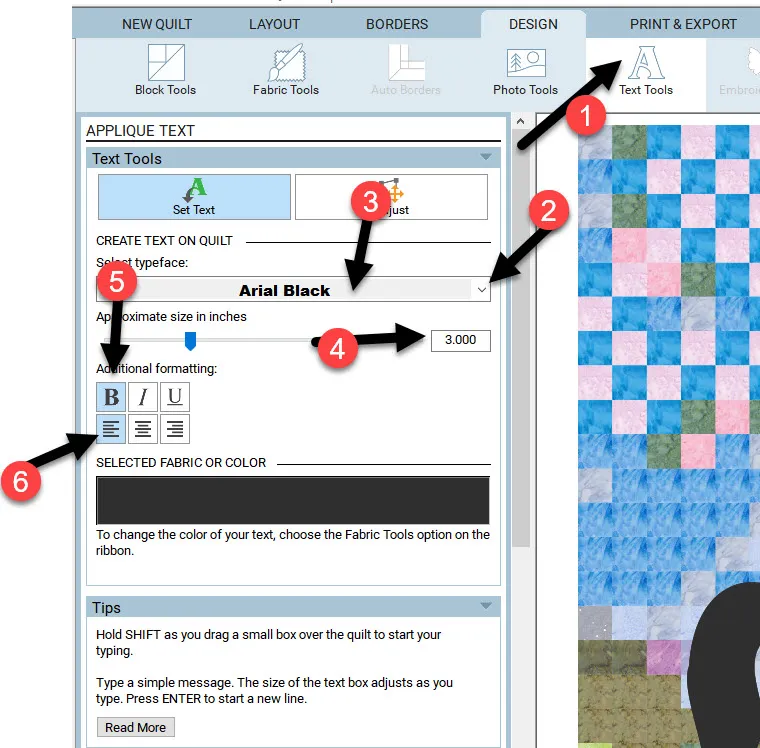
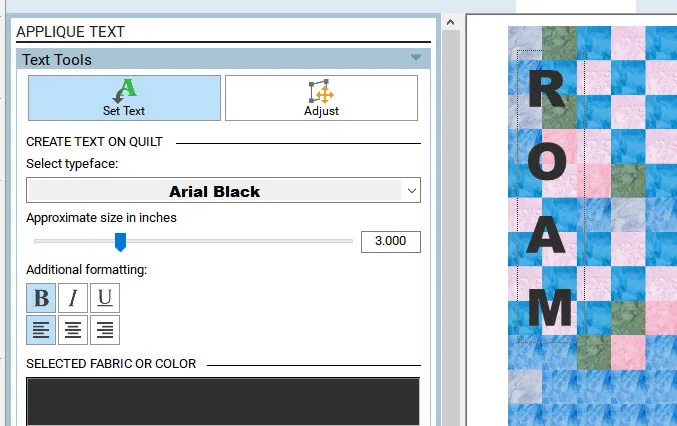
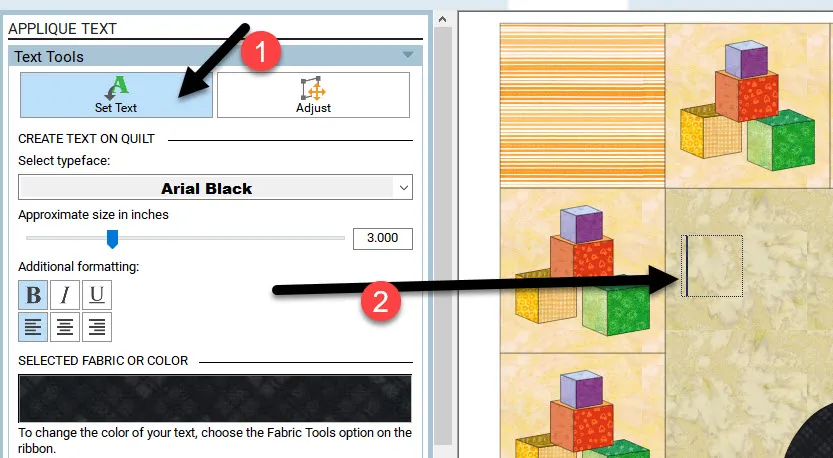
In the drop-down menu, select the Arial Black font. Keep the size of the text at 3 inches. We will change it later. Click on the ‘B” for bold lettering and select the left-justified alignment symbol.
Note that the color selected is the black we used to color the horse. If you set your font color first you will be able to see the letters better as you type. If your fabric color is the same as your background you will not be able to see the text as you type. I always make it a habit to change the color selection to black before I select my text tool for creating my applique words. If I am working on a black background, I would set my text color to white so I can easily see it as I type in the font.
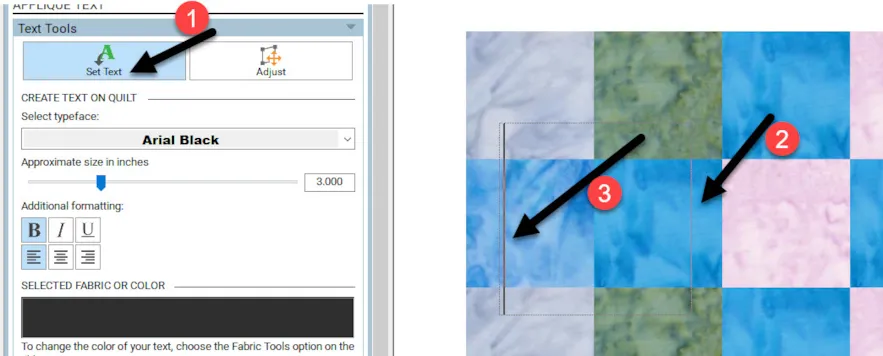
Click on the set text icon ![]() and then move the cursor over to the quilt worktable and while holding down the shift key on the keyboard, click/hold/drag/release a box on the layout. A flashing cursor will appear inside the box to let you know you can type your text.
and then move the cursor over to the quilt worktable and while holding down the shift key on the keyboard, click/hold/drag/release a box on the layout. A flashing cursor will appear inside the box to let you know you can type your text.
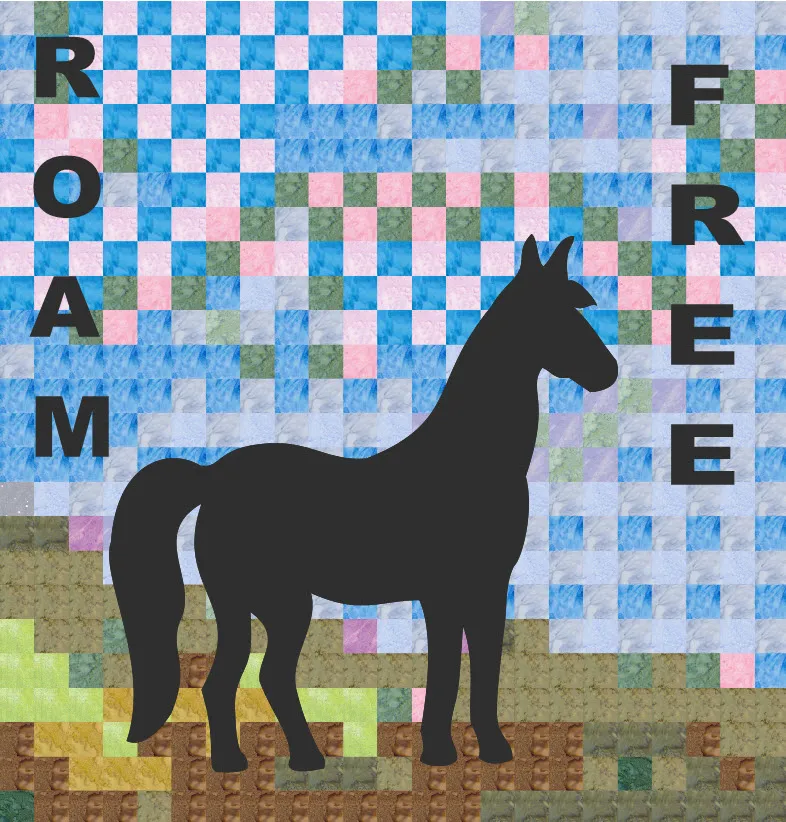
To create a vertical text, you need to click on the return key on the keyboard after typing each letter. Turn on the capital lock key on the keyboard to type all capital letters. Type the word ‘ROAM’ and be sure to hit the return key after each letter.
Click on the adjust tool ![]() to select it and then click on the text. Move the cursor over to a corner selection node and click/hold/drag/release the selection box to resize the lettering. Move the text to the upper left side to the layout.
to select it and then click on the text. Move the cursor over to a corner selection node and click/hold/drag/release the selection box to resize the lettering. Move the text to the upper left side to the layout.
Repeat this same process and type the word ‘FREE’ and place it on the upper right side of the layout.
NOTE: If after designing your layout you still want to change the colors of some of the fabric background squares, just return to layer one (1) of the quilt and change the individual squares to a different color.
Let’s create a quilt layout with traditional text lettering in a row. Create a new quilt layout with a different text option.
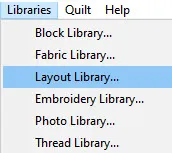
Click on LIBRARIES>Layout Library at the top of the screen.
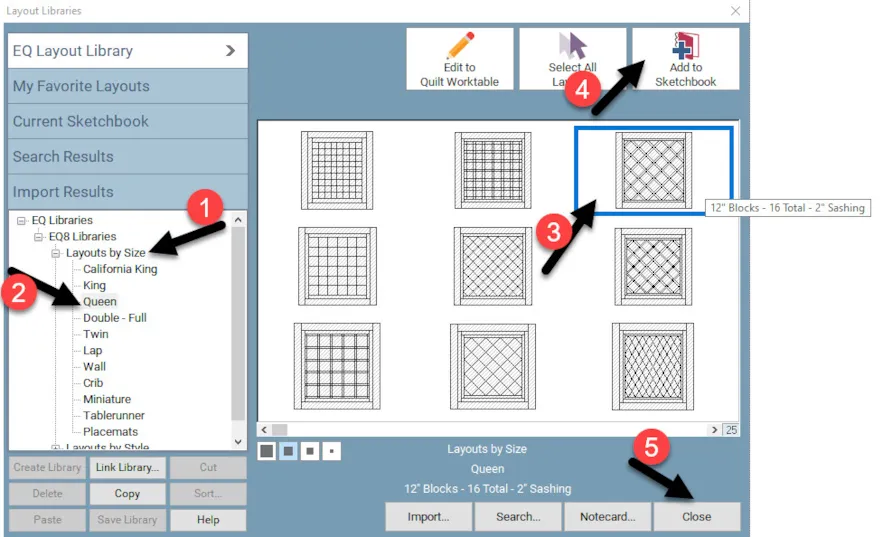
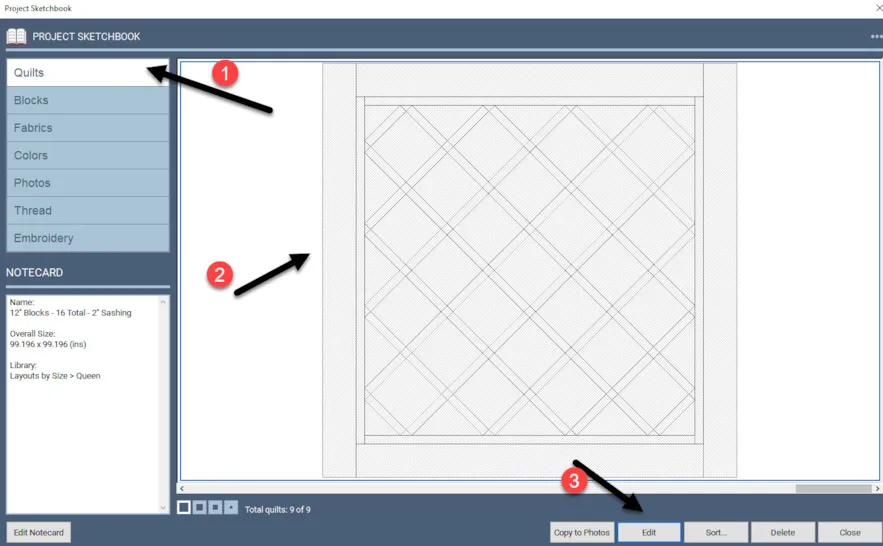
In layout library box, click on Layout by Size and select the queen size quilt layout. Click on the layout with the sashing around the on-point layout to select it and then add to the sketchbook and close the box.
Click on the view sketchbook icon ![]() on the far left side of the screen.
on the far left side of the screen.
In the sketchbook, under the quilts heading, navigate to the last layout added and select the layout we just added by clicking on it. Once it is selected, click on the word ‘edit’ at the bottom of the box.
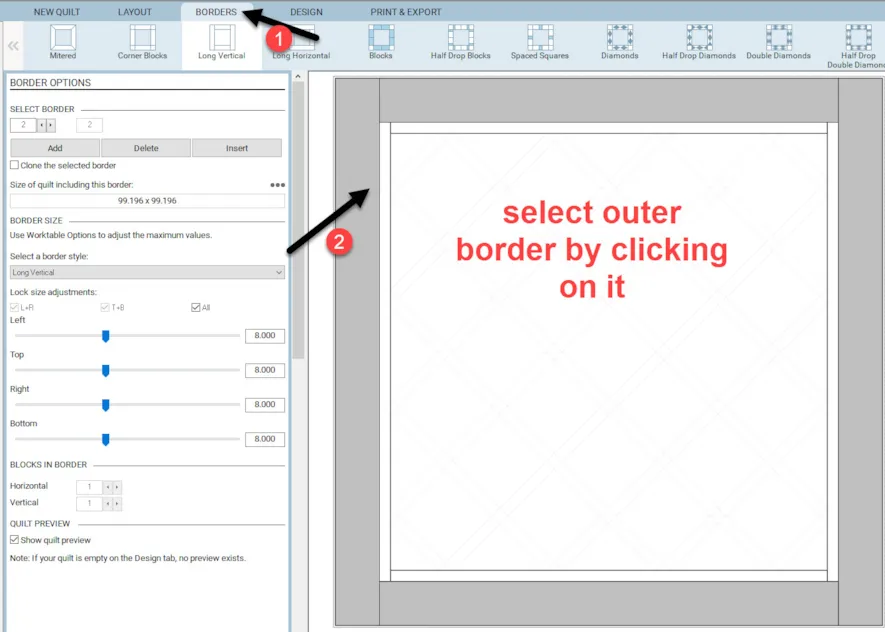
Click on the borders tab at the top of the screen and then click on the outermost border to select it. It will turn gray when selected.
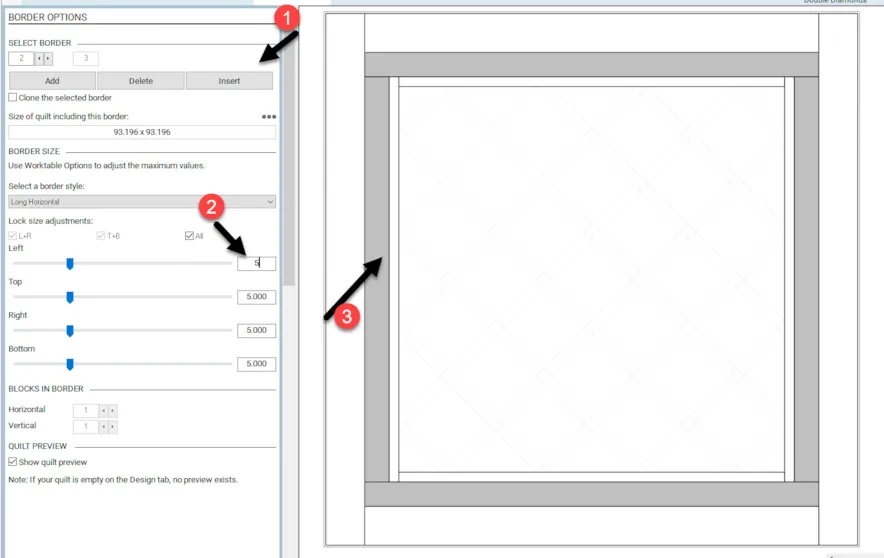
Once the outer border is selected, click on the word ‘insert’ in the border option box at the left side, This will insert a new border just inside of the selected outer border. Set the size of the newly inserted border to be 5 inches on all sides.
Click on the Design tab at the top of the screen and add the new layout to the sketchbook.![]()
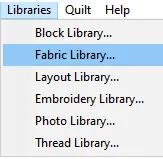
Click on LIBRARIES>Fabric Library at the top of the screen.
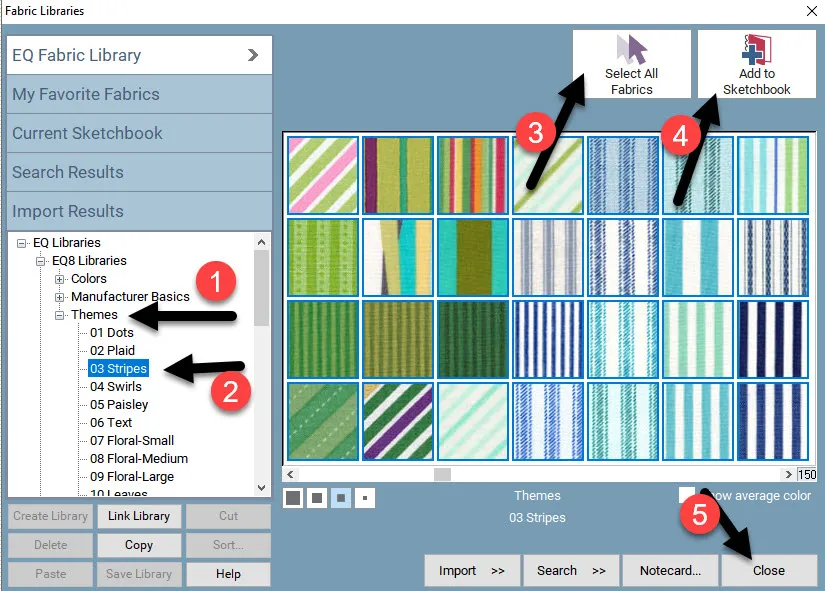
In the fabric library box, select the ‘Themes’ >03 Stripes. Click on ‘select all fabrics’ and then click on ‘add to sketchbook’. Click on close at the bottom of the box.
The new fabrics will be added to the end of the fabric selections in the sketchbook fabrics on the left side of the screen.
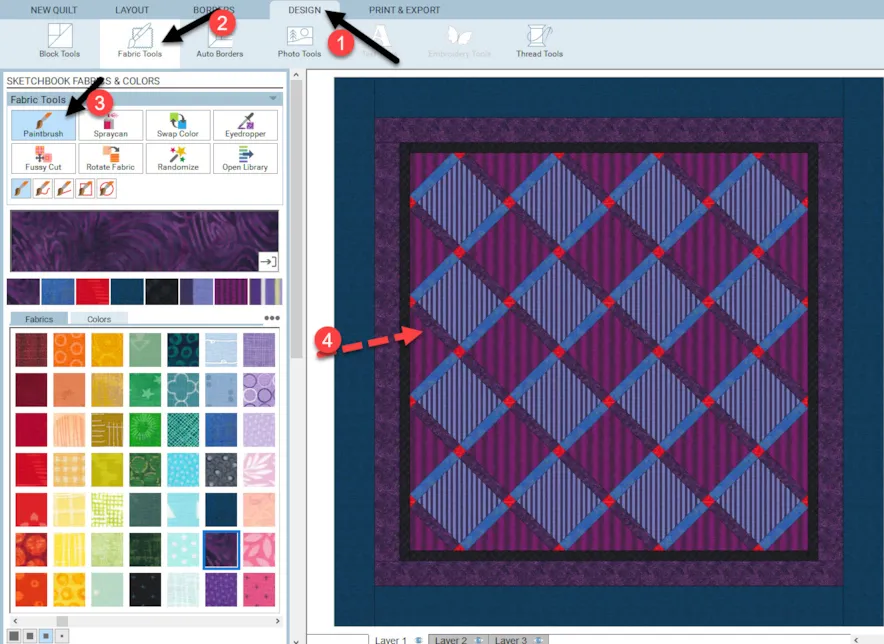
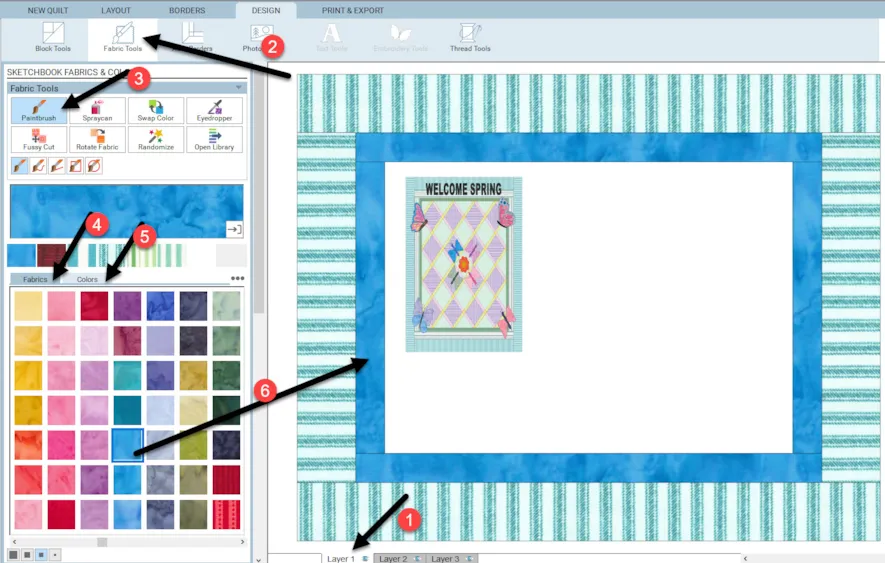
Click on the design tab>fabric tools>paintbrush and select darker colored stripes to fill each of the block areas on the center of the quilt layout. Select stripes that run vertically in the fabric box selections. While holding down the control key(CTRL) on the keyboard, click once to fill all similar blocks with one click of the mouse. Color the borders and sashing strips with the default colors of the EQ8 program at the beginning of the fabric palette on the left side of the layout.
Add the layout to the sketchbook![]()
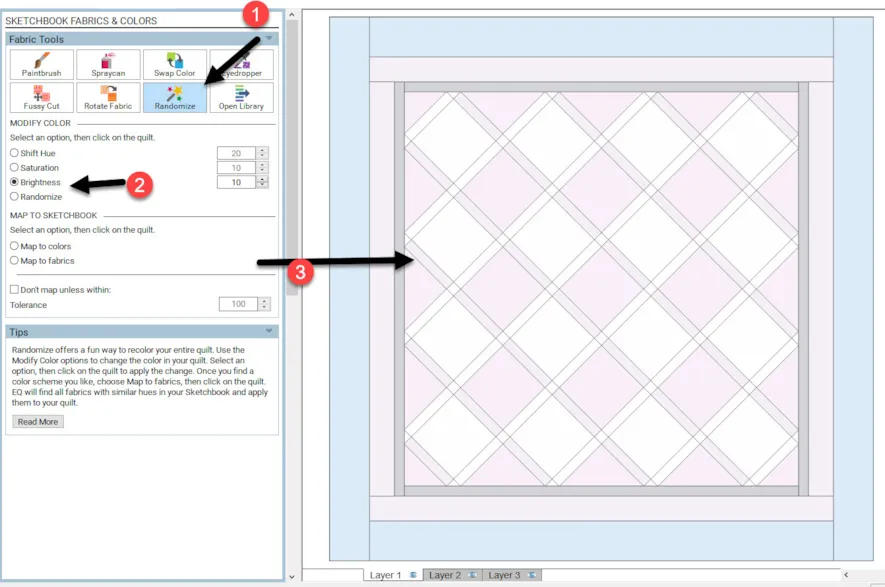
Some may not like the deep colors of this layout. If you want a fresher, lighter color but don’t want to change the layout itself, you can easily change this. Click on the randomize tool icon to select it.![]() Click on the ‘brightness’ radio dial in the properties box to select it. Move the cursor over to the layout area and click multiple times until the layout turns light or pale color.
Click on the ‘brightness’ radio dial in the properties box to select it. Move the cursor over to the layout area and click multiple times until the layout turns light or pale color.
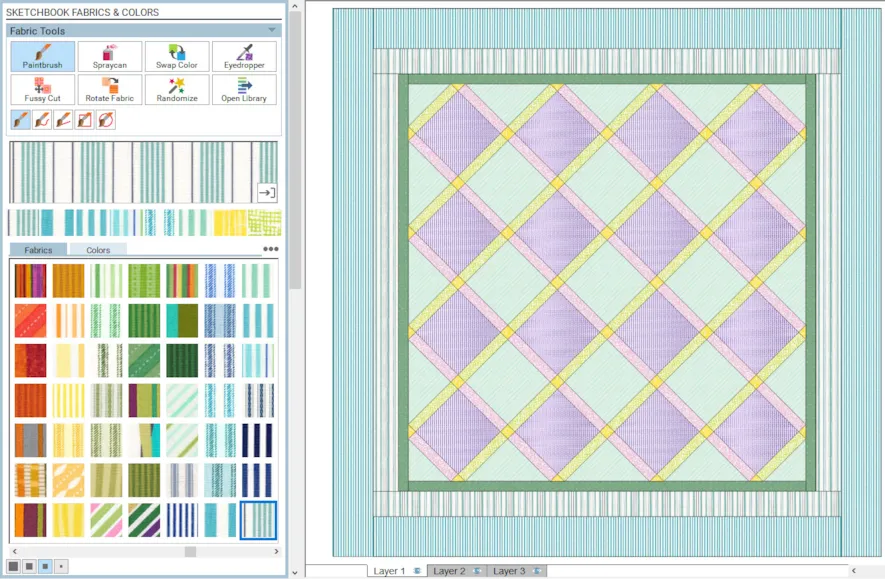
Click back onto the paintbrush tool![]() and select striped fabrics to fill the areas of the new colored quilt with lighter/pastel stripes.
and select striped fabrics to fill the areas of the new colored quilt with lighter/pastel stripes.
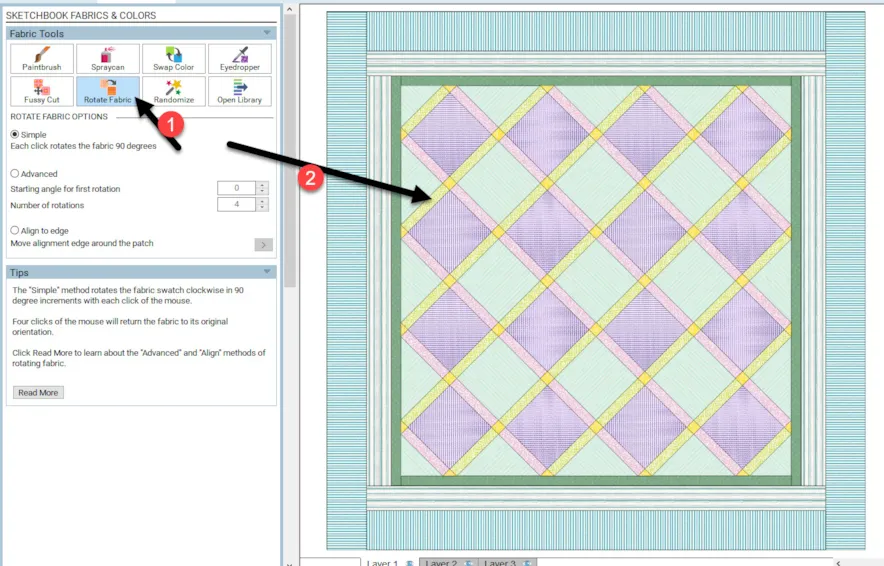
The directional fabric has the unique ability to be rotated to create more depth to your design layout. Use the ‘rotate fabric’ icon![]() to rotate the stripes on the layout. Click once on each area to rotate the fabric 90 degrees. Hold down the ALT key on the keyboard while clicking on the stripes in the blocks to rotate the fabric of each alternate block in the layout into a different direction from the one next to it.
to rotate the stripes on the layout. Click once on each area to rotate the fabric 90 degrees. Hold down the ALT key on the keyboard while clicking on the stripes in the blocks to rotate the fabric of each alternate block in the layout into a different direction from the one next to it.
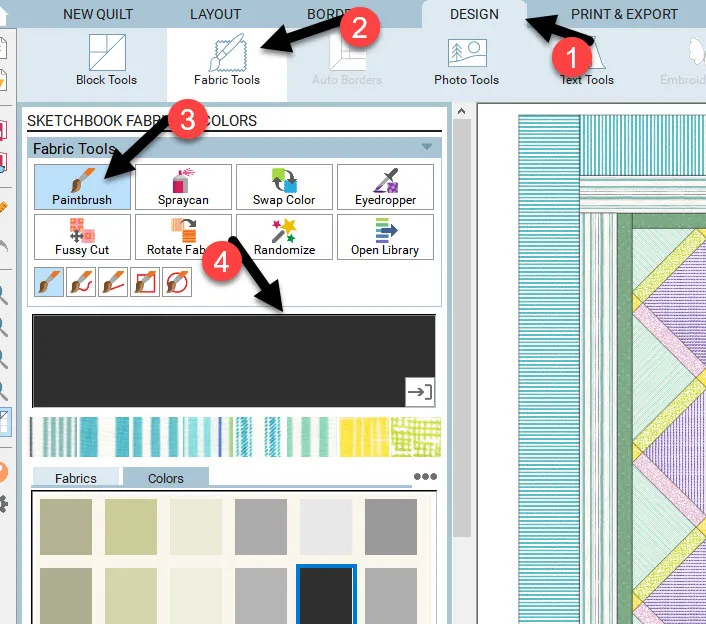
Click on the fabric tools icon  and click on the paintbrush
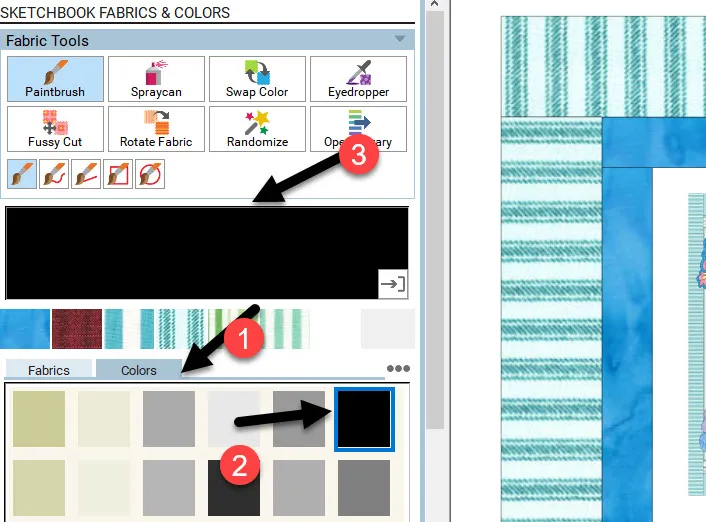
![]() . Under the solid colors tab, select the black color. This will be the color of the text we will add to the layout.
. Under the solid colors tab, select the black color. This will be the color of the text we will add to the layout.
Click on the layer two (2) tab at the bottom of the layout screen.
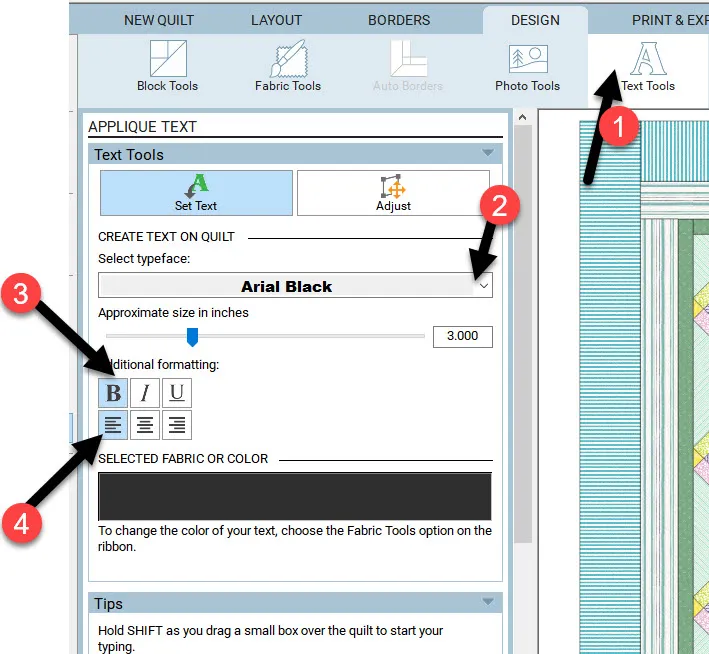
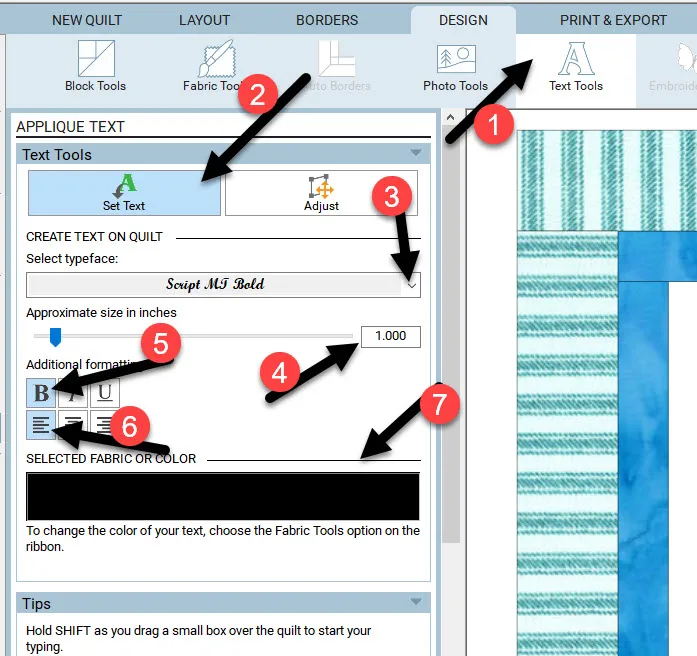
Click on the text tools icon ![]() at the top of the screen. Select the font from the drop-down menu to be ‘Arial Black’ and select the ‘B’ for bold, and left justify. Keep the size of the text to 3.00 inches. We will change that after the text is typed. The black color of the fabric will show in the selected fabric color box.
at the top of the screen. Select the font from the drop-down menu to be ‘Arial Black’ and select the ‘B’ for bold, and left justify. Keep the size of the text to 3.00 inches. We will change that after the text is typed. The black color of the fabric will show in the selected fabric color box.
Click on the set text icon![]() in the text box to select it. Move the cursor over to the worktable and while holding down the shift key on the keyboard, click/hold/drag/release a box for the text. You will see a flashing cursor inside the box.
in the text box to select it. Move the cursor over to the worktable and while holding down the shift key on the keyboard, click/hold/drag/release a box for the text. You will see a flashing cursor inside the box.
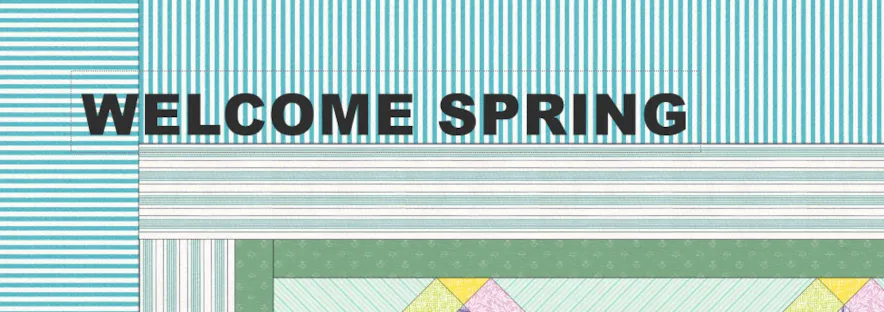
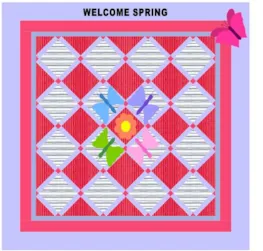
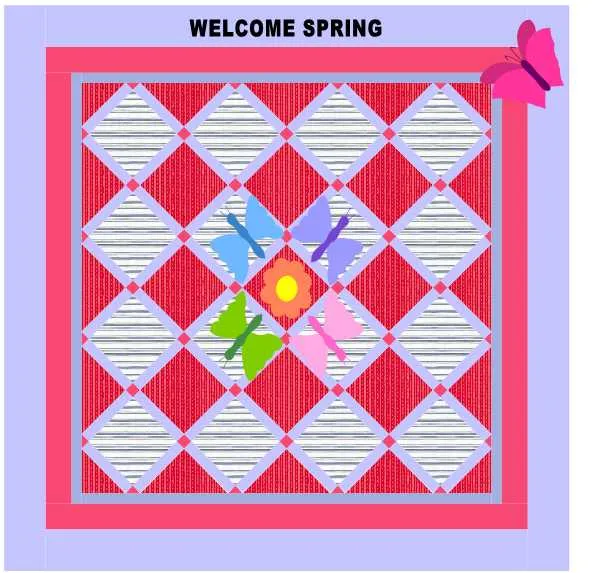
Click on your capital lock key on the keyboard. Now all the text you type will be capital letters. Type the words ‘WELCOME SPRING’.
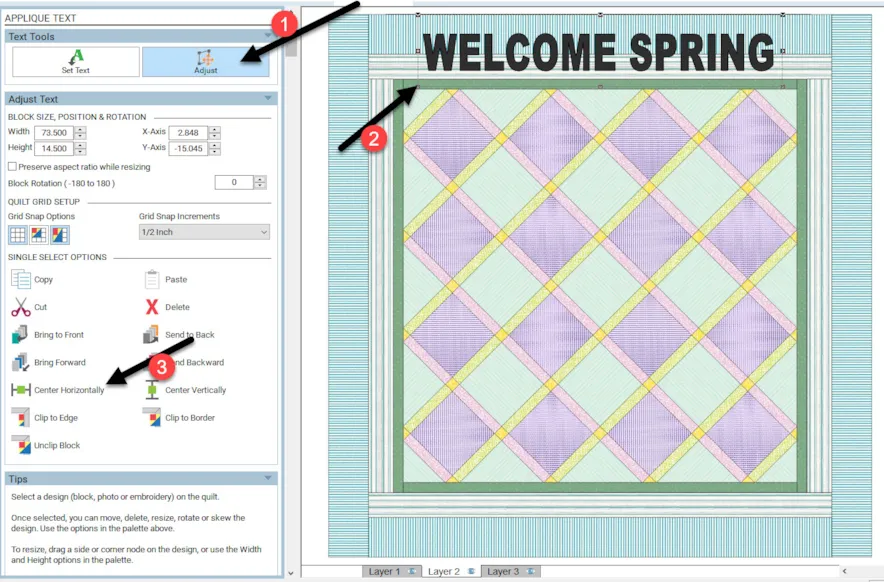
Click on the adjust tool![]() to select it. With the adjust tool, click on the text you typed. Click/hold/drag/release a corner handle of the selection box to resize the text to how you want it across the top of the quilt layout. Once it is resized, click on the ‘center horizontally’ icon
to select it. With the adjust tool, click on the text you typed. Click/hold/drag/release a corner handle of the selection box to resize the text to how you want it across the top of the quilt layout. Once it is resized, click on the ‘center horizontally’ icon ![]() in the text properties box to center it at the top of the quilt layout.
in the text properties box to center it at the top of the quilt layout.
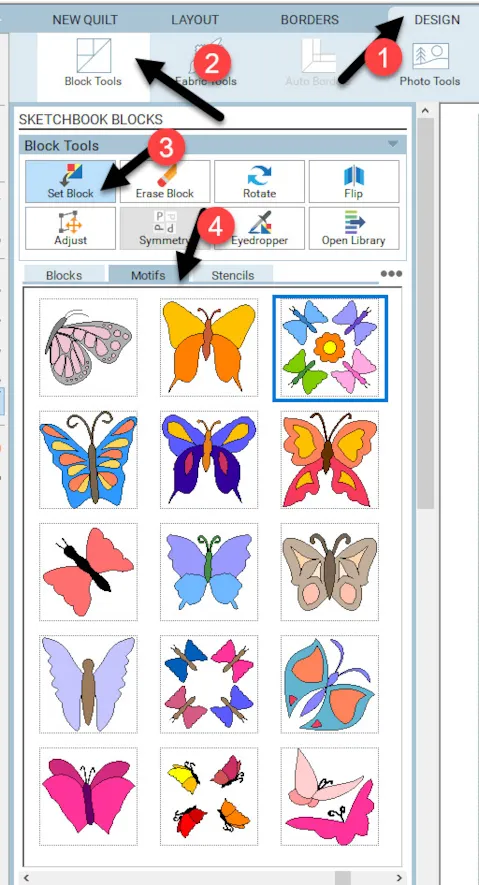
While you are still on layer two (2) of the quilt layout, click on the block tools from the ribbon at the top of the screen and then click on the set block tool
 ![]() to select it. Click on the motifs tab in the blocks sketchbook and select some butterflies from the box that we added in lesson one of this Design and Sew 2 class. Or, you may choose to download different motifs from the library. Go back to lesson one to see how we downloaded the selection of motifs from the library if you want to use something different than the butterflies.
to select it. Click on the motifs tab in the blocks sketchbook and select some butterflies from the box that we added in lesson one of this Design and Sew 2 class. Or, you may choose to download different motifs from the library. Go back to lesson one to see how we downloaded the selection of motifs from the library if you want to use something different than the butterflies.
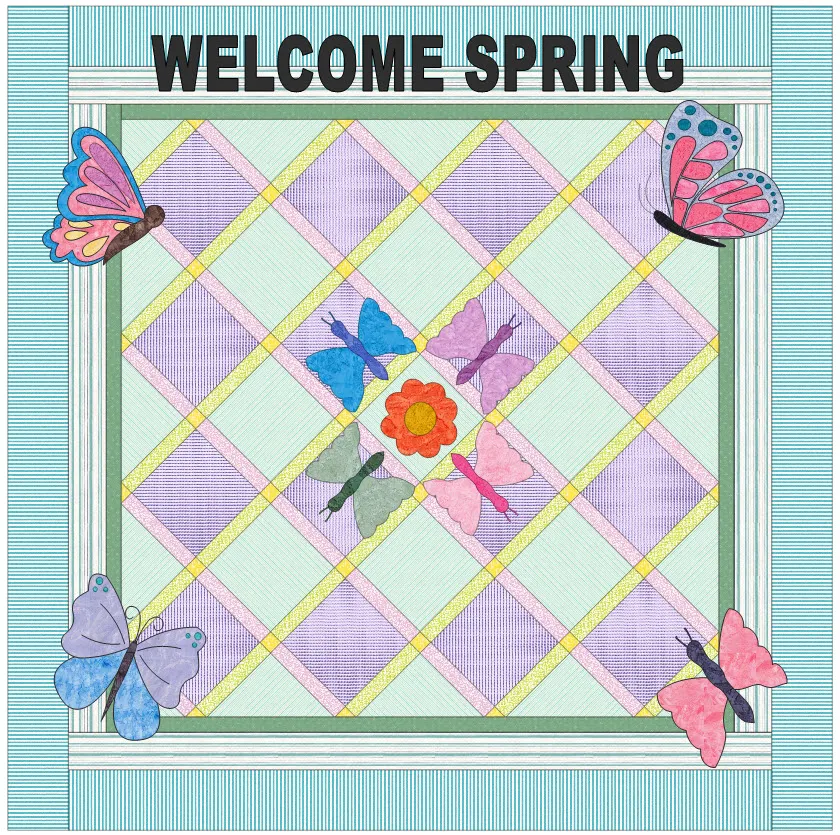
Select motifs and add them to the layout. Use the same steps of placing them and adjusting them on layer two as we have been doing with all our other applications for layer two of the quilt. Color them with light/pastel colors to blend with the quilt background.
Simple words can portray a feeling or an activity we love to participate in. Words can be placed on the quilt at any angle or embedded into an ‘object’ in a quilt design.
At the top of the screen, click on NEW QUILT>On Point.
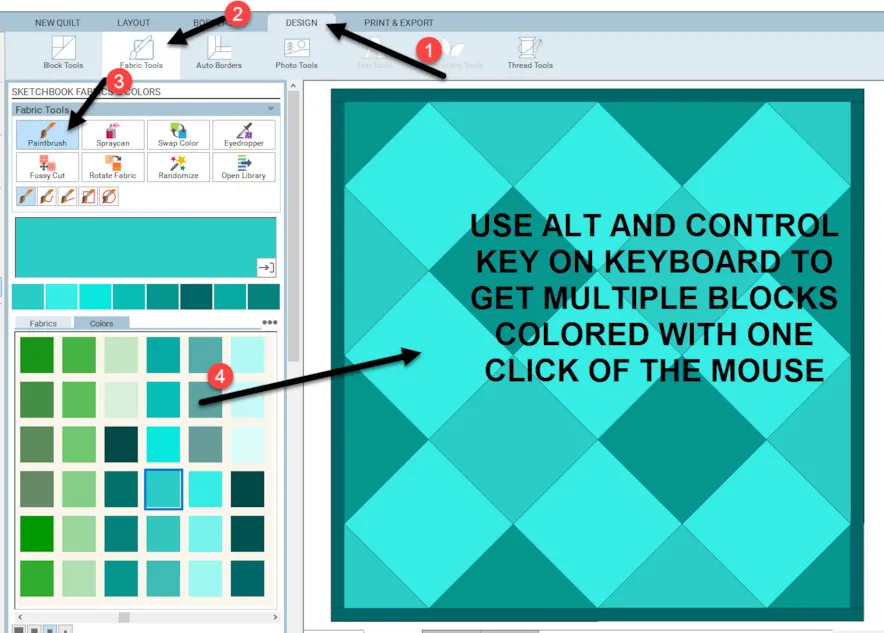
Leave all the default settings as they are. Click on the Design tab and click on the fabric tools>paintbrush. Using solid colors for your background and borders, paint the blocks in alternating colors. Use the control and alt keys on the keyboard while clicking on the quilt blocks to lay your selected colors in multiple blocks at one time.
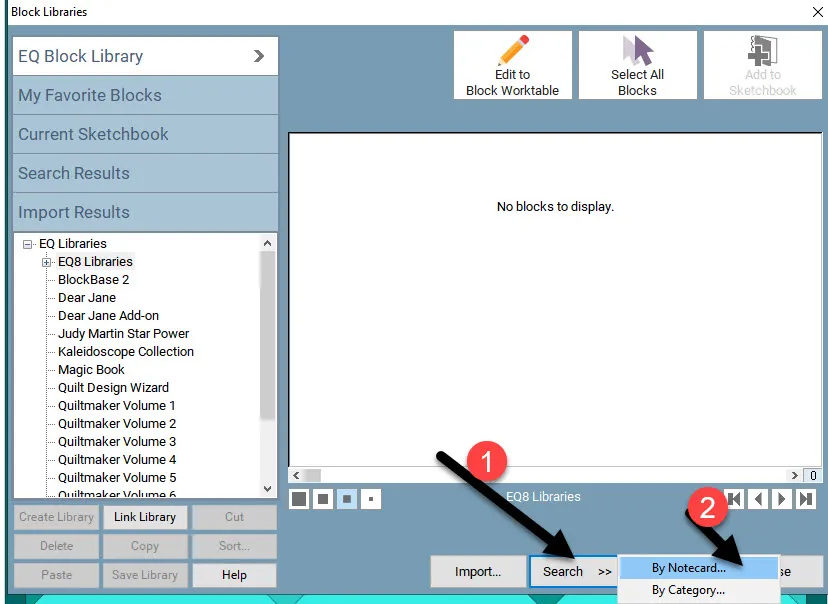
Click on LIBRARIES>Block Library
At the bottom of the library box, click on the word ‘search >by notecard’.
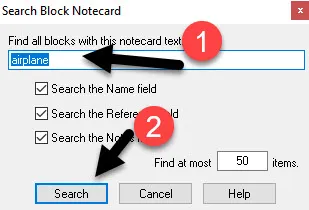
In the box, type in the word ‘airplane’ and then click on the search at the bottom of the box.
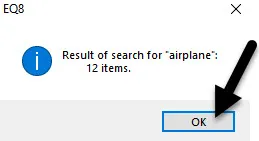
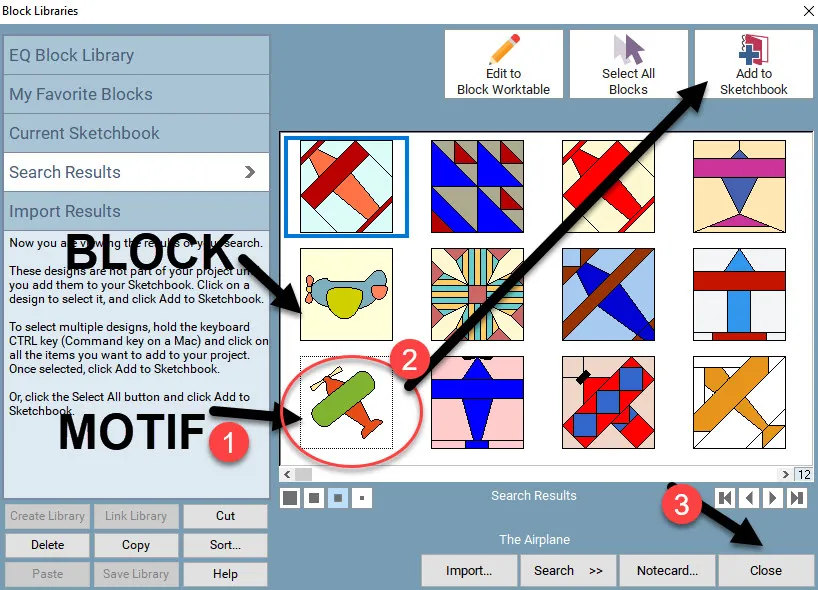
EQ will give you the search results. All blocks in the library that have the name ‘airplane’ associated with them will show up. Click on the OK in the box to see the airplane designs.
NOTE: If you have several add on blocks to the EQ8 installed on your computer, you may indeed have more items show up in your results box. The search function looks at all blocks installed into your EQ8 and not just the default blocks in the program.
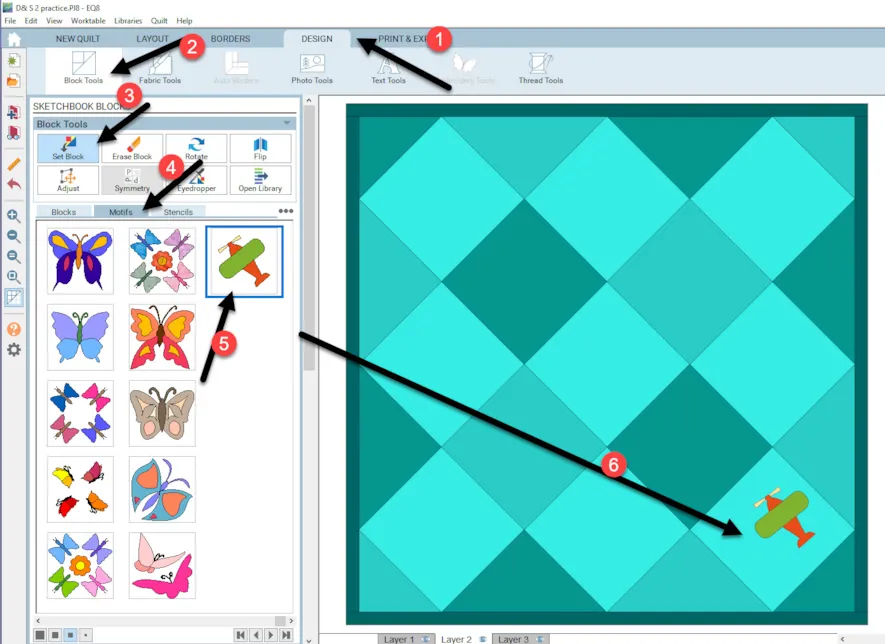
Look closely in the search results blocks at the images of airplanes. Some have a solid block outline around them and some have a dashed outline box around them. The solid outline tells us they are a block and the dashed outline tells us it is a motif design. Choose a simple motif design and add it to the sketchbook. Close the search box when done.
Click on layer 2 of the quilt layout at the bottom of the screen. Applique is almost always added on layer 2 of the quilt worktable.
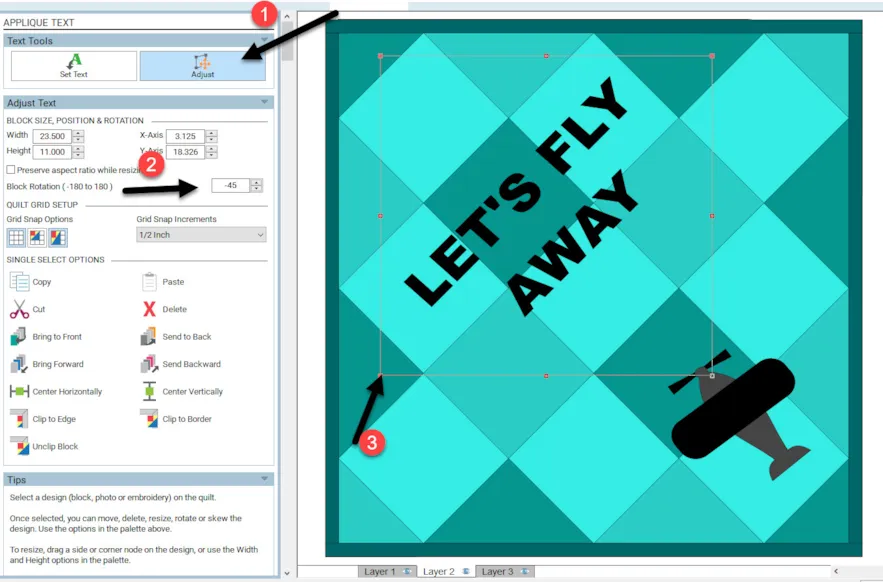
Under the Design tab, select the block tools>set block icon and then click on the motifs tab in the blocks pane at the left of the quilt layout. Scroll to the end of the motifs to see the airplane you just added. While holding down the shift key on the keyboard, click/hold/drag/release the airplane motif into the lower right corner of the quilt layout.
The airplane is too small. Click on the adjust tool ![]() to select it. Click on the airplane. Move the mouse to a corner handle of the selected airplane and click and drag the handle so you have a larger airplane that extends over two blocks.
to select it. Click on the airplane. Move the mouse to a corner handle of the selected airplane and click and drag the handle so you have a larger airplane that extends over two blocks.
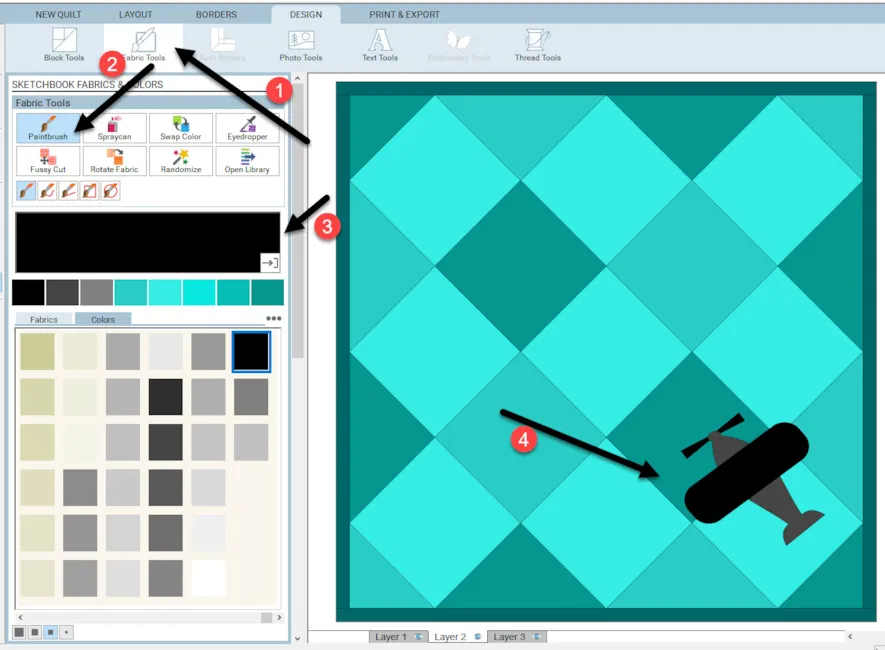
Click on the fabric tools icon on the ribbon at the top and select solid black/deep gray colors to color your airplane. Use the black color last so it is what is still selected in the fabric tools box.
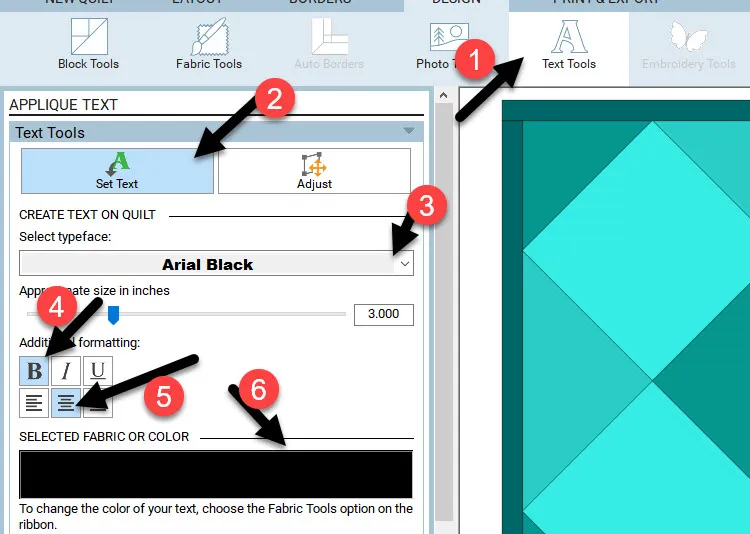
Click on the text tools icon ![]() and the set text tool icon
and the set text tool icon ![]() and choose the properties of Arial Black font, 3-inch size, bold (B) font, and center justified. The black color is already selected as it was the last color we used in coloring the plane.
and choose the properties of Arial Black font, 3-inch size, bold (B) font, and center justified. The black color is already selected as it was the last color we used in coloring the plane.
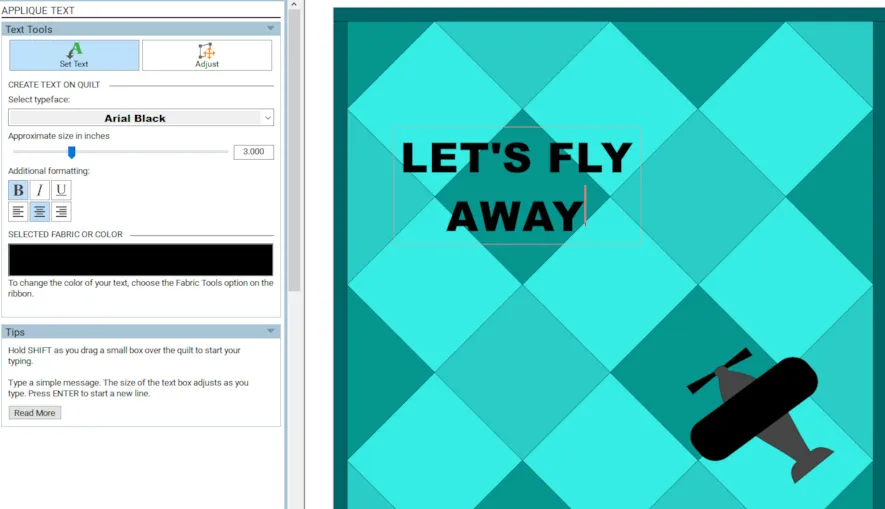
Move the cursor over to the quilt layout and while holding down the shift key, click/hold/drag/release a box to reveal a flashing cursor. Once you have the flashing cursor you can type your text message. Use the return key to get the second line of text for your message. Let your message express your feeling about flying. LET’S FLY AWAY; FLY HIGH EVERY DAY; SOAR THROUGH LIFE; could be some sayings that represent your feelings.
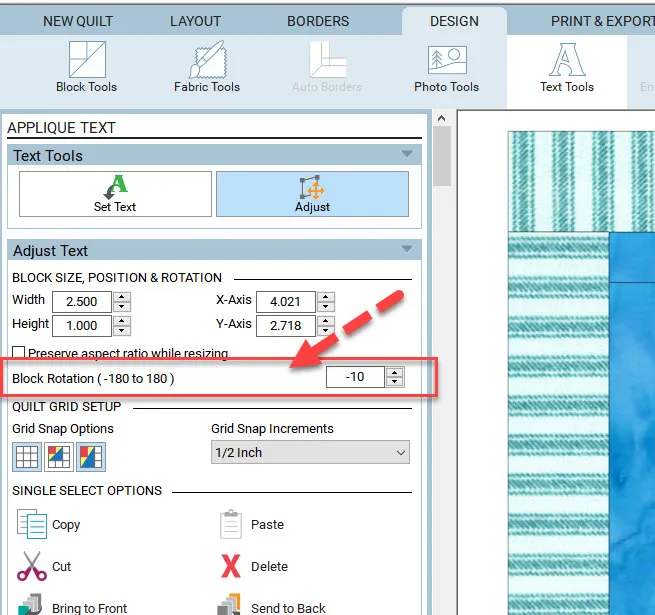
Click on the adjust tool ![]() to select it. Click on the text to reveal a selection box around the text just typed. Change the block rotation to be -45 degrees. Click/hold/drag/release the corner selection handle to adjust the size of the text. Click and drag the text that is rotated to a position on the quilt layout that you are happy with.
to select it. Click on the text to reveal a selection box around the text just typed. Change the block rotation to be -45 degrees. Click/hold/drag/release the corner selection handle to adjust the size of the text. Click and drag the text that is rotated to a position on the quilt layout that you are happy with.
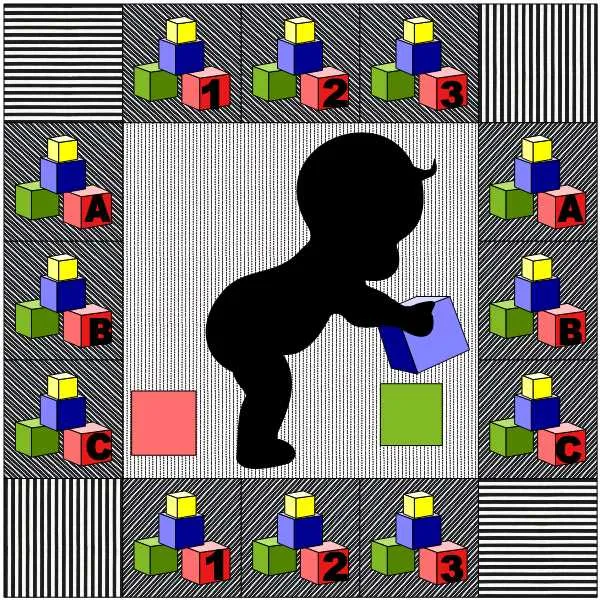
Text can also be placed strategically in a design to add more interest to a block element.
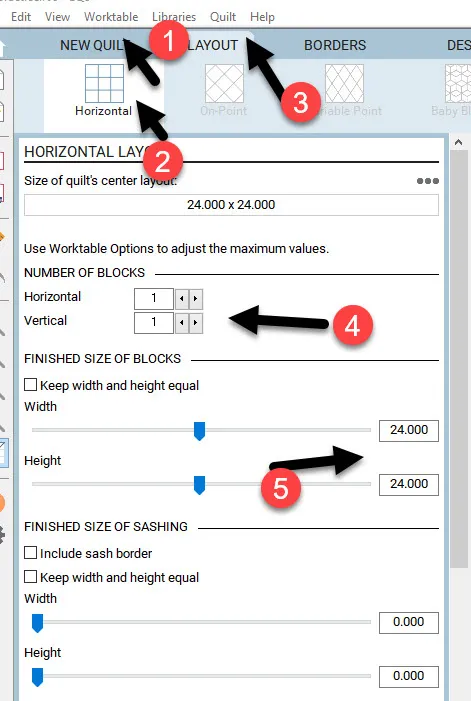
Click on NEW Quilt>Horizontal at the top of the screen.
Click on the layout tab and set the number of blocks to be 1 x 1 and the size to be 24 inches.
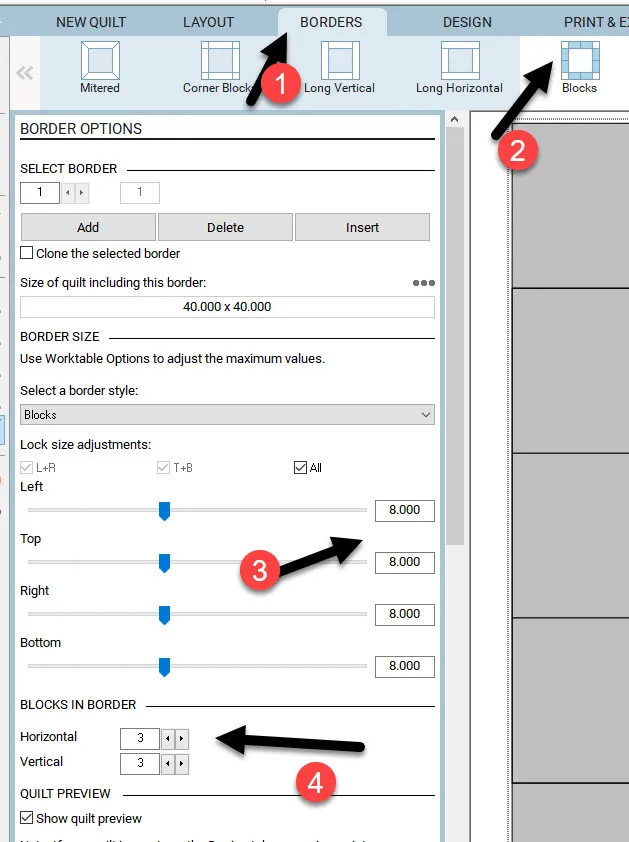
Click on the borders tab at the top and select the Blocks border design. Set the blocks to be 8 inches in size and 3 horizontal and vertical.
Click on the Design tab at the top of the screen and add the layout to the sketchbook. ![]()
Click on LIBRARIES>Block Library at the top of the screen.
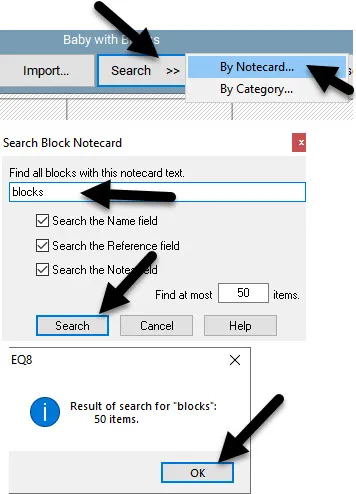
At the bottom of the library box, click on search>by notecard.
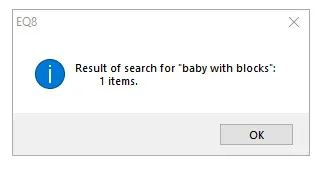
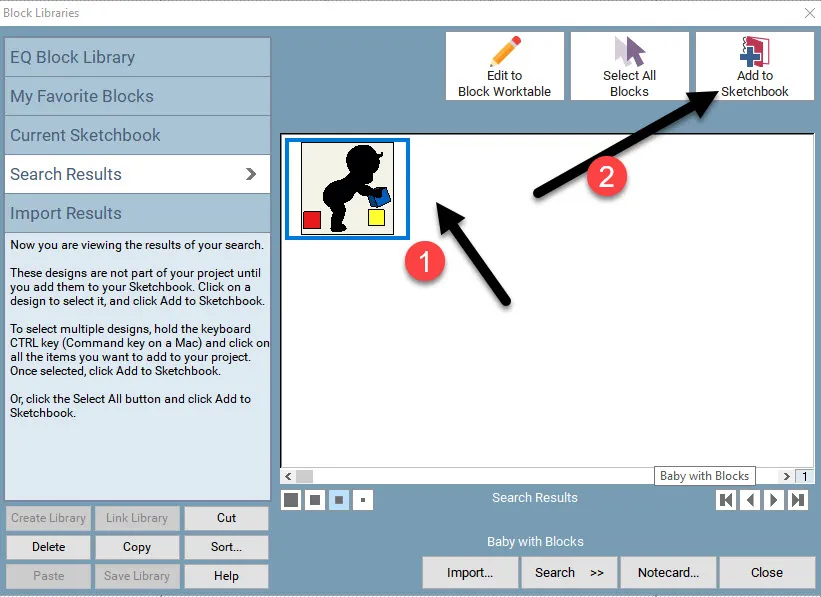
In the search box type in ‘baby with blocks’ and click on the search at the bottom of the box.
In the results box, click on the OK at the bottom of the box to view the results.
In the sketchbook, click on the baby image and add it to the sketchbook.
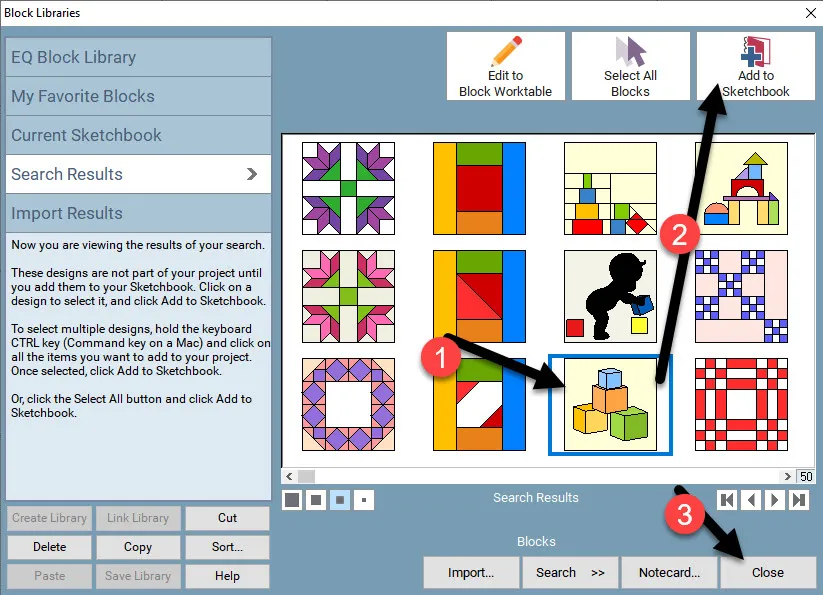
Click on search>by notecard one more time and search for ‘blocks’. Add the search results by clicking the OK in the box.
In the sketchbook click on the stacked blocks to select them and then click on add to the sketchbook. Close the box when done.
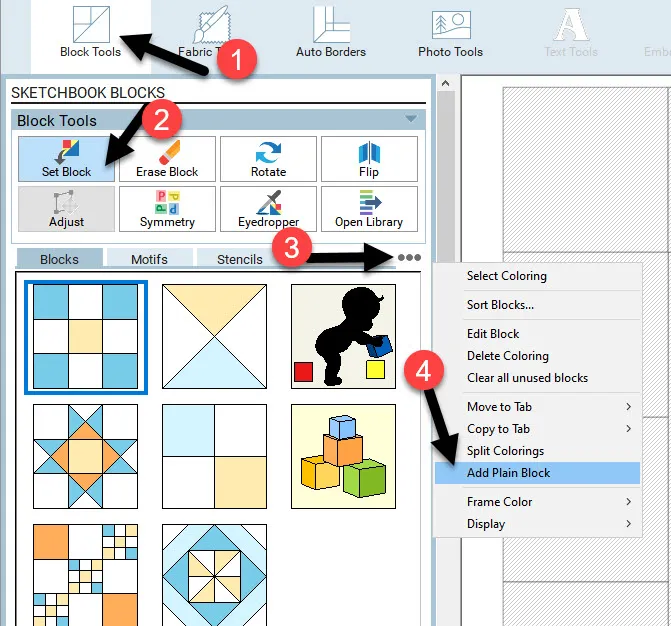
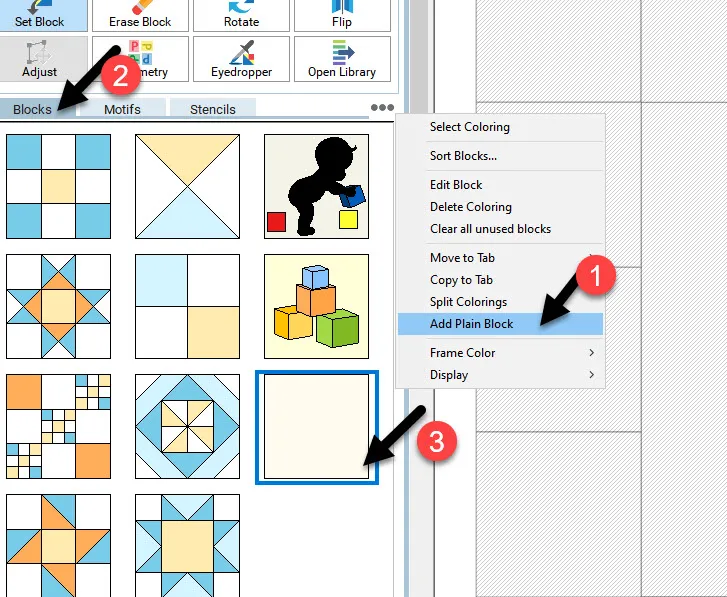
Click on the block tools icon at the top and then click on the set block tool. Click on the three little dots and select the ‘add a plain block’ option.
A plain block will be added to the blocks category of the block tools to use.
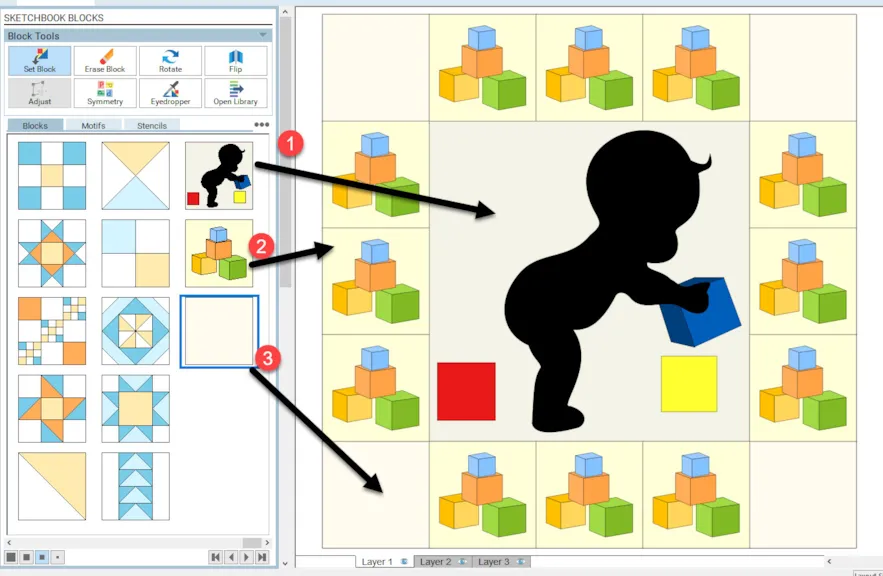
Click on each of the new blocks we added and drag them to the worktable. Place the baby silhouette in the center and the stacked blocks around the outside border. Place the plain block in each of the four corners of the layout.
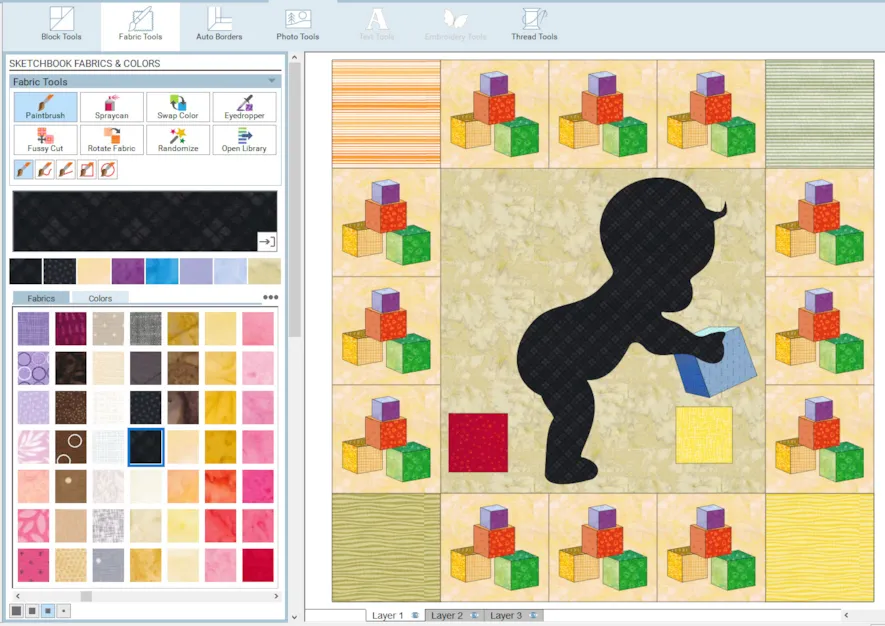
Click on the fabric tools and use the paintbrush to color in the layout with fabrics from the palette. Color the black silhouette of the baby as the last step so the black can be used for the text to be added.
Click on layer 2 of the quilt layout worktable.
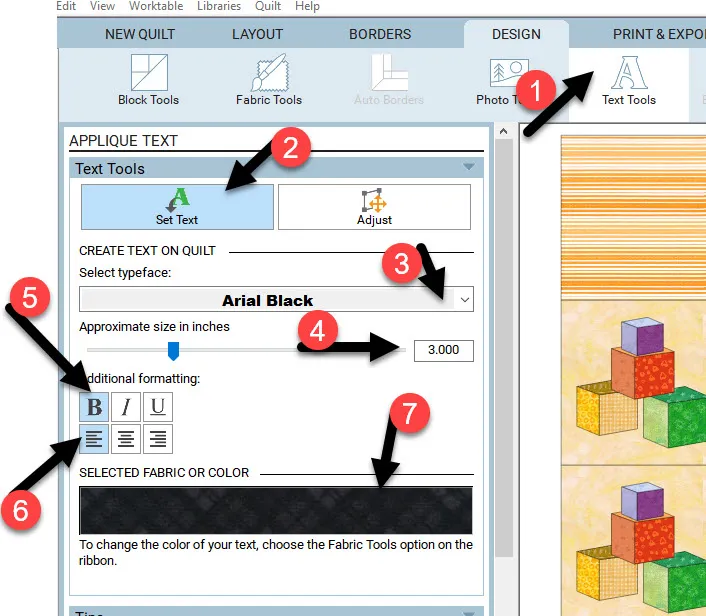
Click on the text tools icon![]() on the ribbon at the top of the screen.
on the ribbon at the top of the screen.
Click on the set text icon and set the properties to be Arial Black font, 3 inches in size, bold (B), and left-justified. The color black should already be in the fabric color box.
Move the cursor over to the worktable and while holding down the shift key on the keyboard, click/hold/drag/release a box with a flashing cursor for the text needed.
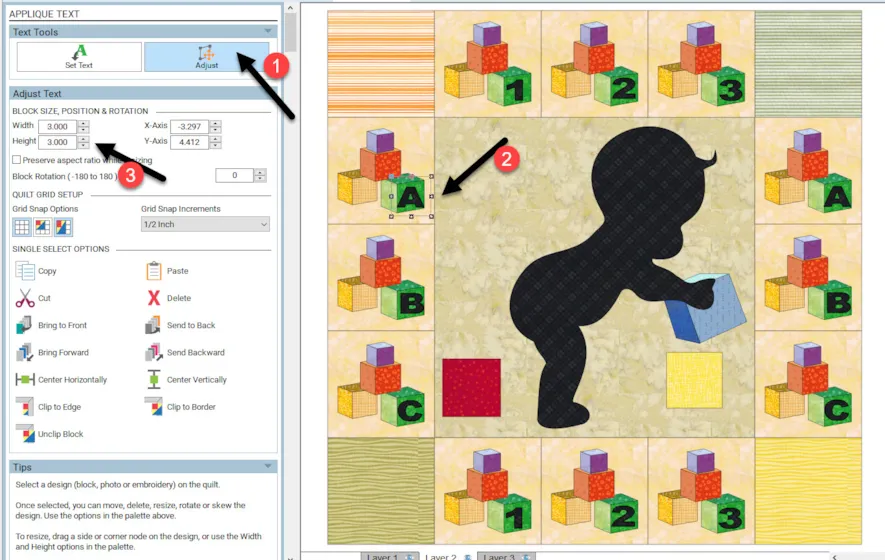
Type in the capital letter ‘A’. Click on the adjust tool![]() and move the letter over to the baby blocks on the left side of the screen. Repeat this process and create the letters B, C, and numbers 1, 2, and 3 for the front face of the baby blocks. Make sure the letters keep their 3-inch size.
and move the letter over to the baby blocks on the left side of the screen. Repeat this process and create the letters B, C, and numbers 1, 2, and 3 for the front face of the baby blocks. Make sure the letters keep their 3-inch size.
NOTE: The text fits into the stacked blocks at 3 inches in size. If you had a smaller size determined for your stacked blocks, it may make it too difficult to create an applique element small enough to fit into the space allowed. Consider this when creating blocks that will accommodate letters within the pieces of the blocks.
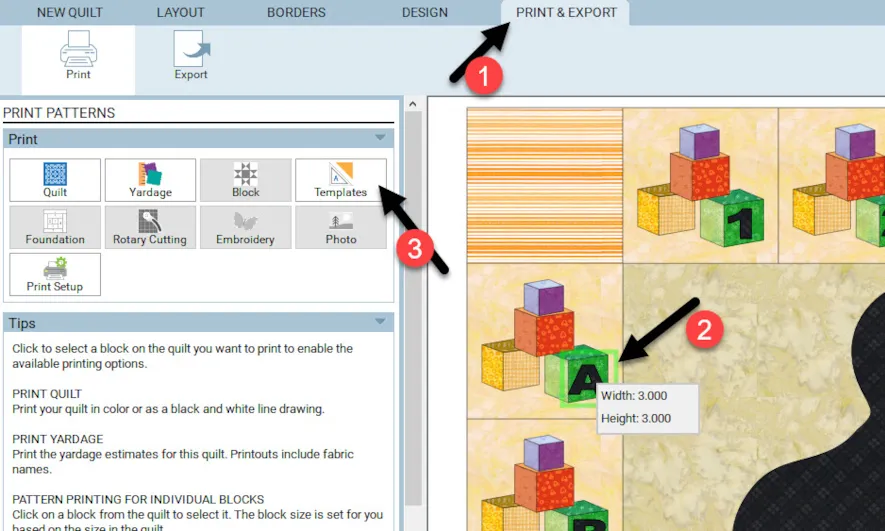
All text that is applique applied to the layer 2 of the quilt worktable is created as templates. You can create a template for either fusible elements or as needle turned elements. On the print and export tab at the top of the screen, click on the letter ‘A’ to select it. A green box will appear around the text when it is selected. Click on the templates icon![]() to create a pattern piece for the text.
to create a pattern piece for the text.
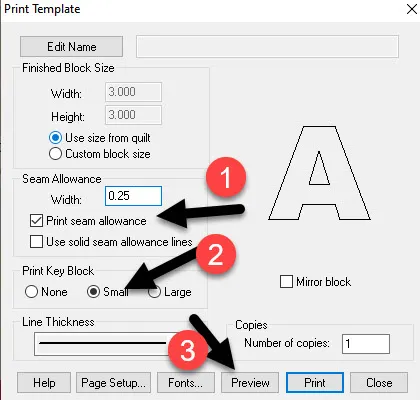
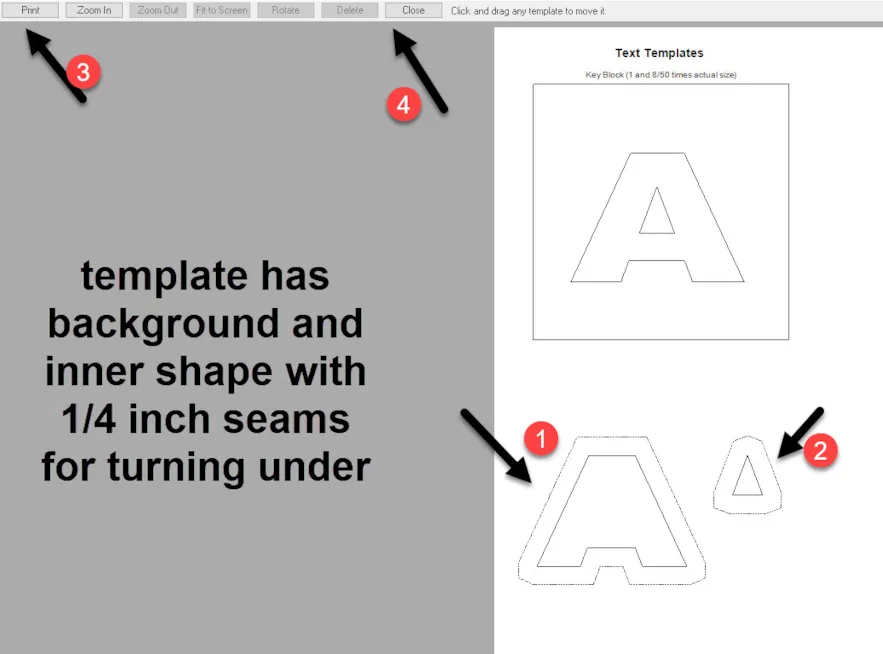
To create a needle turn pattern, click on the small key block, and then click on the preview at the bottom of the box.
EQ8 sees each object of the text as a closed object. The letter A would have a background shape and a smaller inner shape layered on top of the background to create the text letter. When the letter is small like this, it may be difficult to make a template as a needle turn for this size text. Close the print box.
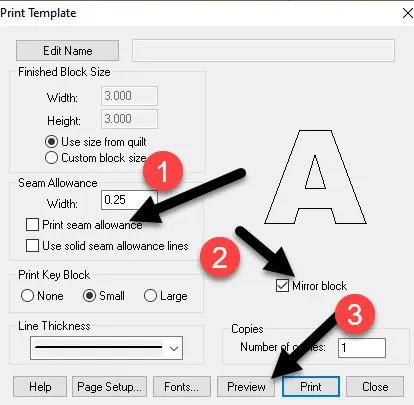
Consider making the text as a fusible applique element instead of a needle turn design. In the print template box, turn off the seam allowance and click on the mirror block, then click on the preview at the bottom of the box.
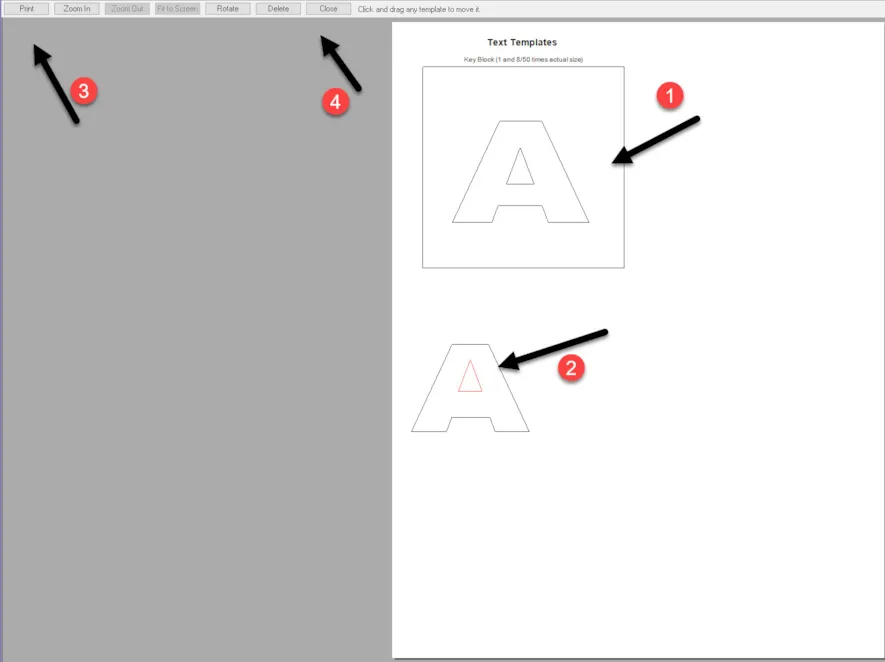
NOTE: Because the fusible web is ironed onto the back of the fabric before cutting the template, you need to mirror the text and number elements so they will not be backward when you cut out the shapes. The fusible web has a paper backing so it can go through the printer to print your shapes before fusing and cutting the shapes needed.
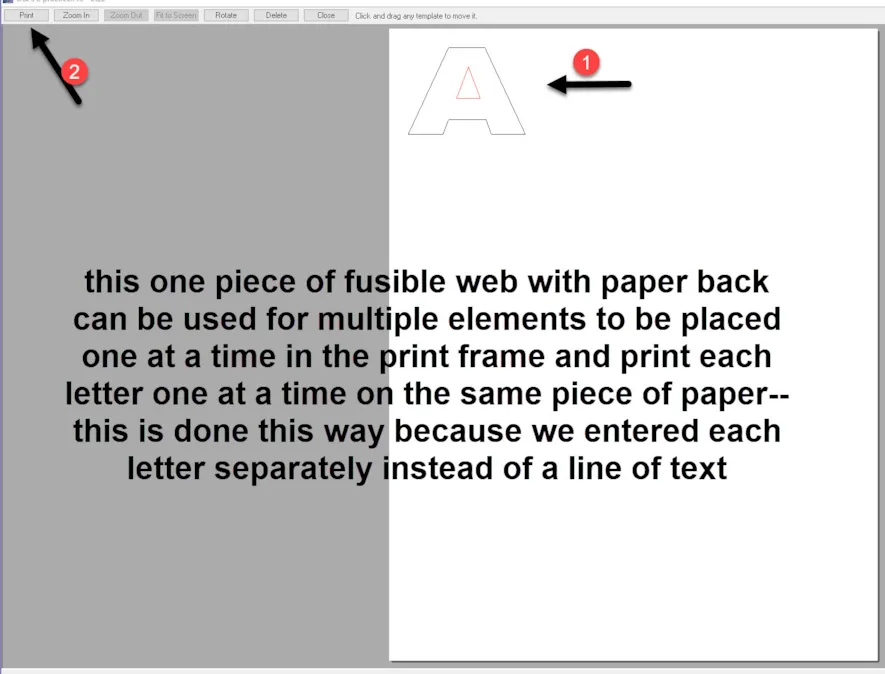
On the print page, click and drag the smaller element of the letter to place it into the ‘A’ shape. When you click on it it will highlight as a red color so you can drag it into position. As a single fused element, you could cut out the center opening in the letter ‘A’.
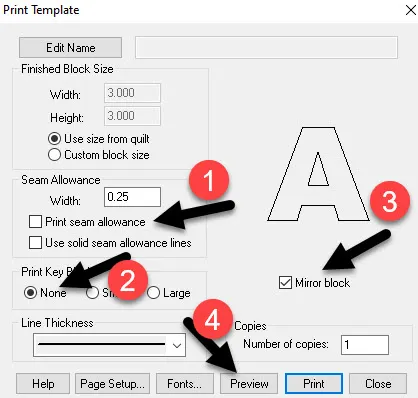
This is still not ideal. Go back to the print set up and tell the program to set the key box to ‘none’. You want no seam allowance, no key image, and mirror the text. Then click preview. This will allow you to move the elements together and set them in a corner of the paper layout.
Click and drag the elements to the upper corner of the print page. This now leaves room for you to print other elements on the same page and saves on the cost of the fusible web sheets.
Close the print and the preview boxes.
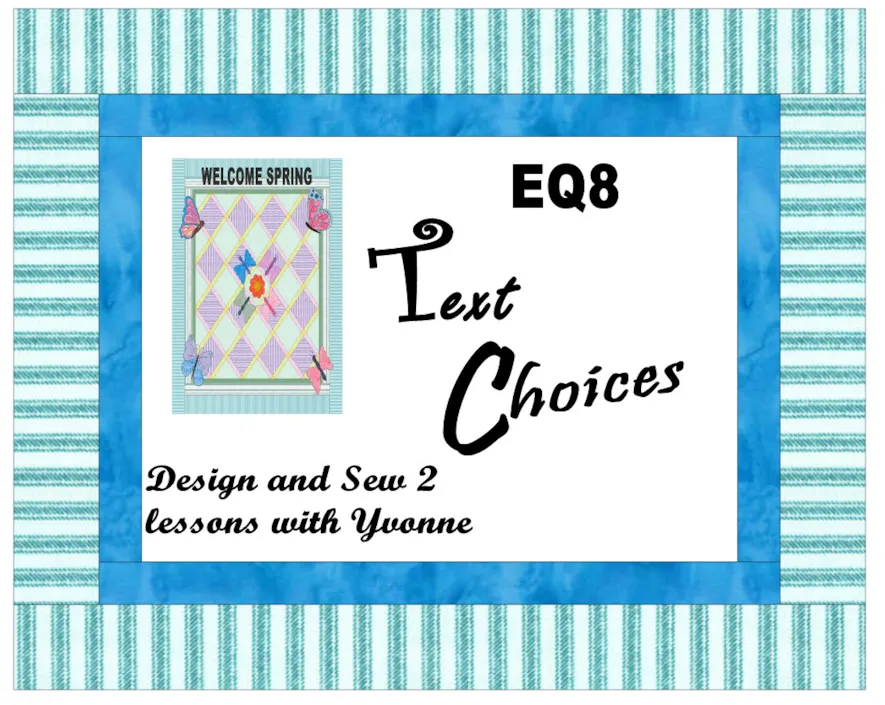
Text can also be created to have different fonts in the same text message. This is good to use when creating a quilt label that will be printed rather than pieced or appliqued. We are going to create a quilt label that is printed but will look like it is a pieced block. Since the text on the label is printed, we do not need to worry about text size or the ability to use it as an applique.
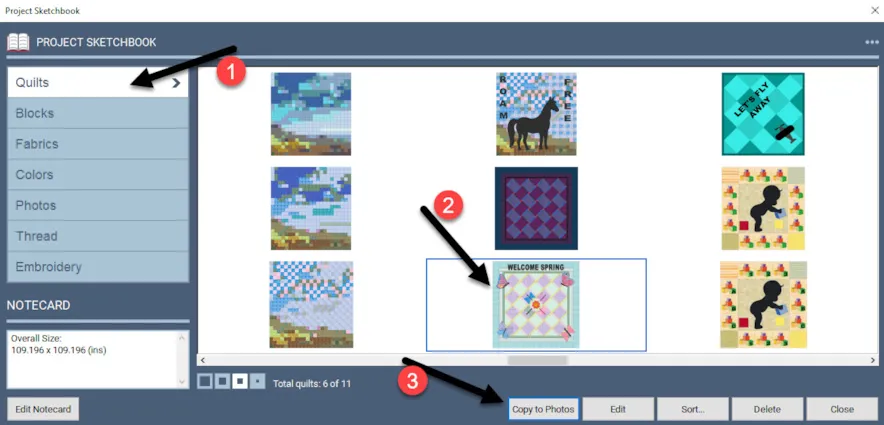
Click on view sketchbook icon ![]() on the left side of the screen. In the sketchbook, click on the Quilts heading and locate your favorite quilt layout from this class. Click on ‘copy to photos’ at the bottom of the box to place the quilt layout image on the photos tab of the sketchbook. We will make a quilt label that is specific to this chosen quilt layout design.
on the left side of the screen. In the sketchbook, click on the Quilts heading and locate your favorite quilt layout from this class. Click on ‘copy to photos’ at the bottom of the box to place the quilt layout image on the photos tab of the sketchbook. We will make a quilt label that is specific to this chosen quilt layout design.
At the top of the screen, click on the quilt worktable icon and then select the NEW QUILT>Horizontal from the ribbon at the top of the screen.
Consider the size of your printer fabric before setting the size of the quilt layout. We will be making our quilt label as a printed image that will fit onto the printer fabric. My fabric sheets are a standard 8.5 x 11 inches so I must design my quilt label so it fits onto that size of printer fabric.
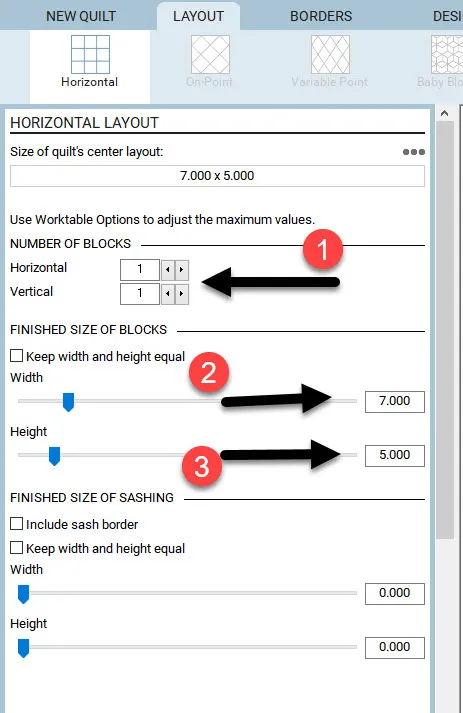
Click on the layout tab at the top of the screen and set the number of blocks to be 1 x 1 and the size of the blocks to be 7 inches wide and 5 inches high.
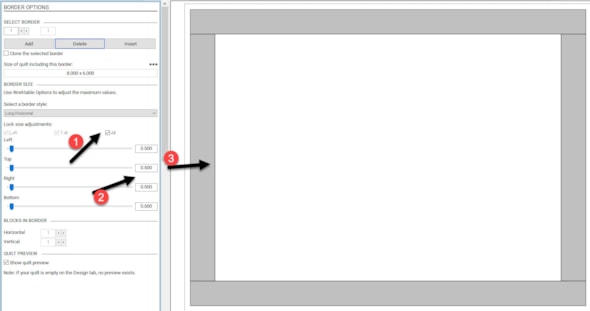
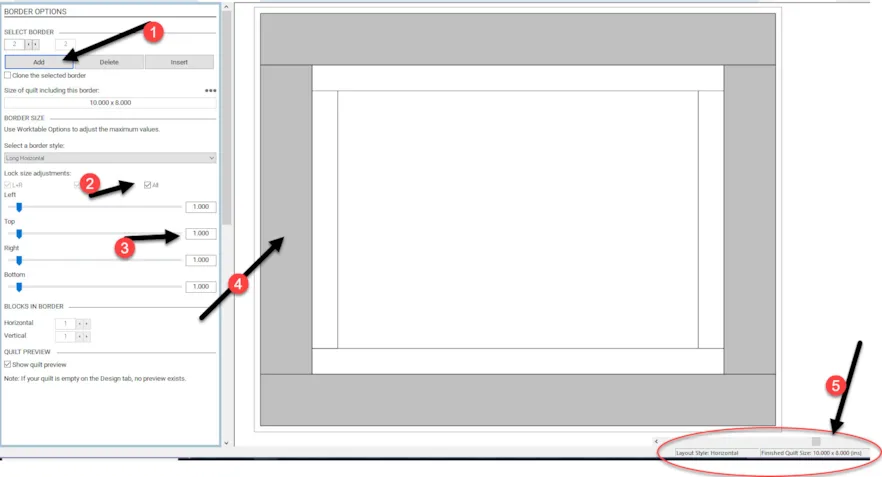
Click on the border tab at the top of the screen. Change the size of the border to be .5 inches on all sides.
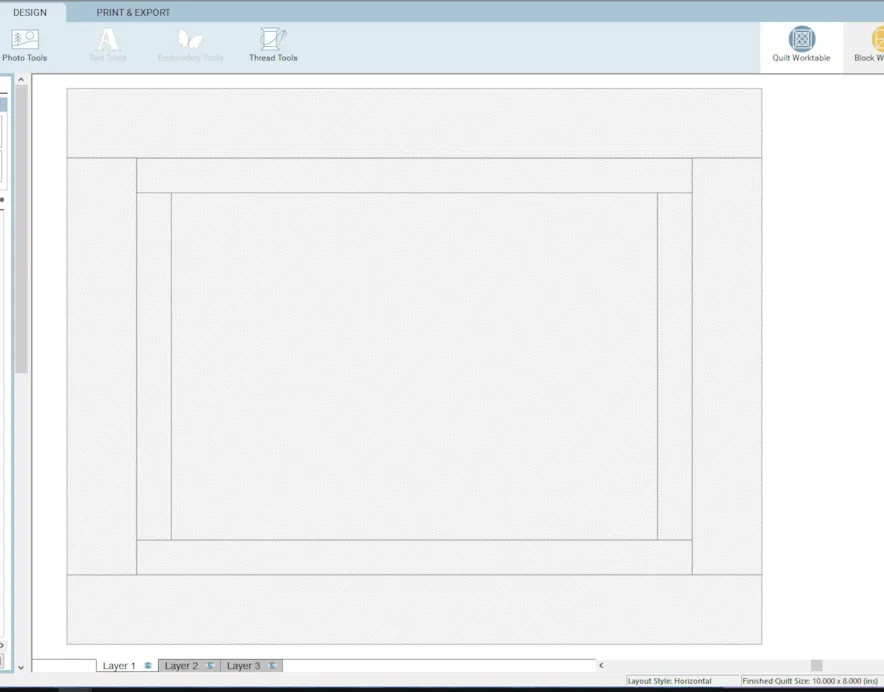
Click on the word ‘add’ in the property box to add another second border. Set the size of this border to be 1 inch on all sides. Note the overall size of the layout is now 8 x 10 inches in the lower right corner of the screen. I know this will work with the size of my printer fabric.
Click on the Design tab at the top of the screen and add the layout to the sketchbook.![]()
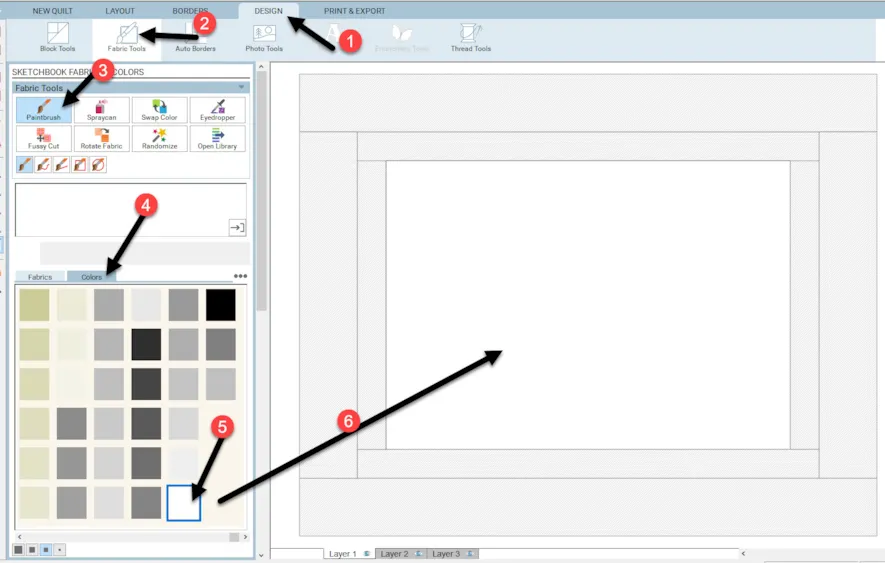
Click on the fabric tools  and the paintbrush icon
![]() and select the solid color white. Move the cursor over to the quilt layout and click once to apply the white to the center of the layout.
and select the solid color white. Move the cursor over to the quilt layout and click once to apply the white to the center of the layout.
NOTE: Printers do not print the color white. The center of the quilt label will be the color of the printer fabric you are using. I usually use a muslin/off white colored printer fabric for my printer labels.
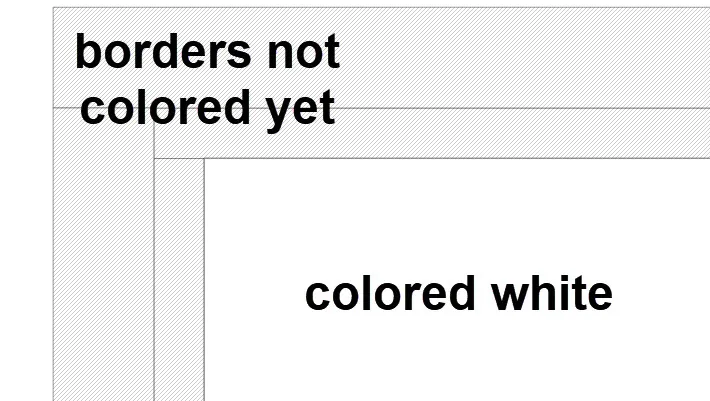
It may be difficult for you to see on your screen that the center of the quilt is indeed colored white. A solid area on the screen means the fabric has been laid in that area. A faint slanted line on the borders indicates that the area is yet to be filled with fabric choices.
I want to color my border with colors used in the quilt that I chose to make an image. It is easier to place the image on the quilt label first so you can be reminded of the colors you used in your quilt layout. From there you can then match those colors with the quilt image for your borders.
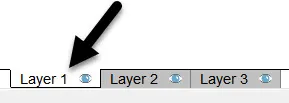
Click on layer 3 of the quilt layout at the bottom of the worktable. We usually place images on layer 3.
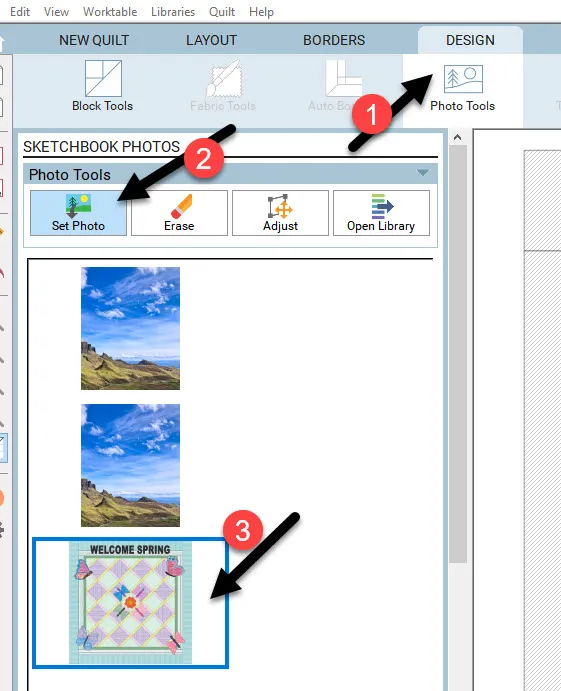
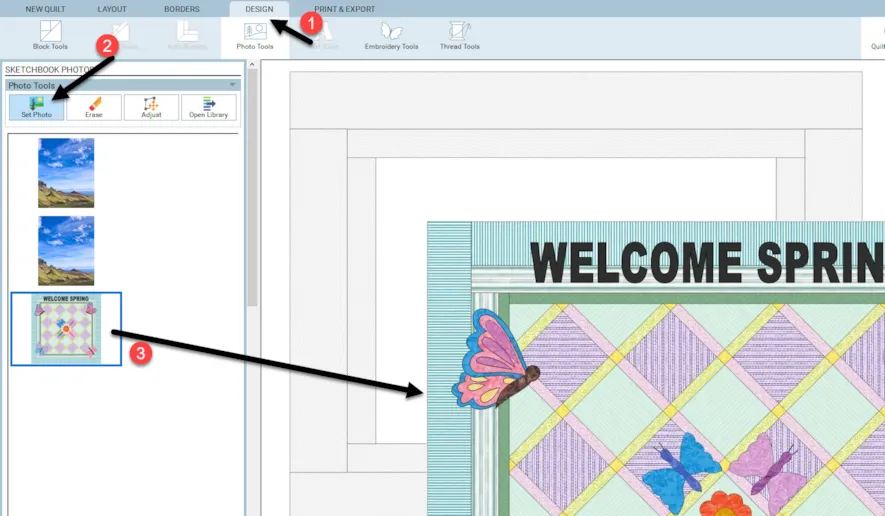
Click on the photo tools icon  at the top of the page. Click on the set photo icon
 ![]() to see the images available in the sketchbook.
to see the images available in the sketchbook.
Click/hold/drag/release the image of the quilt photo onto layer three. It will be too large for the center area of the layout.
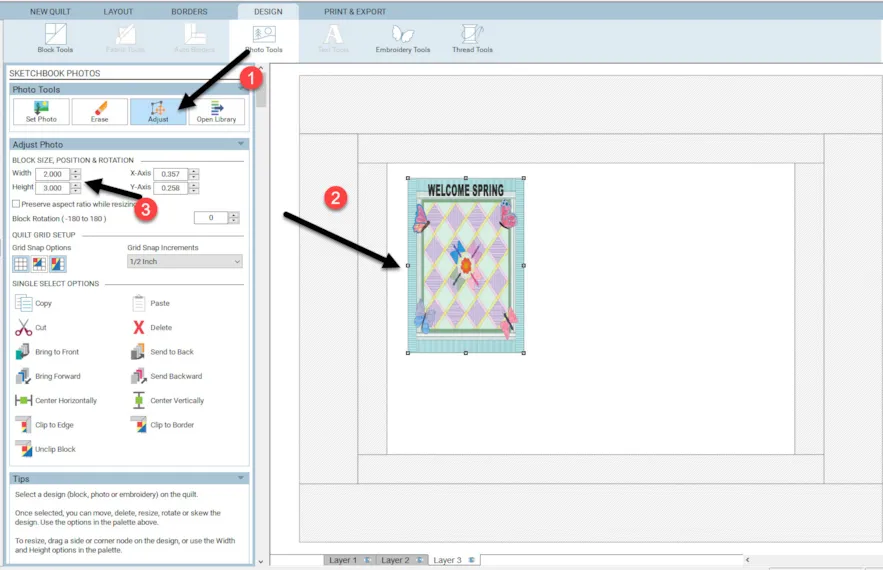
Click on the adjust tool ![]() to select it. Once the tool is selected, click on the photo of the quilt. In the properties box, change the size of the photo image to be 2 inches wide by 3 inches high. Click and drag the resized image to the upper left corner of the center of the quilt.
to select it. Once the tool is selected, click on the photo of the quilt. In the properties box, change the size of the photo image to be 2 inches wide by 3 inches high. Click and drag the resized image to the upper left corner of the center of the quilt.
Click on layer 1 of the quilt at the bottom of the worktable.
Click on the fabric tools icon  and then using the paintbrush,
![]() use some of the same fabric prints, and solid colors to color your borders similar to your photo. Use the rotate fabric icon
use some of the same fabric prints, and solid colors to color your borders similar to your photo. Use the rotate fabric icon ![]() to rotate stripes to match the same direction as your photo.
to rotate stripes to match the same direction as your photo.
Click on the solid black color under the color tab to select it for your text.
NOTE: Any contrasting color that is deep in color will help to show up against your background fabric. I usually choose black as it stands out and does not blend with other colors used in the design.
Click on layer 2 of the quilt layout at the bottom of the screen to add your text to the label design. Text usually goes on layer 2 of the quilt worktable.
Click on the text tools on the ribbon at the top of the screen and then click on the set text icon.![]() Change the size of the text to 1 inch. In the drop-down menu, select any text you want. Select the bold ‘B’ setting and keep the text left-justified. Your text color is already selected as black.
Change the size of the text to 1 inch. In the drop-down menu, select any text you want. Select the bold ‘B’ setting and keep the text left-justified. Your text color is already selected as black.
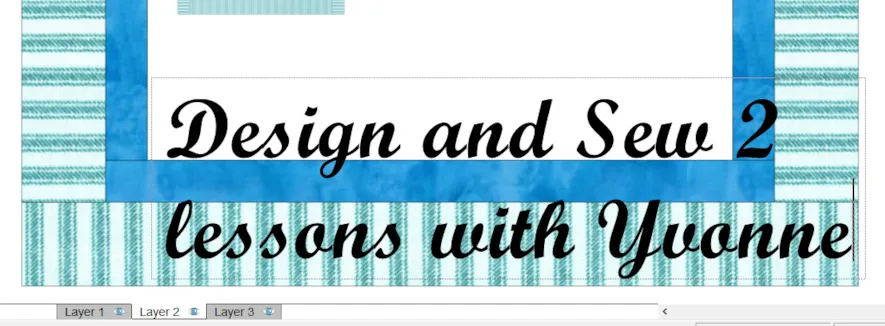
Move the cursor over to the worktable and while holding down the shift key, click/hold/drag/release a box to reveal a flashing cursor. The text can now be applied to the text box. Combine capital and lower case letters and use the return key on the keyboard to create two lines of text. The text will be too large at this point.
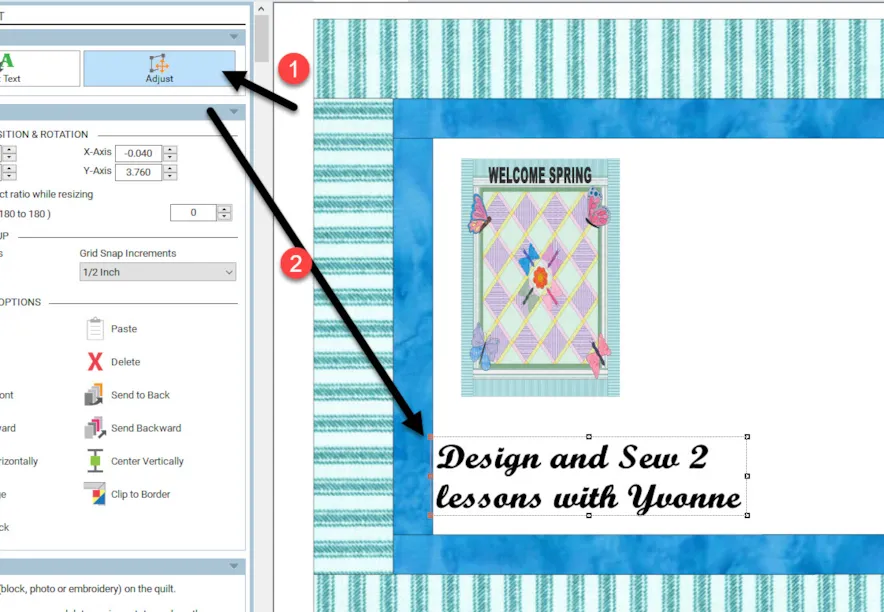
Click on the adjust tool ![]() and move the cursor over to the worktable and click on the text to select it. Move the cursor to the corner handles and click/hold/drag/ release inwards to make the text smaller. Click on the text box and move it to a better location.
and move the cursor over to the worktable and click on the text to select it. Move the cursor to the corner handles and click/hold/drag/ release inwards to make the text smaller. Click on the text box and move it to a better location.
Continue creating text to fill the remaining area. Use different styles of text. Use more than one style on a single word by typing the first letter with one type of text and the remaining letters of the word with a different style of the text. Use both capital and small letters for more interest. Set different sizes and angles to the text you type. Angles of orientation (rotation) can be typed into the properties box as negative and positive angles.
NOTE: When combining different text types in one word, you need to use more than one text box to type the word. You can not have two different text types in one word typing it continuously. Each type of text font needs its own text box.
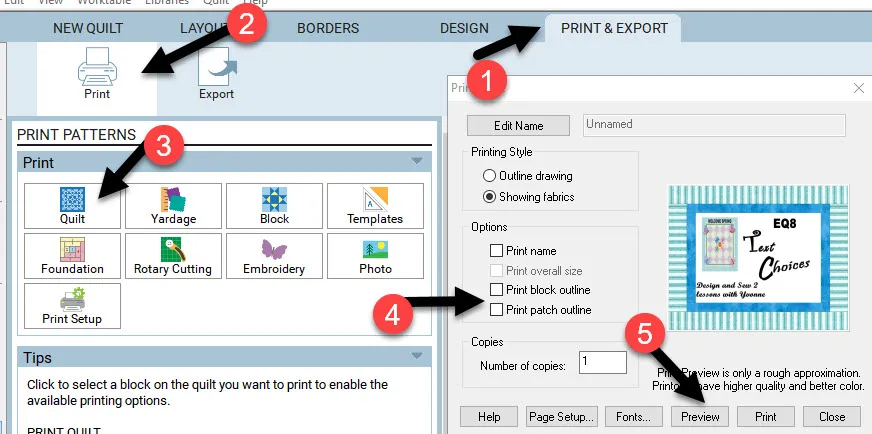
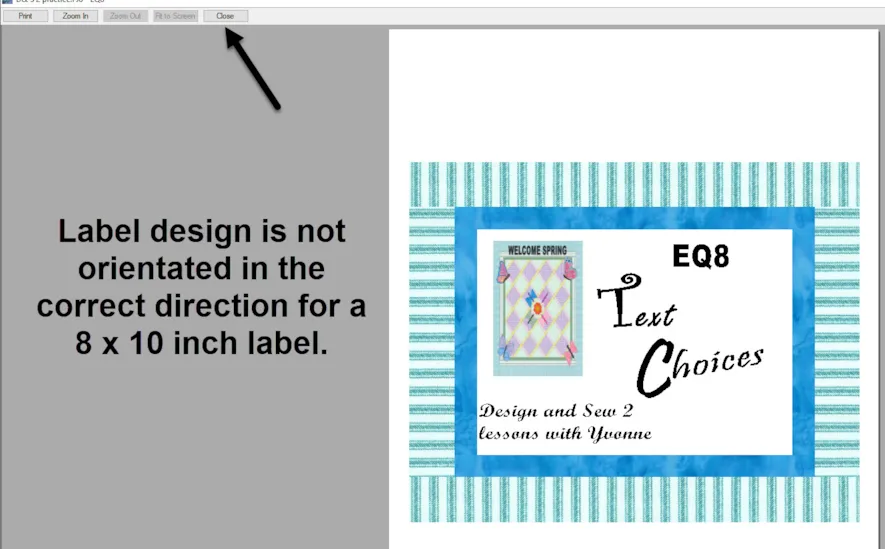
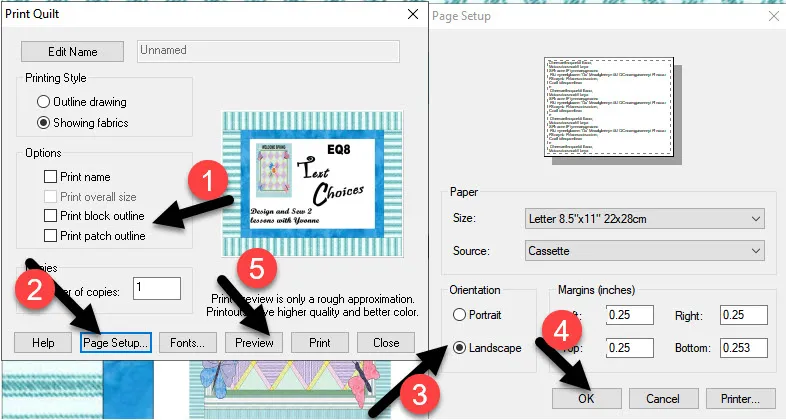
Print the image of your quilt label. Click on the print and export tab at the top of the screen. Click on the printer icon and then click on the quilt option. In the print quilt box, uncheck the print block and print patch outlines. Click on the word preview at the bottom of the box.
The label is not orientated in the correct direction to print an 8 x 10-inch label as we designed. EQ8 has scaled it to fit the paper. Close this box to orient it in the correct direction. Go back to the print quilt screen and make your changes.
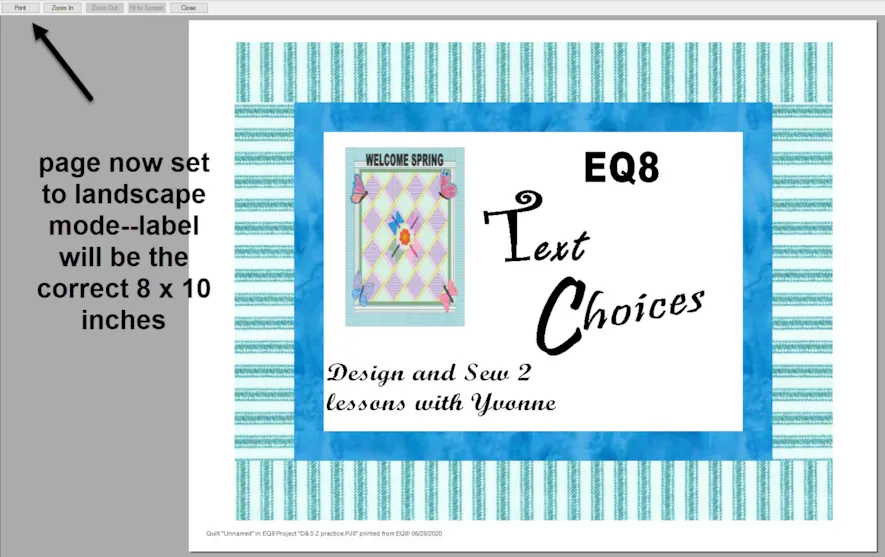
On the print quilt box, make sure to uncheck the outline options and then click on the page set up at the bottom of the box. In the page setup, change the orientation to landscape. Click the OK at the bottom of the box, then click on the ‘preview’ on the print quilt box to see the correct directions for the layout.
Print from the screen with the correct orientation for the paper and the label design.
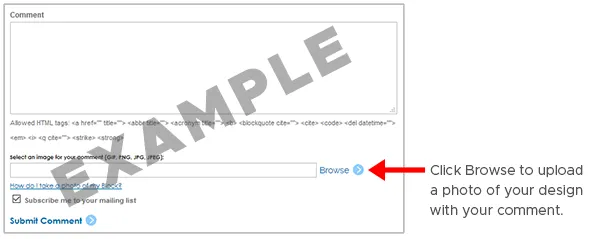
Once you have completed your designs, choose one that you are happy with from the sketchbook and save it as an image to upload to the comment section of the blog page. Refer back to lesson one if you have forgotten how to make your quilt layout an image to send to the comment section below. We all want to see how creative you have been.
WATCH THE VIDEO
Want to download the video to watch later? Click an option below:


