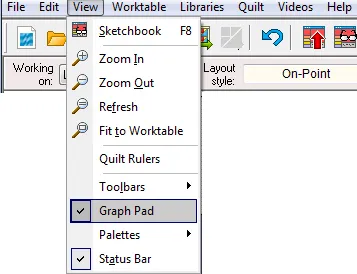
To display or hide the Graph Pad, choose Graph Pad from the VIEW menu.
A check mark appears next to the menu item when the Graph Pad is displayed.
The Graph Pad appears along the top edge of the Quilt worktable, just below the toolbar and is only active with the Adjust ![]() tool. It is used to make fine adjustments to the shape, size and position of blocks on Layers 2 and 3 and all blocks on all layers of a Custom quilt.
tool. It is used to make fine adjustments to the shape, size and position of blocks on Layers 2 and 3 and all blocks on all layers of a Custom quilt.
Using the Graph Pad on a Single Block
When you select a block on the quilt using the Adjust ![]() tool, the controls on the Graph Pad are updated to display the position, dimensions and rotation of the block.
tool, the controls on the Graph Pad are updated to display the position, dimensions and rotation of the block.
Changing the value in the top entry moves the block horizontally. Changing the value in the bottom entry moves the block vertically. (Think of it as moving the block in “x” and “y” directions. These values correspond to the block’s upper-left corner (white dot) to the quilt layout’s upper-left corner (borders not included). Adjust by typing new values, clicking the arrows, or using the keyboard arrow keys.

The value in the rotation entry determines the angle of the rotation of the selected block. The anchor point of the block is indicated by the white dot. Angle is measured in degrees, positive in the clockwise direction; negative in the counterclockwise direction. Allowable values —180 to +180. Adjust by typing new values or clicking the arrows.
Note: As you are rotating, it’s possible the block could rotate off the worktable or overlap another block. Use the Adjust tool or the worktable slider bars to find your block. If you think your block moved off the worktable, you can also just click Fit to Worktable to find your block again.

The top value is the width entry and the bottom value is the height entry. If the block has been rotated, then the width and height edges are drawn in white on the Graph Pad to help identify them.

Custom Set Grid – These tools are most useful on Layer 1 of Custom Set layouts and Layers 2 and 3 of traditional layouts. Keep in mind that the Grid, whether the button is pressed or not, will only be visible on a custom set quilt. Although it’s not visible, it still works for snapping on Layers 2 and 3 of traditional layouts.
Show grid ![]() Displays the grid on the quilt based on the settings in the Quilt Worktable Options dialog.
Displays the grid on the quilt based on the settings in the Quilt Worktable Options dialog.
Snap block position to grid ![]() While moving with the Adjust tool, the upper-left corner of the block snaps to the grid.
While moving with the Adjust tool, the upper-left corner of the block snaps to the grid.
Snap block size to grid ![]() While resizing with the Adjust tool, the block size snaps to a multiple of the number set in the Quilt Worktable Options dialog.
While resizing with the Adjust tool, the block size snaps to a multiple of the number set in the Quilt Worktable Options dialog.

Quilt Worktable Options: Displays the Quilt Worktable Options dialog for adjusting the Grid and Snap settings.

Blocks placed in layers can overlap each other, and these buttons give you control over which block appears on top.

The selected block can be clipped either to the center layout’s edge, the quilt edge or blocks can hang over the quilt’s outer border.

The selected block can be automatically centered in your quilt. Centering can be done horizontally or vertically or in both directions. The block will be centered with respect to the quilt’s center, not including any borders.

We are here to help! If you have questions about this, or anything else, please contact tech support.


