- Click QUILT > New Quilt > On Point.
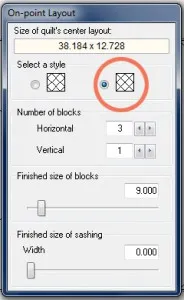
- Click the Layout tab.Under Select a style choose the layout style on the right.
Number of blocks:
Horizontal – your choice
Vertical – 1
Block size: Your choice.
- Click the Borders tab.
- Click Delete to delete the border.
- Click the Layer 1 tab.
- Click Libraries > Block Library. Select any block you would like and click Add to Sketchbook and Close.
- Click the Set Block
 tool. Set blocks into the whole block spaces in your quilt.
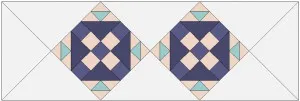
- Click Layer 2.Now you’re going to set a block, then size, move and rotate it so it fits right over one of your end triangles, sticking out beyond the quilt. This will create the pointed end.
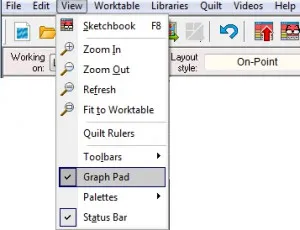
- Click VIEW > Graph Pad, and make sure Graph Pad is checked. That puts this bar along the top of your screen.
- Click the Set Block
 tool and click to select the block you want to set.
 - Point to your table runner, hold down your keyboard SHIFT key, and drag the mouse on the table runner. You’ll see a box form. Release the mouse and the selected block pops from the palette onto your quilt.
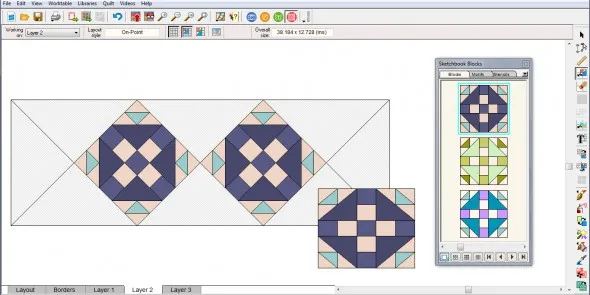
- Click the Adjust
 tool.
tool. - On the Graph Pad, use the size number boxes to make the block the size you want.
Type 45 next to the rotation arrow to put the block on point.

- Drag the rotated block from the center to fit it where it should on either end of your runner.
If your blocks are getting cut off make sure to have Do Not Clip selected.
- While the block is still selected, click EDIT > Copy > EDIT > Paste.
- Drag the copy to the other end of your table runner.
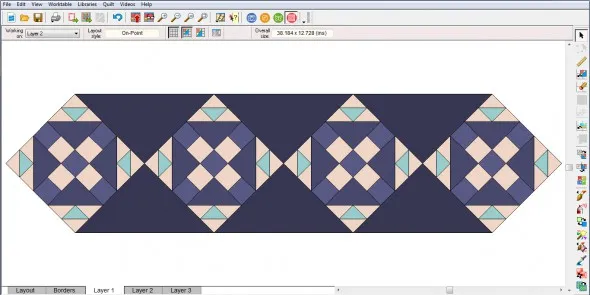
- Use the graph pad to place the end blocks, if needed.

Tip: Remember which layer you set blocks on. To do anything to blocks inside your runner, such as recolor, you must be on Layer 1. To do anything to the blocks at either end of your runner, you must be on Layer 2.
We are here to help! If you have questions about this, or anything else please contact tech support.
Quick Tip Tuesday – Make an on-point table runner with pointed ends!
Posted 05-09-2017 by Heidi | Posted in: Quick Tip Tuesday
Leave a comment!
By submitting a comment you grant The Electric Quilt Blog a perpetual license to reproduce your words and name/web site in attribution. Inappropriate and irrelevant comments will be removed at an admin’s discretion. Your email is used for verification purposes only, it will never be shared without your permission.


05-09-2017
12:40 pm
Excellent tutorial thank you.
QuiltShopGal
www.quiltshopgal.com
06-22-2017
8:53 am
I have been wondering how to do this for the longest time. Thank you.
06-22-2017
6:16 pm
I struggled stepping through this tip. It would have helped me if in step #6 you told me which block you used in the example. I spent a lot of time looking through the block library and settled on a block that was close. As written, at this point there (i.e., step 6) there aren’t any blocks on the Sketchbook to set. Sorry if I missed something.
06-26-2017
3:19 pm
This block is called “Duck and Ducklings” but you can use the same technique for any block. I have added a step indicating that you need to add blocks to the sketchbook. Thanks!
08-09-2017
1:03 pm
Pretty sure I followed all the steps, but … It clips my end blocks off. What did I miss?
08-09-2017
1:08 pm
I just figured it out. You have to click the “Do Not Clip” Icon on the menu bar. I don’t believe that was in the steps.
08-10-2017
10:50 am
Hi Judy,
You are right. “Do Not Clip” needs to be selected. Do Not Clip” is selected by default but other may run into the same issues. I have updated the instructions. Thanks for letting me know!
11-01-2017
12:44 am
Will EQ8 have a layout available for onpoint table runners, rather all the extra steps involved here? Thanks!
11-01-2017
9:40 am
Hi Sondra,
There are layout designed for table runners in the Layout Library, but you would still need to set the end blocks on Layer 2 if you want them to extend past the rectangular ends of the quilt.
There is a table runner with pointed ends in the Quick Quilt projects. You could use that quilt as the starting point for your own design and edit as necessary.