You can create your own “fabric” using the Photo Layout Tile feature.
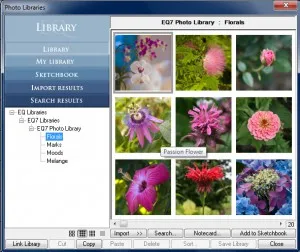
Add a photo(s) to your Sketchbook either through the Library…
or through the Image worktable…
Click FILE > Print > Photo Layout.
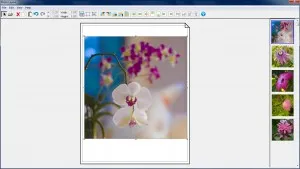
The Photo Layout will appear.
Click, hold and drag a thumbnail photo to the photo layout.
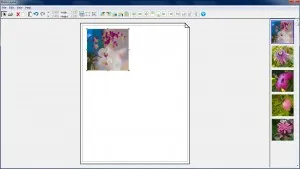
With the photo selected, drag one of the corner handles inward reducing the size of the photo.
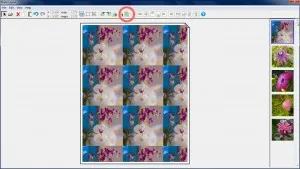
Click the Tile ![]() button on the top toolbar.
button on the top toolbar.
The photo is now repeated across the page.
Note that your original photo that was used to create the tiled page disappears when you click Tile. You can toggle the Tile button on and off if you need to adjust your original photo.
Use the Resize dialog and the Rotate and Flip ![]() buttons to make adjustments to your tiled photo.
buttons to make adjustments to your tiled photo.
Click the Print ![]() button on the top toolbar to print the page as it is on your screen.
button on the top toolbar to print the page as it is on your screen.
Select the printer you’d like to print to, then click OK.
If you have questions about this, or anything else, please contact tech support and we will be happy to help!
Viewing your “fabric” on a quilt
Once you have your fabric sized just as you want it, be sure to check the size of the image by clicking the Resize dialog button . Write this number down so that you remember it. Click Cancel, then close the Photo Layout dialog to return to the worktable.
Making the virtual fabric
Click the View Sketchbook button.
Click the Photos section and select the photo you were just working on.
Click Edit > to Image worktable. You’re now on the Image worktable.
Click IMAGE > Image Resize.
Enter the numbers you wrote down from the Photo Layout Resize dialog. (in our example, 0.918 x 0.918)
Click OK. You’ll see your image change to the new size.
Click Add to Sketchbook .
Click View Sketchbook then click the Photos section. OR, click IMAGE > Add to Sketchbook as Fabric and skip steps 9 and 10.
Scroll to the end of the your photo list and select the last photo (it’s the one you just resized).
Click Copy to Fabrics . This puts a copy of this photo in the Fabrics section of the Sketchbook.
To view your new fabric in a quilt
Click the Quilt worktable button.
Click QUILT > New Quilt > Horizontal.
Click the Paintbrush tool.
Scroll to the end of the fabrics in the palette and select the last fabric swatch (it’s the one you just copied from Photos).
Click in a space on the quilt. You can now see your photo as a fabric!
Notes:
Fabrics will tile to fill the space of a block or patch. Photos do not tile, but take on the normal properties of an image file.
You can also turn a fabric into a photo to be placed on the quilt worktable. Simply click on a fabric in the Sketchbook and click Copy to Photos.


10-24-2016
9:47 am
Nice and clear tutorial. Interesting idea to add your own photos.
10-24-2016
5:51 pm
Congrats on 25 years