To make your t-shirt quilt, you’ll want to set up a Custom Set quilt.
- Quilt > New Quilt > Custom Set.
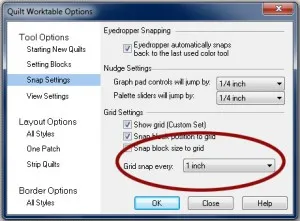
- Set up your snap grid to snap at every 1”. By default it’s set to snap at every 1/8”.
Click Quilt > Quilt Worktable Options. - Under Snap Settings, change to 1” Click OK.
- Click the Layout tab at the bottom of the screen to set your quilt dimensions.
- Click the Layer 1 tab to set your blocks.
- Click the Set Block
 tool on the right.
 - In the palette, right-click and choose Add Plain Block.
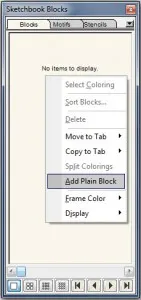
This will give you something to work with as you build your quilt. You can replace these plain blocks with your t-shirt photos later. - In the palette, click and drag the plain block to the worktable. It will set as a square.
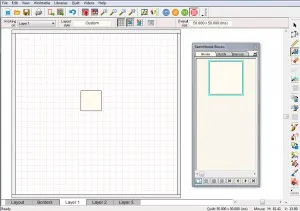
- Click the Adjust
 tool on the right
 - Click the block to move/resize it.
- Use the Graph Pad (bar below the toolbar) to change the dimensions of the block. Move your block into place.
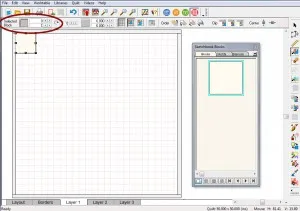
Continue to add more plain blocks, resize and move into place. You can copy and paste blocks if you have similar sizes. You’ll be using the Adjust tool for the most part.
 - Once you get your layout all set, then you can import your photos of your t-shirts.
- Use the Set Photo
 tool to view the t-shirts in the palette. Select a shirt image and click on a plain block space in the quilt. The t-shirt photo will replace the plain block with the photo.

Here is an example of a t-shirt quilt from our EQ with Me: Quilt Design book.
If you have questions about this, or anything else, please contact tech support and we will be happy to help!


09-20-2016
11:42 am
I did a king sized tshirt quilt for a friend. I used this method to arrange the tshirt said; it worked great!
09-26-2016
2:10 pm
EQ is the perfect way to layout the odd sized shirts with just the right amount of plain pieces and sashing to hold it all together.
11-29-2018
8:51 pm
You instructions were clear and considering. I’ve made several by doing the math myself laid out in a design wall. Much easier this way.
01-26-2021
12:11 pm
I had some old dresses and I was not sure about those that what should I do with them. I was thinking to make a patched shirt with them. I followed your method for making that and happy to tell you that it worked.