Critical thinking is the intellectually disciplined process of actively and skillfully conceptualizing, applying, analyzing, synthesizing and/or evaluating information gathered from, or generated by, observation, experience, reflection, reasoning or communication, as a guide to belief and action. Simply put it means to plan ahead. When digitizing we do this all the time. Think of what type of design you want to create, the steps it will take to create the artwork, work from background to foreground, apply stitch properties and thread colors, and then sort the information before exporting it to become a stitch file for your embroidery machine. Did you know you do all that when designing with your EQStitch?
Sometimes it is just easier to let the auto digitizing functions of the program take over and think through all the steps for you. But, when you rely on auto digitizing, you lose the control to be creative yourself.
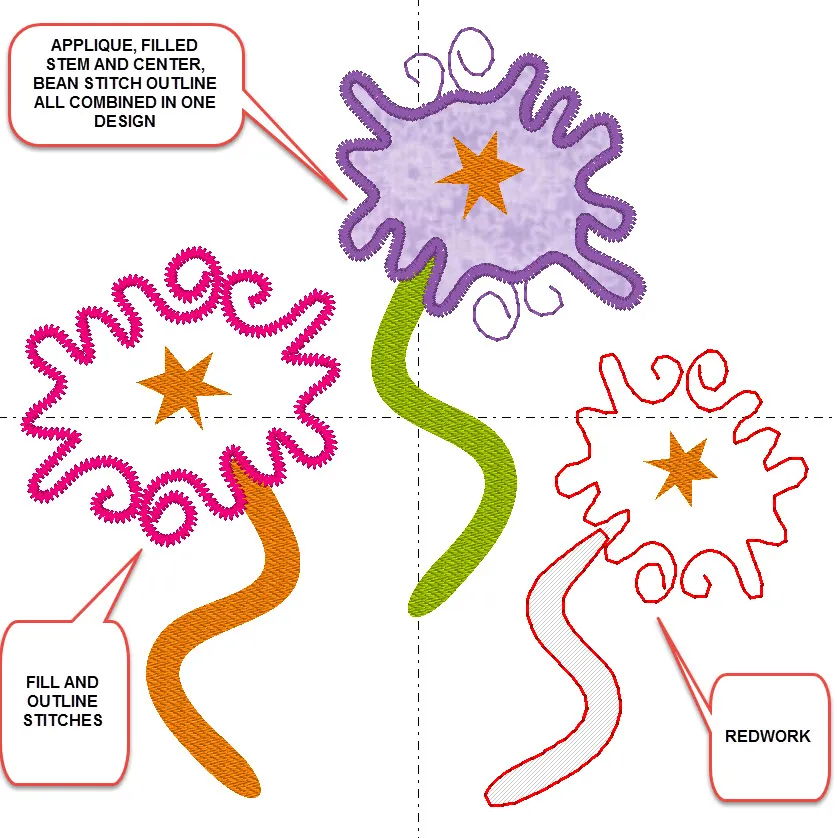
One of the ways to take the control from the very beginning of the design process is to tell the program what you want to do in the ‘drawing board options’ box ![]() before you begin to draw your artwork. This works really well except when you are on the machine applique worktable. The auto digitizing is strongest on this worktable. All lines will automatically have a zigzag edge stitch and all closed objects are assumed to be filled with applique fabric. You can over ride this feature by being careful with your artwork to start with and then changing the stitch properties on the stitch tab in EQStitch.
before you begin to draw your artwork. This works really well except when you are on the machine applique worktable. The auto digitizing is strongest on this worktable. All lines will automatically have a zigzag edge stitch and all closed objects are assumed to be filled with applique fabric. You can over ride this feature by being careful with your artwork to start with and then changing the stitch properties on the stitch tab in EQStitch.
Open your EQ Stitch program and click on the ‘stitch worktable’ icon.![]()
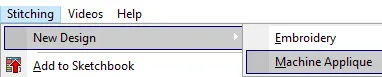
Click on STITCHING>New Design> Machine Applique.
Click on the drawing board options box ![]() on the properties bar at the top of the design area.
on the properties bar at the top of the design area.
In the drawing board options box, set the embroidery edge stitch to a ‘bean stitch’ and the embroidery fill stitch to be ‘no fill’.
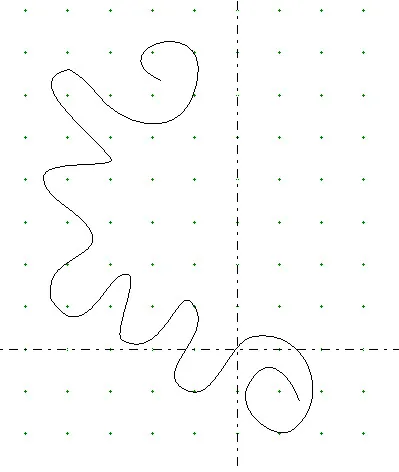
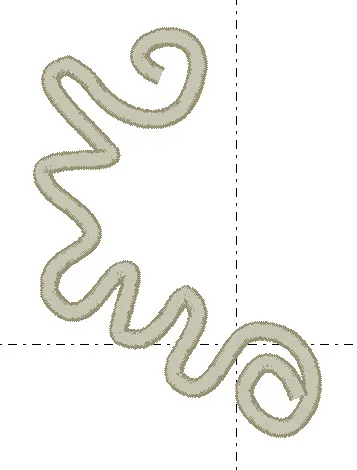
Using the ‘freehand drawing tool’, draw a squiggly line on the artwork area. Since we set the drawing board to have a embroidery edge to be the bean stitch, you would expect the line drawn to be that stitch. Click on the stitch tab and notice how it is not the bean stitch but instead it is the zigzag default edge that you would have with an applique. This is because we are on the applique work table.
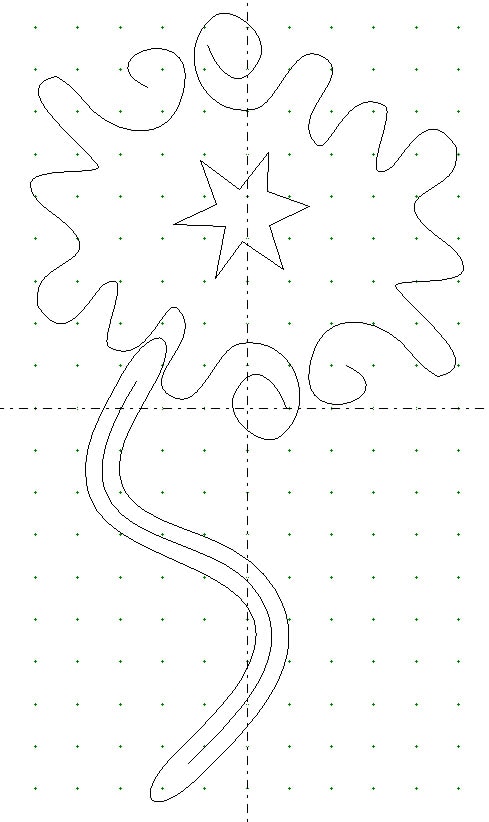
Return to the artwork tab and keeping the open line, ‘clone the selected line’ ![]() and then flip and rotate it to create a free form flower head without closing the shape together.
and then flip and rotate it to create a free form flower head without closing the shape together.
Add a small star shape to the center of the area.
Use the ‘brush stroke’ tool![]() to create a flower stem.
to create a flower stem.
Now use this same design and clone ![]() and re-size it two more times to create 3 separate designs.
and re-size it two more times to create 3 separate designs.
On one of the designs only, use the oval drawing tool (circle) and create another edited circle shape![]() to mimic the flower head outline. This will be a closed shape into which you can apply applique fabric.
to mimic the flower head outline. This will be a closed shape into which you can apply applique fabric.
Click on the fabric tab at the bottom of the screen and add applique fabric to the closed shape area you created.
Once you add the fabric to the closed shape, the auto digitizing functions take over and apply the placement line, the tack down line, and the edge stitch.
Click on the stitch tab and apply the stitch properties of your choice to each of the different design elements.


11-22-2015
12:18 pm
Hi Yvonne
First of all, thanks for putting together the Sunday Stitch lessons. I am finding them very helpful.
Would it be possible to present a lesson on text, and specifically how to use it for a quilt label? I have tried to make quilt labels but find that the quality of the text is poor and I’m not sure if it is because of the font or the size or the specifics of the settings.
1. What are the best fonts to use? Is there one that doesn’t produce a double line?
2. What is the minimum size of text that can be embroidered?
3. What are the best settings, i.e., stitch length, width, density, style?
4. How best to incorporate an image with the text.
Thanks!
11-22-2015
1:45 pm
Text tips will indeed be included in the EQStitch Sunday Stitch informaion. The best information and in-depth study would be through EQUniversity. Registration is now open on the website for the January sessions of classes.
11-27-2015
12:14 pm
when I reach the stitch setting, the first design is still there.
Is there a way to delete it.I tried to edit it in the drawing area
but it still came up in the stitching.
Did I miss a step?
Enjoy your lessons. THANK YOU!
11-27-2015
12:20 pm
Jeannette–On the artwork tab, click on the design elements you want to delete with the pick tool. Make sure you see the selection boxes around the area. Then click on the delete key on your keyboard. You can only edit the designs when you are on the artwork tab. You can not edit the drawing on the stitch tab.
11-28-2015
8:47 am
working through the process,I realized that I’m in the applique
mode and the first drawing may be the tack down (in the hoop)and the second would be the final stitching.
I did the first drawing using running stitch,cloned it then used the steil stitch on top. Tried it and it worked on the simulate sew. Now to put it in action?? Amazing what middle of the night thinking can do!
Will try on the machine.
12-13-2015
2:50 pm
I really enjoy the blog lessons. I work through several as I have the time. This week, going over this lesson I do fine all the way through. Then for some reason, when I click the stitch tab one of my designs does not appear. I save during points and notice that at the first step, when I click on the stitch tab, the lines appear as a zig zag, but then as I continue, the next time I click on the stitch tab the lines do not appear at all. What’s up? Not sure what I did wrong.
12-13-2015
2:57 pm
Hi Catherine! You are correct that the lines appear as a zigzag. You are on the applique worktable and the default for this worktable is to have all lines as a zigzag. You change the properties by clicking on the ‘set edge stitch’ icon and changing the properties to the bean or running stitch on the properties bar at the top of the screen. Try going back to the artwork tab and refreshing the screen with the refresh tool and see if that picks up your design elements. The refresh tool is the little magnifying glass at the top of the screen that has the ‘equals’ sign inside it. Also, make sure all your elements are inside the hoop area and nothing is outside the edges of the drawing page.