| Do you ever think about how many things you make? If someone asked me I would say I don’t make too many things, currently. However, when I REALLY think about it, I’ve made two Halloween costumes (Luke Skywalker as x-wing pilot, and Princess Leia) and an infinity scarf in the last month. Still, no big deal. But even if you just make a few things here and there when you think about how many things you’ve made in you lifetime…wow. |
| Brandy at Gluesticks recently made a book for her Grandma of all her old sewing projects. The book ended up being 275 pages. Phylameana lila Desy made a scrapbook for her mother with a similar theme. I wish I had enough photos of my grandma’s, or my mom’s, projects to make a book like that…Even photos of my own projects would be a good start! If you’re not already, start today! Photograph everything you make. And don’t wait for someone else to make a book for you, make one for yourself. (plenty of websites make these kinds of books, Shutterfly, Snapfish, Blurb, Walgreens) |
|
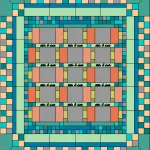
OR…! You would make a photo quilt for an anniversary, a wedding, a new baby, why not make one about all your quilts?! Print out photos of your quilts onto EQ printable fabric, and make them into a quilt. It would be cute, if for example, you made a quilt for your grandson years ago, the picture you use has your grandson in it. And, if you have been quilting for many years it would be interesting to see how your style and skill level has changed (and you too, if you’re in any of the pictures) over the years. Here is one example: |

|
| For this quilt Click Library > Layout Library > Irregular Grids > click on Irregular Grid – 9 > click Add to Sketchbook > View Sketchbook > select it > Click Edit. I didn’t want the 8 half square triangle blocks in the quilt. So, on Layer 1 I clicked on a triangle to select it, then I deleted it. I clicked a nearby square and just copy and pasted it into place. I then colored the quilt with gray to represent the photos. I then added more squares (more places for photos) by clicking the Set Auto Borders |
| If this inspires you to make something, let us know! Email photos to Heidi@electricquilt.com. |


11-19-2012
10:31 am
I’m already doing that! My eventual intent was (and still is) to make a physical scrapbook of all my quilts and sewn items for my daughters, as a memento of what I’ve done. But making actual scrapbook pages is a difficult craft for me.
Instead, what I’ve been doing (and continue to do) is to make a webpage of each quilt. On that page, I have a picture of the finished quilt, pictures in progress or close-ups and lots and lots and LOTS of verbage! Many times, I use EQ to create a mock-up of the quilt before I physically make it and that mock-up also makes its appearance on the webpage.
I talk about the “why” I made the quilt .. who it was for or what the circumstances were that prompted me to make the quilt … and the “how” of the quilt .. the process I used, the problems I encountered along the way and the solutions I came up with. What I usually don’t include is a count of how many yards or squares or spools, as that doesn’t interest me.
Along the way, I realized I was creating a crafting journal for myself. Each page contains all the thoughts I want to have remembered for that quilt. Eventually, I really, really, really hope to make a physical scrapbook but until then, a webpage is my preferred method of remembering. My webpages go back to the first quilts that I still have pictures of (1978) and continue up to the present time (2012).
Sincerely,
Shelley Rodgers