We had a tech support question this weekend about drawing a certain block. After answering it I found I had a good list of tips on how I was able to draw it, so I thought I’d share.
Let’s say you want to recreate a block with a bunch of triangles, diamonds, parallelograms, trapezoids, etc.
- Along the block edge, count up all the squares (this is A).
- Count up the remaining triangle hypotenuse thingies (this is B).
- Using either the 7-10-7 or 41-58-41 (A-B-A) method. Give all your A’s and B’s those values. This will give you the number of snaps you need.
- Set up a block and those snaps that will work with the units you come up with.
- Draw a line across the block and use Partition to find where your lines should go.
When I was trying to find example blocks, the only ones I could think of readily were those from Judy Martin.
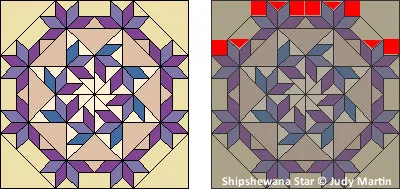
In the first example, there are 6 squares and 4 triangles. So you can use a grid of either 82 [(6*7)+(4*10)] or 478 [(6*41)+(4*58)] . I would probably pick the 82 one and make my block size 10.25 inches.

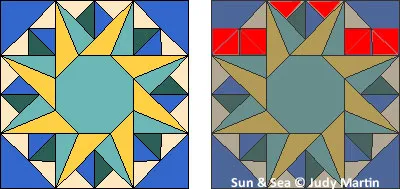
In this second example, there are 4 squares and 2 triangles. You can use a grid of either 48 [(4*7)+(2*10)] or 280 [(4*41)+(2*58)]. Here you could do a 48” block with snaps set to 48 and just draw on the inch marks.

For more difficult blocks, use Partition to figure out where to draw the lines. Once you get the first few parts drawn (usually 1 diamond, and 1 triangle), you just need to duplicate it all.
Using a lot of copy & paste to get the lines to go to the correct places, and a lot of Add to Sketchbook, you finally come up with the finished drawing.
I work with Snap to Grid and Snap to Node on until I have trouble snapping. Then, I turn off Snap to Grid and just leave Snap to Node on.
I hope this helps you next time you want to draw something with these types of pieces.
For those of you who would rather just print & sew, both these blocks are from Judy Martin’s Stars & Sets program. It has over 200 star blocks, where I had to use this technique a lot to be able to put them into EQ. That quilt design software is stand-alone, but works with EQ5 and EQ6 if you have either of them.


06-12-2008
8:03 am
Again, excellent information, Andrea! The pictures make it easy to understand the way you calculate a grid for odd blocks. The examples are pretty but as I study them for sewing, I see some pretty tricky steps, too. It would be an education to produce one of these blocks in fabric. Hats off (!) to anyone who makes multiples of these blocks!
06-12-2008
4:56 pm
I agree. “Y-seams” scare me off most times. Usually I chicken out and draw an extra seam to make it foundation-pieceable.
07-21-2008
6:36 pm
Andrea, could you elaborate on step 5. Are you drawing the line the whole way across the block? How many partitions did you make? I have managed to draw both blocks using your tips, but I could not figure out the partition step. I suspect that would greatly speed the process. I agree with Daphne, the diagrams really clarify the grid calculation.
07-23-2008
10:43 am
For step 5, I would turn on Snap to Grid and draw from corner to corner… along the block outline. (That’s one of my favorite tricks… drawing on top of the outline.) Once you draw this line, turn off Snap to Grid and turn on Snap to Node.
If your snaps don’t go high enough, then just set it to whatever and still use partition to get your nodes.
Let’s say you had 99 snaps. You’d partition the outer line into 11. Then if you need to be 41 over, you go to the the 3rd group, divide that into 9 (so your dots are from 33 to 44) and go to the dot for 41.
Mimmick this on the opposite side of the block outline so you can draw a straight line across the block.
Sometimes I take a regular LeMoyne Star and convert it to guides before I try drawing my real block. A lot of times, the lines are similar.
Upon saying this, I realize the Sun & Sea block is really just on a regular LeMoyne grid. Duh.
The Shipshewana Star has simliar lines and the corner triangle (like in “LeMoyne Star 2 or Silver & Gold in the library) is the same as a regular LeMoyne. So I would use that corner triangle as my starting point.