 The Import Image Tool
1. Click the Import button ![]() on the toolbar.
on the toolbar.
Or, choose BLOCK > Import Image for Tracing (or STITCHING > Import Image for Tracing if importing on the Stitching worktable)
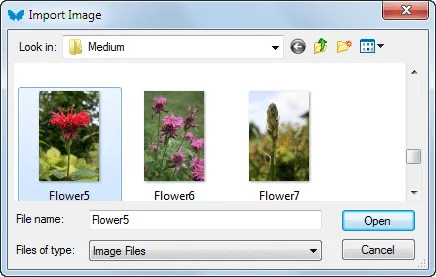
The Import Image dialog box will display.
2. Browse to find the file you wish to import. By default, the filter for Files of type is set to display all image files. If you would like to filter which file formats display (only jpegs for example), click the down arrow next to Files of type and select the file format you would like. Choose the file from the folder, then click Open.
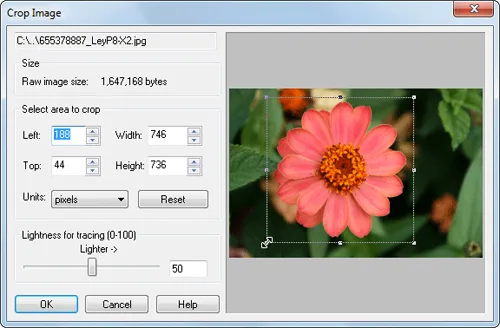
The Crop Image dialog will appear.
Using the Crop Dialog
This dialog lets you crop the image very precisely before placing it on the worktable. Cropping and resizing can also be done once the image is placed on the worktable.
Crop using the mouse
The crop edges can be adjusted by dragging the nodes over the image. Corner nodes (![]() or
or ![]() ) will maintain the original proportions. Middle nodes (
) will maintain the original proportions. Middle nodes ( ![]() or
or ![]() ) adjust width and height separately. Position the mouse anywhere inside the cropping box until the 4-headed arrow cursor
) adjust width and height separately. Position the mouse anywhere inside the cropping box until the 4-headed arrow cursor ![]() displays. Press the left mouse and drag the cropping box to the desired position. Size and position entries update automatically in the dialog.
displays. Press the left mouse and drag the cropping box to the desired position. Size and position entries update automatically in the dialog.
Crop using the dialog entries
Adjustment of the crop edges can be done by typing values or clicking the arrow buttons to adjust the values. When typing values, press the Spacebar or Enter key to complete the entry.
Units of measurement include the cultural units, (inches, centimeters, millimeters) and pixels. The most precise unit to use for cropping is pixels. Rounding may occur in the width and height entries if using cultural units. This is because the value needs to be rounded to the closest pixel. Pixels cannot be cut in half.
To reset the crop selection entries, click Reset to start over.
Lightness
The lightness control determines how faded the image will be on the drawing board. By default, the lightness adjustment will be set to 50. You’ll want the image to be somewhat faded to make it easier to see the lines of your drawing when tracing. This control gives you the flexibility you need to adjust for both light and dark images.
Drag the slider or type a new value to adjust the lightness. The results of the lightness indicator won’t be displayed until the dialog closes.
Placing the image on the worktable
When the dialog closes, the image is loaded into the cursor. There are several options for setting the image onto the worktable:
1. Click for inside fit. This means the whole image will fit inside the block. The largest dimension scales to the block’s width or height.
2. Press and hold the keyboard SHIFT key and click for outside fit. This means the smallest dimension scales to the block’s width or height and the other dimension spills outside the block edge.
3. Press and hold the left mouse button as you drag on the worktable to size the image while it is being set. The proportions of the original image are maintained during the drag process.
4. Press the ENTER key or the ESC key to fit the image to the full block size. This option will distort the image if the image and block are not proportional.
• If you’d like a reminder of this and other tools in EQ7, check out the ![]() Display Dynamic Help tool.
Display Dynamic Help tool.
• To print this: Click the title (Tool Tip Tuesday! - The Import Image Tool) and then print as normal.


10-13-2015
3:32 pm
This is a hint I could have used last week. I’m so glad you posted this.
10-19-2015
3:52 pm
Great posting. I use the image tool to size images for other uses too. For example, my son’s high school photo had to be a specific size and DPI (dots per inch). I was able to use the tool to import the image as a Jpeg and export it to the size they asked for. Also, to those who aren’t familiar with image sizing, it might be nice to have a follow up note listing examples of when larger or smaller images would be better. Again, great article. My Christmas wish: a Patched Piece Draw grid for hexagons – like the ones for circles – , without having to draw them manually. :0)
10-20-2015
10:47 am
Hi Johanna,
Yes! A great examples of what you can use EQ7 for! We have an ongoing list of requests and I’ve added yours. We are always happy to hear what our users want Glad you liked the post.
Thanks,
Heidi