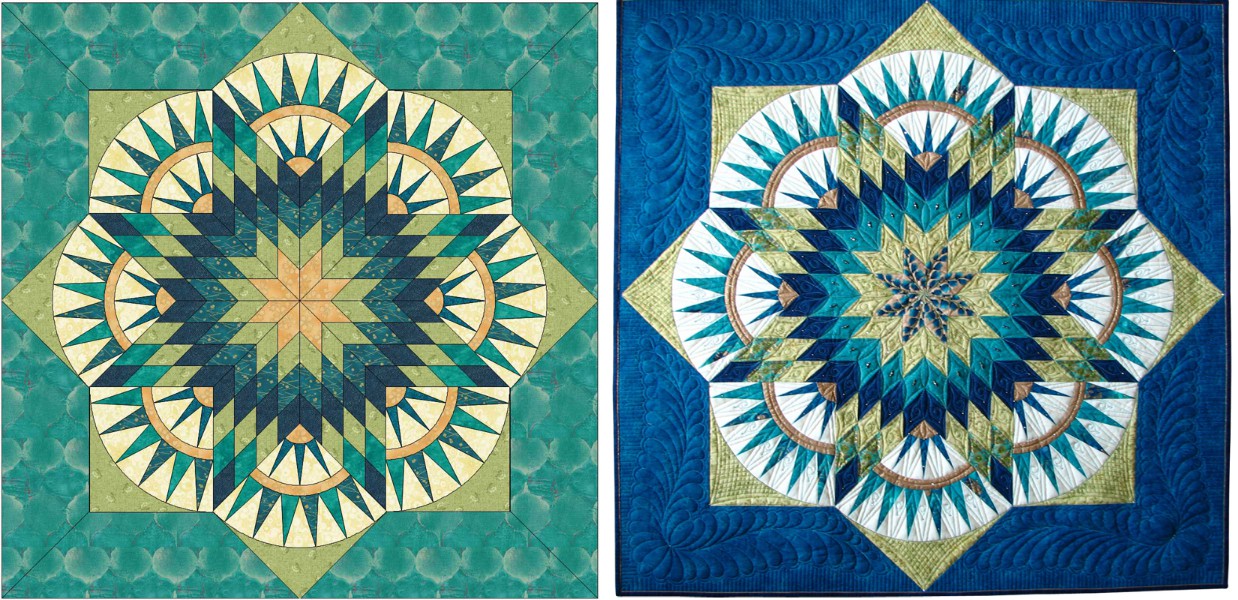
This was designed in EQ7 initially for my local guild. The design was created to teach quilt skills of working with diamonds, paper piecing, curved piecing, y seams, and mitered borders. I also submitted the quilt to the Hoffman Fabric Challenge
This is a fantastic quilt. Do you have a tutuorial on this from start to finish? Wish I belonged to your guild as I definitely would’ve taken this program. You are very talented. Love, Love, Love it!
Stunning. Great design, lovely fabric choices, and wonderful quilting. I wished I belonged to your guild. I sure would have loved to take this workshop.
As you can see when I was ready to put on the border I changed my mind on the color. The blue fabric had more value contrast and became a good frame for the center.
Leave a comment!
By submitting a comment you grant DoYouEQ.com a perpetual license to reproduce your words and name/web site in attribution. Inappropriate and irrelevant comments will be removed at an admin’s discretion. Your email is used for verification purposes only, it will never be shared.
How to export an image of your virtual quilt from EQ
With your quilt displayed on the Quilt Worktable:
Click FILE > Export Image. The Export Image dialog displays.
In this dialog you’ll select the folder location for saving the file, give the file a name. You should name your photo file using this sequence: First letter of your first name, your full last name, underscore, EQQuilt. For example Jane Doe would name her quilt, “JDoe_EQQuilt”.
Click the down-pointing arrow for file type selections. Files can be saved jpeg.
The next dialog lets you specify the size of the image and other options depending on the file type that has been selected. You should choose 150 dpi and a width of 8”.
When taking a photo of your finished quilt, you should follow these guidelines or we may not be able to display your quilt in the gallery.
The quilt must be hanging vertically straight.
Take the photo straight on (the quilt should not be on an angle).
The image file should be larger than 600 pixels. If you send us the original photo without any editing, that file should suffice.
Do not crop out the background.
Do not cut off the borders or binding in the picture.
You should name your photo file using this sequence: First letter of your first name, your full last name, underscore, FinishedQuilt. For example Jane Doe would name her quilt, “JDoe_FinishedQuilt”.


02-10-2017
6:37 pm
Hi I would like how to make the pattern with eq7
Thank you
09-25-2013
1:34 pm
Wonderfull. I would love a tutorial also
08-01-2013
1:59 pm
This is a fantastic quilt. Do you have a tutuorial on this from start to finish? Wish I belonged to your guild as I definitely would’ve taken this program. You are very talented. Love, Love, Love it!
07-27-2013
4:46 pm
I absolutely LOVE it!!! I like Darlene’s idea – how about a tutorial on how you created this in EQ7??
07-26-2013
2:54 pm
What an incredibly beautiful quilt.!
07-26-2013
8:27 am
Stunning. Great design, lovely fabric choices, and wonderful quilting. I wished I belonged to your guild. I sure would have loved to take this workshop.
07-26-2013
8:01 am
Nice job!! Any chance you will be doing a tutorial so you can share your process of creating the design in EQ7 or share the file itself?
07-23-2013
1:17 pm
To me, your minor color changes in executing the design really make this quilt sing.
07-24-2013
9:40 am
As you can see when I was ready to put on the border I changed my mind on the color. The blue fabric had more value contrast and became a good frame for the center.