“How do I make pieced sashes?” is a common EQ question. The super-easy lesson below resulted from a specific tech support query about making sashes forming Ohio Stars. Even if you want a different sash look this lesson will teach you two points applying to any sash block:
Point #1) You can set any pieced block into a sash space. The block will stretch to fill the space. In many cases this will not give you the desired look. But experiment with Rail Fence to make a striped sash (and rotating), and you’ll see possibilities.
Point #2) You can draw your own sash blocks, as we’ll see in the following example:
STEADY? READY? GO!
- Open EQ7.
- On the Create a new project tab, name your project Ohio Star Sashes.
- Click OK. Now that you’re working in a named project, each time you click Add to Sketchbook whatever you add is automatically saved to your hard drive.
SET UP YOUR QUILT
- Click WORKTABLE > Work on Quilt.
- Click QUILT > New Quilt > Horizontal.
- Click the Layout tab at the bottom of your screen.
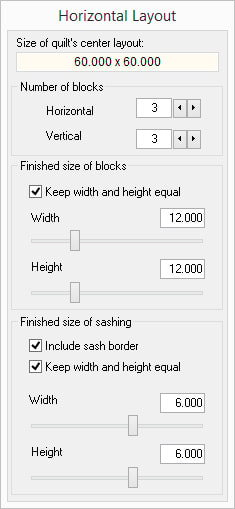
- Input the following settings:
Number of blocks
Horizontal: 3
Vertical: 3Finished size of blocks
Check Keep width and height equal
Width: 12.00
Height: 12.00Finished size of sashing
Check Include sash border
Check Keep width and height equal
Width: 6.00
Height: 6.00TIP: You can choose whatever block size and number of blocks you want. The IMPORTANT part (only important for this particular Ohio Star sash) is making the sashing size 1/2 of your block size.
For example: if you chose 9″ for block size, make the sashing 4.5″. (For other sash settings you could choose any sash width you’d like.)
DRAW THE SASH BLOCK
- Click WORKTABLE > Work on Block.
- Click BLOCK > New Block > EasyDraw Block.
- Click VIEW > make sure you have a check mark next to Precision Bar.
- On the Precision Bar, input these settings:

Block Width: 12.00
Block Height: 6.00
Snaps Horizontal: 12
Snaps Vertical: 6
Graph Paper Cells: ON (pressed down)
Horizontal: 2
Vertical: 2
Snapping Options:
Snap to grid: ON
Snap to node: ON
Snap to line: OFF - The Line tool
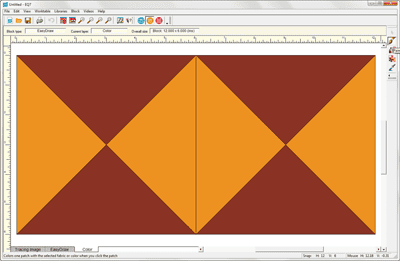
 will automatically be selected. Following the picture below, draw a vertical line down the block at the 6″ mark, dividing the block into 2 squares.

- Next draw x’s in each square, as shown.
- Click the Color tab at the bottom of the screen.
- Color the block as you’d like, using any two colors, as shown.

- Click Add to Sketchbook.
SET THE BLOCK INTO SASH STRIPS
- Click WORKTABLE > Work on Quilt.
- Click the Layer 1 tab.
- Click the Set Block tool
 .
. - Hold down your keyboard CTRL key as you click on any horizontal sash space in your quilt. All horizontal sash spaces will fill, and the block will look fine.

- Now CTRL+click on any vertical sash space. These blocks will look odd, because they need rotating.

- Click the Rotate Block tool
 .
. - CTRL+click on any vertical sash in your quilt. All vertical blocks will rotate at once.

- Click the Paintbrush tool
 . If you don’t know what color you used in your quilt, use the Eyedropper tool
  to find the color for you. This Ohio Star sash setting makes a good setting for a plain block, for photos, or embroidered blocks. You can recolor each Ohio Star to emphasize the different stars, as shown.


