by Andrea Bishop
Welcome to the club! If you have EQ software and the Kaleidoscope Collection add-on installed, you’ll be able to follow along.
This is the tenth of twelve Kaleidoscope lessons.
Intro
This month we are going to work with Vertical Strip quilts. They are a very under-appreciated layout style that need a lesson… and they just happen to give really cool results when used with Kaleidoscopes. Once you master Vertical Strip Quilts, remember… you’ve mastered Horizontal Strip Quilts too! They just go the other direction!
Start the Project
- Open your EQ software.
- Start a new project and name it Kaleidoscope Strip Quilts. Click OK.
Start the practice layout
- Click QUILT > New Quilt > Vertical Strip Quilt.
- Click the Layout tab in the bottom-left corner of your screen. Look at the image below for tips:
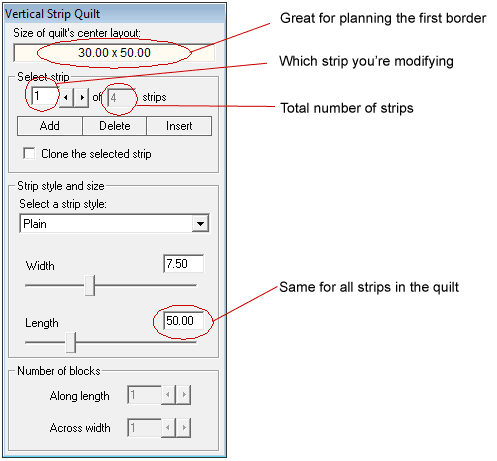
- On the layout palette, click the Delete button until it grays out and you only have one strip left.
- Put a check next to Clone the selected strip.
- Click the Add button one time.
- Drop the “Select a strip style” down one (from Plain to Pieced Blocks).
- Click the Add button one time.
- Drop the “Select a strip style” down one (from Pieced Blocks to Half Drop Blocks).
- Repeat this process until the last one is set to Checkerboard:
(Click the Add button one time. Drop the “Select a strip style” down one.)
Edit the practice layout
Strips work like borders. You can set them to different styles and widths. To edit one that is already created, you click on it.
- Click on the second strip (it is Pieced Blocks).
- Change the Number of blocks Along length to 5.
- Click on each strip after that and change it to 5 as well for them.
- For the Checkerboard strip, change both numbers to 5.
Work with the practice layout
CTRL and ALT work differently. Let’s see how:
- Click the Layer 1 tab.
- Click the Paintbrush
 tool. Click on any color (I picked yellow) in the palette.
 - Hold down your keyboard CTRL key and click in each strip and watch what happens:
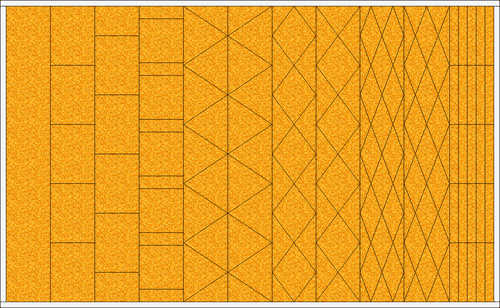
Okay, so lesson learned…. CTRL colors everything in that strip. - Click on a different color in the palette (I picked hot pink).
- Hold down your keyboard ALT key and click in each strip and watch what happens:
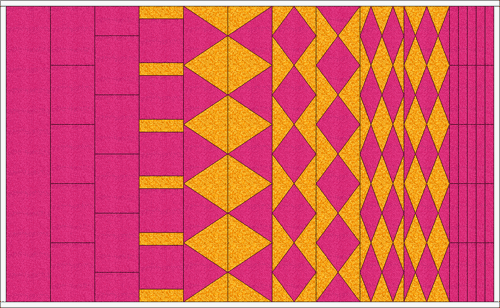
Okay, so for strips with diamonds, triangles, or spaced squares ALT does alternates. - Click the Add to Sketchbook
 button to save your quilt.
Start the real layout: Streak of Lightning
- Click QUILT > New Quilt > Vertical Strip Quilt.
- Click the Layout tab in the bottom-left corner of your screen.
- On the layout palette, click the Delete button until it grays out and you only have one strip left.
- Click HELP > Contents.
- Go to: Designing Quilts > Choosing a Layout > Vertical Strip Quilt > Tips on Designing Strips. It has all the calculations for how to make perfect squares or 90 degree angles. There are basic equations for figuring it out and example equations when you know a certain size or number.
- We’re going to use Points B, set to 4 blocks. The help states this equation for making perfect triangles:
width * blocks * 2 = length
Close the help. - Change your first strip to be Points B.
- Change the width to be 8.
- Change the number of blocks to be 4.
- Change the length to be 64.
- There should still be a check next to Clone.
- Click the Add button until you have 6 strips.
- Click the Layer 1 tab.
- Click the Paintbrush
 tool. Click on any color (I picked yellow) in the palette.
 - ALT+click a few times in the quilt to see how to make lightning. Make 3 streaks like mine.
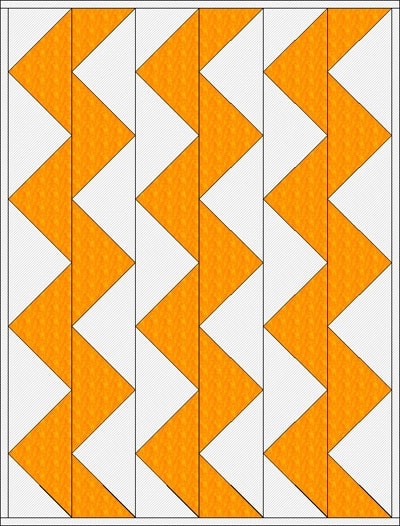
- Click the Add to Sketchbook
 button to save your quilt.
 - Click LIBRARIES > Block Library.
- Go to Kaleidoscope Collection > Star Corners.
- Choose any 3 blocks and click the Add to Sketchbook button in the bottom corner of the library window for each.
- Click the Set Block tool
 . The Sketchbook Blocks palette appears.
 - ALT+click each block on top of one streak of lightning.
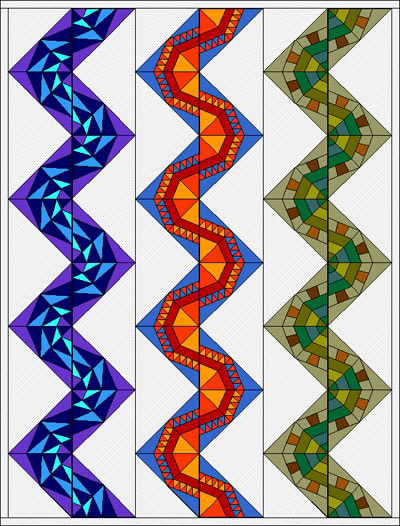
- Click the Paintbrush
 tool. Click on black in the palette.
 - CTRL+click in each empty space and the plain border.
- CTRL+click in the outside color patch of the 3 blocks so it looks curved.
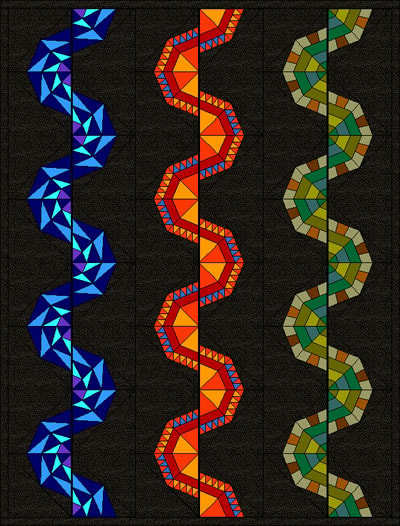
- Click the Add to Sketchbook
 button to save your final quilt.
That’s it! You’re done. Super easy.
FYI, if you want to do this with other blocks… we chose the Star Corners so the seams would match up. That way if you decided you wanted to make full blocks after all, you can.
OPTIONAL MYSTERY SIDE PROJECT – SEWING INVOLVED
MONTH 9 of Sewing Project
Try to finish your quilt top. We planned borders last month, so decide on one if you haven’t yet … and start making it!
Start to think about quilting. Do you want to stitch in the ditch? Do you want to do an allover design around the outside of it? Stars? Stippling? Sraight lines?


