

Here’s a fast way to create your own New York Beauties.
Setting Up the Block and Learning About the PolyArc Tool
- Open EQ7 and start a new project. Name it whatever you wish. (I named mine “PatchDraw Arcs”.)
- Click the Work on Block button
 .
. - Click BLOCK > New Block > PatchDraw Block.
- Make sure you can see the Precision Bar. (Click VIEW > Precision Bar if it is not at the top of your screen.)
- Input the following settings in the Precision Bar:
- Double-click the number for Block Width, type: 12
- Press the TAB key on your keyboard.
- Type: 12
- Press the TAB key on your keyboard.
- Click the drop down arrow next to Grid, and change it to Arc. Once you set the Grid to “Arc”, this will update the snaps to be Rings and Spokes.
- Press the TAB key on your keyboard.
- Type: 4
- Press the TAB key on your keyboard.
- Type: 6
- Press the TAB key on your keyboard.
- The numbers for Graph Paper do not matter. Just be sure that the graph paper button is NOT pressed in.

- The diagram below shows you what you just set in your Precision Bar:

- Click and hold on the PolyDraw tool on the toolbar so the flyout appears.
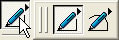
- Click the PolyArc tool
 in the flyout. The PolyArc tool is used for the Arc and Circle grids. It draws lines when going from ring to ring and draws arcs when going from spoke to spoke.
 - Position your cursor near a corner of one of the arc segments, click, and release the mouse. Move your cursor away from the corner and wiggle your cursor around (as in the image below).
- Notice how the blue line sticks to your cursor after you click and follows it around.
- Press your keyboard ESC key (top-left corner of your keyboard). This is one way to release a sticky line.
- Repeat step 9, then double-click somewhere in the block. This is the other way to release a sticky line.
- If you ever have a blue line visible even after you double-click or press the ESC key, click the Refresh button
 on the top toolbar.
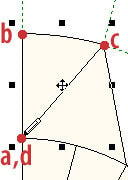
 - Use the PolyArc tool to draw the first segment. Click at point a, release, move, click at point b, move, click at point c, move, click at point d, move.

- Double-click at point a (where you started) to close the patch. If you have auto-fill turned on, your patch will be shaded a muslin color. (If you do not have auto-fill turned on, click to depress the Auto Fill button
 on the Precision Bar.)
 - The next tools you need to use are side by side on the Precision Bar. They are Clone and Rotate.

- If the patch is not selected as it is at the end of step 15, click it with the Pick tool
 to select it.
 - Press the Clone button
 , then press the Rotate button
  on the Precision Bar.
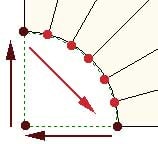
 - Position your cursor over the middle of the pasted patch so your cursor turns into a move icon and lines up with the move image in the patch (a,b). Click and hold and move the patch to the next spoke (c).
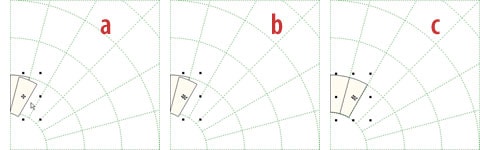
- Repeat steps 18-19 until you fill the ring.
- Next we’re going to draw triangle spikes skipping every other spoke. Still using the PolyArc tool , start at point a in the diagram, click and release the mouse.
- Move to point b, click and release. Move to point c, click and release.
- You need to click at point d, otherwise you may get a gap between the previous ring and this one. So, click at d and release.
- Double-click at point e to close the patch.
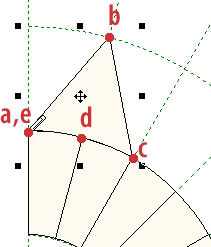
- Let’s draw the left triangle next.
With the PolyArc tool, click at point a and release.
Click at point b and release.
Click at point c and release.
Double-click where you started (at point a) to close the patch.
- Try drawing the right triangle on your own. Start at point c in the image for step 25. Click the other 2 corners to that triangle and double-click (at point c) to close it.

- Click the Pick tool and click on the left triangle. Hold down the SHIFT key and click on the center spike, and the right triangle.
(You can also drag a marquee box around all 3 patches to select them all.) - The group of patches is selected so click the Clone button once,
then press the Rotate button TWICE (because our triangle group spans two spokes). - Move the cloned group into place.

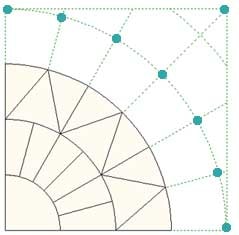
- Repeat step 29 to fill the ring. Your block will look like this now:

- Lastly, we’re going to draw 3 blank sections… but remember to click on every spoke to avoid gaps.
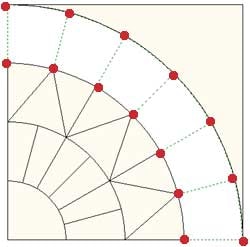
- Let’s draw the innermost arc/corner. Start at any one of the dark red dots, click on each of the other dots, and double-click on the dot you started at:
- Same as 32 – let’s do the outermost arc/corner.
- Same as 32 and 33 – let’s do that last one in the middle. Start at one of the dots, click on each of the other dots, double-click to close the patch.
- Then Add to Sketchbook.

- Your block is done! Click the Color tab and add fabrics to your block. Add it to the Sketchbook again.

- Try setting the block in a 4×4 horizontal quilt. Then use the Symmetry tool for some fun rotations!


