

The Steps to the Altar pattern most likely has its beginnings in things romantic, though there is a possibility that it also has a spiritual aspect. Before the twentieth century, marriage announced a major role shift in a woman’s life. A gift of a quilt from her closest friends both honored this event and served as a reminder of her friends’ love and support. The Steps to the Altar pattern is a fairly simple block that is striking when contrasting fabrics are used. The name actually refers to at least three different patterns, some of which have their earliest origins in late-nineteenth-century Ohio and New York. It is also called Dish of Fruit, Flat Iron Patchwork, Strawberry Basket, Stairstep, Stairs of Illusion, English T Box, Jacob’s Ladder, and Building Blocks.
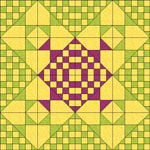
Quilt design by Tina Davis
Start the Steps to the Altar project
- Open EQ7 or EQ6.
- Start a new project and name it Benni-Altar.
Setting the Drawing Board Setup
- Click WORKTABLE > Work on Block.
- Click BLOCK > New Block > EasyDraw Block.
- On the Precision Bar set the following numbers:
• Block Width and Height: 6
• Snap Horizontal & Vertical: 24
• Graph Paper Cells > click it up so you see no graph paper

- You will now see a 6 x 6 block with no graph paper lines. All of those little dots on your screen are the snap to grid points.
- Next, we need to make sure you can see the rulers at the top and left side of your block drawing. If you do have rulers, skip to the next step. If you do not see any rulers on the sides, click on VIEW on the main menu bar across the top, and choose Block Rulers.
Drawing Steps to the Altar
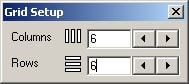
- Click the small red square in the bottom right corner of the Grid
 tool.
tool. - The Grid Setup box will appear. Set both to 6.
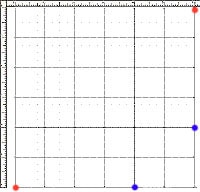
- Next, start in the upper-left corner of the block outline at 0, 0. Notice how your cursor’s position on the Block Worktable is reflected on the rulers.
- Click and hold with the left mouse button and drag a grid across the Block Worktable… stop in the bottom-right corner of your block outline.

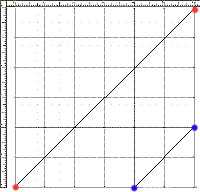
- Click the Line
 tool. Your lines will be drawn in the following places:(Red dots) diagonally across the center, from the bottom left to the top right
(Blue dots) diagonally from the 4″ mark on the bottom of the block outline to the 4″ mark on the right side of the block outline
- Now we have some extra lines to get rid of. But wait… if you click on a line and press your keyboard DELETE key, you will delete the whole line, and not the section that we need to delete. What we need to do first is break the lines at the intersections or crossings, so we only delete the sections we need.
- Click the small red square in the bottom-right corner of the Shape
 tool.
tool. - Click the long diagonal line on the block.
- Click the Xings button. This will divide the long diagonal line into segments at every intersection where it crosses our 6 x 6 grid.Did you know? Another fast way to mimic the Xings button (for the entire block!) is to click to the Colortab, then back to the EasyDraw tab.
- Click the Pick
 tool .
 - Start in the top right of your block. We’re going to work in the area just below the long diagonal line. The only two lines that need to stay (below the long diagonal line) are the ones drawn in red in the image below.
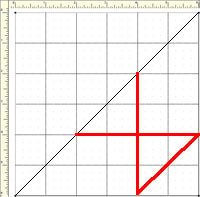
- Click on the lines under the long diagonal line to select them, and press your keyboard DELETE key. (If you delete the wrong line, click EDIT > undo.)
- When you are finished, your EasyDraw block should look like this.

Make mistakes deleting? Just delete all the lines in the block’s right diagonal half and draw the lines in as shown.
Coloring the Steps to the Altar Block
- Click the Color tab.
- You should see all the lines to the Steps to the Altar block, but no snap to grid dots anymore. If any of your lines to the Steps to the Altar block are missing, then it means they were not connected. If this happens:
- Switch back to the EasyDraw Tab
- Redraw the line that is missing
- Use the Zoom In
 tool to check the nodes at which the lines connect
 - Make sure you only see one node and not two side by side
- Use the Pick
 tool to adjust any lines that are not connected
 - Switch back to the Color Tab to make sure you have the full Steps to the Altar
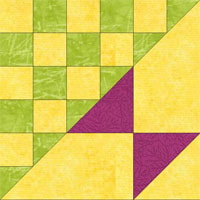
- Click the Paintbrush
 tool and select your first color (green in the example). Color along the diagonals starting, but skipping the first top left-corner block.
 - Pick your second color. Use the Paintbrush tool to color the two triangles (purple in the example).
- Click the Spraycan
 tool. Pick a third color, and click in a section of your block that has not been colored by the first or second colors.
- When you are happy with the colors you’ve chosen, click on the Add to Sketchbook
 button.
Setting up the Quilt
- Click on WORKTABLE > Work on Quilt.
- Click on QUILT > New Quilt >Horizontal.
- Click on the Layout Tab at the bottom.
- Set the Number of blocks: Horizontal & Vertical: 4
- Set the Size of blocks: Width & Height: 12
- Set the Sashing: Width & Height: 0 x 0
- Click the Borders Tab.
- Click the Delete button to delete the border.
Designing the Quilt
- Click on the Layer 1 Tab.
- Click on the Set Block
 tool . The Blocks palette will appear at the side of your quilt.
 - Position your cursor over the center of your quilt. Hold down the CTRL key on your keyboard and click. The selected coloring of the Steps to the Altar block in the Blocks palette will be the block that pops into every square of your quilt.

Rotating and Coloring the Blocks in the Quilt
- Click the Symmetry
 tool.
tool. - Hold down your keyboard CTRL key as you click on any block in your quilt. You can also try the clicking theSymmetry tool while holding down the ALT key. Click the Add to Sketchbook button to save as many variations as you would like.
Coloring the Border
- Click the View Sketchbook
 button and click the QUILTS tab > Notecard button.
 - In the top Name field, type: “My Steps to the Altar quilt”. Name only one quilt or all your quilts, if you’d like.
- Your Steps to the Altar project is now complete, and saved on the hard drive.
- Close the Sketchbook.
Print the blocks (optional)
- To print a rotary cutting chart for the blocks click the Select
 tool. Click on the block on the quilt.
 - Click FILE – Print – Rotary Cutting. Click the Size from quilt box. Click Print.
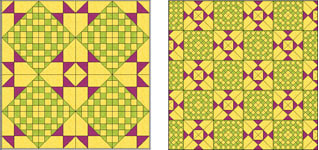 |
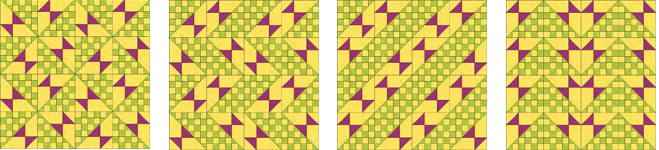
Here’s what Tina’s second and third variations look like.to be continued with another Benni Harper mystery quilt |
Here are some other examples:
 |
 |
 |
 |


